#Milestone9 - #ArcadeIntercolumniation #Keystone and #Modillion

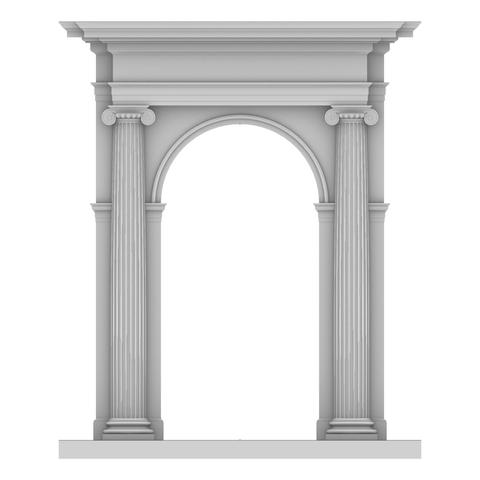
#Arch without Pedestal https://pixelfed.social/p/Splines/803615973439041638

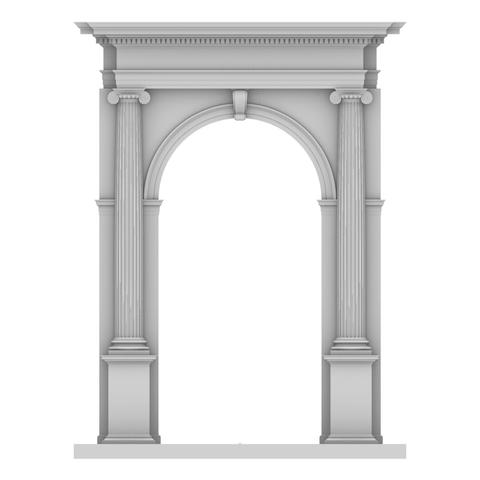
#Arch with #Pedestal and Keystone https://pixelfed.social/p/Splines/804537414363507454

#Keystone and #Dentil Details https://pixelfed.social/p/Splines/804548474524642209

#Modillion Details https://pixelfed.social/p/Splines/805587292338863257

#ModernEntablature with Detail https://pixelfed.social/p/Splines/805607059171193759

#Milestone8 - #SimpleIntercolumniation https://pixelfed.social/p/Splines/803106316515798367

#Milestone7 - Complete #IonicOrder https://pixelfed.social/p/Splines/800050647761776920

#Milestone6#Braids #3StrandBraids https://pixelfed.social/p/Splines/799602946527813102

#Milestone5#EggsAndDarts https://pixelfed.social/p/Splines/797069447808333887

#Milestone4#IonicScroll https://pixelfed.social/p/Splines/795361973789834465

#Milestone3#IonicColumn https://pixelfed.social/p/Splines/792803978865652429

#Milestone2 — Classic #IonicEntablature https://pixelfed.social/p/Splines/791021871062069787

#Milestone1#IonicPedestal https://pixelfed.social/p/Splines/790752092700055739
Splines (@Splines@pixelfed.social)

#Arcade #Intercolumniation without #Pedestal In https://pixelfed.social/p/Splines/803089629244302486, we saw #simpleIntercolumniation, also known as #Architravato. Roman architects combined columns with walls thick enough to bury half of the column width inside the walls and added arches to them for better load distribution. An arcade (multiple arches) can be run in series along a single wall, or in parallel to form a walkway. They can also be combined in both series and parallel configurations, perhaps the most famous of which is the #Colosseum in Rome. In the Colosseum, the outer walls follow an elliptical curve (even though it looks circular from the outside), and it has multiple tiers of arches in series. The interior has arches in concentric passageways in the lower tiers giving it a lattice-like design. Because arches distribute the load from above, they allow for wider intercolumniation. The rules for #ArcadeIntercolumniation differ depending on whether the columns have pedestals or not. Besides the arch itself, which is part of the wall, the figure shows some new architectural elements. The narrow part of the wall immediately behind a column is known as a #pier. The visible face of a pier between a column and the opening under the arch is known as #alette. The base of the pier has a molding, the flat part of which has the same height as the column base (µ) while the rest follows the #fillet and #cavetto or #conge of the #shaft. As we move up the pier, there is a horizontal molding known as #impost just below where the arc of the arch starts. The impost wraps around on the sides of the pier. Around the arc is a circular molding known as #archivolt, the bottom portion of which has a #fascia that is aligned with the face of the wall. The wall itself extends all the way to the top of the #entablature. It is worth noting that the entablature is repeated on the wall. It doesn't end at the columns and has two "outside" corners and one "inside" corner.
Pixelfed
In https://pixelfed.social/p/Splines/803615973439041638, we saw #Arcade #Intercolumniation without #Pedestal. Here we see it with pedestals. The previous post was missing #dentils but they are included here.

Arches are made up of wedge-shaped blocks known as #voussoir. The middle one at the top of the arch has a special name — #keystone — and it is the stone that supports the most vulnerable part of the beam above and distributes its load to the adjacent blocks, which, in turn, do the same to the next lower block until the load is transferred to the #impost above a #pier.

When the arch does not include a pedestal, the arch opening is closer to the entablature, and there is no special decoration on the keystone. When there are pedestals, they add 6µ (864 units) to the total height, but the height of the opening goes up only by 5µ. So there is greater separation between the entablature and the top of the arch. In that case, there is a decoration on top of the arch to close the gap.

With pedestals, everything added for the arch has different measurement. Because of the increased height, the whole wall behind the columns is thicker — 2µ instead of 1.5µ when there is no pedestal. The pier is also wider, but its base molding is shorter. The impost profile is same, but it is wider because the pier is wider. The #archivolt is also wider, almost reaching the column shaft.

#Scarlata's book https://babel.hathitrust.org/cgi/pt?id=mdp.39015031201190&view=1up&seq=47 has all the measurements. So, I won't repeat them here.

In this post as well as in the previous one, I showed only a single arch on a flat wall with two columns half buried in the wall. When there are multiple arches running along a curve, the wall, entablature, archivolt, impost, pier, and its base are flexible and bend along the curve, but the column and pedestal are rigid. Most #CAD tools offer the option of flowing rigid bodies along a curve or curved surface — Just flow the columns and pedestals separately.
Splines (@Splines@pixelfed.social)

#Arcade #Intercolumniation without #Pedestal In https://pixelfed.social/p/Splines/803089629244302486, we saw #simpleIntercolumniation, also known as #Architravato. Roman architects combined columns with walls thick enough to bury half of the column width inside the walls and added arches to them for better load distribution. An arcade (multiple arches) can be run in series along a single wall, or in parallel to form a walkway. They can also be combined in both series and parallel configurations, perhaps the most famous of which is the #Colosseum in Rome. In the Colosseum, the outer walls follow an elliptical curve (even though it looks circular from the outside), and it has multiple tiers of arches in series. The interior has arches in concentric passageways in the lower tiers giving it a lattice-like design. Because arches distribute the load from above, they allow for wider intercolumniation. The rules for #ArcadeIntercolumniation differ depending on whether the columns have pedestals or not. Besides the arch itself, which is part of the wall, the figure shows some new architectural elements. The narrow part of the wall immediately behind a column is known as a #pier. The visible face of a pier between a column and the opening under the arch is known as #alette. The base of the pier has a molding, the flat part of which has the same height as the column base (µ) while the rest follows the #fillet and #cavetto or #conge of the #shaft. As we move up the pier, there is a horizontal molding known as #impost just below where the arc of the arch starts. The impost wraps around on the sides of the pier. Around the arc is a circular molding known as #archivolt, the bottom portion of which has a #fascia that is aligned with the face of the wall. The wall itself extends all the way to the top of the #entablature. It is worth noting that the entablature is repeated on the wall. It doesn't end at the columns and has two "outside" corners and one "inside" corner.
Pixelfed
#Arcade #Intercolumniation without #Pedestal

In https://pixelfed.social/p/Splines/803089629244302486, we saw #simpleIntercolumniation, also known as #Architravato.

Roman architects combined columns with walls thick enough to bury half of the column width inside the walls and added arches to them for better load distribution. An arcade (multiple arches) can be run in series along a single wall, or in parallel to form a walkway. They can also be combined in both series and parallel configurations, perhaps the most famous of which is the #Colosseum in Rome.

In the Colosseum, the outer walls follow an elliptical curve (even though it looks circular from the outside), and it has multiple tiers of arches in series. The interior has arches in concentric passageways in the lower tiers giving it a lattice-like design.

Because arches distribute the load from above, they allow for wider intercolumniation. The rules for #ArcadeIntercolumniation differ depending on whether the columns have pedestals or not.

Besides the arch itself, which is part of the wall, the figure shows some new architectural elements.

The narrow part of the wall immediately behind a column is known as a #pier. The visible face of a pier between a column and the opening under the arch is known as #alette. The base of the pier has a molding, the flat part of which has the same height as the column base (µ) while the rest follows the #fillet and #cavetto or #conge of the #shaft.

As we move up the pier, there is a horizontal molding known as #impost just below where the arc of the arch starts. The impost wraps around on the sides of the pier.

Around the arc is a circular molding known as #archivolt, the bottom portion of which has a #fascia that is aligned with the face of the wall.

The wall itself extends all the way to the top of the #entablature. It is worth noting that the entablature is repeated on the wall. It doesn't end at the columns and has two "outside" corners and one "inside" corner.
Splines (@Splines@pixelfed.social)

Side View of a #Peripteral (#Sexastyle) #Colonnade with #IonicColumns arranged in #Eustyle #intercolumniation. In my previous post at https://pixelfed.social/p/Splines/803076419096100108, I mentioned that the consensus sweet spot for inter-column spacing was 2.25 diameters (4.5µ) between column shafts at the bottom (6.5µ axis-to-axis), except for the two middle columns where the spacing was 3 column diameters (8µ from axis-to-axis). This variable intercolumniation is only for #colonnades in the front and back. The spacing between columns on the sides is uniform as shown in the image here. Something worth noting in this image is the number of columns on each side. In a peripteral (sexastyle) building, there are 6 columns in the front (and back) with 5 intercolumniations between them. On the sides, it is an error to double the number of columns on the sides. Instead, the number of intercolumniations is doubled — in this case from 5 to 10, giving us 11 columns. So, the number of columns is always even in the front, and always odd on the sides (one less than twice the number of columns in the front). On the topic of even and odd, also note that the number of steps leading up to the base of the colonnade is always odd. #Vitruvious suggested keeping the rise between 9" - 12" and the run twice that, or between 18" - 24". Note that these measurements are in physical units — a marked departure from the abstract µ = 144 units we have been using all along. The rules for intercolumniation presented so far are known as #simpleIntercolumniation. When the Romans introduced #arches and combined them with #halfColumns to produce #arcades, the rules were adapted for the new design. Because the arches distributed the load from the beams above, it allowed for wider intercolumniation. With the addition of #pedestals, the gap was made even wider still, and the look of the complete edifice is just majestic! With half-columns and arches, we will see some new architectural elements.

Pixelfed
We have now looked at every nook and cranny of the complete #IonicOrder in microscopic detail.

Here is one more look at the underside of the #ovolo to revel in the splendor before we move on to the macro level, the first step of which is arranging columns in a row to create a #colonnade according to spacing rules known as #intercolumniation.

Colonnades need not be straight and can follow arcs or other (preferably loose) sweeping curves.

As mentioned in https://pixelfed.social/p/Splines/790357912719769731, a #pedestal is always optional.

Greek designers designed the Ionic Order with full columns. The Romans introduced half columns on surfaces of walls, with or without arches. Multiple columns with arches, whether in series or in parallel, are called #arcades.

The rules for #arcade intercolumniation are different from those for simple intercolumniation, varying even by whether pedestals are present or not.
Splines (@Splines@pixelfed.social)

This is a sketch of the complete #IonicOrder, excluding #intercolumniation and #arches, which came later. Different people have different abilities and different levels of mathematical knowledge. I make few assumptions about the minimum knowledge one must possess to follow my posts. At a minimum, one must understand ratio, proportion, similar, congruent triangles, Pythagoras, and basic properties of circles, including radius, diameter, circumference, tangents, secants, and chords. No trigonometry or calculus is assumed, but people who have a knowledge of differentiable continuity, maxima, minima, and inflection points will have increased appreciation of the nuances of some designs featuring smooth curves and surfaces. I start with first principles, even if it might be a little boring for people with advanced skills. The most basic requirement is that one must be able to mark points on a 3D grid, draw a straight line between two points, and draw a circle or arc from the center. The CAD tools should help with the rest, for example, to find a point of tangency, draw a circle through three arbitrary points, or tangential to three curves (if possible). There are three components in the #Ionic order. Starting at the bottom is the #pedestal (which is optional), the #column, and the #entablature. Each of these three components has three subcomponents: — Pedestal has #basement, #dado, and #cap. — Column has #base, #shaft, and #capital. — Entablature has #architrave, #frieze, and #cornice. The pedestal, column, and entablature are always in 4:12:3 ratio. If all components are present, the total order height is divisible by 19. If there's no pedestal, the total height is divisible by 15. The entire order is parameterized by a SINGLE parameter — the radius of the column at its base. #Vitruvius called the radius a "module" (µ) — an abstract unit of measure independent of physical units. Components of Ionic column and entablature also have classic and modern variations.

Pixelfed
Now playing: Pedestal 🔥🔥🔥🔥🔥
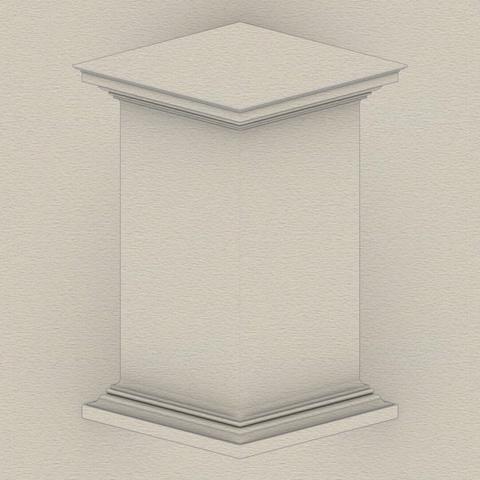
#Pedestal
#SoapGirls
Classic #IonicCapital #Tectonic Surfaces Plan

We already made the 8 unit tall #fillet at the bottom of the #capital a part of the #shaft in https://pixelfed.social/p/Splines/791794072490907090. So, excluding that, the remainder of the capital is 14 parts or 112 units tall, for the bottom half of which we use the #revolve operation (like the #columnBase and #columnShaft), and for the top half we use the #extrude operation (like the #pedestal, #entablature, and #plinth).

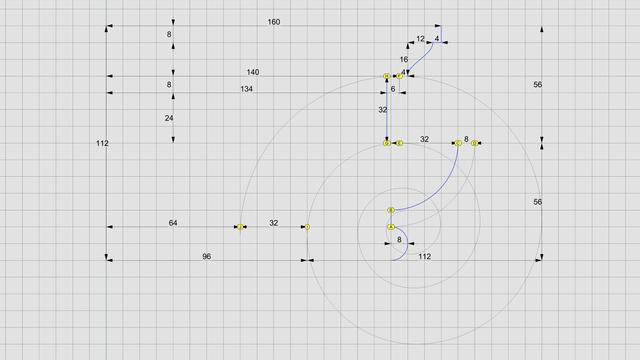
Starting at the bottom, we have an #astragal that is 2 parts or 16 units tall and has the same profile as a #reed and #torus, falling in between the two in terms of size. The arc AD is shown in gray because it is an invisible #virtualSurface that envelops the decorations like #eggsAndDarts on the #ovolo. This is the measurement that is given in #Scarlata's #PracticalArchitecture, but it makes no mention of the #decorative and #tectonic surfaces. Arc BC with a radius of 4 parts or 32 units is the tectonic surface on which the Ovolo decorations rest. Such decorations have a variable or uneven surface which may not exceed 1 part or 8 units.

Points E and F mark the horizontal tangent or maxima of the second spiral and the first (outermost) spiral, respectively. The gap between them is exactly 4 parts or 32 units. GH is the profile for the vertical side surface on which part of the #ribbon and #braid lie flat, protruding exactly 6 units to coincide with the invisible virtual flat surface through EF.

The #cymaReversa is 2 parts or 16 units tall and 1.5 parts or 12 units wide. It starts 4 units to the right of F and stops 4 units short of the top fillet, which is one part or 8 units tall and 20 parts or 160 units from the #columnAxis.

Of the 4 parts or 32 units between G and H, the lower 3 parts or 24 units are part of the #voluteChannel groove and the top 1 part or 8 units is a fillet that follows the curve of the #volute and progressively gets narrower until it converges with the #eye of the volute.
Splines (@Splines@pixelfed.social)

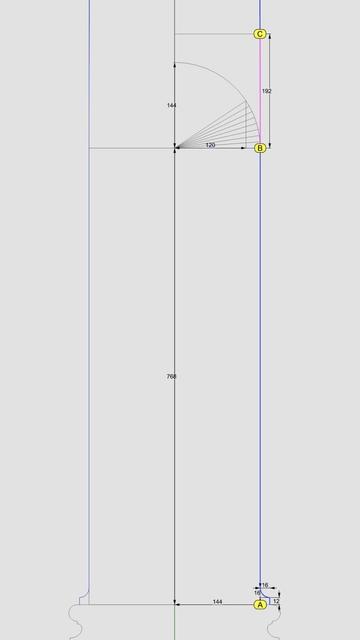
The bottom 1/3 of the #columnShaft for an #IonicColumn is a perfect cylinder. So the line below point B is a straight line. In https://pixelfed.social/p/Splines/791723063470910081, we blended the bottom end of the 60° arc and the top end of the long interpolated curve between points J and K. Now blend the bottom end of the interpolated curve and the top end of the straight line between points B and C to obtain the 3rd and final #NURBS segment for the #primaryProfileCurve of the shaft. Just like there's a #cavetto and #fillet near the #neck of the shaft, there is a fillet and cavetto near the foot of the shaft. However, there is a subtle difference between the two. The cavetto near the neck is tangential to the blended #NURBS curve that is not a straight line. The profile curve for the cavetto near the foot is tangential to a straight line. There is a special name for a cavetto that is tangential to a straight line or flat surface, like the two cavetto moldings in the #dado of the #pedestal. It's called a #conge. Another alternate name for the cavetto molding is #cove, which is evocative of "cave" because of its concave profile curve. Above the neck is a fillet 8 units tall and an #astragal 16 units tall that #Scarlata puts in braces in the column shaft section within his tables of #VignolaProportions, with a note saying they are not counted as part of the shaft but are accounted for as part of the #capital. I decided to include the top fillet as part of the shaft and keep the astragal with the capital. It does not change the design or alter the proportions in any way, but the inclusion of the fillet makes it more practical for #3DPrinting and #CNCMilling of the neck. This concludes the profile curve for the shaft with a height of 291 parts or 2328 units + 8 for fillet. The column shaft is tapered in the upper 2/3 due to #entasis whose purpose is to make optical corrections to the shape of the column which, without correction, appeared concave near the top.

Pixelfed
The bottom 1/3 of the #columnShaft for an #IonicColumn is a perfect cylinder. So the line below point B is a straight line.

In https://pixelfed.social/p/Splines/791723063470910081, we blended the bottom end of the 60° arc and the top end of the long interpolated curve between points J and K. Now blend the bottom end of the interpolated curve and the top end of the straight line between points B and C to obtain the 3rd and final #NURBS segment for the #primaryProfileCurve of the shaft.

Just like there's a #cavetto and #fillet near the #neck of the shaft, there is a fillet and cavetto near the foot of the shaft. However, there is a subtle difference between the two. The cavetto near the neck is tangential to the blended #NURBS curve that is not a straight line. The profile curve for the cavetto near the foot is tangential to a straight line.

There is a special name for a cavetto that is tangential to a straight line or flat surface, like the two cavetto moldings in the #dado of the #pedestal. It's called a #conge. Another alternate name for the cavetto molding is #cove, which is evocative of "cave" because of its concave profile curve.

Above the neck is a fillet 8 units tall and an #astragal 16 units tall that #Scarlata puts in braces in the column shaft section within his tables of #VignolaProportions, with a note saying they are not counted as part of the shaft but are accounted for as part of the #capital.

I decided to include the top fillet as part of the shaft and keep the astragal with the capital. It does not change the design or alter the proportions in any way, but the inclusion of the fillet makes it more practical for #3DPrinting and #CNCMilling of the neck. This concludes the profile curve for the shaft with a height of 291 parts or 2328 units + 8 for fillet.

The column shaft is tapered in the upper 2/3 due to #entasis whose purpose is to make optical corrections to the shape of the column which, without correction, appeared concave near the top.
Splines (@Splines@pixelfed.social)

The section between points J and K is the #neck of the #shaft. The blue #primaryProfileCurve below J is the #interpolated #NURBS curve we fit through 8 points in https://pixelfed.social/p/Splines/791526497210906825. The neck is conceptually divided into three bands, each 1 part (8 units) tall. In the top 2/3, we draw a circular 90° arc with radius of 16 units, divide it into thirds, and discard the lower 30° portion. Then, blend the lower end of the arc and upper end of the interpolated NURBS curve to create a new NURBS curve shown here in magenta. Zoom in, and you will see that it deviates slightly from the original 90° arc. This is because the blended curve is tangential to the 60° arc and the longer NURBS curve. When joined, the three sections form a smooth continuously differentiable NURBS curve. This level of precision is only needed for engineering work. If you just want a #charcoal #sketch, #draw in #ink, #paint in #watercolor, or even make #clay or #ceramic #basrelief, then you don't even need a #CAD program. A compass and protractor are sufficient. Just blend the shapes by hand as closely as you can. The imperfections, if any will be imperceptible. This brings us back to the previous post. If you're not using CAD, how do you obtain the 8 points C through J using manual tools? Look closely at the radiating lines, first of which passes through point B and the last one reaches point 8. An easy way to find the angle between these two lines is to use basic trigonometry. Focus on the center of the arc, follow up to point 8, and then drop down vertically where the horizontal line is split at 120 units, and close back to the origin. This is a right triangle whose hypotenuse is the radius of the arc. The cosine of the angle between the base and the hypotenuse is 120/144 = 0.83333333. So the angle itself is arc cosine of 0.83333333, or 33.55730976°. For hand drawing, round it off to 33.6°. Then divide that into 8 parts of 4.2° each to plot points 1 through 8.

Pixelfed
Classic variation of the #IonicEntablature. Left side shows the macro-level plan. Right side shows the detailed plan for the #moldings.

All moldings should be familiar from the #IonicPedestal, except the #fascia — flat bands, of which there are 3, at the bottom of the #Architrave. The fascias grow progressively taller, starting at 36 units at the bottom, to 48 in the middle, and 60 at the top, with each successive one offset horizontally by 6 units from the previous one.

Above the fascia, we have a #cymaReversa which is 24 units tall and 20 units wide. Here we are using half turn of a helix with a vertical axis. Either helix or elliptical arcs are acceptable, but the choice must be consistent across the entire order. You cannot use ellipses in the pedestal and helices in the entablature, for example.

If you do use a helix, remember that it is a 3D shape like a round coil. To use it as a #profileCurve, it must be flattened to a 2D shape by #projecting it to the #constructionPlane. I will describe this technique in detail later.

The #frieze is a flat surface with no moldings. It is meant as a blank space on which to put custom decorative 3D #ReliefCarvings or sculptures.

There are no new moldings in the #cornice. Note that the order of #cymaRecta and cyma reversa are reversed from that of the #pedestal, with cyma recta at the top and cyma reversa at the bottom. The only difference between the two is that the recta has a horizontal axis and reversa has a vertical axis. Rotating either one 90° yields the other.

So, the bottom of the cornice starts with a cyma reversa 32 units tall and 34 wide. This is followed by a fascia 56 units tall on which the #dentils will appear later on. The 36 unit horizontal offset for the 4-unit thick fillet above it is to leave room for the dentils.

This is followed by a #reed (8 units), #ovolo (32 units), #corona (48 units), cyma reversa (16 x 12 units), fillet (4 units), cyma recta (40 x 44 units), and fillet 12 units
There are two variations of the #IonicEntablature. The classic variation has #dentils, which are teeth-like structures shown here above the #frieze. The modern version has #modillions, which are projecting brackets under the #corona of the #cornice. Well, "modern" is a relative term. For designs that are more than 2000 years old, even an alteration 1000 years ago would qualify as modern.

Although the sketch shows the #entablature with a square footprint, in practice, it runs the entire length of a #colonnade (multiple columns) or an #arcade (multiple arches).

#CAD construction of the entablature is very similar to that of a #pedestal.

The first step is to consult #Vignola's #RegolaArchitettura for the visual appearance, and then consult #Scarlata's #PracticalArchitecture for #VignolaProportions in tabular form.

It is convenient to create a spreadsheet to convert the measurements given in Scarlata's book from module "parts" to your own model units based on your choice of value for the module parameter µ.

Armed with these measurements, it is time to plot the points and draw the #primaryProfileCurves on our standard 2D grid with minor grid lines 8 units apart and major grid lines 32 units apart.

In the first pass, skip the dentils and draw the profile curves for the rest of the moldings. Just as with the pedestal, I will show the macro-level plan as well as the detail plan. So, you don't have to go to Scarlata's book, but you know it's there if you want to.

I will show the dentil arrangement in a subsequent post.

Based on µ = 144, the classic Ionic entablature is 648 units (36 parts, or 4.5*µ) tall. Of this, the #architrave at the bottom is 180 units (10 parts, or 1.25*µ) tall, the frieze in the middle is 216 units (12 parts, or 1.5*µ) tall, and the cornice at the top is 252 units (14 parts, or 1.75*µ) tall.
#Vitruvius defined the single parameter called #module or µ, which is the radius of a column at its base [https://pixelfed.social/p/Splines/790357912719769731].

#Vignola divided µ into 12 parts for the #Tuscan and #Doric orders, and into 18 parts for the #lonic, #Corinthian and #Composite orders. To make it easier to move between the orders, it is helpful to choose a value for µ that is a multiple of both 12 and 18. We could start with module µ = 36, which is the least common multiple of 12 and 18.

However, in classical design, it's a lot easier if minor grid lines are multiples of 8 (as in music 'octaves' and poetry 'octets'). So, I use a grid with minor grid marks at 8 and major grid marks at 32, which leads us to choose µ = 144 as that is the least common multiple of 12, 18, 8, and 32.

This value of µ = 144 is still abstract because we haven't chosen a physical unit like mm or inch, but it does not matter at this point. Once the model is constructed with the chosen value of µ, it can be scaled up or down in software to get the desired column width or order height in physical units.

The total height of columns for the same µ are in the ratio 7:8:9:10 for the #Tuscan, #Doric, #Ionic, and #Corinthian, with #Composite the same as Corinthian. When µ = 144, the diameter is 288. So the height of the Ionic column is 288*9 = 2592 units.

The #pedestal, #column, and #entablature are always in 4:12:3 ratio across all orders. So the height of the Ionic pedestal is 864 and height of the entablature is 648, and the total height of the order is 4104 units.

Remember that in the Ionic order, µ is divided into 18 "parts". So each part is 144/18 = 8 units. With this we can convert between µ and parts in either direction.

Total order height of 4104 units is then 4104/8 = 513 parts. If you are trained in computer science, you will grow despondent that it is 513, not 512. Let go, and everything will be all right.

The pedestal is the easiest component, and we start with that.
Splines (@Splines@pixelfed.social)

This is a sketch of the complete #IonicOrder, excluding #intercolumniation and #arches, which came later. Different people have different abilities and different levels of mathematical knowledge. I make few assumptions about the minimum knowledge one must possess to follow my posts. At a minimum, one must understand ratio, proportion, similar, congruent triangles, Pythagoras, and basic properties of circles, including radius, diameter, circumference, tangents, secants, and chords. No trigonometry or calculus is assumed, but people who have a knowledge of differentiable continuity, maxima, minima, and inflection points will have increased appreciation of the nuances of some designs featuring smooth curves and surfaces. I start with first principles, even if it might be a little boring for people with advanced skills. The most basic requirement is that one must be able to mark points on a 3D grid, draw a straight line between two points, and draw a circle or arc from the center. The CAD tools should help with the rest, for example, to find a point of tangency, draw a circle through three arbitrary points, or tangential to three curves (if possible). There are three components in the #Ionic order. Starting at the bottom is the #pedestal (which is optional), the #column, and the #entablature. Each of these three components has three subcomponents: — Pedestal has #basement, #dado, and #cap. — Column has #base, #shaft, and #capital. — Entablature has #architrave, #frieze, and #cornice. The pedestal, column, and entablature are always in 4:12:3 ratio. If all components are present, the total order height is divisible by 19. If there's no pedestal, the total height is divisible by 15. The entire order is parameterized by a SINGLE parameter — the radius of the column at its base. #Vitruvius called the radius a "module" (µ) — an abstract unit of measure independent of physical units. Components of Ionic column and entablature also have classic and modern variations.

Pixelfed