my #sengled wifi "smart" lights have gone dark. or dumb. it seems like this is a universal phenomenon (see link below). there is some talk about workers at a factory in china going unpaid. seems like its lights out for sengled?

can some #electronics #hacker geek please #reverseengineer the bulb hardware or at least the protocol so we can free our bulbs? #opensource #smarthome #iot

https://www.reddit.com/r/SengledUS/comments/1lez0zo/sengled_down/

I guess all those folks that want to #ReverseEngineer #Apple #LogicBoard|s got a new "toy" to salivate about...

An #Xray - #CT - #Scanner with high-enough resolution to inspect ICs...

https://youtu.be/_qhcDLMCM18?feature=shared&t=1168

#ReverseEngineering #TechPorn #ToolPorn #LogicBoards #ComputerTomography #Electronics #Tech

Putting Space Things In A CAT Scanner

YouTube
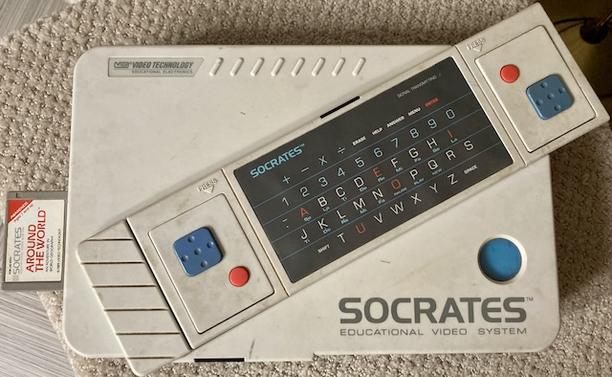
The VTech Socratic Method (the teardown of a VTech’s computer from the 90Β΄s) https://www.leadedsolder.com/2025/04/22/vtech-socrates-pickup.html #teardown #retro #reverseengineer
The VTech Socratic Method

Initial technical exploration of the VTech Socrates line of Z80-based educational home computers. A composite video modification board is developed.

Leaded Solder
2/2…the technology necessary to produce them . You can only #ReverseEngineer your way up to the edges of your own knowledge. The drop offs are usually steep.
There are a few things in all this that are extremely troubling. If you want to understand #NHI tech the most obvious thing would be to go to the source. So far the best the cave dwellers can come up with is retrieving crash materials or causing crashes and then retrieving. Not good but about what you’d expect.This will not end well
#Milestone4 β€” #IonicScroll

#ModulatingSpirals https://pixelfed.social/p/Splines/792906324854792619

#ReverseEngineer #ImageScans https://pixelfed.social/p/Splines/793215298082967733

#ScrollSurface #scaffolding https://pixelfed.social/p/Splines/793597613908557570

#SecondaryCurves https://pixelfed.social/p/Splines/794105734853818690

#Sweeping with #TertiaryCurves https://pixelfed.social/p/Splines/794203007066866034

#Smoothness with #SurfaceBlend https://pixelfed.social/p/Splines/794868875707070193

Solid #Scroll https://pixelfed.social/p/Splines/795276076797088402

#Milestone3 β€” #IonicColumn https://pixelfed.social/p/Splines/792803978865652429

#Milestone2 β€” Classic #IonicEntablature https://pixelfed.social/p/Splines/791021871062069787

#Milestone1 β€” #IonicPedestal https://pixelfed.social/p/Splines/790752092700055739
Splines (@Splines@pixelfed.social)

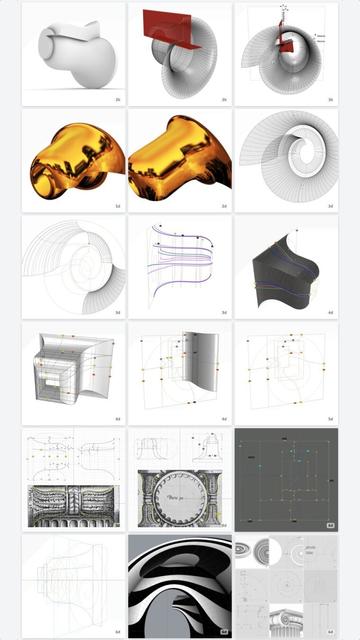
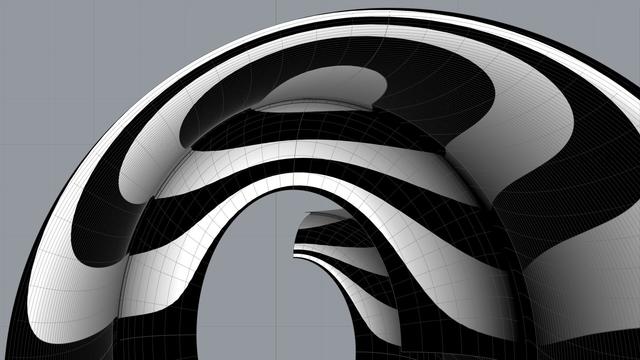
#IonicVolutes are the sinews of #IonicScrolls. Without #volutes, there would be scrolls, but not #Ionic Scrolls. Each scroll starts with a volute in front and is modulated by as many as six volutes of different shapes and sizes as it reaches the back, with the scroll surface tightly hugging the volutes at each contact point in ALL 3 dimensions. This is a key point to remember before we start #reverseEngineering the first #primaryProfileCurves from old image scans. This diagram shows the #scaffolding we will construct using straight lines and rectangles, first in 2 dimensions, then place them front-to-back in 3 dimensions using precise markers, and finally scale and superimpose the volutes on this scaffolding. All of this will be done before we derive the primary profile curves from the image scans. How did I know about this scaffolding? I didn't. It is not documented anywhere that I'm aware of. I developed this after years of striving to derive the correct shape, and I hope that there are people who can still "see" things I might have missed and help improve the design. So, the actual process went like this: I drew outlines from 2D image scans in the top view, getting close to #Vignola's detailed sketches. Then, I did the same thing with image scans in the side view, and I found that the designs didn't line up. After several iterations, I got the designs to line up in both views, and it was obvious that the bell shape of the scroll would follow the large volute in the front. So, I used the large volute as a "rail" and tried to sweep the primary profile curves on one rail. Big mistake! The undulating shapes of the primary profile curves wobbled wildly on the single rail β€” The middle, 3/4, and back of the scroll were twisted out of shape! Instead of trying to #sweepOneRail, I decided to clamp down wobbling with another operation called #sweepTwoRails, using volutes at both front and back ends as rails with less wobbling. You will need a #CAD tool to practice.

Pixelfed
#ReverseEngineer #ImageScans for #restoration.

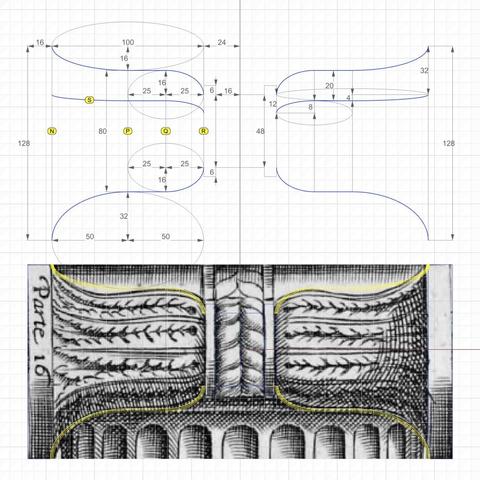
This is a side view from #Vignola's #RegolaArchitettura at https://archive.org/details/gri_33125008229458/page/n39/mode/2up.

We recover the essential geometry of #primaryCurves using #curveFitting by trial and error β€” a human endeavor by "eye" and heuristics β€” not to be confused with mathematical curve fitting by regression analysis.

The heights of rectangles labeled N, P, Q, and R are 128, 80, 80, and 48, respectively. P is halfway between N and R, and Q is halfway between P and R.

The curve labeled S is the counterpart to the curve labeled O in the previous post. The purpose of these curves will be explained when we derive the #secondaryCurves from the primary curves.

For now, just note that curve O in the previous post is derived by simple proportion arithmetic. Width of N is 112 units and width of R is 28 units [https://pixelfed.social/p/Splines/793169876757012827]. Since the gap between start of curve O and the curve closest to it is 32 units at the front, the gap at the rear is 32*28/112 = 8, and 16 in the middle.

Curve S is derived in a slightly different manner because, unlike curve O where we knew the starting point, we know neither the start nor the end of curve S. Instead, we look at another clue that Vignola left for us β€” The 4 long leaves emanating from the rear and spreading towards the front on each bell shape. So we divide the front height of N and rear height of R into 4, giving us the start of S at 32 units from the top (miraculously in agreement with the start of curve O) in front and 12 units in the rear.

The top profile curve does not seem to "fit" Vignola's sketch. First, this is a hand sketch. Second, I tried to fit the curve more closely, but the design broke down later. Third, realize that if we fit the curve more closely to what's in the sketch, this will be the ONLY curve to have a tangent at the inflection point (switch from convex to concave) that is neither horizontal nor vertical.
Regola delli cinque ordini d' architettura : Vignola, 1507-1573 : Free Download, Borrow, and Streaming : Internet Archive

48 leaves : 44 cm (fol.)

Internet Archive
#ReverseEngineer #ImageScans

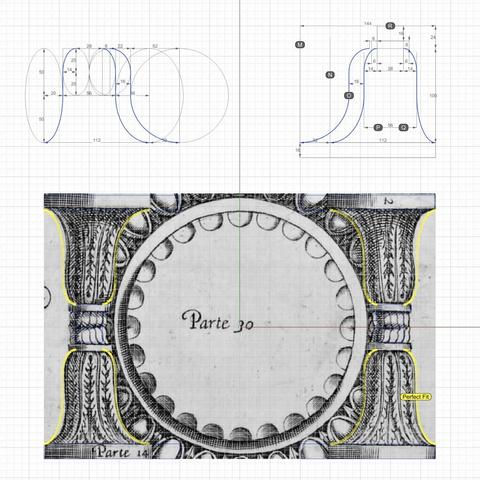
We now dig into the archives and resurface old sketches for #restoration. This one is from #Vignola's #RegolaArchitettura at https://archive.org/details/gri_33125008229458/page/n39/mode/2up. This lavishly illustrated book with copious notes that also flaunt his #calligraphy was written (in Italian) when America was still a British colony. The book went out of copyright a long time ago.

Straighten the image as much as you can in an image editor and crop it before bringing it into a #CAD tool.

Then, stare at the image for a while and squint occasionally until you "see" crucial features and patterns emerge, while ignoring the "noise."

Finally, try #curveFitting with the simplest of curves β€” straight lines, circular arcs, ellipse, and so on to get as close an approximation as possible. Remember that with hand-drawn sketches, the fit will rarely be perfect. So use some structure as a guide or #scaffolding as I laid out in https://pixelfed.social/p/Splines/792966507797633558.

In the top left of the diagram, I show the measurements that I was satisfied with after a lengthy process of trial and error because the numbers comport with my understanding of the proportions the original designers intended β€” many, but not all of which are documented in #Scarlata's #PracticalArchitecture with #VignolaProportions in tabular form.

For measurements that are missing, use plausible heuristics to fill in the blanks and try to justify your choices using simple rules. In this case, the bedrock rules are:

1. The entire #volute is exactly Β΅ = 144 units wide, including #ArcZero, which extends 32 units beyond the portion of the volute that is actually used in the design.

2. The portion of the volute that is actually used in the design is 112 units wide, same as the height of the unadorned #capital.

3. Width of the #scroll bell shape as seen from the bottom is 112 units in front, 56 units in the middle and 28 units in the rear β€” all in #geometricSequence.
Regola delli cinque ordini d' architettura : Vignola, 1507-1573 : Free Download, Borrow, and Streaming : Internet Archive

48 leaves : 44 cm (fol.)

Internet Archive
The classic #IonicScroll is the most complex of all components in the #IonicOrder mainly because it is poorly documented, if at all, and even poorly understood. It is as if the classical architects deliberately concealed its enigmatic design secrets within the confines of a smooth elegant shell that could only be revealed after intense study and analysis.

I got this impression because I spent years searching for credible and actionable documentation on how to recreate this beautiful design in a #CAD tool. In the Age of Internet and Social Media, my web searches always disappointed me because the results lacked something vital in one respect or another. Over the years, I created hundreds of versions of the scroll that looked so perfect and pleasing that I thought I had cracked it, only to find some flaw or another in my work.

So, it is with caution that I present my work on the scroll in the hopes that someone will build upon this knowledge and either validate the design, or correct it and share it with me and the rest of the world.

Looking back at my progress, I'm now surprised at how remarkably simple and elegant the design is that defied familiar geometrical construction techniques I had been using until now.

As I mentioned in my introductory post, this design can be recreated by drawing simple 2-dimensional lines and circular arcs, but instead of just #primaryProfileCurves, we will use up to three additional sets of curves β€” #secondaryCurves, #tertiaryCurves, and #quaternaryCurves β€” each derived from the previous set.

I extracted the #primaryCurves after a lengthy trial-and-error process that involved #curveFitting image scans from #Vignola’s book, #RegolaArchitettura. I had to #reverseEngineer the details because the measurements have either been lost, or are locked away in some library.

Even though we start with lines and arcs, the end results are always #NURBS curves and surfaces, but everything is done by the CAD tool, and no additional math is needed.
Excited to conduct my 5th guest lecture at George Mason University on February 14th 6pm where we have another juicy #Embedded #CTF where they are given the firmware in .uf2 format and will need to #ReverseEngineer the binary and figure out a way to attack its wireless access point. This is part of a larger #DEFCON #DC540 Chapter CTF series. Link below with the story and the binary! Hope to see you there! #ReverseEngineering https://github.com/mytechnotalent/dc540-0x00008
GitHub - mytechnotalent/dc540-0x00008: DC540 hacking challenge 0x00008 [UNKNOWN CTF].

DC540 hacking challenge 0x00008 [UNKNOWN CTF]. Contribute to mytechnotalent/dc540-0x00008 development by creating an account on GitHub.

GitHub
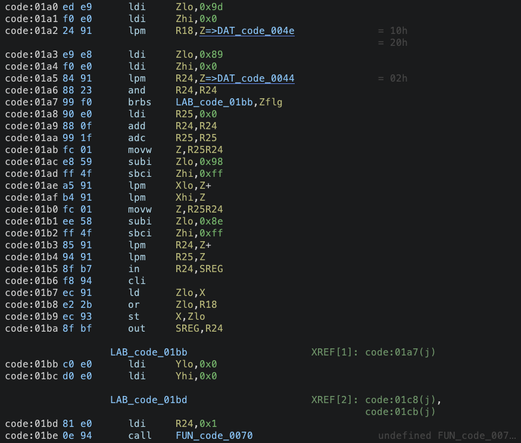
Tomorrow in our next episode of #GhidraBytes, we will dig into DAT_code_0043 and see what value exists at the value going into t hat function which is 0x9d! We will need to understanding our hex to binary conversion to make sense of how to #ReverseEngineer this in #Ghidra!