#Modillion for the #ModernIonicEntablature

In https://pixelfed.social/p/Splines/790782316675150160 , I mentioned that there are two variations of the #IonicEntablature — a classic version that we saw in https://pixelfed.social/p/Splines/804548474524642209, and a modern version that has a new feature called #modillions, which are projecting brackets under the #corona of the #cornice. Note that, "modern" is a relative term. For designs that are more than 2000 years old, even an alteration hundreds of years ago would qualify as modern.

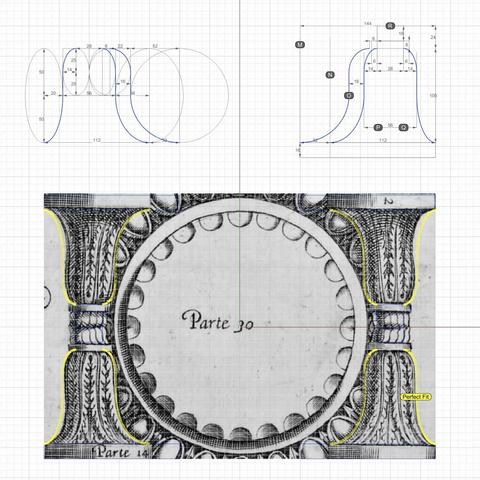
The modillion design continues a similar pattern but not identical to that of a #keystone. The measurements can be found in https://babel.hathitrust.org/cgi/pt?id=mdp.39015031201190&view=1up&seq=45 from which you can surmise that the length is 130 units (based on µ = 144) and the height is 36 units excluding the flamboyant #cymaReversa. The depth is not given, but can be derived from the sketch in https://babel.hathitrust.org/cgi/pt?id=mdp.39015031201190&view=1up&seq=141.

The measurements for the cymaReversa are listed between the corona and medallions, but its #profileCurve is attached to the modillion, not to the corona. Like #dentils, we attach modillions separately to the entablature. The dentils are still there with the same square footprint and same interdental spacing, but they are shorter to make room for the modillions above.

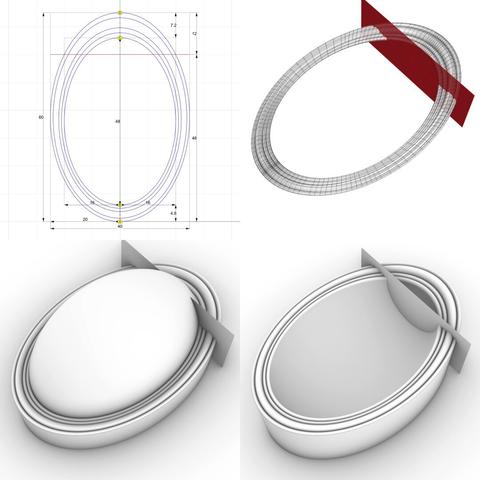
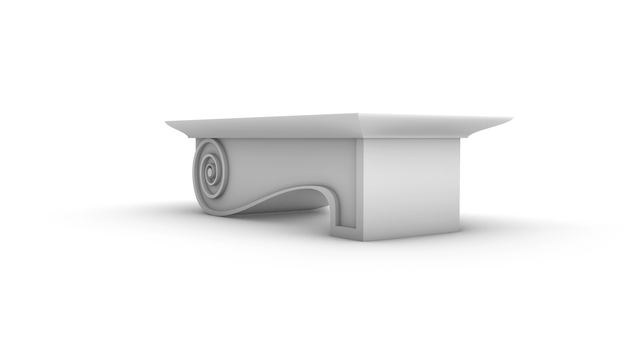
The original #volute that forms the basis of the modillion design is µ = 144 wide (including #arcZero) and 128 tall. Since the modillion height divides evenly into µ, I used that orientation for constructing the modillion, creating a box 144 units wide and 520 units tall. After construction, I scaled it to 1/4 to get 36 x 130 units, and then rotated it 90°.

The length of 520 was divided into 128*3.5 = 448 for the curved portion (which aligns with the wall) and 72 for the straight portion, which faces the front. Try to recreate it on your own first, and if you need help, just ask me.
Splines (@Splines@pixelfed.social)

There are two variations of the #IonicEntablature. The classic variation has #dentils, which are teeth-like structures shown here above the #frieze. The modern version has #modillions, which are projecting brackets under the #corona of the #cornice. Well, "modern" is a relative term. For designs that are more than 2000 years old, even an alteration 1000 years ago would qualify as modern. Although the sketch shows the #entablature with a square footprint, in practice, it runs the entire length of a #colonnade (multiple columns) or an #arcade (multiple arches). #CAD construction of the entablature is very similar to that of a #pedestal. The first step is to consult #Vignola's #RegolaArchitettura for the visual appearance, and then consult #Scarlata's #PracticalArchitecture for #VignolaProportions in tabular form. It is convenient to create a spreadsheet to convert the measurements given in Scarlata's book from module "parts" to your own model units based on your choice of value for the module parameter µ. Armed with these measurements, it is time to plot the points and draw the #primaryProfileCurves on our standard 2D grid with minor grid lines 8 units apart and major grid lines 32 units apart. In the first pass, skip the dentils and draw the profile curves for the rest of the moldings. Just as with the pedestal, I will show the macro-level plan as well as the detail plan. So, you don't have to go to Scarlata's book, but you know it's there if you want to. I will show the dentil arrangement in a subsequent post. Based on µ = 144, the classic Ionic entablature is 648 units (36 parts, or 4.5*µ) tall. Of this, the #architrave at the bottom is 180 units (10 parts, or 1.25*µ) tall, the frieze in the middle is 216 units (12 parts, or 1.5*µ) tall, and the cornice at the top is 252 units (14 parts, or 1.75*µ) tall.

Pixelfed
See https://pixelfed.social/p/Splines/796798349526747214 and https://pixelfed.social/p/Splines/796786779066451143 for detail.

Just like #ArcZero in the #spiral for the #IonicVolute, the plan for #EggsAndDarts starts out larger than what is eventually used.

The outermost frame is 7.5 parts or 60 units tall (from A to D), and 5 parts or 40 units wide when µ = 144. The innermost frame is 6 parts or 48 units tall (from B to C), and 4 parts or 32 units wide.

The height and width for both inner and outer are in 3:2 ratio. The difference in height is also split in the ratio 3:2. So, the gap between A and B as 12*2/5 = 4.8, and the gap between C and D as 12*3/5 = 7.2. We then divide both of these gaps in 5 equal segments shown by the dots between them.

Create an ellipse to fill the outer frame, and another to fill in the inner frame. Then interpolate them to create 4 more through the dots, only to delete the 3rd ellipse. This gives us the 5 #rails for sweeping the rim of the egg.

Create circles perpendicular to and touching adjacent pairs of rails, and then #sweepTwoRails using the circles to get the rim shown in the top-right. The red cutting plane marks tentative slicing for eggs.

The bottom left image shows a convex egg created with an #ellipsoid that is 48 units tall, 32 units wide, and 32 units deep. This is equivalent to #revolving the innermost ellipse around its major axis. Only half of this egg is above the oval slab.

The bottom right image shows the concave variant which is created by performing a #booleanDifference between the oval slab and the round egg created above. The top portion of the egg is removed in the concave variant, but the convex variant must still account for the bulge of a fully round egg. As such, the slab heights of the convex and concave variant are different. I will show the measurements later.

To create the slabs for the convex and concave variants, #extrude the outermost ellipse according to their measurements and #cap #planarHoles.
Splines (@Splines@pixelfed.social)

#Ovolo with a composite of both concave and convex eggs as seen from the bottom. For a perspective view, see https://pixelfed.social/p/Splines/796790115584241591. As I will show later, all of this is created using just straight lines and circular or elliptical arcs. Even though I used an oval as the starting point for the eggs, note their striking resemblance with natural eggs — with ends that taper off toward the bottom. This is due to the nature of the Ovolo surface, which is shaped like a bowl where the bottom radius is less than the top radius. So, when the egg is laid on this surface, it "flows" with the contours of that surface, and its bottom end is thereby tapered. Also note that in this view, the top of the eggs appear round, but they are in fact sliced, just like the rippled rim and the surrounding darts.

Pixelfed
#ReverseEngineer #ImageScans

We now dig into the archives and resurface old sketches for #restoration. This one is from #Vignola's #RegolaArchitettura at https://archive.org/details/gri_33125008229458/page/n39/mode/2up. This lavishly illustrated book with copious notes that also flaunt his #calligraphy was written (in Italian) when America was still a British colony. The book went out of copyright a long time ago.

Straighten the image as much as you can in an image editor and crop it before bringing it into a #CAD tool.

Then, stare at the image for a while and squint occasionally until you "see" crucial features and patterns emerge, while ignoring the "noise."

Finally, try #curveFitting with the simplest of curves — straight lines, circular arcs, ellipse, and so on to get as close an approximation as possible. Remember that with hand-drawn sketches, the fit will rarely be perfect. So use some structure as a guide or #scaffolding as I laid out in https://pixelfed.social/p/Splines/792966507797633558.

In the top left of the diagram, I show the measurements that I was satisfied with after a lengthy process of trial and error because the numbers comport with my understanding of the proportions the original designers intended — many, but not all of which are documented in #Scarlata's #PracticalArchitecture with #VignolaProportions in tabular form.

For measurements that are missing, use plausible heuristics to fill in the blanks and try to justify your choices using simple rules. In this case, the bedrock rules are:

1. The entire #volute is exactly µ = 144 units wide, including #ArcZero, which extends 32 units beyond the portion of the volute that is actually used in the design.

2. The portion of the volute that is actually used in the design is 112 units wide, same as the height of the unadorned #capital.

3. Width of the #scroll bell shape as seen from the bottom is 112 units in front, 56 units in the middle and 28 units in the rear — all in #geometricSequence.
Regola delli cinque ordini d' architettura : Vignola, 1507-1573 : Free Download, Borrow, and Streaming : Internet Archive

48 leaves : 44 cm (fol.)

Internet Archive
Classic #IonicScroll #Scaffolding

Take the time to understand the measurements of this scaffolding plan in the broader context of the #IonicCapital measurements, as this is the bedrock on which the #scroll reconstruction rests.

First, note that there are 5 rectangles labeled M, N, P, Q, and R, where M and N are coplanar with the large #volute at the front of the scroll. P and Q are congruent, with P exactly midway between the front and the back of the scroll, and Q exactly 3/4 of the way from front, or 1/4 from back. R is the smallest of them and lies at the back of the bell-shaped part of the scroll, but ahead of the ribbon bearing the 3-strand #braid.

M completely encloses the volute, including #ArcZero, but much of Arc zero is discarded later. So, the part of the volute that really matters is enclosed by N, whose width is 112 units, height the same as M at 128 units, and the width of M itself is exactly µ or 144 units. So these measurements are in the ratio 7:8:9.

The width of P and Q is 56 units, which is exactly half the width of N. Recall from the post on #IonicCapital #Tectonic Surfaces [https://pixelfed.social/p/Splines/792124787573855518] that the unadorned capital is also exactly 112 units, divided into two halves of 56 units each.

R is concentric with P and Q and its width is exactly half of the width of P and Q, which are exactly half the width of N.

Top of R is 32 units from top of N and 16 units from top of P and Q. Bottom of P and Q are 32 units from bottom of N and 16 units from bottom of R.

Finally note the diagonal line from the origin to the #eye with a point in the middle. That middle point is the center of rectangle labeled N. It shows that the volute #eye, the center of N and the centers of concentric rectangles P, Q, and R would be collinear if these rectangles were coplanar.

All of these constraints point to warrantable consistency and coherence of the scaffolding measurements, justifying their use in scroll reconstruction.
Splines (@Splines@pixelfed.social)

Classic #IonicCapital #Tectonic Surfaces Plan We already made the 8 unit tall #fillet at the bottom of the #capital a part of the #shaft in https://pixelfed.social/p/Splines/791794072490907090. So, excluding that, the remainder of the capital is 14 parts or 112 units tall, for the bottom half of which we use the #revolve operation (like the #columnBase and #columnShaft), and for the top half we use the #extrude operation (like the #pedestal, #entablature, and #plinth). Starting at the bottom, we have an #astragal that is 2 parts or 16 units tall and has the same profile as a #reed and #torus, falling in between the two in terms of size. The arc AD is shown in gray because it is an invisible #virtualSurface that envelops the decorations like #eggsAndDarts on the #ovolo. This is the measurement that is given in #Scarlata's #PracticalArchitecture, but it makes no mention of the #decorative and #tectonic surfaces. Arc BC with a radius of 4 parts or 32 units is the tectonic surface on which the Ovolo decorations rest. Such decorations have a variable or uneven surface which may not exceed 1 part or 8 units. Points E and F mark the horizontal tangent or maxima of the second spiral and the first (outermost) spiral, respectively. The gap between them is exactly 4 parts or 32 units. GH is the profile for the vertical side surface on which part of the #ribbon and #braid lie flat, protruding exactly 6 units to coincide with the invisible virtual flat surface through EF. The #cymaReversa is 2 parts or 16 units tall and 1.5 parts or 12 units wide. It starts 4 units to the right of F and stops 4 units short of the top fillet, which is one part or 8 units tall and 20 parts or 160 units from the #columnAxis. Of the 4 parts or 32 units between G and H, the lower 3 parts or 24 units are part of the #voluteChannel groove and the top 1 part or 8 units is a fillet that follows the curve of the #volute and progressively gets narrower until it converges with the #eye of the volute.

Pixelfed