Clean Data, Smart Flows: Automating Data Cleanup in Salesforce Nonprofit Cloud
I had the privilege of presenting at Nonprofit Dreamin, one of the most community-driven Salesforce events on the calendar. With a sold-out crowd of 300 participants, the energy in the room was exactly what you’d hope for when talking about technology that actually matters for mission-driven organizations. It was a great session, and the conversations that followed reminded me why this work matters. For everyone who attended, asked questions, or tracked me down afterward, thank you. Here’s a deeper look at everything we covered.
The Case for Clean Data in Nonprofit Cloud
Every Nonprofit wants to make decisions grounded in accurate, real-time data. But as any Salesforce professional knows, “accurate data” doesn’t just happen on its own. It requires deliberate architecture, thoughtful automation, and a clear understanding of which tools belong where.
In Salesforce Nonprofit Cloud (NPC), that challenge is multiplied. Built on the Salesforce Industries architecture, NPC introduces a purpose-built data model with Person Accounts, Gift Commitments, Gift Transactions, and volunteer management objects that all need to stay tightly synchronized. The good news? Salesforce Flow, especially with the addition of the Transform element, has become a powerful enough tool to handle both the data hygiene work and the complex calculations your fundraising and volunteer teams depend on, without touching your DPE credit limits.
This post covers two interconnected use cases: automating data sanitization for volunteer management and building advanced donor fulfillment calculations with Flow, including the new Transform element. Together, they demonstrate what’s possible when clean data and smart automation work in concert.
Why Clean Data Is the Non-Negotiable Starting Point
Before we get into calculations and check-in flows, let’s establish something foundational: none of this works without clean data.
In the Salesforce world, “clean data” means records that are accurate, consistent, and free of duplicates. For admins, this has always been best practice. But with the rise of AI Agents, autonomous programs that can execute real transactions inside your org, data quality has become a hard requirement. AI is only as good as what it’s grounded in. Garbage in, garbage out, and now that garbage can trigger a bad transaction at scale.
In NPC specifically, clean data is the backbone of reliable volunteer coordination, accurate donor reporting, and eventually, trustworthy AI-assisted fundraising. One of the most common, and most overlooked, data quality issues is mobile phone formatting.
Part 1: Automating Data Sanitization with Record-Triggered Flow
Volunteers check in using their last name and mobile phone number. That sounds simple until you realize that the same phone number can be stored dozens of different ways: (512) 555-0100, 512-555-0100, 5125550100, 512 555 0100. When a Get Records element tries to match on an exact value, any inconsistency breaks the lookup.
The fix is a record-triggered flow that strips all non-digit characters from the mobile phone field the moment a Person Account is created or updated.
Person Account
A person account is a Salesforce record type that combines Account and Contact into a single entity, allowing you to manage individuals like donors or volunteers without needing a separate business account record. NPC relies on Person Accounts as its primary constituent record.
The “Clean Mobile Phone” Flow
This flow runs when a Person Account is created, or when the mobile phone field is changed and is not blank. The sanitization logic uses a chained SUBSTITUTE formula that removes spaces, dashes, and parentheses in sequence, leaving only pure digits. The result: a consistent, matchable value in every record.
If you need flexibility, there are alternatives. Validation rules can reject improperly formatted entries at the point of save, preventing the problem before it’s created. Scheduled flows can run as a daily batch job to clean up any legacy data that snuck through before your automation was in place. For most organizations, a combination of all three provides the most airtight coverage.
Part 2: Reactive Screen Flows for Volunteer Check-In
Once your data is clean, you can build experiences that actually work. In NPC, volunteer management tracks jobs, positions, and shifts, and getting volunteers into the right slot quickly is a real operational challenge.
Rather than relying on a standard digital experience site, we built a custom screen flow that leverages reactive functionality: the ability for a screen to update dynamically based on user input without navigating to a new page.
Reactive Screen Flow
A reactive screen flow allows components on the same screen to communicate with each other in real time. A data table can update the moment a user types a search term or makes a selection, with no page reload.
How the Check-In Flow Works
The volunteer enters their last name and mobile phone number. Because we’ve already sanitized the phone field, the Get Records query finds an exact match reliably. If no match exists, a warning screen appears immediately.
From there, a data table displays available jobs, such as “Food Distribution.” Once the volunteer selects a job, a Screen Action triggers an auto-launched subflow in the background.
That subflow queries available shifts for that specific day and passes them back to a second data table on the same screen. The volunteer selects their shift and clicks Next, and the flow creates a Job Position Assignment record with a status of “Complete.” Clean, fast, no paper sign-in sheet required.
Part 3: Complex Donor Fulfillment Calculations with Flow and the Transform Element
With volunteers managed and data sanitized, let’s look at the other side of the NPC operation: donor management. Here, the goal is to give fundraising teams a real-time snapshot of donor health directly on the Account page.
Specifically, we want to calculate three things for each donor:
Current Year Gift Commitment: The donor’s pledge for the year. In NPC’s data model, this tracks promises rather than payments.
Current Year Paid Amount: The total actually received via Gift Transactions. A single commitment can have multiple transactions associated with it as the donor makes payments over time.
Fulfillment Rate and Membership Level: The percentage of the commitment that’s been paid, and a tiered classification (Gold, Silver, Bronze) based on actual payments.
Why Flow Instead of DPE?
NPC includes pre-built Data Processing Engine (DPE) calculations for Donor Gift Summary. Think of DPE as a mini-ETL tool built directly into Salesforce, designed to handle millions of records with joins, filters, and aggregations that would push a standard Flow to its governor limits. It’s powerful, but it comes with two significant constraints: a steep learning curve that many admins haven’t climbed yet, and a license-based DPE credit limit that can be exhausted quickly if calculations run in real time or too frequently.
Flow provides a low-code alternative that doesn’t count against those credits, making it the right choice for on-demand or daily updates across mid-sized datasets. The golden rule: always use the tool you already know if it fits the case at hand.
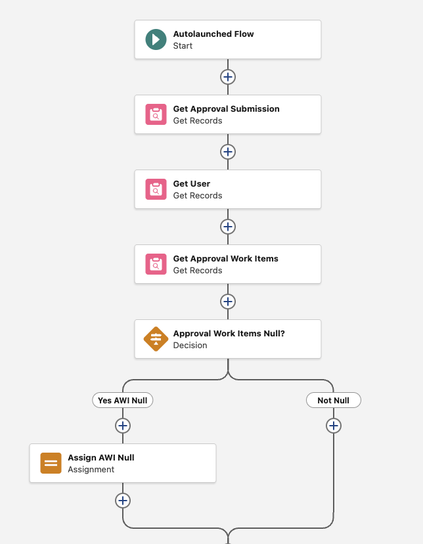
Step 1: The Auto-Launched Subflow
We start by building an Auto-Launched Flow to house all the calculation logic. Keeping the math in a subflow means the same logic can be triggered by a user button, a nightly schedule, or an automated event, without ever rebuilding it.
The flow takes three input variables: the Account ID we’re processing, a StartDate, and an EndDate. Formulas handle null inputs gracefully, defaulting to January 1st of the current year and today’s date respectively, so the flow still works if those values aren’t provided.
Two Get Records elements pull the data. The first retrieves Gift Commitments filtered by DonorId and EffectiveStartDate within the selected range. The second retrieves Gift Transactions for the same donor where Status is Paid and TransactionDate falls within range.
The Transform Element
This is where Flow Builder has meaningfully evolved. The Transform element allows you to map and aggregate data collections without the traditional Loop + Assignment pattern. Instead of iterating through every transaction record manually, we point the Transform element at the Gift Transactions collection, set the target to a currency variable, select Sum, and choose the Amount field. The element does the rest. Repeat the process for Gift Commitments.
This approach is bulkified by design and significantly easier to debug than a loop-based alternative.
Categorization via Formulas
A nested IF formula handles Membership Level assignment: Bronze for paid amounts under $50,000, Silver up to $100,000, and Gold above that. A separate formula calculates the Fulfillment Rate as a percentage. Both formulas include null checks to handle donors who have commitments but no transactions yet.
Step 2: The Screen Flow and Quick Action
The subflow handles all three rollups in a single execution: total paid amount, total commitment, and the derived fulfillment rate and membership tier. The Screen Flow itself grabs the Account ID from the page, passes it into the subflow, receives the calculated values back, and writes them to custom fields on the Account using an Update Records element. A Flow Message component displays a toast-style confirmation to the user when the calculation is complete.
Step 3: Nightly Automation via Scheduled Flow
A button is great for one-off checks. But data goes stale. The subflow architecture makes automation straightforward: a Schedule-Triggered Flow runs nightly at 8:00 PM, loops through all active donor Accounts, and calls the same subflow we built for the button. Every morning, the fundraising team logs in to dashboards and Account views that are already current.
Conclusion
Clean data and efficient automation are the engine of nonprofit effectiveness. Accurate volunteer check-ins mean accurate service records. Accurate service records mean accurate outcome data. And accurate outcome data is what allows organizations to apply for larger grants, deepen constituent relationships, and scale their mission year over year.
The same principle applies on the donor side. When gift fulfillment data is reliable and up to date, fundraising teams can have better conversations, identify at-risk donors earlier, and make the case for continued investment with confidence.
With NPC’s purpose-built data model and Flow’s growing capabilities, especially the Transform element, there has never been a better time to consolidate your automation strategy around tools your team already understands. The result is an org that’s not just manageable, but genuinely ready for whatever comes next, including AI.
Want to walk through these builds step by step? The Clean Data Playbook is available FREE on Flow Canvas Academy.
Explore related content:
Mastering Data Rollups in Nonprofit Cloud
What Nonprofits Taught Me About Building Salesforce for Humans, Not Just Systems
Salesforce NPSP vs Nonprofit Cloud Consultant Certifications
How the Salesforce Architecture Program Is Being Rebuilt with the Community
#Nonprofit #NonprofitCloud #NPC #NPSP #SalesforceAdmins #SalesforceDevelopers #SalesforceHowTo #SalesforceTutorials