Warn and Inform with Native Toast Messages in Salesforce Flow
Just when the Salesforce community thought we had fully digested the Summer ’26 release notes, the product team decided to drop a classic “one more thing.” Adam White recently announced that two new functionalities were “snuck” into the release at the last minute. For those of us who live and breathe Flow Builder, this is like finding an extra gift under the tree after you thought Christmas was over.
The star of this stealth update? The Native Show Toast Message Action.
In this post, we’re going to break down why this is such a great update for Salesforce Admins, how we used to handle this the “old way”, and a clever trick to implement these notifications without cluttering your Flow logic.
What Exactly is a Toast Message?
In the world of User Experience (UX) and User Interface (UI) design, a Toast Message is a small, non-modal notification that “pops up” (like toast from a toaster) to provide feedback about an operation.
Unlike a modal or a popup window, a toast message doesn’t require the user to click “OK” to continue their work (though they can be configured to stay until dismissed). They are designed to be subtle but informative. In Salesforce, you usually see them at the top of the screen in green (Success), red (Error), yellow (Warning), or blue (Information).
Why Toasts Matter
Toasts are critical for a smooth user journey. They confirm that an action was successful or alert a user to a problem without breaking their concentration or forcing them to navigate to a new page. Without toasts, users are often left wondering, “Did that save?” or “Did my automation actually run?”
The Way We Were: The Era of UnofficialSF and AppExchange
For years, the request for a native “Show Toast” action in Flow was one of the most requested ideas. But for a long time, the answer from Salesforce was silence. This led the community to innovate on its own.
The UnofficialSF Method
To get a toast message in a Screen Flow, most Admins turned to UnofficialSF. This incredible community resource offered a “Show Toast” flow component. While it worked beautifully, it came with technical debt considerations:
Installation Management: You had to install a managed or unmanaged package in your production environment.
Maintenance: Every time Salesforce updated its API, you had to ensure your community-sourced components remained compatible.
Security Audits: In highly regulated industries (like Finance or Healthcare), getting a third-party package approved by a security team can take months.
The AppExchange and Custom LWC
Other Admins turned to the AppExchange for “Flow Utility” packs or, if they had developer resources, they wrote custom Lightning Web Components (LWC). An LWC could use the ShowToastEvent in JavaScript, but it required writing code, which goes against the “Clicks, Not Code” mantra that makes Flow so powerful.
That era is officially over. With the Summer ’26 release, the power is finally native.
Exploring the New Native “Show Toast” Action
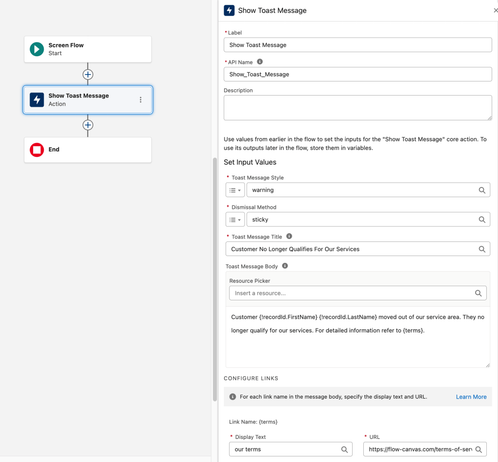
The new functionality allows us to call a standard action directly from the Flow Builder. It is robust, flexible, and incredibly easy to configure. Here is what you can now do natively:
Style Selection
You can choose the “Flavor” of your notification. This dictates the icon and the color of the toast:
Success (Green): For when things go right.
Warning (Yellow): To alert users of a potential issue that doesn’t stop progress.
Information (Blue): General updates or helpful hints.
Error (Red): When a process fails or a validation is triggered.
Dismissal Control
You get to decide the “persistence” of the message.
Automatic: The toast appears and then fades away after a few seconds. This is great for simple success confirmations.
Manual: The toast stays on the screen until the user clicks the “X” to close it. This is vital for errors or warnings where you want to ensure the user has actually read the information.
Rich Messaging and URLs
This is where it gets really exciting. You aren’t limited to plain text.
Dynamic Resources: You can include Flow variables, formulas, or record fields in the title and description.
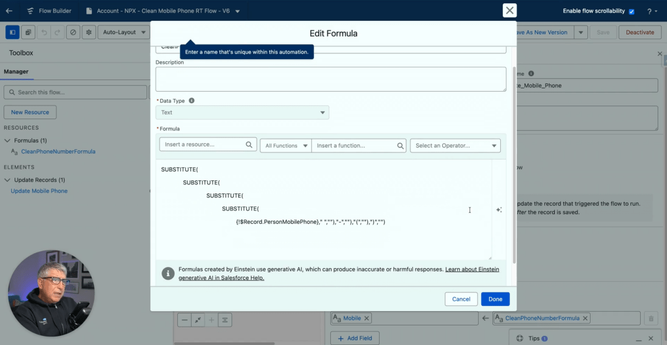
The “Curly Bracket” Trick: By using curly brackets
{ }in your message description, you can embed a URL. This could be a link to a public webpage, a internal Terms & Conditions document, or even a link to a specific Salesforce record.
Use Cases for Native Toasts
How should you use this in your day-to-day Admin life? Here are a few examples:
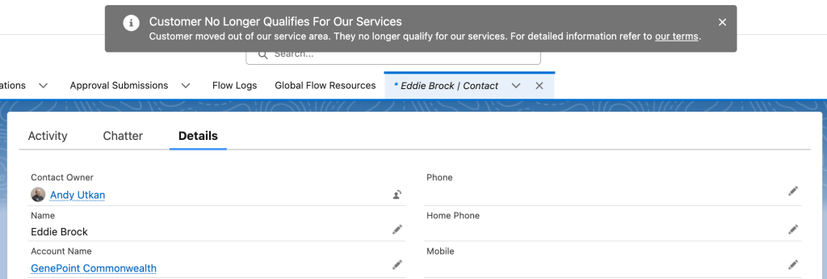
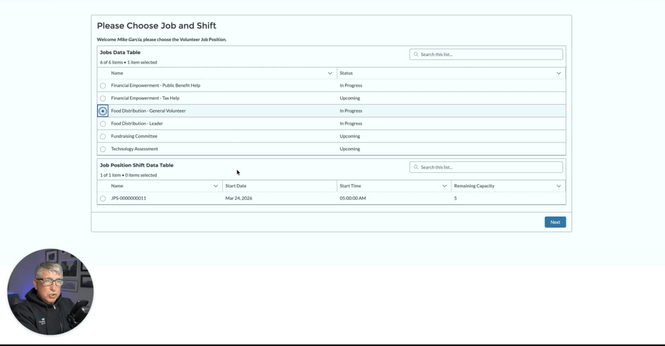
Eligibility Alerts: As shown in the video below, if a customer no longer qualifies for a service (e.g., they moved out of the service area), a toast can immediately inform the user the moment they open the record.
Data Validation Feedback: Instead of a clunky fault screen, show a red Error toast if a user enters data that doesn’t meet business criteria.
Onboarding Guidance: When a new Lead is created, show an “Information” toast with a link to the “Sales Playbook” for that specific industry.
Process Confirmation: After a complex Screen Flow that updates multiple records, show a “Success” toast that includes a link to the primary updated record. Please note that Salesforce included another action in the last minute that opens the newly created record on another tab for the user. Stay tuned for more updates related to that action.
The Pro Trick: Conditional Visibility via Lightning Record Pages
In the video, I demonstrated a clever way to use this. Normally, you might think you need to build a complex Flow that runs, checks criteria using a Decision element, and then decides to show the toast. There is a clever method.
Instead of putting the logic inside the Flow, you can keep the Flow extremely simple. Just the “Show Toast” action, and put the logic on the Lightning Record Page.
How to do it:
Create a simple Screen Flow: The flow only contains one element: the “Show Toast” action.
Add to Record Page: Drag the “Flow” component onto your Contact or Account page layout.
Set Component Visibility: In the Lightning App Builder, click on the Flow component. In the right-hand sidebar, go to Set Component Visibility.
Define Your Criteria: For example, set the visibility to Record > Last Name > Equals > Brock.
The Result: The Flow only “exists” and runs when that specific condition is met. When I go to Lex Luthor’s record, nothing happens. But when I navigate to Eddie Brock’s record, the Flow triggers, and the toast message pops up instantly: “Customer no longer qualifies for our services.”
This keeps your Flow canvas clean and offloads the “heavy lifting” to the Lightning UI engine.
Stop Duct Taping Your Flow Notifications
The “Sneaky” Summer ’26 release features prove that Salesforce is listening to the community. By making the Show Toast action native, they have removed the need for third-party dependencies, reduced technical debt, and given Admins a powerful new tool to communicate with users.
The ability to include clickable URLs and dynamic variables means our notifications can now be functional bridges to other parts of the business.
Enjoy this new functionality, folks! It’s a game-changer for Flow UX.
Watch the video here:
Does this new native action mean you’ll be retiring your unofficialSF packages? Let us know in the comments below!
Explore related content:
11 Flow Updates in Summer 26 Release
Get Your Org Ready: Summer ’26 Admin Highlights
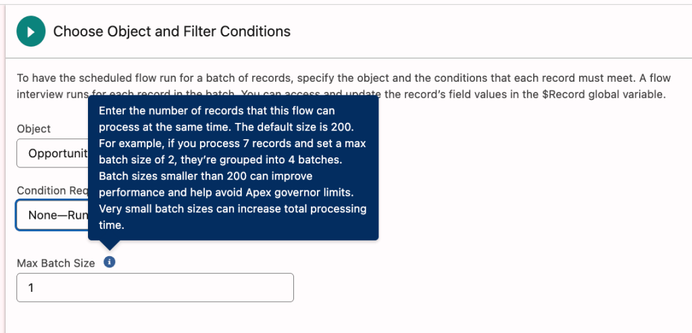
Master Custom Batch Sizes for Schedule-Triggered Flows
#HowTo #NewReleaseUpdate #Salesforce #SalesforceAdmins #SalesforceDevelopers #Summer26 #Tutorial