I'm eating a bowl of #Chinese #potstickers right now. Did you know potstickers were created from a mistake? Remember that, next time you feel bad about making mistakes!

https://www.windchimeschinese.com/windchimes-blog/2018/6/20/the-legend-of-potstickers#:~:text=The%20Chinese%20have%20been%20enjoying,the%20stove%20for%20too%20long.

#Asian #food #history #HowItWasMade

The Legend of Potstickers — Windchimes

Potstickers are one of my favorite dishes. These simple, little fried pillows filled with meat leave you wanting more. Usually they are an appetizer and meant to share but sometimes you just want them all to yourself. How did these little dumplings become so popular and why are they so delicious?&am

Windchimes
How It Was Made: THE COMMODORE 64

YouTube

How I 3D Printed a Ground Glass Back for My LomoGraflok 4×5 Instant Back

I recently began shooting with the new LomoGraflok 4×5 instant back from Lomography on my Chamonix 4×5 camera and found that I needed to use a spacer every time we compose a shot.

The space is to take into account the different film plane on this back. The Instax Wide film plane is further away by 19.4mm from the usual sheet film plane.

Another thing I found is that if I were to mount the back on the camera, I would need to remove the ground glass frame. The Chamonix ground glass frame is easy to put back ( one hand to slide the frame in) but difficult to remove (you need two hands to lift out the two spring arms) and that is kind of troublesome if you have to do that for every shot.

So, I decided to 3D print a ground glass frame that already has the spacer built-in and that is also much easier to remove and put back.

Read also : The LomoGraflok 4×5 Instant Back Review: A New Twist for Large Format

The new ground glass frame that I 3D printed is very similar in size to the spacer that came with the back. The only difference is the height which is about four millimeters higher to take into account where the ground glass should be.

The other thing I added was the grooves along the long sides so that they can be locked down. In contrast, there is no groove on the original spacer because will be held in place when you insert it into the ground glass frame

The 3D design in Fusion 360

The 3D design is done in Fusion 360, nothing too complicated as the shape is quite regular. It is a matter of measuring the original spacer and transferring the measurements into the design. One of the things that I nearly missed including is the two raised bars on the right side of the frame. These are used to align the entire frame on the camera back to prevent it from being inserted too much or too little.

I 3D printed it using my Anycubic Mega S printer with the following specs (for reference):

  • Layer : 0.3mm
  • Infill density : 20%
  • Extruder temp : 230C
  • Support : Everywhere
  • Time taken : 5 hours

Printing on my AnyCubic Mega S 3D printer

The STL files can be downloaded here (please note this is a work in progress project).

Ground Glass

Acrylic ground glass

Instead of making my own ground glass, I opted for a piece of 3mm acrylic that is frosted on one side. I have a piece lying around from my Afghan Box camera builds so I decided to use it. There are also four corners that I used to hold the ground glass in place. The two bottom pieces are glued to the main body using superglue while the other two are secured with screws. This will make it easier to swap ground glass in the future by unscrewing the top two pieces.

Test Shoot

So what was left is to do a test shoot to make sure the ground glass image plane is the same as the Instax Wide back film plane. I chose a still life setup and focused on the label on the orange. The results show that there is no shift in focus switching from ground glass to instant back.

Results.

Improvements

The radial locks to catch the groove are not well aligned. Although the 3D frame is still held in place, it is something to look into.

Conclusion

While the 3D printed back is not perfect, it certainly makes using the instant back easy with my Chamonix camera. Other 4×5 cameras may not require this if the back can be slotted under the ground glass.

About the author : Cheng Qwee Low is a (mainly) film photographer based in Singapore. In addition to using cameras ranging from 35mm to ultra-large-format 8×20, Low also enjoys alternative processes such as kallitype and albumen printing. The opinions expressed in this article are solely those of the author. You can find more of Low's work on his website and YouTube. This article was also published here.

#doityourself #equipment #walkthroughs #3dprinted #3dprinting #chengqweelow #diy #groundglass #homemade #howitwasmade #lomograflok #lomography

How I 3D Printed a Ground Glass Back for My LomoGraflok 4×5 Instant Back

Photographer Cheng Qwee Low shares how he 3D printed a ground glass back for his new LomoGraflok 4x5 instant back.

How I Bring My Sketches to Life as Conceptual Photo Art

For a digital artist like me, getting those unique ideas for my images is one of the most important things. I see the ideas in my dreams, when I read a magazine, when I’m out for a walk, or pretty much anywhere. I have learned that ideas are everywhere if you just allow yourself to see them.

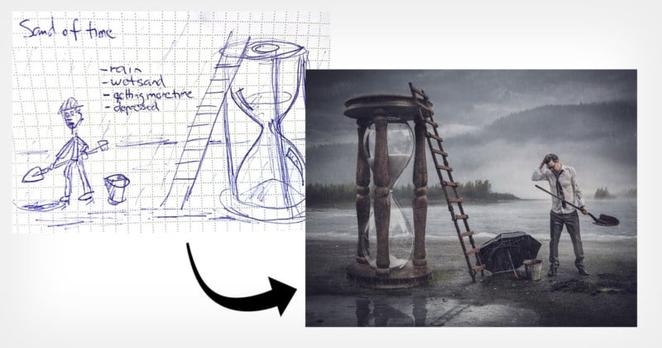
When I get the idea, I see it in my head as a “flash”. I see pretty much every detail, but I need to sketch out that idea quickly into my notebook so I don't forget it.

These sketches work as a guide when I start doing the image itself. When I look at the sketch, I’m able to remember all the aspects of the image I saw in my head. Of course, every image has a different process when I start putting all the pieces together, but that is another story.

Below you can see a bunch of my sketches from the small notebook I carry pretty much everywhere. There are always some tweaks to the concept or the image itself, but many times my sketch and final image almost are one to one match as you can see.

Leaving Home. Running Out of Time. Layers of Being Human. Stormy Relationship. 2020. Edge. Gary V. Turn the Blind Eye.

In my notebook, there are many more similar sketches just waiting for their time to be created as a final image.

So how do I come up with these ideas? Here are 5 tips on how you can create your own original conceptual art.

#1. Sketch Out Your Ideas as Soon as Possible

When you sketch the idea, even with the crappy stick figures, you are able to previsualize your image and you will remember it better when you come back to it. So keep that notebook available at all times. I use a small Moleskine notebook that usually is in my bag, where I dribble my tiny sketches. And when the time is right I breathe those sketches into reality.

#2. Allow Yourself to See New Concepts, Steal Like an Artist

Years back after reading a book called Steal Like an Artist by Austin Kleon, everything changed with me how I create new concepts. When you allow yourself to steal (not copy) ideas all around you are able to combine those multiple ideas into one unified new concept. So don’t copy someone’s image or idea but rather save some parts of it and combine it with some other idea.

#3. Add Randomness to Your Thought Process

When creating new concepts for your images try not to research things that you know. Try to research things that you don’t know. For example, I have often used Wikipedia's Random Article button to expose myself to new articles and visuals that I’m not definitely looking for. These random articles might initiate something new for your thought process and you might come up with a new unique concept.

#4. Random Word Generator

You can also use a Random Word Generator to create, say, 3 totally random words and try to imagine those words as an image in your head. I would recommend you to use 3 words and then try to visualize those words as a new conceptual image. This will be a fun exercise for any artist.

ABSTRACT, FUR, MACHINERY.

Now try to see that image in your head. I’m definitely getting some weird images in my head. Maybe a new concept is born yet again?

#5. Creativity Needs Time

I often heard the argument that “I don’t have time to create anything new.” Well, we all have the same hours to spend during the day. The older we get the more excuses we just have to NOT be creative. Give a child a cardboard box and they will turn it into a car or even a space rocket. We are just too lazy to see creativity around us.

If you want to create unique concepts and do conceptual images, you need to invest time. And yes I know that time is our most precious thing, but if you allocate the time of a single Netflix episode to creativity, I’m sure you will create a new unique concept also.

Invest that time in reading random articles, going out, and trying to see those unique concepts all around you. Write them all down, previsualize them, and then when the time is right put your energy creating those visions into reality. Do the work!

About the author : Antti Karppinen is a photographer, digital artist, and retoucher based in Finland. He is an internationally award-winning commercial and portrait photographer. You can find more of his work over on his website and blog. This article was also published here.

#ideas #inspiration #tips #anttikarppinen #bts #creativity #howitwasmade #howitwasshot #skeching #surreal

How I Bring My Sketches to Life as Conceptual Photo Art

Digital photo artist Antti Karppinen shares how he turns flashes of ideas into sketches and then those sketches into conceptual photos.

Making a DIY Camera Flash by Reusing a Disposable Camera’s

Recently I bought a film camera from the 1970s, the Canon A-1. Considering that the camera is almost three times older than me, it was no surprise that there are a few issues with it.

The first camera I got jammed before I even loaded in my first roll, and the replacement camera had a battery drainage issue (which took an almost complete disassembly to fix).

But anyway, that isn't the point of this article. Electrical problems aside, my main issue with this camera is its lack of a flash. Unbeknownst to me when I bought this camera, film cameras can't really operate without a ridiculous amount of light (at least by modern camera standards). Even in a reasonably lit room, the camera struggles to take photos without the help of a tripod. This led to me trying some creative solutions, with limited success.

Trying to take a photo in a dimly lit McDonald's. The setup. The result.

I tried to find a camera flash online, but all of them were huge -- like almost bigger than the actual camera.

Why doesn't anyone make a small camera flash?

I didn't exactly want to show up to parties looking like the paparazzi, so I decided to make my own small flash module.

Making the Flash

The camera flash I built uses the flash circuit from a cheap Fuji QuickSnap disposable camera which I got for only about $7.

A Fuji QuickSnap disposable camera with a built-in flash.

Make sure to discharge the capacitor before handling the circuit! It's charged up to 300V, so you really don't want it to touch it while it's still charged.

Flash PCB from disposable camera. Don't forget to discharge the capacitor!

There are two switches in the circuit: one to charge the cap and one to trigger the flash. For the charging switch, I simply attached a toggle switch up to it.

The trigger switch was a bit more complicated, however. It should be wired up to the camera's hotshoe so that the flash will trigger exactly when the photo is taken. However, wiring the trigger directly to the hotshoe would cause a couple of hundred volts to pass through the camera, frying it.

Note : Some older cameras would be fine with this voltage because they have physical trigger contacts, but a newer camera would definitely get damaged.

I instead designed and ordered a PCB based on this schematic (the webpage has a really good explanation of how the circuit works). You can find the PCB and 3D files on my GitHub. This circuit takes in the ~300V trigger voltage and turns it into a 5V for the camera's hotshoe.

I then modeled up an enclosure for the circuits, along with a hotshoe with contacts. The contacts used in the 3D-printed hotshoe are taken from the copper contacts on the disposable camera's PCB. And that's it! I now have a small camera flash.

Inside the flash. Please ignore that I soldered directly to a battery. The final product. Note the charging toggle switch on the left.

How to Use the Flash

You may have noticed that there are no settings on the flash at all. The big bulky flashes allow you to select the distance of your subject and tell you what aperture to use, but my flash has nothing like that at all.

I simply just use the disposable camera's fixed settings of f/10 @ 400 ISO (adjust aperture depending on your film's ISO). You should also keep the subject within ~3m/10ft. This gives the flash a theoretical guide number of 50, but who knows how accurate that is considering it's a cheap disposable camera.

Conclusion

I ended up meeting all of my initial goals for this project. I now have a "discreet" flash for my film camera that works perfectly for my purposes. The hotshoe contacts are a little bit finicky, so I might buy a PC sync cord so I can use the PC socket in my camera which will have a much more reliable connection.

About the author : Joshua Bird is a photographer and computer science undergraduate student at the University of Cambridge. The opinions expressed in this article are solely those of the author. You can find more of Bird's work on his website. This article was also published here.

#doityourself #equipment #walkthroughs #canona1 #compactflash #diy #flash #homebrew #homemade #howitwasmade #joshuabird

Making a DIY Camera Flash by Reusing a Disposable Camera's

Photographer Joshua Bird couldn't find a suitable compact flash for his Canon A-1, so he took apart a disposable camera and made his own.

How I Converted My Afghan Box Camera Into a 4×5 Slide Projector

I have been shooting 4×5 color transparencies or commonly known as color slide film for many years but the best that I could enjoy them was to put them on the light table and viewing them through a loupe. Unlike my 35mm and 120 slides, I have never seen them projected big simply it is not easy to locate a 4×5 slide projector.

4×5 slides on a light table

For the last few years, I tried searching online on how to do it yourself (DIY) and build a 4×5 slide projector but no one seems to have made them before. There are commercially produced 4×5 slide projectors, but I have never seen one in real life. I have not even seen them on the used market on eBay before but even if they are available they are going to cost a lot and even more to ship.

It was only recently that I saw this YouTube video by DIY Perks on how he made a 4K LCD projector that triggered me to think about making a 4×5 projector again. In the video, he explained how he made use of the Fresnel lens instead of the conventional thick condenser lens.

Afghan box camera

With this new knowledge, I started to think about how I could convert my Afghan box camera into a slide projector. For those who do not know the Afghan box camera, it is a camera and darkroom built into a single box. If you need more info on how to build one you can refer to this amazing eBook by Lucas Birke on his Afghan box camera project.

Light Source

Philips 12B LED light bulb

The most important part of the side projector is a powerful light source. The conventional projector will use a powerful but hot incandescent or halogen light bulb. However, for this project, I went to the store and find the highest wattage LED Bulb. This turned out to be a 12 watts LED light bulb from Philips. It is also warm light which is what slides are usually projected with. It was said the slides usually come with a blue tint to balance out the warm light.

I wired with up with a socket and attached it to the back of the box camera using 2 screws.

Warning : Live wire is involved. DO NOT do this yourself if you are not confident and knowledgeable/trained.

Fresnel Lens

Fresnel lens sold as magnifying sheets

I went online and bought 2 magnifying reading sheets that are usually used for reading but I guess they would work for this purpose. On every sheet, there will be one side that is made up of the Fresnel lens, which is a series of concentric circles, and the other side will be smooth, so it is important to place the sheets in the right orientation. The one nearest to the light bulb has the Fresnel lens facing away from it and the other piece will have the concentric circles facing the bulb. In this manner, the light from the bulb will be collimated By the first piece and converged by the second piece.

It is also important to find out the true focal length of the Fresnel lens. The DIY perks video shows you how. My two lenses have focal lengths of 90mm.

Fresnel lens separated by a narrow strip of plywood

To mount the lenses I just got two pieces of plywood with a window cut in the center and I 3D printed some corners to mount the lenses to the plywood. To attach the two Fresnel lens plywood in the Box camera I just use two narrow strips of plywood and two elastic bands to act as a spacer between the two boards. The idea here is to be able to convert this back to a box camera instead of turning it permanently into a slide projector.

Lenses

Fujinon 210mm lens

For the lens, I continue to use my Fujinon 210mm, which is my large format photography shooting lens. I find that it still does a decent job in projecting the image, but I’m not sure if there is a difference in projection quality if I were to use an enlarger or projector lens.

Focusing

In order to focus the image on the screen, I use the focusing rods that are already part of the box camera system. This box camera is designed to take 5×7 inches photo negative so I removed the existing ground glass and made a 4×5 slide mount to hold it to the holder and to block off excess light.

Testing

Fully projected Finally I saw my 4×5 slides big!

For testing, I set up a piece of 5-foot white fabric backdrop mounted across two light stands and was placed about 3 meters from the slide projector in the darkened room with all the lights off.

Hurrah! I was able to get a good image on the screen! I was certainly very impressed and I to be able to see my large format slides on such a big screen finally!

Conclusion

While this slide projector is not bright enough to be used in an auditorium, it is good enough for the personal viewing of 4×5 slides at home. You will need a very dim room to enjoy the slides at a view distance of 3 meters. There is certainly room for improvement but that will be for another DIY project.

About the author : Cheng Qwee Low is a (mainly) film photographer based in Singapore. In addition to using cameras ranging from 35mm to ultra-large-format 8×20, Low also enjoys alternative processes such as kallitype and albumen printing. The opinions expressed in this article are solely those of the author. You can find more of Low's work on his website and YouTube. This article was also published here.

#doityourself #ideas #walkthroughs #4x5 #afghanboxcamera #chengqweelow #diy #homemade #howitwasmade #largeformat #projector #slideprojector

How I Converted My Afghan Box Camera Into a 4x5 Slide Projector

Photographer Cheng Qwee Low shares how he converted his Afghan box camera into a slide projector to view his 4x5 photos on the big screen.

NASA Shows How the Mars Perseverance Rover Took its First Selfie

Back in April, the Mars Perseverance rover shared a selfie that included the Ingenuity helicopter drone on the surface of the Red Planet. The space agency has now shared a video and detailed explanation of how that photo was taken, including the fact it is made up of 62 individual images.

NASA explains that the point of the selfie isn't just to show off to folks back on Earth and perhaps inspire new generations of space enthusiasts, but actually is a way for the engineers to check wear and tear on the rover.

In the video clip above, the results of Perseverance’s robotic arm can be seen as it maneuvered to take the 62 images that compose the finished image. What it doesn’t capture is how much work went into making this first selfie happen. In a separate video below, Vandi Verma, Perseverance's Chief Engineer for Robotic Operations, explains.

<https://petapixel.com/assets/uploads/2021/06/TakingASelfieOnMars-1920.m4v>

"The way you and I might take a selfie is by holding a camera up with our arm and taking a single image," she says. "The way the rover takes a selfie is a little more complex than that."

The rover uses its' WATSON (Wide Angle Topographic Sensor for Operations and eNgineering) camera that is positioned at the end of its robotic arm. The main purpose of this arm is to allow the rover to take close-up images of rocks for scientific analysis.

"Even with the arm fully extended, it can't cover the entire rover in a single image," Verma explains. "To capture the entire rover, we take multiple images and then stitch them together."

The image below shows a computer simulation of NASA’s Perseverance Mars rover taking its first selfie. The point of view of the rover’s WATSON camera is included to show how each of the 62 images were taken. Those photos were later sent to Earth and stitched together into the selfie.

The team tries to hold the camera in the same position for each shot, and to do so it actually may mean that the arm has to move quite a lot.

"It can take up to an hour of arm motion and imaging to take that entire selfie," Verma says. "The reason you don't see the robotic arm in the selfie is that it is moving in between the different image frames that we are taking and we include enough overlap between the images so that when we stitch them together, we don't have to include the arm."

In the video clip above where Verma explains how the photo was taken, she also notes that for the first time, a Mars rover also has a microphone equipped, which allows them to share the sound of the rover moving its arm and taking each frame.

“The thing that took the most attention was getting Ingenuity into the right place in the selfie,” said Mike Ravine, Advanced Projects Manager at MSSS. “Given how small it is, I thought we did a pretty good job.”

Once the photos were compiled and sent back to Earth, image processing engineers began their work. They had to clean up any blemishes caused by dust that had settled on the camera, assemble the images into frames with a mosaic and smooth out their seams with software, and finally warp the crops so that it looks more like a normal camera that the public is used to seeing.

While a selfie on Earth is made by a single person, the Perseverance's selfie took an entire team of people and almost an entire week.

#news #software #technology #cameradrone #drone #howitwasedited #howitwasmade #howitwasshot #ingenuity #mars #marsingenuitydrone #marsingenuityhelicopter #marsperseverancerover #nasa #perseverance #redplanet #selfie #space

NASA Shows How the Mars Perseverance Rover Took its First Selfie

It took 62 photos, a team of people, and almost a week to create.

Building a 16×20 Camera with a Giant Aerial Lens and Cardboard

A few years ago I built an ultra-large-format (ULF) camera that is 24 inches by 24 inches. While it was a pretty huge camera, it was a simple build it was just two square standards, one for the front and one from the back that were connected by a big bellow.

There was no support base or focusing rails and I just support the two standards by using two tripods, so it was not the most stable camera. After a while, I dismantled the whole setup and recycled the wood and the bellows so I thought that would be the end of my Ultra Large Format (ULF) camera building adventures but who knows?

Then a while back, my friend passed me a big lens and it got me thinking of rebuilding an ultra-large format camera again.

Lens

The lens compared to a Nikon film SLR

The story was that my friend came across a camera collector near a local market during one of his walks and spotted this big lens. Money changed hands and he brought over the lens.

After some research, I discovered that it is an aerial lens. It was used in an aerial camera mounted on aircraft for surveillance photos, probably during World War 2 or later. The lens weighs 8 kilograms (17.6 pounds) and the focal length is 36 inches and has the biggest aperture at f/6.3. However, no brand or maker’s mark can be found on it. It may be one of the few lenses that were made by different companies during the war.

As the lens is so heavy, I built a wooden lens support for it. It is made with a few pieces of wood and I cut some curves that will fit the front part of the lens. I also designed it so that there are two height adjustments as my camera design will be of a rectangular shape and there may be a need to mount the camera at different heights for landscape and portrait orientation.

Watch the video about the lens here:

Camera

As I do not have the space for a ULF camera, I decided to just make one from corrugated cardboard boxes. I opted for a sliding camera design but with a twist in the back design. It has 2 sleeves holes cut out at the sides so that I can put my hands inside to load the paper. The “dark slide” would be at the back of the camera covering up the ground glass when I need to load the photo paper and doing exposure.

With no removable film holder, I would load the paper would by sticking it on the ground glass using magnets. I am not sure this is considered innovative, but I must say I have never come across a similar design in other cameras.

Watch the video about the camera building here:

Shutter

Flap shutter

While the camera has a working aperture, there is no shutter control for it. Initially, I built a simple cardboard lens cap for it and use it to control the exposure. You "remove and place back" the lens cap for exposure. This is a common method to control exposure in barrel lenses. However, this method will not work if I were to take my own self-portrait.

As the lens is so big (diameter ), it is hard to find a commercial shutter like the common Packard shutter for it. Again I built a flap shutter for it. Then I just use rubber bands (or elastic bands for longer-lasting elasticity). I tied a long string to it so to open the shutter just pull the string to pull down the flap. When the string is released, the flap will be pulled back by the elastic bands.

Watch the video about the shutter building here:

Samples

Here are photo negatives shown next to a Nikon F2 for a perspective of scale:

Here are positive photos after digital conversion:

Conclusion

Overall this is a successful prototype build that helped me to test (1) the lens itself and (2) the camera design.

Hopefully I will have the resources to build a more permanent ULF camera in the future.

About the author : Cheng Qwee Low is a (mainly) film photographer based in Singapore. In addition to using cameras ranging from 35mm to ultra-large-format 8×20, Low also enjoys alternative processes such as kallitype and albumen printing. The opinions expressed in this article are solely those of the author. You can find more of Low's work on his website and YouTube. This article was also published here.

#doityourself #equipment #walkthroughs #16x20 #aeriallens #camera #cardboard #cardboardcamera #chengqueelow #diy #homemade #howitwasmade #ultralargeformat

Building a 16x20 Camera with a Giant Aerial Lens and Cardboard

A few years ago I built an ultra-large-format (ULF) camera that is 24 inches by 24 inches. While it was a pretty huge camera, it was a simple build it was