Unlocking the Power of Tripod Ball Heads with Balanced Mode https://petapixel.com/2025/04/08/unlocking-the-power-of-tripod-ball-heads-with-balanced-mode/ #stabilization #Educational #Equipment #AlanAdler #ballhead #Reviews #tripod #gear

Some Great APS-C Lenses That I Use on Full Frame Cameras https://petapixel.com/2025/03/05/some-great-aps-c-lenses-that-i-use-on-full-frame-cameras/ #Inspiration #Equipment #AlanAdler #fullframe #lenses #apsc #crop

How to Shoot Macro Photos with Regular Lenses and Extension Tubes
Macro photography works well with conventional lenses and inexpensive extension tubes. The combination achieves 0.3x to 0.5x magnification. Depth of field is much greater with these moderate magnifications than at the 1x magnification possible with macro lenses.
I have superb 90mm and 105mm macro lenses which I use to photograph bees. But often I want a longer focal length to capture the rapidly moving bees at a greater distance. I've tried telephoto lenses with both diopter lenses screwed on the front and with extension tubes inserted between the camera body and the lens.
16mm and 21mm extension tubes (left) and a diopter lens (right).
Diopter lenses work with manual focus but don't autofocus well. I need autofocus for fast-moving bees.
Extension tubes allow autofocus and, after moderate sharpening, deliver sharpness which rivals macro lenses. I shoot mostly at f/11 with both the macro and extended telephoto lenses.
Shot with a Sony 70-350mm.
I mainly use a 16mm extension tube for lenses from 100 to 200mm, but 21mm works well with my longer lenses.
The longer the extension, the greater the possible magnification, but autofocus is more difficult with longer extensions.
Shot with a Tamron 28-200mm. Shot with a Tamron 28-200mm.
Zoom Lenses Will Only Autofocus at the Long End of Their Zoom Range
I've bought 3 tube sets for about $25. They work with every telephoto lens I've tried. I mostly extend 150 to 300mm lenses.
While 1:1 isn't achievable, it's much easier to shoot at lower magnification because depth of field increases rapidly with lower magnification. I find that 0.3x to 0.5x meets most of my macro needs. The formula for depth of field is:
Depth Of Field (in mm) = .02 x f-number / Magnification 2
Note how DOF increases rapidly with lower magnification:
0.32mm is about 3x the thickness of a human hair.
Some ordinary lenses are capable of 0.25x or closer without extension tubes.
Shot with a Tamron 70-300mm.
Determining Your Maximum Magnification
You can measure your maximum magnification by photographing a ruler at the shortest distance that will focus.
This was shot with my Tamron 28-200mm at 200mm on a 16mm extension tube. The capture is 3.3″ wide which calculates to 0.4x magnification. The vignetting is due to the extension tube, but it never concerns me because I only keep a small portion from the center of the frame.
Then calculate magnification as follows:
Magnification = Sensor width / Captured ruler width
Sensor widths are approximately:
Full frame : 36mm or 1.4″
APS-C : 24mm or 0.95″
Micro Four Thirds : 17mm or 0.7″
Shot with a Tamron 28-200mm. Shot with a Tamron 28-200mm.
Lower Magnification Can Compete With Macro Focus Stacking
I recently issued a focus stacking "challenge" on a macro forum. I had no objection to focus stacking but wanted to demonstrate that a single frame at moderate magnification works surprisingly well.
A man who goes by "Roger in Edmonton" posted a 29-frame stacked image of a silver dollar and I came pretty close with this single frame:
The above photo was shot with a Sony a6400 and an ordinary 18-135mm kit lens without extension tubes, at f/16 and 135mm zoom.
Following are example bee photos.
Shot with Sigma 105mm macro lens at f/11 Shot with Sony 90mm macro lens at f/11
The following were all shot with telephoto lenses on extension tubes.
Tamron 28-200mm at 200mm f/16 Sony 70-350mm at 350mm f/11. This An APS-C lens, but I only keep a small part in the center. Tamron 70-180mm at 180mm f/11 Sony 100-400mm at 315mm f/11
If you have a yen for macro photography you can get started for very little cost with extension tubes on your existing lenses. You may never need a real 1x macro lens.
About the author : Alan Adler lives in Los Altos, California. The opinions expressed in this article are solely those of the author. He has been an avid photographer for 60 years. He is also a well-known inventor with about 40 patents. His best-known inventions are the Aerobie flying ring and the AeroPress coffee maker.
#educational #equipment #alanadler #bees #depthoffield #extensiontubes #howto #learn #lenses #macro #macrolenses #macrophotography #technical #technique


Using a Flash for Insect Photography
I've shot thousands of pics of insects without flash and tens of thousands with flash. When the lighting is bright and sunny, the results can be good without flash. But when I venture out in pursuit of photo ops, I often encounter poorly lighted situations which are better with flash. If you study the work of experienced insect photographers, you'll find that most of them use flash.
A very important advantage of flash is it captures motion. I use f/11 for depth of field and ISO 100 or less for quality. Without flash, that calls for approximately 1/100s. But flying insects are very fast and that shutter speed is too slow. So I use the fastest shutter speed possible with flash (1/250 on my Sony a7R IV and 1/400 with my Sony a1). At these settings, the ambient light contributes a fraction of what's needed for exposure, so the remainder comes from the flash. And with a flash duration of about 1/10,000s, even the speediest flying insects are frozen sharply. It also eliminates camera shake.
When I began photographing bees, I thought the pop-up flash on my Sony a6400 would be perfect. The distance was short and low power was adequate. But there were two problems:
1. Longer lenses cast a shadow blocking the low flash head from illuminating the subject.
2. The recycle time was 4 seconds, causing me to miss opportunities while waiting for recycling (which is the charging of the capacitor in the flash).
So I tried an external flash.
My first external flash was the small Sony HVL-F32M. The light head is high enough to eliminate the lens shadow and it recycled in 2 seconds when shooting closeups. But I was still missing opportunities while waiting those 2 seconds so I sought even faster recycle time. I soon learned that flashes powered by lithium batteries recycled fastest. That reduced the number of options.
My first lithium-powered flash was a Godox 860 IIs. It offered a lot of performance for the money. But after only five months it began making a loud snapping sound each time it fired. I was advised to stop using it because that was the precursor to an exploding capacitor.
Godox had just brought out the V1s, which was about the same power. With a round head, it looks like a $1,100 Profoto. I bought it but sadly within a month the plastic foot broke. If you read user reviews on flashes, you see many complaints of broken plastic feet on many brands. Why manufacturers continue to use plastic feet is a mystery. For less than $1 they could cure the problem with a metal foot.
I ordered a warranty replacement for the V1s, and also ordered the only flash for Sony I could find with a metal foot, the $1,100 Profoto. It arrived and didn't work at all. I emailed Profoto but they were of no help so I returned it.
Meanwhile, the replacement Godox V1s arrived and worked well for about two months until its plastic foot also broke. Argh!
Further research led me to discover the Nissin MG80 Pro, with a metal foot - YAY! The Nissin distributor sent me one to review.
Here are some comparisons of the MG80 with the Godox flashes I've owned.
Foot. MG80 Pro has metal foot. Having lost two Godox flashes to broken feet, I like this a lot.
Guide number The MG80 and Godox 860 have equal guide numbers (max brightness). The Godox V1s is not rated with a guide number but is probably slightly lower. At my close range, the guide number is not very important, but a high guide number suggests that I'll be using it at a small fraction of its power and will enjoy a short recycle time.
Battery. The MG80 Pro battery capacity of 360 full power flashes is about half of the Godoxes. This is not an issue for me. My close-up flashes consume a fraction of full power. So I get over 1,000 closeup flashes on a charge. The MG80 can use four conventional AA batteries or four 14500 lithium cells. Users might appreciate this if they run out of juice while away from their home base. They could buy some AAs and keep going until they could charge their depleted lithium cells.
Flexibility. A unique feature of the MG80 is that the concentrating Fresnel lens head can be slid off, revealing the quartz flash tube. This looks like it would allow flash with extremely wide-angle lenses.
I'm buying the MG80. I want that metal foot and the price is less than half of the only other metal-footed Sony flash I know of, the Profoto.
Continuous Shooting With Flash
I thought this was impossible. But I've found that with flash-fill in daylight at close range, most flashes can repeat five or more frames for a medium rate burst.
About Flash Diffusers
Many skilled insect photographers construct their own diffusers that they carry out to the field. They primarily shoot at 2x to 3x magnification and are so close to the insect that their diffuser hangs over it, surrounding it with diffuse light and blocking the Sun. They achieve beautiful results under these close conditions.
A custom-made AK Diffuser
I've opted for a much greater distance because the bees are so fast. They stop off a few seconds, drink, and move on. There's rarely enough time to get close, so I shoot from several feet away at about 0.3x magnification. I've not found a diffuser that is beneficial at that distance. So I currently shoot with undiffused flash to minimize the size of the reflection on the bee's eyes. (Diffusers enlarge the diameter of the flash light source and thus the diameter of the reflection on the insect's eyes).
The bright spot on the eye is a reflection of my flash. If I shoot in sunlight there will be two spots, one from my flash and one from the Sun.
I'm also experimenting with a mask over the flash head to reduce the diameter of the reflection.
The masked flash head results in smaller spot on the eye. Mask on flash head
Good luck with using a flash with your own insect photos!
About the author : Alan Adler lives in Los Altos, California. The opinions expressed in this article are solely those of the author. He has been an avid photographer for 60 years. He is also a well-known inventor with about 40 patents. His best-known inventions are the Aerobie flying ring and the AeroPress coffee maker.
#educational #lighting #tips #alanadler #bees #flash #insects #macro


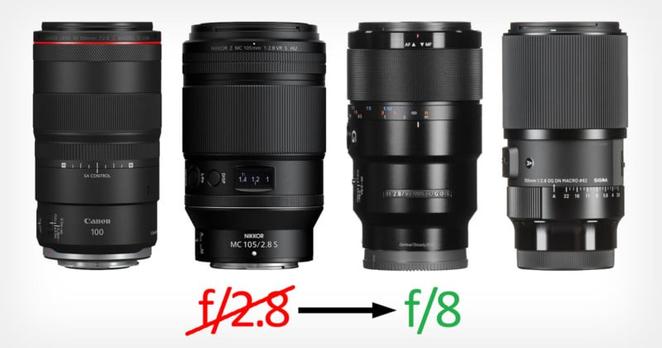
Dear Lens Makers: Please Make Slower, Longer, Lighter Macro Lenses
Dear lens manufacturers,
I'm writing this letter to remind you of something you well know. The age of mirrorless cameras is upon us. And with this comes the benefit that we can compose, focus, and shoot at f/8, f/11, and f/16.
In the prior age, that of the SLR, we needed fat lenses to gather light for our optical viewfinders. And that need was very well met. We have thousands of fat lenses.
Now, in this present age, many of us want thin, lightweight lenses. Our arms and our wallets are tired of the weight and cost of fat glass that we don't need.
Photo by Alan Adler.
With a max aperture of f/8, the lens becomes much lighter for two reasons. First of all, the weight of each glass element diminishes as the inverse of diameter cubed. Second, fewer elements are needed to achieve excellent correction at f/8. And with the reduction of the number of elements comes both the joys of light weight and the beauty of higher contrast.
Photo by Alan Adler.
A smaller maximum aperture will enable something we photographers have long yearned for. That is long macro lenses. And we macro photographers rarely use apertures wider than f/11 because we need depth of field. I have five macro lenses that open to f/2.8. It's a waste because we don't shoot at f/2.8, nor f/4, nor f/5.6. Reading the photography forums reveals a steady stream of searches for long, lightweight macro lenses. I can assure you, dear manufactures, that you'll sell a hundred 200mm f/8 macro lenses for every f/1.0 lens that you make.
Photo by Alan Adler.
So, manufacturers, please give this some thought. Thin lenses will fatten your bottom line and make a lot of photographers love you.
Sincerely yours,
Alan
About the author : Alan Adler lives in Los Altos, California. He has been an avid photographer for 60 years. He is also a well-known inventor with about 40 patents. His best-known inventions are the Aerobie flying ring and the AeroPress coffee maker.
#editorial #equipment #ideas #alanadler #idea #lenses #macro #macrolenses #openletter #suggestion


Photos of Bees, Our Helpful Insect
As you all know, bees help us put food on the table. Their pollination of California almonds alone has been valued at a billion dollars. They have also become my favorite photographic subject. I wrote about this last September.
In this article, I'd like to present a portfolio of some newer bee photos and comments about the bees and the process of photographing them.
In September I wrote about shooting with my Sony a6400 APS-C camera. I've gradually transitioned to my Sony a7R IV full frame. Both cameras have very similar pixel density and produce similar final results. I typically crop about 1500 pixel wide images from the center of any frame, so the final edits are about equal for both formats. But I've come to prefer the full frame camera because finding is easier with the greater field of view for any given lens.
The a7R IV is the only full frame camera that matches APS-C pixel density, so given a choice between APS-C and any other full frame camera, I'd choose APS-C.
My favorite lenses are a Tamron 28-200mm f/2.8-5.6 Di III RXD on a 10mm extension tube and a Sigma 105mm f/2.8 DG DN ART Macro.
In September I was shooting at f/16 to f/22. I've since discovered that my camera autofocus works in different ways:
1. For f/11 and larger apertures, the lens opens for focus, then stops down for the exposure.
2. For smaller apertures than f/11, it focuses and exposes at the set aperture.
Method 1 delivers more sharp keepers than method 2. So now I shoot at f/11.
Another improvement in my technique is shutter speed. Using my standard aperture- preferred "mode A", the fastest shutter speed with flash was 1/160 or 1/60. But I found that a simple way to speed the shutter is to set the camera mode to Manual and the shutter to 1/250. (I've tried faster than 1/250 with spotty results). I set the ISO to the lowest available (50), and the aperture, as mentioned above, is f11. This is about ten percent or less of the necessary exposure, so about 90% of the light is provided by the flash in TTL mode. The flash duration of 1/10,000s freezes most action except for the bee's very fast wings.
But enough of technique, on to the portfolio.
Honey Bees
Western Honey Bees (often called European Honey Bees) live in large hives of more than 10K individuals. This hive is wild, and in an old pepper tree near my home.
Hive – outside. Hive – inside. I illuminated the cavity with a powerful flashlight to focus. Then added flash for the exposure. A Western Honey Bee with his mandibles (jaws) open and tongue out. Some are gray colored. Note her white neck. I've seen this neck on all types of bees. Another view of a bee's neck. Open mandibles and extended tongue Western Honey Bees are cultivated for pollination. Professional bee keepers bring hives to orchards or fields and leave them while the bees work. A rare lucky shot, on-the-wing and in-focus.
Wild Bees
Wild bees are important pollinators. Many live alone or in small groups. The larger bees are called bumblebees.
Large, smooth black bumblebees are Carpenter Bees. They live alone or in small groups in cavities in wood. They can adopt existing holes, or chew their own. People put "Bee Blocks" in their yards. Any piece of wood with drilled holes. This variety of pollen is structured like tiny doughnuts. These beauties are named Wool Carders. They scrape fuzz from leaves, creating "wool" to line their nests.
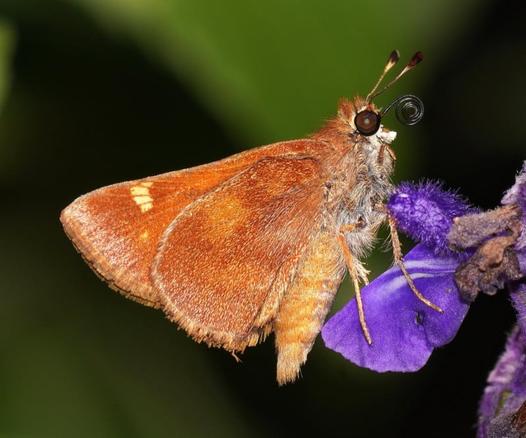
Wasps can be quite beautiful. I see them while photographing bees.
That's all for now. I hope you've enjoyed viewing our insect friends. Please treat them well. They help our food to grow.
About the author : Alan Adler lives in Los Altos, California. He has been an avid photographer for 60 years. He is also a well-known inventor with about 40 patents. His best-known inventions are the Aerobie flying ring and the AeroPress coffee maker.
#features #inspiration #tips #alanadler #bee #howto #insects #wildlife


Basic Advice About Photography for Beginning Photographers
This article is aimed at people who would like to advance their basic photography skills. I assume that you already make decent photos and are familiar with f-stops, ISO, shutter speeds, etc. But I'm hoping that this read will prove worth your time and lead to even greater photographic skills and enjoyment.
Suggested Basic Equipment
It's likely that you already have this basic equipment. It doesn't take much to make excellent photos and enjoy shooting them.
A camera with a zoom lens
This list is in of image quality:
- An APS-C mirrorless or SLR camera
- A Micro Four Thirds camera
- A compact "one-inch" camera
- A compact 1/2.3 camera or a super-zoom
You may notice that I've omitted the high-end full frame and medium format cameras. That's because you'll rarely (or perhaps never) encounter a situation where their greater image quality is perceivably better than APS-C. If you already use a more advanced camera, that's fine. But if not, one of the above will prove quite satisfactory.
Lenses
(This applies to interchangeable lens cameras. Your camera may have a fixed lens, preferably zoomable).
I've omitted prime lenses. Many photo gurus demean zoom lenses and insist that primes are necessary. But my tests have demonstrated that most zoom lenses today are so good that you're unlikely to perceive any difference in image quality between zooms and primes.
Prime lenses offer larger apertures. But large apertures often produce blurry photographs due to insufficient depth of field. I own quite a few prime lenses, but I've found that lenses 1. and 2. above meet my needs.
Yes, primes are usually sharper and faster than zooms, but my tests (described in this article) showed that it's unlikely that you'll perceive the difference in sharpness between an average lens and a great lens.
A computer or tablet with a photo editing program. I began editing with Photoshop. It's very capable but complex and difficult to learn. Currently, I use ACDSee which is easy, fast, and inexpensive.
A flash. If it's not already built into the camera.
Closeup aids. This can be a macro lens. But you can take great close-up photos with an inexpensive close-up diopter lens that attaches to your standard lens like a filter, or an extension tube that mounts between your lens and your camera body. I prefer the extension tube(s) which works with all of my lenses and is sharper with my longer lenses than the diopter lens.
A tripod. You can postpone this, perhaps forever depending on what you shoot.
(Probably) Not Needed
Very wide lenses (shorter than 28mm equivalent). It's difficult to shoot good photos with very wide-angle lenses. Some of the disappointments include:
- People, animals, and objects may look distorted.
- Mountains and other scenery in landscapes looks too distant.
I was recently amused to watch a video on how to improve landscapes shot with very wide lenses. The author said that distant mountains were so small that his photos were boring. His video showed how to cut the mountains out, enlarge them, and paste them back into the image. But that problem only exists with very wide lenses.
Very fast lenses , like f/1.4. They are heavy, expensive, and their depth of field is too shallow for most subjects. They often cost more and weigh more than the camera they are mounted on.
Lens hoods. These are only capable of keeping the Sun off your lens over a very narrow range of Sun angles. That range is so narrow that I don't bother with hoods. I have a box full that I never use.
Setting Up Your Camera and Shooting
Mode Dial
Most beginners set their camera mode to "auto". I began with that, but my images improved greatly when I set the camera on "A" (aperture) and the aperture to f/11. The apertures selected by your camera's "auto" mode tend to have too shallow a depth of field. f/11 is my "home aperture". I often change it to suit the needs of the photo. More on this later.
ISO
Today's digital cameras produce good image quality at higher ISO than film ever could. Your choice of ISO should consider the destination of your photos. If you only want to share them in small form, such as email or smaller, higher ISO may give you sharper results because it permits faster shutter speed. But if you make large prints or crop the photos when you edit them, then lower ISO will have less noise. Lower ISO may require a steadier camera which you can achieve with a tripod or just holding your camera on something like a fence.
Don't forget that if you shoot the same photo 5 or 10 times, trying to "freeze" your hold for each shot, your chances of getting one very sharp shot are excellent.
I usually let the aperture and ISO dictate shutter speed. But I do pay attention to shutter speed when shooting action or using a telephoto lens, which is more sensitive to shake. I increase ISO if I want a faster shutter speed. The camera's auto-exposure will automatically select a faster shutter.
You may already know the accepted rule that shutter speed should be at least 1 over focal length. For example, 1/100s is the minimum speed with a 100mm focal length. Many cameras have anti-shake which allows 2 to 4 stops slower speeds. Experiment to see what speeds you need with your longest zoom. But remember that your ability to hold your camera still for that instant will greatly vary from shot to shot.
Of course, shake isn't the only consideration. Your subject may be moving. If it is, do you want to freeze it? Or do you want to capture some blur to convey motion?
Light
The most common lighting errors are shooting people with the light behind them, or on their faces in harsh sunlight. It's best to avoid any sunlight on the face. If that's not an option, then use flash in the "fill" mode to fill in shadows. For outdoor portraits, shade or overcast light is best. For indoors portraits, seek indirect lighting which comes from windows or lamps in front of, or beside the subject.
Always focus on the eyes. Sharp eyes are a must for portraits of people and animals.
Backgrounds can enhance the portrait if they are attractive and not distracting. But they often are distracting so many pros use large apertures to blur the background. But that often blurs noses and ears. I prefer to pose my subjects with a distant background. The photo below was taken at f/11 and the background was 100 feet behind her. That achieved a blurred background without resorting to large apertures, which have shallow depth of field.
Note that her ears are in focus. The largest aperture that will achieve this is about f/11. Anything larger will begin to blur the ears. Larger than f/5.6 blurs the nose too.
Take lots of photos
In this digital age, "film" is free. More shots will let you select for less shake, better expression, open eyes, etc. Many cameras have a burst mode and can shoot ten pics in a second or two. I don't use that because I've found that the entire burst often has the same fault, such as closed eyes. So I manually separate my multiple shots by a few seconds or more.
Use flash
Flash can enhance many photos. Try closeups of flowers with and without flash. You'll often like the flash assist.
Flash illuminates the center of the flower and darkens the background.
Flash will also freeze action or your shake. Set your camera flash mode to "flash fill" in order to fill in shadows in sunlight.
The brightness of a flash diminishes with the distance squared. The maximum useful distance is about 5 feet with on-camera flash and about 15 feet with external flash. You can use this rapid fall-off of light with distance to create dramatic black backgrounds, such as this bee which was shot in daylight with flash.
Allow a few seconds between shots to give your flash time to re-charge.
A common difficulty when using flash is overexposure. Your camera's exposure compensation adjustment may have no effect to fix this. That's because when you activate flash, the camera sets a relatively slow shutter speed – such as 1/60s to ensure that the shutter will be open while the flash fires. So, you must reduce your aperture to f/16 or f/22 and/or set your ISO very low, like 100.
Another adjustment, usually buried in your camera's menus, is called "Flash Compensation". Setting that to negative can also mitigate overexposure. As a quick fix, I sometimes partially block the flash with my hand on the flash head.
More About Aperture
I set the aperture to suit the conditions and the subject. If the light is poor, I open the aperture to keep the shutter speed from going too low. Or even in good light, I may want to emphasize the subject with a shallower depth of field. But I rarely need to open my lens larger than f/4.
I also often choose very small apertures where depth of field is needed. This photo was shot at f/22 because of the subject's depth of field.
Gurus advise against small apertures like f/22 because the resulting diffraction reduces sharpness. But diffraction is a very small effect and the tiny reduction in sharpness is far preferable to the huge reduction in sharpness due to insufficient depth of field. The examples above and below are sharp, even at f/22. You can also restore diffraction effects with a bit of sharpening while editing. I sharpen all my photos, except for certain portraits.
f/5.6 yielded adequate depth of field for this photo because the subjects of interest are at constant depth.
Capturing Action with Preset Focus
You may be frustrated by your camera missing focus on moving subjects such as children, pets, sports, etc. The autofocus may focus correctly, but on the wrong thing in the scene. An alternative to autofocus is to preset your focus. It's instantaneous and foolproof.
Set your zoom lens at a wide-angle and f/16 aperture. Then set your camera to manual focus. In a confined area, where you don't need infinity, focus on something about one-third of the way from nearest to farthest in that area.
Or, you can focus on the hyperfocal distance, which is sharp from half of that distance to infinity.
Here are some lens focal lengths and the hyperfocal distance for each at f/16:
24mm : 6 feet (1.82m)
28mm : 8 feet (2.44m)
35mm : 12 feet (3.66m)
50mm : 25 feet (7.62m)
This list is for APS-C or Micro Four Thirds cameras. Smaller sensors like "one-inch" and 1/2.3 have closer hyperfocal distances.
Think
Shooting is so easy that we forget to think. We may just aim and shoot. But we can do much better.
Look at the entire image and think:
- Is this the best zoom?
- Is my camera level?
- What depth of field do I want?
- Is the Sun striking the lens? If so, can I shade it with my hand, or by shifting my position?
- Is the shutter fast enough to avoid shake or freeze a moving subject?
- Are shadows harsh? Should I add flash fill?
Remember to freeze when you press the shutter. If you felt yourself shake as you pressed the shutter, just shoot again. Or just shoot again anyway. It's free.
When you play back, examine the image with a critical eye. You'll often see opportunities for improvement. Adjust, and shoot again.
If you're concerned about shake or focus, magnify the playback and examine for sharpness. If you see blur due to shake, speed up the shutter if possible or use flash. If that's not possible, just shoot many frames. Hopefully, some will be steady enough.
In playback, evaluate the exposure. Is it right for your goals? Don't forget that your camera's automatic exposure adjusts for medium. But medium is all wrong when shooting snow, a white dog, or a white bird. Medium will turn white to gray. The fix is to increase the exposure by one or two stops. But if you overdo this the highlights will lose detail. So watch for detail in the white areas.
What about the shadows or dark areas? Can you see texture in the bark on that tree, or is it solid black? Perhaps you should increase the exposure.
There's a lot to watch for and your job is to be aware of these factors. Playback is the wonderful feature of digital photography. Use it often.
With static subjects, shoot a few extra exposures after you get the settings just right. Then select the sharpest one while editing.
Manual Focus
Your camera's autofocus will usually focus more precisely than you can manually. But things in the foreground, such as branches, will result in your camera focusing on the wrong thing. You repeat many shots and they are all wrong. It's time to switch your camera to manual focus, just for that shot.
Wildlife Photography
Many of us enjoy photographing birds and other wildlife. To emphasize the creature, a telephoto lens is best. You can begin with the maximum zoom that your camera offers, then achieve further emphasis by cropping in edit. Eventually you'll probably want a telephoto lens.
I've been shooting birds for decades and usually use an equivalent focal length of 500mm. Longer is sometimes nice. But the cost and weight rapidly escalate. A monopod or tripod is helpful to reduce shake and steady your view while composing although I also shoot hand-held. Wildlife photography is a pursuit where taking lots of exposures pays off.
Shooting Birds In Flight (BIF) is a challenge pursued by many bird photographers. I do this only occasionally because birds flying above are backlighted and it's difficult to capture detail. I prefer stationary birds and bird head portraits.
Because I mostly shoot at f11, I avoid the cost and weight of fast telephoto lenses. A Sony 400mm f2.8 lens costs $12,000 and weighs 6.4 pounds. My 70-350mm f6.3 Sony lens weighs 1.4 pounds and costs $900.
Egret – f/11, 1/500s, ISO 250
Digital Zoom
This is just cropping in the camera. The resolution of a 2x digital zoom is the same as if you cropped to half size then upsized 2x in edit. Digital zoom does this automatically. But I prefer to do this in editing.
Editing Your Photos
Editing is a lot of fun, and an opportunity to greatly improve your photos. Here is my typical edit:
This only takes a few minutes and really is fun.
More About Cropping
A 24-megapixel image is 6,000 pixels wide. For images shared online or via email, 1,200 or 1,500 pixels wide is sufficient to look great. But more pixels will produce a better large print. I often share my best pics down-sized to the above. However, I save the original for printing or future edits.
Cropping is a wonderful option in editing. Within that 6,000 pixel wide original frame are countless cropping opportunities.
Summary
Think , take lots of shots, play back, think some more, and repeat.
Have fun, don't fret about the bad shots. You'll learn more from them than from the good shots.
About the author : Alan Adler lives in Los Altos, California. He has been an avid photographer for 60 years. He is also a well-known inventor with about 40 patents. His best-known inventions are the Aerobie flying ring and the AeroPress coffee maker.
Image credits: Header stock photo licensed from Depositphotos
#educational #tips #tutorials #advice #alanadler #basics #intro #introduction #learn #primer #tutorial


Why Are So Many Cameras Limited by Design?
Expensive cameras often lack basic features. The most common limitations-by-design are fixed screens and no flash. I suspect that some camera designers aren't photographers and don't realize how much these two features will be missed.
Let's consider these two limitations. Other limitations will be discussed later in this article.
Cameras with Fixed Screens
A movable screen has many uses, yet is missing from many very expensive cameras. A movable screen saves wear and tear on your knees. Some of the ways I use a movable screen include:
- Achieving a low point of view for photographing pets and children.
- Using my tripod set low which is easier to set up and more stable.
- Table-top macro photography.
- Shooting selfies (still or video).
- Steadying my camera on low posts, fire hydrants, etc.
Cameras with No Flash
Unfortunately, all full frame cameras lack a flash. They may have once been classified as pro equipment. And perhaps it was thought that pros only use big, powerful flashes. But there are countless situations where a low power flash does the job perfectly. Also, of course, many amateurs use full frame cameras and photography forums ring with complaints about missing flashes.
And there are many closeup situations where it's best to have the flash close to the lens, such as shooting the anthers (pollen clusters), or insects, deep in a flower:
Flash freezes action and shake. It's often better and easier than using a tripod.
The easiest way I've found to photograph a watch is with a pop-up flash. I just shoot from slightly below center to avoid reflections. But a shoe-mounted flash is so high that I must shoot from well below center to avoid reflections – leading to an oblique view. (The crystal of this watch is flat. Domed crystals pose a greater lighting challenge).
The long exposure (with camera on tripod) alternative is far less desirable, resulting in blurred second hands or pulled-out crowns to hack the movement. And, of course, not all watches can hack (stop the movement).
Flash can dramatically isolate the subject because its brightness diminishes with the distance squared. So the background will appear dark if distant from the subject.
A touch of flash is great to fill harsh shadows with sunlit portraits.
Let's consider two other limitations by design. Fixed lenses and monochrome only.
Fixed Lens Cameras
These cameras have a short, non-changeable, prime lens. They are valued for instilling a discipline by confining the users to one, moderately wide, field of view. Henri Cartier Bresson and Fan Ho did their greatest work with this limitation.
I only recently discovered Fan Ho, who used a Rolleiflex with a 75mm lens. It has the field of view of a 35mm lens on a full frame camera when cropped to square format. I find Ho's work to be absolutely stunning. What an eye! Of course, Ho held his camera at belly level, which we can do with a movable screen.
The idea of walking around with a short, fixed lens has intrigued me. I recently wrote an article about it.
My favorite walk-around rig is my Sony a6400 ILC with a 24mm lens having the above field of view. I use either a manual focus lens or an autofocus lens in manual mode. I set it at f16 and focus at 6 feet, which is the hyperfocal distance. This is faster than autofocus and there is never the error of the autofocus focusing on the wrong thing in the picture. With this setting, everything from 3 feet to infinity is sharp. I think it's the perfect setup for street photography.
But the above is not the only type of photography I enjoy. I also shoot wildlife with a long telephoto, portraits with a slightly long-ish lens or zoom, and insects with a macro lens. My ILC does it all with the appropriate lens.
Many of us have asked, "Why buy a limited camera when you can make the equivalent by putting a short lens on your ILC, or not zooming your point and shoot?" But owners of fixed-lens cameras love them.
Let's and move on to the final limitation by design.
Monochrome Only
Currently, only Leica offers monochrome-only cameras. But when you shoot with a mono camera or a color camera in mono mode, you lose a wonderful advantage available in edit. That advantage is the freedom to control the brightness (in the mono image) of selected colors.
Consider this image:
Below are two mono treatments of the above image.
The left image is relatively straight mono, about what you would get from a mono camera or a color camera in mono mode. The right image was adjusted in edit to make red brighter.
This just one example of the flexibility of creating mono in edit. You can create any effect that you can imagine.
Filters in front of the lens can achieve these results with monochrome cameras. But I like to play with these effects in edit.
Leica states that their monochrome cameras have higher resolution than their color versions because the pixels are not screened by the Bayer filter. But this greater resolution is apparently difficult to perceive because color cameras have such superb resolution.
Fstoppers did a detailed comparison of the Leica Q2 in monochrome mode and the mono-only Leica Q2 Monochrom, which costs $700 more than its color cousin. The reviewer could not perceive the sharpness benefit of the mono-only version.
"One of the other things that Leica claims about the Monochrom is that the new camera will produce better, sharper, and crisper details," photographer Usman Dawood writes in the review. "The removal of certain filters means that details will be much clearer in the Monochrom.
"In our testing, we haven't found this to be the case. In almost every scenario, both in 'real-world' and controlled scenarios, the details and clarity between the two were pretty much identical. There is no noticeable change in how much detail the Monochrom captures when compared to the original."
Conclusion
Personally, I strongly prefer cameras that have movable screens, interchangeable lenses, and built-in flash, and I would love to see more cameras (especially high-end ones) offer all three features.
About the author : Alan Adler lives in Los Altos, California. The opinions expressed in this article are solely those of the author. He has been an avid photographer for 60 years. He is also a well-known inventor with about 40 patents. His best-known inventions are the Aerobie flying ring and the AeroPress coffee maker.
#editorial #equipment #alanadler #cameras #limitations #oped #opinion


How Much Does Lens Sharpness Matter?
Many of us enjoy quality. Be it a car or a lens, there's a pleasure in using quality things. And in the case of lenses, how perceivable is the quality of the images captured?
The research for this article was prompted by my "lust" for the Voigtlander 50mm f/2 Apo Lanthar. Phillip Reeve has written that it's one of the sharpest lenses we can buy. I wondered if I would perceive that sharpness compared to my inexpensive Sony 50mm f/1.8 OSS lens.
The Voigtlander 50mm f/2 Apo Lanthar (left) and the Sony 50mm f/1.8 OSS lens (right).
The mosaic below is comprised of six 745×620 pixel images cropped from the center of full frames shot with a Sony a7R IV producing 9504×6336 pixel full frame images. Each panel is only 7.8% of the full frame width (click to enlarge).
The panels were shot with a Sony 90mm f/2.8 Macro, which is one of the best available lenses for my camera. Each panel was shot at the aperture printed on the panel. The MTF resolution that opticallimits.com reported for each aperture is given below. As usual, diffraction degrades the image as the aperture size decreases.
If each panel is about six inches wide on your computer screen, that would correspond to pixel peeping a full frame print 76 inches wide. You would be peeping at that huge print from the same distance that you are now viewing your computer screen, perhaps about 18 inches.
The lowest resolution is the f/22 panel in the bottom right corner. Opticallimits.com reported a diffraction-limited MTF of only 2389 line pairs at this aperture. Up close, you can see that this panel is softer than the f/16 panel to its left, which has an MTF of 3423. Now move away to find the distance where you can't perceive a difference between the two lowest panels. For me, that distance is 24 inches.
Although lens reviews often report diffraction degrading resolution beginning at f/11, I don't perceive any difference in any of the panels from the best f/4 (top left) down through f/16 (bottom left). Perhaps you can see a difference, but I'll wager we agree that they are very close.
And, of course, when we view a photo, we aren't comparing two versions of the same image. We view the image alone. Below is the full frame shot at f/22, resized to 1500 pixels wide for the internet. Viewed in isolation, it looks sharp to me.
You can download the full 24mb image here.
What if we crop 1500 pixels out of this image?
In an article published a few months ago, I demonstrated zoom by cropping. This 9504-pixel-wide frame allows 6x zoom by cropping. Surely we want to start with a sharp image if we're cropping 6x. Yet it appears to me that even the worst f/22 image is sharp enough. The pic below is 1500 pixels cropped out of the f/22 image.
1500 pixels cropped from the center of the f/22 image
Viewed in isolation, it's pretty nice. Yet it was captured with a lens set at an MTF of only 2389.
Now view the 1500 pixel crop, taken from the center of the sharpest f/4 frame which was shot with an MTF of 5002, more than twice as high as the f/22 image.
1500 pixels cropped from the center of the f/4 image
When you view the images separately, are you aware of any difference in sharpness?
What about the edges?
The accepted definition of an excellent lens is one that's sharp at large apertures in the center and the edges. But, as I've mentioned in some of my recent articles, we usually want the edges as soft as possible when shooting at large apertures.
When we do want sharp edges, we also want depth of field. And even mediocre lenses have sharp edges at f/11 or f/16 which we choose for depth of field.
An exception, rare for most of us, is an architectural photo of a building façade, which doesn't need depth of field. But of course, we can shoot this at f/11 or f/16 to capture sharp edges. The building isn't moving, so we don't need to freeze it with f/2.
Summary
Like many of us, I've long lusted for sharp lenses. But this experiment is tempering my lust because it revealed that I'll rarely perceive the difference between an excellent lens and a mediocre one.
Read also : Perfect is Boring: Lens Makers Need to Loosen Up and Have Fun
This work also showed me not to worry too much about diffraction in non-macro photos. Sometimes the depth of field of small apertures is more important than slight softening due to diffraction. The photo below was shot at f/22.
But for macro photos, be warned that diffraction is much more serious.
About the author : Alan Adler lives in Los Altos, California. The opinions expressed in this article are solely those of the author. He has been an avid photographer for 60 years. He is also a well-known inventor with about 40 patents. His best-known inventions are the Aerobie flying ring and the AeroPress coffee maker.
Image credits: Header illustration eye stock photo licensed from Depositphotos
#educational #equipment #alanadler #analysis #commentary #lens #mtf #mtfcharts #perception #sharpness


