Needed some new ceiling vents for the basement to replace some old bulky and discoloured ones I installed years ago (after one fell out!). New store bought ones are $20+ a piece and still look bulky and ugly, so designed and printed some custom flush mount vents instead for <$1and they look awesome.

#3dprinting #functional3DPrint #functionalprint #homedecor #diy
#autodeskfusion #orcaslicer

Nine months later, I finally posted the knife block tilting base to Printables. The delay was because I didn't want to post photos of our messy kitchen. So I propped up a cutting board and used it as a backstop.

https://www.printables.com/model/1563887-tilt-up-base-for-wusthof-knife-block

🧵 15/N #FunctionalPrint #3DPrinted #KitchenGadgets

Tilt-up base for Wüsthof knife block by kbob | Download free STL model | Printables.com

Printables.com

@FreeCAD Is it FreeCAD Friday already? 👍

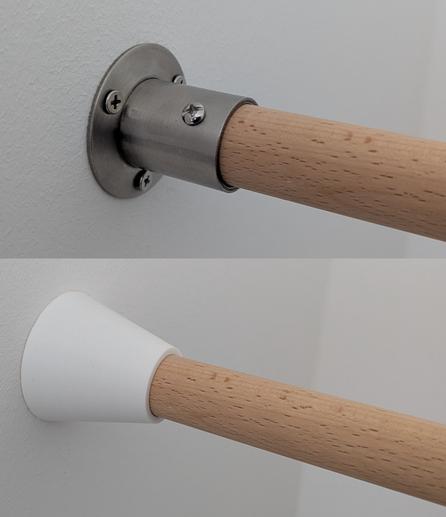
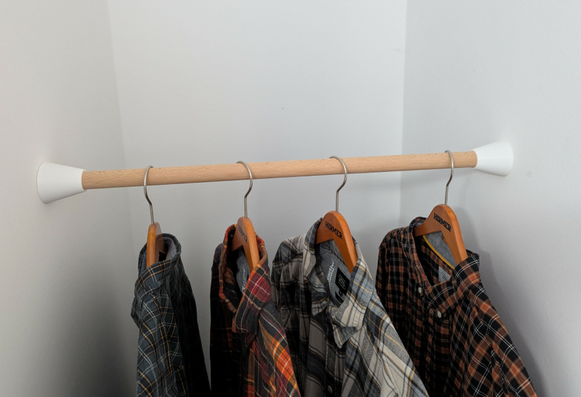
I have an unused corner I wanted to do something useful with, so I decided to install a clothes hanging rail. I had two wall mount flanges leftover from something else, so I just bought a wooden stick that fits. Because they’re ugly I decided to create a piece to cover them up.

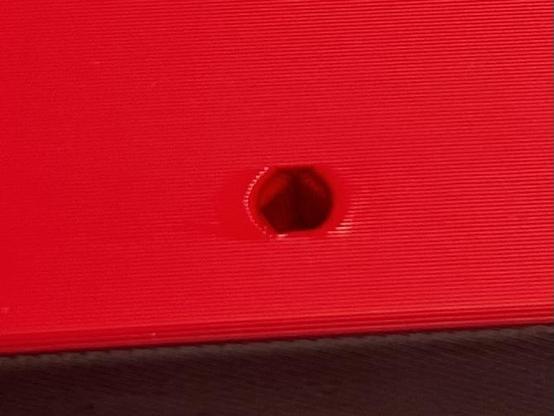
I had one test print that was too small and which I created completely different (solid shape and then hollowing it out). This one is the one I ended up using.

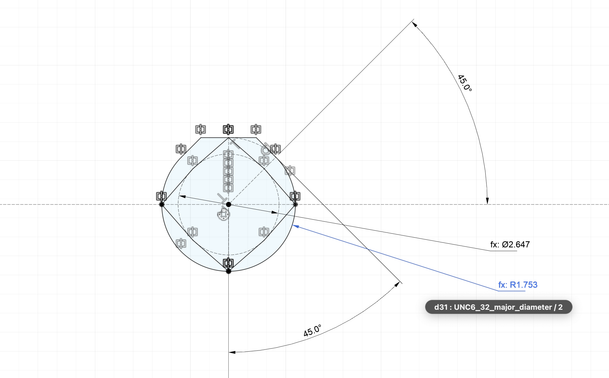
I first created a maximum outer dimensions part resembling the flanges, and then modeled the cover around it. I was going for a simple cone shape with a straight line from the wall to the wood.

Overall, it worked out exactly as I expected. Leaving out the print time (one hour and 25 minutes on my Ender-5 Pro for one cover) this project was done in 30 minutes, including me amateurish installing everything in that corner.

… now I just need more coat hangers 🙃

#CAD #fc3d #FreeCADFriday #functionalprint

This disk drive has horizontal screw holes. Here's how I modeled them. They have four crush ribs and a maximum overhang of just over 45°.

Tagging @rahix because he's The Man of functional prints.

EDIT: also tagging @amd because he's done some work on this.

🧵 3/N #3DPrinting #FunctionalPrint

@macberg a subcommunity you can definitely check out for this is #functionalprint - not explicitely shunning that other kind of printing, but it is about something else.

although the iterations you often go through to get something to work are also consuming quite a bit of filament.

I also used my 3d printer in this project to make some guides for drilling perfectly centered and straight holes for dowels. #3dprint #functionalprint #diy
🌳 Protect your table in style with this tree drink coaster 3D print! Perfect for nature lovers and a quick functional print for your desk or coffee table.
Free STL file: https://www.myminifactory.com/object/3d-print-tree-drinkcoaster-133110
#3DPrinting #FunctionalPrint #Coasters​​​​​​​​​​​​​​​​

i uploaded a new model for a little #3dprinted #rackmount adapter bracket. it’s purpose is to adapt between 2u on a rack to a ceiling junction box screw pattern so that I could mount one of my omada wireless access points to the bottom of a wall mounted network rack.
#functionalprint
#3dprinting

https://www.printables.com/model/1308697-omada-ceiling-box-2u-adapter-bracket

Omada Ceiling Box 2U Adapter Bracket by wookiearocket | Download free STL model | Printables.com

A bracket to adapt between an NA ceiling box fastener pattern and 2U rackmount | Download free 3D printable STL models

Printables.com

Just printed cushion extenders for my Audio-Technica headphones. The default cushions are too thin from my big ears and it was painful to use my headphones for longer periods of time.

Before the extenders I had to use different longer cushions that had worse sound quality, now I don't have that problem anymore.

https://www.thingiverse.com/thing:7031701

#3dprinting #functionalprint

Customizable cushion extenders for Audio-Technica ATH-M30X by tnoisu

The minimal height is 2mm which results in 6mm extension. To compute the total extension just add 4mm.All values are good for ATH-M30X and possibly for ATH-M40X and ATH-M50X, the only value you have to change is the height. The minimum height is 2mm which gives 6mm extension. To compute the total extension just add 4mm to the height value.

Thingiverse

@rahix Are you thinking about adding a section on alignment pegs in your functional printing guide?

This is the way I use them. The parts are held together by screws, and the pegs make it easy to get the screws aligned and started. I can also keep the parts from being assembled the wrong way around by using asymmetric pegs. These parts have significant taper because the screws create the final alignment.

@3dprinting #FunctionalPrint #3DPrinting