An eInk, Wrist-Mounted, TOTP Generator
https://shkspr.mobi/blog/2023/07/an-eink-wrist-mounted-totp-generator/
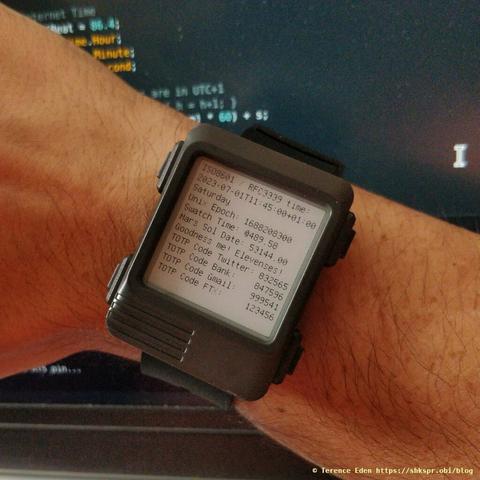
Behold! Thanks to the power of the Watchy development platform, I now have all my 2FA codes available at the flick of my wrist!
HOWTO
This uses Luca Dentella's TOTP-Arduino library.
You will need a pre-shared secret which is then converted into a Hex array. Use the OTP Tool for Arduino TOTP Library to get the Hex array, Base32 Encoded Key, and a QR Code to scan into your normal TOTP generator.
Add the Hex array into the code below.
To check that it is functioning correctly, either scan the QR code from the OTP Tool above, or use the Base32 Encoded Key with an online TOTP generator.
Here's how the code interfaces with the Watchy:
#include <Watchy.h> //include the Watchy library#include "settings.h"#include "sha1.h"#include "TOTP.h"class MyFirstWatchFace : public Watchy{ //inherit and extend Watchy class public: MyFirstWatchFace(const watchySettings& s) : Watchy(s) {} void drawWatchFace(){ ... RTC.read(currentTime); time_t epoch = makeTime(currentTime) - 3600; // BST offset // The shared secret - convert at https://www.lucadentella.it/OTP/ uint8_t hmacKey[] = {}; // e.g. {0x4d, 0x79, 0x4c, 0x65, 0x67, 0x6f, 0x44, 0x6f, 0x6f, 0x72}; int hmacKeyLength = sizeof(hmacKey) / sizeof(hmacKey[0]); TOTP totp = TOTP(hmacKey, hmacKeyLength); char* epochCode = totp.getCode( epoch ); display.print( "TOTP Code Twitter: "); display.println( epochCode ); ...You can grab the full code from GitLab.
I'm not very good at C++ - so please let me know what terrible mistakes I've made.
Is this a good idea?
Well... Yes and no.
TOTP is a strong-ish form of Multi-Factor Authentication. It helps prevent attacks where someone already knows your username and password. Having a convenient way to get your TOTP codes may make you more likely to use them. It also prevents you from getting locked out of your accounts if your phone dies or is stolen.
Convenient security is good security.
But... Having them on your wrist for everyone to see? I've deliberately made the font as small as I can so it is only readable up close. However, if someone is shoulder-surfing your details, they may well see your wrist. The watch isn't encrypted - so even if you hid the codes behind a button press, anyone who steals your watch will have your codes. If they steal your phone, they need to get through your PIN / biometrics.
Who are your adversaries? If you are trying to evade state-level actors, thieves specifically targeting you for your crypto-holdings, or an untrustworthy spouse - this probably isn't a great idea. If you don't use 2FA because you don't keep your phone with you - this will probably increase your security posture.
Ultimately, all security measures are a trade-off between convenience and control.
#2fa #arduino #eink #security #watchy