I found this article (https://www.instructables.com/Mini-CNC-Plotter-Arduino-Based/) on instructables on how to use cd/dvd drives to make a small CNC plotter and what immediately came to my mind is that i can use it to make PCBs. Just put a copper plate underneath, instead of paper and then off to the pickling solution. I feel like it could draw much smaller features then i can, if i provide it with fine enough pen. This feels like a genius idea and so naturally i put all my projects on hold to hyperfocus on this one ๐Ÿค™๐Ÿ—ฟ

#diy #arduino

Mini CNC Plotter - Arduino Based

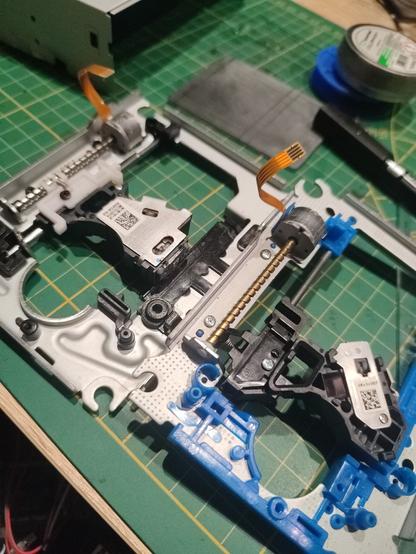
Mini CNC Plotter - Arduino Based: In this project I will show you how to easily build your own low-cost Arduino Mini CNC Plotter! For X and Y axis we will use stepper motors and rails from two dvd/cd roms! Printing area will be max 4x4cm. Because it works with serial communicationโ€ฆ

Instructables

Okay, i received two dvd drives from one of my friends who didn't need them anymore. I disassembled them and stripped of all unnecessary parts. Next up is assembling a chassis

(Part 1)

#diy #cnc #arduino #electronics

The scaffolding is ready, just like in the article, i found that the leftover metal chassis is perfect to be reused for this. I welded the vertical sheet using just a soldering tin with welding paste since i don't have a welding machine. It's a silly way to do it but it holds solid. Quick tip, use rubber bands to mark straight lines (see pic) when placing measurements.

(Part 2)

#diy #cnc #arduino #electronics

The axis are now mounted. This project just flooded me with dopamine initially, but with all the annoying problems i had, it got frustrating. I had trouble leveling and angling the axis correctly and the metal plates were a nightmare to drill holes for the screws. I had to obtain harder drills but this step was eventually a success. Next up is wiring the electronics

(Part 3)

#diy #cnc #arduino #electronics

I've got movement!  
I roughly connected one bridge to one axis to see if it would move at all and look at it! Look at it goooo  
I feel reinvigorated, I think i might actually be able to finish this project. Next up is putting all the wiring on a prototype board

(Part 4)

#diy #cnc #arduino #electronicsโ€‹

Wiring placed on a prototype board. Both axis move!  
I've run into problems initially, because the second chip wouldn't work no matter what I did but i finally found the issue. It was because arduino nano i'm using, specifically it's pins A6 and A7 ๐—ฎ๐—ฟ๐—ฒ ๐—ฎ๐—ป๐—ฎ๐—น๐—ผ๐—ด ๐—ผ๐—ป๐—น๐˜† and to drive those chips, you need a digital signal. It took me an embarrassing amount of time to figure out and an unnecessary disassembly and assembly of the board. Hopefully this post will save somebody some debugging

(Part 5)

#diy #cnc #arduino #electronicsโ€‹

Okay I'm so incredibly excited to show this  
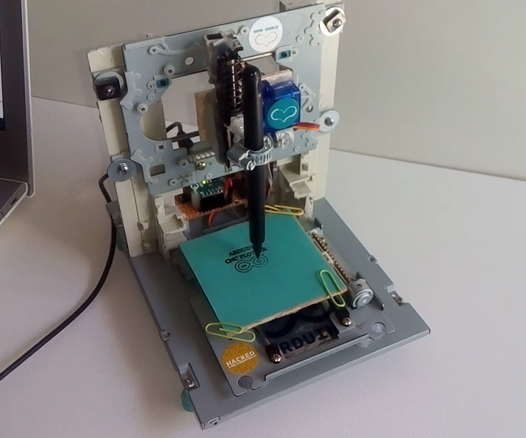
The CNC machine is almost ready and here is a short video of the z axis at work, together with a 3d printed pen holding contraption (courtesy of my friend who kindly printed it for me ๐Ÿฅฐ)
I can't believe it works. Now all that remains is the software part ๐Ÿ‘€

Credits:
The 3d model used is by tranluan19 and can be found here: https://www.thingiverse.com/thing:5505579

(Part 6)

#diy #cnc #arduino #electronicsโ€‹

โ€‹It is done. I finished making the CNC machine. It draws circuits on a copper plate, just how i wanted. It is rare for me to finish a project. I'm so incredibly happy about it  
The machine is still in kind of a rough shape. I will make proper power circuit and maybe a bluetooth for serial. Other then that, it is ready to be used  

(Part 7: Finished)

#diy #cnc #arduino #electronicsโ€‹

@adaofgreengables ooo neat! I see a warning sticker. Was this made using a dvd drive?