Looking Ahead: My Intentions For 2026

About this time last year, I jotted down some intentions for 2025, ‘a few ideas of the things that I really want to do over the coming twelve months’. I did quite well with these: I resurrected a few old cameras, like the Kodak 1A and 3A folding cameras, and the Vest Pocket Kodak; I finally got to use the medium format half-frame beastie that’s the Bencini Koroll 2; and I actually used my only 127 film in the Purma Special on a 127 Day this year. I also tumbled down the rabbit hole that was the Rapid film system, which led to some great fun with colour emulsions, redscaling, and even trying some EBS photography, or exposing both sides of the emulsion, and of course I added a load more weird and wonderful cameras to my collection. 

https://flic.kr/p/2rscu7a

The only part of my ‘intentions’ for 2025 that I didn’t really get anywhere with was glitching; taking a perfectly good photograph in digital format and altering the data contained in it to produce a corrupted image. As a reminder, images can be glitched in a number of ways: with a Hex Editor, to alter details of individual pixels in an image; processing a digital photograph in a program not intended for editing image files; or using a script in a programming language to corrupt the file. This is known as databending, but there is also circuit bending, which either takes an image and corrupts it using a specially made image processor, or using a camera where the hardware within the camera has been physically altered so that the image saved to the card is corrupted. 

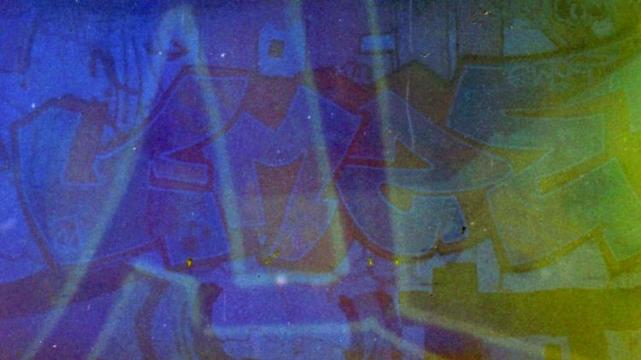
A corrupted 3D image, taken with the Fujifilm W3 Real 3d stereo digital camera. The file has been databent by processing the file in the audio editing program Audacity.

I already have one circuit bent camera, and also a couple of cameras with failing sensors that produce lovely glitchy images, but I’ve also recently obtained an old Digital8 video camera that I hope will allow me to use a circuit bent device called the Mismatcher Petite to corrupt digital images and videos. This year, I also picked up a scanner, the Epson Perfection v750 Pro flatbed scanner, and a little micro computer to use it with. Onto this computer I’ve loaded some of the programs and applications that I hope will aid me with databending and glitching.

The Mismatcher Petite, an image modification device the I’ll use in conjunction with the Sony Digital8 camera below.

I’ve not forgotten film, of course, and although I’m not really in a position to soup and develop my own films, perhaps I can ‘glitch’ some instant film, or deliberately introduce light leaks to exposed 35mm and medium format film, for instance. Of course,  there will always be new (to me) cameras to play with, and if last year is anything to go by, not all of these are light tight, and I have several rolls of expired film to use. With glitching, be it digital  or film, you never quite know what result you’ll get, and that for me is what will make the coming year so exciting. 

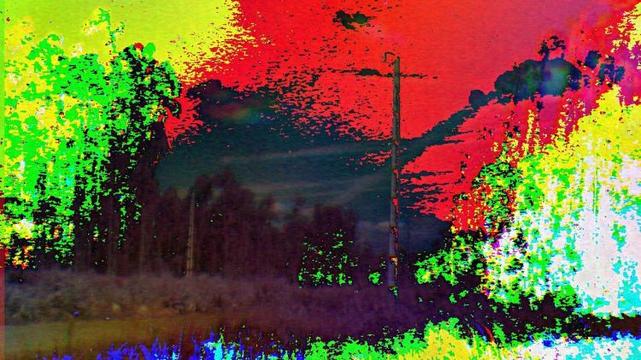
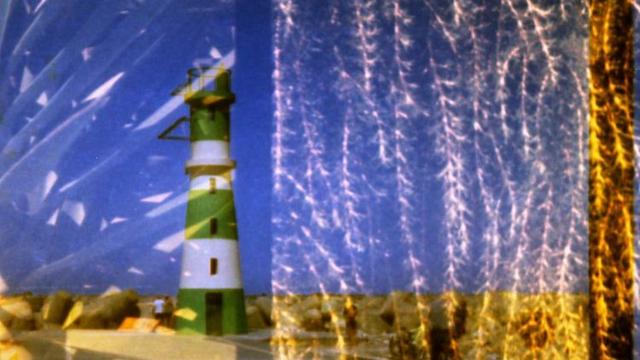
A digital image taken with an Olympus Pen E-PL1 and a homemade Deakinizer (a wide-angle effect lens held reversed over the lens). The image has been databent by processing the image in the audio editor, Audacity.

If you are on Mastodon, you can now follow this blog directly. Just go to Mastodon and follow the ‘Snapshot’ WordPress account at @keithdevereux.wordpress.com. All new posts will be automatically updated to your timeline.

#Adapters #AgfaRapid #Cassette #CircuitBending #Databending #Experimental #Expired #Glitch #Inspiration #Intentions #LoFi #Motivation #Rapid #VintageCamera

Filling The Gaps: The Bencini Comet Rapid Half-frame Camera

Back in the early 1960s, in response to Kodak’s introduction of its instamatic film system, the European film and camera company Agfa launched the Rapid system. Actually, it’s more accurate to say that they reintroduced their 1940s Karat film system under a new name. Instead of a sealed plastic cassette, the Agfa Rapid system used metal canisters, which contained a length of 35mm film. Inside the camera, the film would be fed from a full canister to an empty one. When exposed, the now filled canister was sent to the lab for development and the once full canister became the empty one for the next film.

When Agfa launched its Rapid film system, it produced dedicated cameras, but it also shared the Rapid format technology with other European and Japanese camera manufacturers as well. So, you can find Rapid cameras from Agfa, Canon, Ferrania, Hanimex, Mamiya, Minolta, Olympus, Ricoh, Voigtländer, and Yashica, among others. Bencini was an Italian manufacturer who produced cameras in various incarnations between the 1930s and the late 1980s. The Comet range, made from the 1940s until the 1970s, from what I gather, included 127, 120 and 35mm camera, so I guess that it was inevitable that one of these would include the Rapid format. 

The Bencini Comet Rapid was produced from about 1965 to the early 1970s. It’s a half-frame camera, with a frame size of 18x24mm, and it uses 35 mm film in Rapid canisters. Since the film is physically pushed from a full canister to an empty one, there is no rewind feature, just a thumbwheel on the back. The eyepiece took me a while to find, it’s just a tiny hole on the back of the camera. In contrast, the viewfinder on the front is a large gold tinted window very much like the viewfinder on my other Bencini half-frame camera, the Koroll 2.

I came across this model on that popular auction site during a random search for Rapid cameras. There were a few available in Europe, and prices were not that bad. I found one interesting item in Italy, so this is probably the furthest this Comet has travelled since its manufacture, and it was described as: ‘Vintage camera with case. Good condition, some signs of aging. Untested.’ I was a little put off by the ‘untested’ bit, but what really convinced me to go for it was a photograph of the open back of the camera; there was still a film in there. Perhaps it was because the camera had been stored loaded for a long time (I reckon decades) but the canisters were really hard to extract from the camera. I wasted one frame checking that the shutter was firing, but then prised the canisters out of the camera without moving the film too much.

I reloaded the canisters back into the Golden Wonder, the Welta Penti II half-frame Rapid camera, and exposed the rest of the frames at ISO 25. The counter on the top of the camera suggested that eight frames had been exposed, so I reckoned that there should be enough film for 10—15 half-frame images from this film, and I think I got eleven. Sadly, when I got to the end of the roll, it turned out it was Agfa CN S film. Made between 1965—72, Agfa CN S was a colour film that used the C22 process, and not C41. I can’t get it developed in C41 chemistry, because at 38°C the emulsion will fall off, so for the time being, the film is being stored in a 35mm cassette until I decide what to do with it.

https://flic.kr/p/2ry6BcH

The controls on the Bencini Comet Rapid are all on the front. On the top of the camera is a frame counter, and on the rear just the thumbwheel to wind on the film. To the right of the lens is the shutter speed dial. There are just two options: 1/30s for flash sync (with a little lightning symbol next to it), or 1/100s with a sun symbol. On the top of the lens housing is the aperture dial, between f8 and f22, which is changed by turning the lens housing. The Bencini Comet Rapid even has distance focusing, with a tiny ring on the front of the camera.

https://flic.kr/p/2rxZx15

The camera was pretty dirty, so I spent a good hour with the air blower, lens cleaner, and wipes cleaning it up. One thing I was delighted to achieve was removing a nasty brown crud from around the lens, so now the text, ‘Bencini Milano, Made In Italy’ stands out beautifully against a white background. To the naked eye, the lens looks clean now. I’m just hoping that there isn’t some fungus behind the front element. 

https://flic.kr/p/2rybF4p

I loaded the Comet with some Lomochrome Turquoise, which I had bought specifically to decant into Rapid canisters, and took it to Oliveira do Bairro. The Lomography Turquoise was rated at at ISO 100, and the shutter speed of the Comet set to 1/100s. To judge the correct exposure, I used the Camera Meter app. After a lovely morning around the town,I decanted the film into a recyclable 35mm cassette and dropped it off at Forever Blue in Aveiro. The negatives were scanned at home with an Epson Perfection v750 Pro flat bed scanner and Epson Scan software. I’ve posted the whole roll in an album on my Flickr, if you want to see the rest of the images. 

https://flic.kr/p/2ry6cRN

I was delighted with how the photographs came out, the Comet behaved admirably and I’m glad to have another Rapid half-frame camera to add to the collection. It seems to me that when it’s rated at lower ISOs the turquoise effect of the Lomochrome is not as pronounced as at higher ratings, but for this experiment, that was fine. The images were a little ‘soft’ when blown up, so there might be some haze under the lens still. I’m not sure how I might access that, and at this stage I really don’t want to. In conclusion, the Bencini Comet Rapid is a lovely little camera. One thing that did occur to me was that since the Agfa CN S film was only produced up to 1972, that might date the camera from the late 1960s to the early 1970s. That would be cool.

https://flic.kr/p/2ry4Wti

If you are on Mastodon, you can now follow this blog directly. Just go to Mastodon and follow the ‘Snapshot’ WordPress account at @keithdevereux.wordpress.com. All new posts will be automatically updated to your timeline.

#Agfa #AgfaRapid #Bencini #BenciniCometCanister #Experimental #Expired #Lomochrome #Rapid #RapidFilm #Turquoise #Vintage

The #FrugalFilmProject, September 2025: The One Where We Tried To Expose Both Sides (Again)

This post has been sitting in my draft folder since the middle of September,  and I’ve just realised that I haven’t posted it, and it’s now October. Oops! I had actually submitted  one of the images for the World Wide Half Frame Photography Day, and I guess that with all that was going on, this post just slipped through the cracks. A couple of months ago on the Frugal Film Project, I tried something different: EBS photography, or Expose Both Sides. This is exactly what it sounds like, first exposing a film normally in the camera — with the emulsion side facing the subject — and then reversing the film, reloading it back into the camera, and exposing the whole film again — this time with the emulsion side facing away from the subject.

https://flic.kr/p/2rhpwgd

It didn’t go well. Even though I marked the film carefully, somehow I managed to get the alignment completely wrong, so the frames on each side of the film were not lined up. In fact they were almost precisely 50% off, so there was a big band down the centre of the ‘normal’ exposure which was the ‘between frames’ unexposed part of the film of the redscaled exposure. However, this made me all the more determined, and I really wanted to try the technique again. I read somewhere that it’s better to expose the redscaled side first, and then to expose normally for the second exposure. So this time I decanted some Harman Red film into a Rapid canister and loaded this into the Golden Wonder. The pre-production Harman Red I have is actually Harman Phoenix spooled backwards. In fact, within the sprockets it even says Harman Phoenix, so I feel this certainly counts towards the Frugal Film Project.

https://flic.kr/p/2rsYQqN

As before, I marked the position of the film gate, and this time, since I reckon this was one of the reasons the film didn’t line up the first time, I also marked the position on the film of the little tabs that engage the sprockets and push the film into the empty canister. My subject was street art, so with the redscale side I took a close-up of a series of pieces of street art around Aveiro. Once the film was finished, I decanted this into another Rapid canister, with the emulsion side facing the subject, and lined up the film with the markings on the other side (remembering to make sure that the position of the little tabs matched, too). I then retraced my route, taking photographs of the same pieces of street art, but this time at a distance.

https://flic.kr/p/2rt5pYA

When taking the photos for the second series of exposures I held the camera upside down so that the orientation of the images on both sides would be in the same direction, although I did forget this a couple of times. On completion, the film was taken to Forever Blue in Aveiro and scanned at home with an Epson Perfection v750 Pro flat bed scanner and Epson Scan software. This time, the frames on both sides were almost perfectly lined up, which was excellent. Unfortunately, both the ‘redscaled’ exposure and regular exposures were well overexposed. I had tried to underexpose the exposures on each side by 1-stop, but clearly it didn’t work, and I’m thinking that Harman Phoenix, with a box speed of ISO 200, is just too fast for EBS with the Welta Penti II half-frame Rapid camera.

https://flic.kr/p/2rsYQqN

After my initial disappointment with the images, I wasn’t sure what I got, and I was confused and a little deflated with the results, on repeating viewings I became a little happier with what I had achieved.  The images took on a really ‘painterly’ effect, almost not a photograph at all, and I really liked that. The colours were all over the place, I wasn’t sure if that was because of the scanning or what, but the overall effect was pleasing. I’m going to try it again, but this time with a slower film, and perhaps not trying to overlap with the same pieces of street art each time.I’ve posted the whole roll in an album (https://www.flickr.com/gp/147583812@N06/QBYW5KMxg8) on my Flickr, light leaks and all, if you want to see the rest of the images.

https://flic.kr/p/2rsYQp5

If you are on Mastodon, you can now follow this blog directly. Just go to Mastodon and follow the ‘Snapshot’ WordPress account at @keithdevereux.wordpress.com. All new posts will be automatically updated to your timeline.

#AgfaRapid #Art #FrugalFilmProject #Graffiti #HalfFrame #HarmanPhoenix #Mural #Penti2 #Rapid #RapidFilm #Redscale #Streetart #Welta #EBS #ExposeBothSides #URBAN #WWHFPD25

The #FrugalFilmProject, August 2025: The One Where We Took The Golden Wonder On Holiday

We generally spend the month of August on holiday down in Meco, which means that most of the time I don’t have my Frugal Film camera with me. This usually meansI either I miss a month, or find myself rushing around to grab something in the last couple of days after we get back. This year, though, I have the Golden Wonder, and that little beastie is small enough to carry around in a pocket. So I decanted Harman Phoenix into a couple of Rapid canisters and took it with me.

https://flic.kr/p/2rs86bu

What I especially wanted to try this month was diptychs and triptychs, two or more half-frame images presented alongside each other. First of all, I took the Golden Wonder loaded with a canister of redscaled Harman Phoenix into the woods between the village of Meco and the Praia Ria da Prata. These are the pine woods that we have to walk through to get to the beach, and I’ve taken a lot of images of these trees over the years.

https://flic.kr/p/2rscu7a

The afternoon sun falls sideways on the trees, and it’s perfect for redscale. This time I was focusing on isolated trees, and I tried to fill each side of the diptych with one tree. I also found a few telegraph and electricity poles, so of course I had to get a few diptychs of these, too. On the whole,  it was a fun exercise, and it got me outside on a day that it was too windy to go on the beach.

https://flic.kr/p/2rscu5X

The second canister was filled with ‘normal’ Harman Phoenix (the roll was not reversed, as for redscale), but this time the results were less satisfactory. I still got some nice results, especially from the tripych and the sunsets, but some of the images were really disappointing. For some reason, with the Golden Wonder I always get better results with redscaled Phoenix. I’ve posted the both rolls in albums on my Flickr, light leaks and all, if you want to see the rest of the images. You can find the normally exposed Phoenix here, and the redscaled version, here.

https://flic.kr/p/2rscu3h

If you are on Mastodon, you can now follow this blog directly. Just go to Mastodon and follow the ‘Snapshot’ WordPress account at @keithdevereux.wordpress.com. All new posts will be automatically updated to your timeline.

#HarmanPhoenix #Agfa #AgfaRapid #Cassette #Diptych #FrugalFilmProject #HalfFrame #Penti2 #Rapid #RapidFilm #Redscale #Triptych #Welta

It’s Pink! Gearing Up For The Crappy Commie Camera Party (Part V): The Beirette SL 100N

The Beirette SL 100 was originally launched by the Karl Pouva KG company of Dresden in 1972 as the Pouva Start SL 100. When the company became the state-owned Kamerafabrik Freital, the name was changed to the Beirette SL 100. In 1987, the Beirette SL 100N was introduced in a range of different colours, and I was delighted to find this lovely version in pink for not very much money. 

The camera is made almost entirely of plastic, with a cup-like lens cap permanently attached to the camera with an plastic strip. It’s a simple camera, with a Chromar 50mm lens, and zone focusing of 1—3m, 3—8m, and 8m to infinity marked with little icons on the lens. The shutter has two speeds of 1/30s (flash) and 1/125s (for ‘sunny’  conditions), plus B, and a fixed aperture of f11.

The Beirette SL 100N has a countdown frame counter. After loading a film, the counter is set to 0 with the wheel on the rear of the camera. The film is advanced until ’12’ is visible and the camera is then ready to use. After taking the last frame (number 1), the film is advanced three more times before opening the camera and unloading the film.

Naturally, I was keen to see how the camera performed, so I loaded the SL100N with an SL canister of probably slightly expired Lomography 100 film. I say ‘slightly expired’ because the film was supplied loose so there was no packaging with any film stock details on it. In the event, the exposure was … reasonable. Some of the images came out really well, though I felt that the negatives were quite ‘thin’, but the wind-on mechanism was rubbish with poor frame-spacing and far too many overlapping images. 

https://flic.kr/p/2rhpyEB

https://flic.kr/p/2rhopVY

There were also a lot of light leaks, though this was intermittent, and I reckon that this because of the poor quality of the recyclable 35mm cassette that I used to transfer the film from the Rapid canister rather than the camera. The Beirette is really light hungry, and will benefit from using a much faster film, even on sunny days. Despite these faults, I really like the Beirette and will certainly try it out again, though probably not before the end of the Crappy Commie Camera Party. I’ve posted the whole roll in an album on my Flickr, light leaks and all, if you want to see the rest of the images.

https://flic.kr/p/2rhopR9

https://flic.kr/p/2rhq6wD

If you are on Mastodon, you can now follow this blog directly. Just go to Mastodon and follow my WordPress account at @keithdevereux.wordpress.com. All new posts will be automatically updated to your timeline on Mastodon.

#AgfaRapid #Beirette #Canister #CrappyCommieCameraParty #Experimental #HarmanPhoenix #HarmanRed #Pouva #Rapid #Redscale #Shittycamerachallenge #SLFilm #Vintage

The #FrugalFilmProject, July 2025: The One Where We Tried To Expose Both Sides

This month I thought it would be fun to try something different with the Golden Wonder (a.k.a the Welta Penti II, half-frame Rapid camera). EBS photography, or Expose Both Sides, is exactly what it sounds like. First exposing a film normally in the camera — with the emulsion side facing the subject — but then reversing the film, reloading that into the camera, and exposing the whole film again — this time with the emulsion side facing away from the subject.

There are a few factors that need to be borne in mind when conducting EBS photography, like slightly underexposing each side so that the multiple exposures balance out to give a ‘properly exposed’ film, and deciding whether its important to you if the frames on each side are lined up or not. I loaded the Golden Wonder with a canister of Harman Phoenix, but this time I inserted a little bit of film into the take-up canister and marked the position of the film gate on the film. By doing this I hoped that I could line up the frames when I exposed the other side of the film. I reset the frame counter to zero, closed the camera, and fired off two shots to take the counter to ‘1’.

We took the camera to Barra, where I took photographs around the beach, and later finished the roll in Oliveira do Bairro. When metering the exposures I tried to underexpose the film slightly by taking each image 1-stop under the suggested reading from the Camera Meter app. Once the film was exposed, it was time to turn it over and reload it back into the Golden Wonder. Inside the dark bag I fed the previously exposed film into another Rapid canister, but this time I fed it backwards, as if for redscaling, with the emulsion side facing outwards. 

Once loaded into the canister, I pulled a bit of film out of the canister until I could see the gate markings that I made for the first exposure. I marked the emulsion side of the film with the markings in the same position and loaded the canisters into the camera so the film was in the same position. I then reset the frame counter to zero, closed the camera, and fired off two shots to take the counter to number ‘1’. By doing this, I hoped that the frames on each side were lined up.

I took the Golden Wonder on a walk around Águas Boas, a nearby village, and photographed walls, trees and various textures. When taking the photos I held the camera upside down so that the orientation of the images on the both sides would be in the same direction. On completion, the film was taken to Forever Blue in Aveiro and scanned at home with an Epson Perfection v750 Pro flat bed scanner and Epson Scan software. I’ve posted the whole roll in an album on my Flickr, light leaks and all, if you want to see the rest of the images. 

On return from the lab, looking at the negatives one thing was immediately apparent: the frames weren’t lined up. In fact they were almost precisely 50% off, so there was a big band down the centre of the first exposure which was the ‘between frames’ unexposed part of the film of the second exposure. Also, the ‘redscaled’ second exposure was well overexposed compared to the first exposure, so most of the details of the first exposure were completely lost. I had tried to underexpose the second exposure by going 1-stop unter the exposure, but clearly it didn’t work.

https://flic.kr/p/2rhpwgd

https://flic.kr/p/2rhonBE

A couple of the images came out really well, and I was pleased there was some success, but most of them were an unintelligible mess. At the end of the roll, there were a few more redscale images, and these came out really well. I’m definitely going to try some EBS with Rapid films again, though, but next time I might use a different camera to the Golden Wonder. Still, it’s now challenging me to get the frames lined up.

https://flic.kr/p/2rhpwk1

https://flic.kr/p/2rhj79p

If you are on Mastodon, you can now follow this blog directly. Just go to Mastodon and follow the ‘Snapshot’ WordPress account at @keithdevereux.wordpress.com. All new posts will be automatically updated to your timeline.

#HarmanPhoenix #Agfa #AgfaRapid #Cassette #EBS #ExposeBothSides #FrugalFilmProject #HalfFrame #Penti2 #Rapid #RapidFilm #Redscale #Welta

The #FrugalFilmProject, June 2025: Oh, I Do Like To Be Beside The Seaside (Part II)

After last month’s mixed results from the Golden Wonder (a.k.a the Welta Penti II, half-frame Rapid camera), I loaded the it with a canister of Harman Phoenix and we went to Costa Nova. It was the perfect opportunity to have a fabulous lunch at the Marisqueira Costa Nove, and to play tourist with the unique buildings that form the ‘seafront’ along the estuary of the river in Costa Nova. 

https://flic.kr/p/2rbGjXX

The typical buildings here, some over 100 years old, are painted with different coloured stripes on a white background. But there are plenty of other styles of building in the ‘terrace’ that forms the row of houses. Some typically art deco, some which look like from the 1950s, and some of quite indeterminate ages 

https://flic.kr/p/2rbHW7g

Nowadays,  the modern buildings in Costa Nova are covered in tiles marking the stripes, but these are kept away from the original row of houses and I believe planning permission or renovation needs to follow strict rules. This makes the houses quite expensive, and if you’re looking for one of these houses you need deep pockets.

https://flic.kr/p/2rbHWcr

As I had not completed the film, I used the rest of the frames on a trip to Barra. I’ve posted the whole roll in an album on my Flickr, light leaks and all, if you want to see the rest of the images. For exposure metering I used the Camera Meter app and rated the film at ISO 100, because on a test with the Pentacon Electra 2 I got some really nice results with Harman Phoenix at ISO 100. This wasn’t too successful, though, the images were still a dullish brown and with quite high contrast.

https://flic.kr/p/2rbHmxb

If you are on Mastodon, you can now follow this blog directly. Just go to Mastodon and follow the ‘Snapshot’ WordPress account at @keithdevereux.wordpress.com. All new posts will be automatically updated to your timeline.

#HarmanPhoenix #Agfa #AgfaRapid #Cassette #FrugalFilmProject #HalfFrame #Penti2 #Rapid #RapidFilm #Welta

Gearing up for the Crappy Commie Camera Party (Part IV): The Pentacon Electra 2, An Automatic Camera For SL Film

Anyone who has read this blog will know that I’ve really tumbled down the Rapid film system rabbit hole. It all started late in 2024, when I picked up a couple of Agfa’s Iso-Rapid IF cameras and the Welta Penti II (the ‘Golden Wonder’) for the Frugal Film Project. Since then, I’ve added several more Rapid film cameras to my collection, from a 1940s Agfa Karat — the original version of Agfa’s Rapid system — to 1960s Rapid cameras like the Voigtländer Vitoret Rapid D.

The 1940s Agfa Karat, the original Rapid film system.

Although the Rapid film system was developed by the West German film company Agfa, in response to the launch of Kodak’s instamatic film system, East German camera companies soon developed their own version of Rapid film, known as the SL, or Schnell Lade (‘Speed Loading’) system. Eastern Bloc SL cameras used exactly the same format canisters as the Agfa Rapid system, the films are interchangeable, except that the SL canisters were made of plastic, not metal, like in the West.

The 1960s Smena SL. The Eastern Bloc copy of Agfa’s Rapid film cameras.

I already have two SL format cameras, my beloved Smena SL, with its classic Triplet T-43 4/40 lens, and the ‘Golden Wonder’, which I think of as a Rapid camera but it was actually made in East Germany, and I had this ‘need’ for a couple more. I started my search with the SL System page on Wikipedia, which quite handily gives a list of SL format cameras at the bottom. I mentally crossed off the Smena SL and the Penti II, and started searching down the list on eBay. 

In the end, I settled on a Pentacon Electra 2, an aperture priority automatic camera from the late 1960s, from a German seller. In the eBay post it was described as, ‘fully functional condition with age-appropriate signs of wear’, but what really convinced me to go with this model was a YouTube video about the camera which featured a close-up of the lens and its wonderful 60s style pictograms for the focusing distance markers.

The Pentacon Electra 2 is a camera that screams the 60s, from the amazing pictograms mentioned above to its Eastern Bloc brick-like shape — almost utilitarian. What is unusual about this camera is that it’s an automatic camera. Well, aperture priority — you set the exposure, sunny, hazy, or cloudy — and the camera sets the shutter speed. It’s powered by two AA batteries, and the CdS sensor is situated behind a little round window above the lens.

Being an SL format camera, there’s no rewind knob, and the top of the camera is plain apart from a hot shoe and a little window for the film counter. The camera actually came with a flash, but that flash is anything but portable. It’s huge, for one thing, and instead of taking batteries the flash is powered by a mains lead! On the bottom of the camera is a thread for a tripod and a cover for the battery compartment. Handily, the cover has a guide to the aperture settings and conditions. 

On the front, to the right of the lens, is a little toggle switch that you can set the ISO of the film. There are two options, ISO 50 or 100. To the left of the lens is another toggle switch to set how the camera functions. This can be set to three options: Automatic (actually aperture priority), flash sync (1/125s), or flash sync for bulbs (1/30s). Below this toggle switch is the shutter lever. 

Focus distance is presented in metres and feet around the lens. There are also those wonderful pictograms for distances for portraits, groups and landscapes. The aperture can be set to f2.8, f4.8, f8, and f13.5 with a lever on the bottom of the lens. You can see these as little icons through a window on the top of the lens for ‘tripod’ (fully open), cloudy, hazy and sunny conditions. If you turn the lens upside-down the lens has the f-numbers printed out. They are also on the battery cover.

On the back of the Electra is a wind-on knob with a large arrow showing the direction of travel of the film. This is important since the direction is right to left, instead of the customary left to right. When the film is wound on, the shutter is cocked with a satisfying ‘click’ 

https://flic.kr/p/2raDP66

I was keen to try out the Pentacon Electra 2, and loaded it with a roll of Harman Phoenix film that I have laying around (nowadays I always have some Phoenix, or Harman Red, decanted into Rapid canisters for the Frugal Film Project). Besides, it’s the Crappy Commie Camera Party, and I want to use the Pentacon for this, too. In my rush to get out, I was half way through the roll before I remembered that the box speed of Phoenix is actually ISO 100, so the film was underexposed by 1 stop. However, I came across a YouTube video where someone exposed Phoenix at ISO 100, so I’m hoping that I might have got away with it.

https://flic.kr/p/2raDP7D

The results came out great! I needn’t have worried about rating the film at ISO 100 instead of the box speed of ISO 200. There were some light leaks, but I’m increasingly convinced that these are because of the lab loading these into the developing machine rather than leaks within the camera or SL canister. Instead of transferring the film to a 35mm cassette, this film was loaded straight from the SL canister, and there were still light leaks. On the frames thatdid not show light leaks, the exposure was spot on, and I reckon these are the best results I have had from Harman Phoenix. 

https://flic.kr/p/2raDP97

I’ve posted the whole roll in an album on my Flickr, light leaks and all, if you want to see the rest of the images.

If you are on Mastodon, you can now follow this blog directly. Just go to Mastodon and follow the ‘Snapshot’ WordPress account at @keithdevereux.wordpress.com. All new posts will be automatically updated to your timeline.

#Agfa #AgfaRapid #CrappyCommieCameraParty #Experimental #Lomo #Pentacon #Rapid #RapidFilm #Retro #Shittycamerachallenge #SL #Soviet #SovietCamera #Vintage

The #FrugalFilmProject, May 2025: WTF?

I’ve been a bit tardy with posting my May entry for the Frugal Film Project. The weather in our region was unpredictable for the best part of the month, and the forecast was unsettled. But the last week of May the rain stopped, the skies cleared, and we had a few days of really nice weather.

https://flic.kr/p/2r93rbo

This also coincided with a need for a trip to Coimbra, so I thought it was the perfect opportunity to take the Golden Wonder (a.k.a the Welta Penti II, half-frame camera) along with me. I loaded the Penti II with a fresh canister of Harman Phoenix, and we took it through the back streets of the old town of Coimbra, and also down the main street. At the end of the trip I still had a few frames left, so a few days later I took the Golden Wonder on a trip around Costa Nova and Vagueira. 

https://flic.kr/p/2r8WPbb

As usual, to measure the exposure I used the Camera Meter app and rated the film at ISO 160. I dropped the film off at the lab a few days later, and within a couple of hours the images dropped into my inbox. I opened them for a first look. WTF? What. The. Actual. F? The subjects came out great, I’ll say that for the Golden Wonder, what you point it at, the cameras sees perfectly, but the light leaks? I do love my light leaks, I always think that they give character to the images, but in this case it was a bit much.

https://flic.kr/p/2r8WPae

I originally thought that the lab might have scanned the roll with the wrong colour profile, and asked them about it. In reply the lab sent a snap of the film with the comment that it was ‘burned’, and looking at the film I was amazed that they got anything from it at all! Further along the roll the images looked like the film had light leaks, but the first few frames were almost solarised. 

https://flic.kr/p/2r92hYB

For those not aware, solarisation is where the exposed film is exposed to light so that certain tones are reversed. It is also referred to as the Sabbatier Effect (although this is a slightly different phenomenon). Often the edges of objects on film show the most pronounced effect, and this can clearly be seen on some of the early images from Coimbra. The later images, near the tail end of the film, show more normal looking light leaks. 

https://flic.kr/p/2r93YGb

I was a little frustrated with the results, it’s not often that we go to Coimbra, but on reflection I really like how some of these came out. I’m sure I’ll never be able to produce this effect again, of course. I’ve posted the whole roll in an album on my Flickr, light leaks and all, if you want to see the rest of the images.

https://flic.kr/p/2r93YF9

If you are on Mastodon, you can now follow this blog directly. Just go to Mastodon and follow the ‘Snapshot’ WordPress account at @keithdevereux.wordpress.com. All new posts will be automatically updated to your timeline.

#Agfa #AgfaRapid #FrugalFilmProject #HalfFrame #HarmanPhoenix #Penti2 #Rapid #RapidFilm #Welta

Further and Further Down the Rabbit Hole: The Voigtländer Vitoret D Rapid

Every time I say to myself, ‘I have enough cameras now,’ somehow another one always seems to grab my attention. I wasn’t looking for another Rapid camera, but then a Voigtländer Vitoret D popped up during a random browse on eBay, something, ‘Inspired by your recent search ‘. It was reasonably priced, and with several days to go before the auction came to an end no-one had made any bids. I added it to my watchlist and left it alone, popping in to see what was happening from time to time.

With a few hours to go before the end of the auction there were still no bids for this Rapid camera. I had checked the reviews of the seller already, which were positive, and the condition of the camera was described as, ‘beautiful, fully functional condition (tested) with only minor signs of wear’. With this in mind, I put in a minimum bid, and waited until the auction was closed. There were no further bids, and the Voigtländer Vitoret D Rapid was mine.

The Vitoret D is a manual focus camera made by Voigtländer and introduced c.1962. There is a ‘normal’ 35mm version, but my model is the Rapid version that uses Agfa Rapid film canisters. It has a rounded body, which dates it to before 1966, when a modified model was released with squarer body corners. It comes with a 40mm f2.8 Color-Lanthar lens,  with apertures between f2.8 and f22, and a Prontor 300 leaf shutter, with speeds of 1/30s, 1/60s, 1/125s and 1/300s (+ B).

According to the description, the ‘optics are clean, with no dust, fungus, or fungus residue. The shutter speeds run smoothly and even at long exposures. The leather trim is not worn.’ So it should be in good condition. The Vitoret D Rapid has an uncoupled selenium cell in a window to the right of the lens, and you can see the suggested exposure reading on a little window on the top of the camera, where in a normal camera the rewind knob might be. I’m not sure if this works properly but I can use the camera meter app and set the camera manually.

On its arrival, I could see that the Vitoret D was in lovely cosmetic condition, with few signs of use and a lovely clear lens. However, on checking the shutter speeds and apertures, although the faster speeds of 1/125s and 1/300s sounded fine, the slower speeds of 1/60s, 1/30s, and B, lagged terribly. This is something I will raise with the seller. The apertures were fine, though. 

https://flic.kr/p/2r6bVLW

https://flic.kr/p/2r6icmK

https://flic.kr/p/2r6hDvd

Naturally, I was keen to see how the camera performed, so I loaded the Vitoret D with a canister of Harman Phoenix and set off for a walk ‘around the block’. For exposure I used the Camera Meter app and rated the film at ISO 160, which is the speed I normally use with Harman Phoenix. In the event, the exposure was fine. Harman Phoenix kept its high contrast tonality, and some of the images came out really well. However,  there were also a lot of light leaks, and in some instances the image was more light leak than subject. Despite these faults, I really like the camera, and will certainly try it out again. I’ve posted the whole roll in an album on my Flickr, light leaks and all, if you want to see the rest of the images.

https://flic.kr/p/2r6grHv

https://flic.kr/p/2r6bVNe

If you are on Mastodon, you can now follow this blog directly. Just go to Mastodon and follow my WordPress account at @keithdevereux.wordpress.com. All new posts will be automatically updated to your timeline on Mastodon.

#AgfaRapid #Canister #Experimental #HarmanPhoenix #Rapid #RapidFilm #VitoretRapidD #Voigtländer