AY-3-8912/8910 Hardware Emulation – Part 2

Having explored how an AVR can be used to emulate the AY-3-8912/8910 in AY-3-8912/8910 Hardware Emulation I wanted to have a go at using the very common ATMega328P to do the same. But rather than wire things up on breadboard, I put together a quick PCB to allow me to do some experiments.

Spoilers: This isn’t working yet!! Read on for where I’ve got to, but I’ll need to come back to this at some point.

Warning! I strongly recommend using old or second hand equipment for your experiments.  I am not responsible for any damage to expensive instruments!

If you are new to electronics and microcontrollers, see the Getting Started pages.
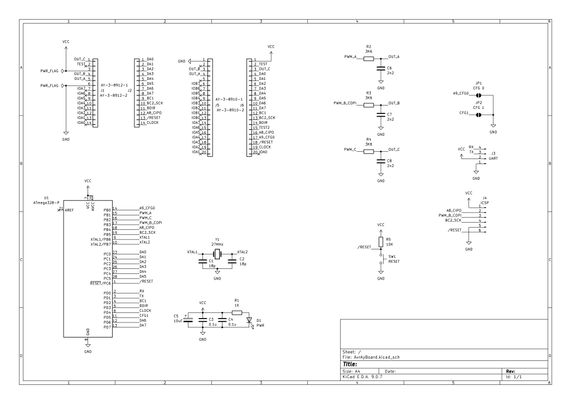
The Circuit

This is essentially the circuit from here: https://github.com/Yevgeniy-Olexandrenko/avr-ay-board

But with an ATMega328P rather than the suggested ATMega48PA (more about that in part one here: AY-3-8912/8910 Hardware Emulation). I’ve included headers for both the AY-3-8910 and AY-3-8912.

I’ve kept the same usage of ATMega ports, which map onto IO for the ATMega328P as follows:

AY-3-8912SchematicATMega328P PORTATMega328P PinArduino EquivalentD0-D5DA0-DA5PC0-PC523-28A0-A5D6-D7DA6-DA7PD6-PD712-13D6-D7A8A8_CIPOPB418D12BC1BC1PD24D2BC2BC2_SCKPB519D13BDIRBDIRPD35D3CLOCKCLOCKPD46D4RESETRESETPC61RESETTESTN/CIOA7-IOA0N/CCPWM_CPB216D10BPWM_B_COPIPB317D11APWM_APB115D9A9_CFG0PB014D8CFG1PD56D5RXPD02D0TXPD13D1VCCVCCVCC7, 20VCCGNDGNDGND8GND

The only change is I’m not connecting TEST to anything. I’ll have to see if this becomes an issue later…

The circuit calls for overclocking the ATMega328P to 27MHz (again more discussion on this in the first part).

I’ve included breakout headers for ICSP and a serial header.

  • Update: Turns out the header is back to front! See later…

I have also swapped the oscillator to a crystal using a common configuration I’ve seen on many DIY Arduino-style boards using an ATMega328P.

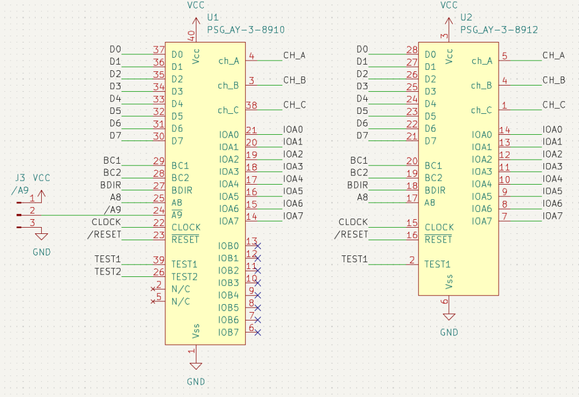
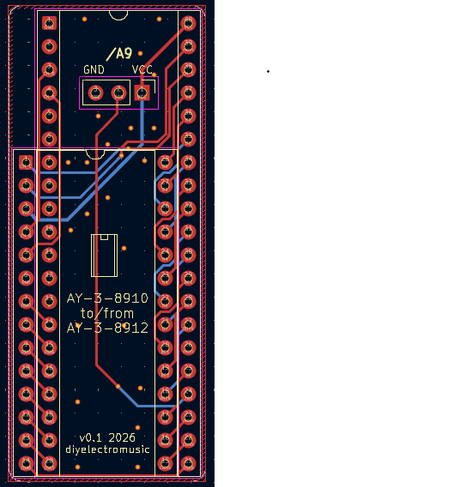
Rather than put together two boards, one for the 8912 and one for the 8910, I’ve also put together a simple adaptor circuit to allow one to plug into the socket for the other.

The schematic essentially just maps the signals from one footprint onto the other.

The only slight complication is that /A9 for the 8910 doesn’t exist on the 8912, so I’ve left in a jumper to provide the option of tying this to GND or VCC should the need arise. This should allow the larger 8910 to be used in the place where a 8912 is required whilst still enabling the 8910.
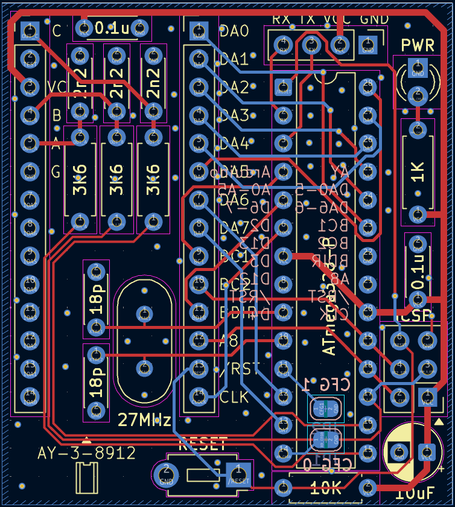
PCB Design

I did wonder quite how much of a 28 pin DIP could fit inside the footprint of a 28 pin WDIP and still keep through hole components, but I didn’t have to wonder for long to see it wasn’t really going to work.

So as this is basically just for messing around I went with the format as shown. This way, round-profile pin headers can be used on the underside for the AY footprint if the board is to replace a genuine device. Alternatively normal pin headers or sockets can be used on the topside if jumper wires are going to be used to hook this board into another PCB.

The two CFG jumpers are solder bridges (default not connected) on the underside of the board. I’ve also listed the Arduino versions of the AVR pins used on the underside too.

For the converter board, I’ve left the /A9 jumper as standard pin headers. With hindsight I’m not sure when this would be wanted to be tied high, as presumably that would disable the chip. When plugging a 8912 into a 8910 socket, anything expecting an 8910 and using /A9 as part of the addressing scheme would require some additional logic before mapping it onto the smaller 8912.

Errata

The ICSP header is swapped to what is required. This will still work as long as the header is populated on the reverse of the board…

From the top/silkscreen, the header has the following pinout (viewed from the top, ATMega328 on the left).

RESETGNDCLKCOPICIPOVCC (square pad)

Bill of Materials

AVR-AY Emulator Board:

  • AVR-AY-Board PCB (GitHub link below).
  • ATMega329P (28 pin DIP version).
  • 1x 1K resistor
  • 3x 3K6 resistors
  • 1x 10K resistor
  • 1x 10uF electrolytic capacitor
  • 2x 100nF ceramic capacitors
  • 3x 2.2nF ceramic capacitors
  • 2x 18pF ceramic capacitors
  • 1x 3mm LED (colour to taste)
  • 1x 27 MHz crystal (2 pin, low-profile, HC-49 package – see footprints)
  • 1x 2-pin momentary push switch (see footprints)
  • Optional: 28-way narrow DIP socket
  • Optional: round-pin header pins (see photos and discussion)
  • Range of pin headers or sockets as required

AY-3-8910 to 12 Converter:

  • AY-3-8910-12 Converter PCB (GitHub link below).
  • Either 40-pin WDIP socket or 28-pin WDIP socket.
  • Round-pin header pins.

AY-3-8910 to 12 Converter Build

This is a relatively straight forward build, but depending on the DIP sockets used it might be necessary to doctor the socket slightly to sit neatly over the soldered pins.

Order of build:

  • Round pins for either the 28 pin or 40 pin part of the PCB.
  • The 40 pin or 28 pin DIP socket.

If the converter is from a 8912 socket to a 8910 device, then the /A9 jumper or a solder link will have to be configured, presumably connecting it to GND to make it permanently active.

One note of caution – the pins I was using are not particularly robust, so when removing the adaptor from its socket, I managed to break one and had to replace it, which wasn’t easy.

But apart from that, it works!

AVR AY Board

As already mentioned there are a number of configuration options for the 28-pin AY-3-8910 emulation as illustrated below.

The first two are designed for jumper wire connections. The third shows the use of pins which would allow the board, space permitting, to be inserted into a AY-3-8910 socket on an existing board.

These headers will be soldered on last, but it is worth deciding in advance what configuration will be required.

I’ve chosen not to populate the UART and ICSP headers, and am using round pins so that this can hopefully replace an AY-3-8912. But at the moment all my test boards are built for the AY-3-8910, so I’m also having to use the converter, which has led to the following stack of boards!

ATMega328P Programming

The stand-alone ATMega328P chip cannot be programmed directly from the Arduino IDE with this code as it stands. Instead the following are required:

  • AVRDude: https://github.com/avrdudes/avrdude
  • An AVR Programmer: I’m using a cheap USBasp clone, so one based on this: https://github.com/piit79/USBasp
  • Connection to the device via ICSP: I’m using a homemade link, but it should be possible to use the ICSP header on the PCB (however see previous warning about the pinout error!); plug it into a DIP-version of another Arduino Uno board; or possibly even a second Arduino Uno board in “Arduino as ISP” mode.

The firmware should be downloaded from https://github.com/Yevgeniy-Olexandrenko/avr-ay-board.

Update: I ended up using a slightly different firmware and configuration – see later…

I’m using v1.0 of the firmware and have downloaded the binary firmware and the 1.75MHz configuration. I now have the following files:

C:\Kevin\Temp> dir
09/05/2026 15:49 <DIR> .
09/05/2026 15:49 <DIR> ..
09/05/2026 15:49 1,920 avr-psg.hex
09/05/2026 15:40 909,660 avrdude.conf
09/05/2026 15:40 9,604,608 avrdude.exe
09/05/2026 15:40 13,316,096 avrdude.pdb
09/05/2026 15:49 34 config-1.75mhz.hex
C:\Kevin\Temp>

To program the ATMega328P requires the following instructions to get the code into flash, the configuration into EEPROM and to set the fuses for the MCU:

C:\Kevin\Temp>avrdude -c USBasp -p ATMega328P -U flash:w:avr-psg.hex:i
Error: cannot set sck period; please check for usbasp firmware update
Reading 682 bytes for flash from input file avr-psg.hex
Writing 682 bytes to flash
Writing | ################################################## | 100% 0.43 s
Reading | ################################################## | 100% 0.23 s
682 bytes of flash verified

Avrdude done. Thank you.


C:\Kevin\Temp>avrdude -c USBasp -p ATMega328P -U eeprom:w:config-1.75mhz.hex:i
Error: cannot set sck period; please check for usbasp firmware update
Reading 5 bytes for eeprom from input file config-1.75mhz.hex
Writing 5 bytes to eeprom
Writing | ################################################## | 100% 0.09 s
Reading | ################################################## | 100% 0.01 s
5 bytes of eeprom verified

Avrdude done. Thank you.

C:\Kevin\Test>avrdude -c USBasp -p ATMega328P -U lfuse:w:0xdf:m -U hfuse:w:0xdf:m -U efuse:w:0xfd:m
Error: cannot set sck period; please check for usbasp firmware update

Processing -U lfuse:w:0xdf:m
Reading 1 byte for lfuse from input file 0xdf
Writing 1 byte (0xDF) to lfuse, 1 byte written, 1 verified

Processing -U hfuse:w:0xdf:m
Reading 1 byte for hfuse from input file 0xdf
Writing 1 byte (0xDF) to hfuse, 1 byte written, 1 verified

Processing -U efuse:w:0xfd:m
Reading 1 byte for efuse from input file 0xfd
Writing 1 byte (0xFD) to efuse, 1 byte written, 1 verified

Avrdude done. Thank you.

The error “cannot set sck period” is apparently pretty common especially with USBasp clones, and can be ignored.

The three fuse settings come from the original AVR-AY firmware (here) in the readme as follows:

ATMEGA328 ===================================================
avrdude -p m328p -c USBasp -U flash:w:AY_Emul_XXX_Nch_KK_MM.hex -U eeprom:w:Conf_XXX_YYMHz_ZZMhz.hex -U lfuse:w:0xee:m -U hfuse:w:0xdf:m -U efuse:w:0xfd:m
Example:
avrdude -p m328p -c USBasp -U flash:w:AY_Emul_250_2ch_m328_ay.hex -U eeprom:w:Conf_standard_27MHz_1_75Mhz.hex -U lfuse:w:0xee:m -U hfuse:w:0xdf:m -U efuse:w:0xfd:m
=============================================================

But where the fuse settings for lfuse = 0xEE, when decoded from the ATMega328P datasheet and an online AVR fuse calculator here: https://eleccelerator.com/fusecalc/fusecalc.php?chip=atmega328p means the following:

0xEE = b1110 1110
CKDIV8 = 1 (unprogrammed)
CLKOUT = 1 (unprogrammed)
SUT = 10
CLKSEL = 1110

Which from the AVR fusecalc site maps onto:

  • External crystal oscillator
  • Frequency 8MHz +
  • Start up time 1K
  • Powerdown/reset 16

However, following through the settings in the datasheet, it is similar but slightly different, giving:

  • Low power crystal oscillator (CLKSEL3:0 = 1111 – 1000)
  • Low power operating mode 111 = 8.0-16.0 MHz (with recommended caps 12-22pF)
  • CLKSEL0+SUT = 0+10 = Ceramic Resonator BOD enabled, Start up time 1KCK, additional delay 14CK

But I’m not using a ceramic resonator, I’m using a crystal oscillator, so I think I need the mode:

  • Crystal oscillator BOD enabled, startup time 16KCK, additional delay 14CK = CLKSEL0+SUT = 1+01

There is no “1KCK” for the crystal oscillator settings, so I’ll have to use 16KCK I guess?

This is what gives me the 0xDF value I’ve used:

0xDF = b1101 1111
CKDIV8 = 1 (unprogrammed)
CLKOUT = 1 (unprogrammed)
SUT = 01
CLKSEL = 1111

Actually, this wasn’t working with either 0xEE or 0xDF, so I decide to try to turn off BOD and went with “slow rising power” (CLKSEL0+SUT = 1+11) which gave me the fuses:

lfuse = b1111 1111 = 0xFF
hfuse = 0xDF (as before)
efuse = 0xFF (no brown-out detection)

But that isn’t working either…

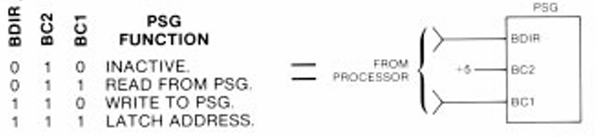
The AY891x Library and BCn/BCDIR control

Eventually, I remembered reading about the control signals with the library that was designed for use with that test board. It states the following (here):

“While the PSG has tight timing requirements, it is possible to use digitalWrite() by using all three bus control signals (BDIR, BC1, BC2) and cycling through an extra state when reading and writing the chip registers.”

But the emulation is ignoring BC2 (more here), relying instead on the ATMega’s two IO interrupt pins INT0 and INT1 on D2 and D3, to trigger on BDIR and BC1. This means I had to ditch the library and instead switched over to my own PORT IO driver as described here: Arduino and AY-3-8910 – Part 3.

Resetting the fuses as before, unfortunately it still isn’t working.

At this point I loaded on a simple tone() function on one of the IO pins using the Arduino IDE then set the fuses again as above. I can definitely see that the frequency for the tone() output is almost twice as high as when the ATMega328P is plugged into the Arduino, so the 27MHz crystal is certainly having an effect compared to the Uno’s original 16MHz.

I can also see the 105kHz PWM carrier frequency on all three PWM output pins, but the peaks are so narrow, these must be responding to a level 0 output which implies all code is working, but there are simply no register writes getting through.

So, in summary, I think the code on the emulator is running fine – so why isn’t it responding to register writes?

An Epiphany?

At this point I left things for a bit and came back to it all a few days later.

I was chewing over why the register writes didn’t seem to be getting through, so at this point I think the handling of BC1 and BDIR are key. The next things that I tried:

  • Getting it all on a breadboard and showing it working with a real AY-3-8910.
  • Check I can see BC1 and BDIR and the data lines doing something.
  • Replace the real chip with the emulator.
  • Repeat the tests for BC1, BDIR and data – all appear ok.

At this point I’m suspecting the interrupts aren’t getting through (remember BC1 and BDIR are triggered off the external interrupts), so I’m contemplating two things:

  • Some test code that lights an LED on an external interrupt.
  • Porting the whole code across to the Arduino environment to let me build and run it all from there.

But this has got me wondering about build differences for the two devices – what might be different between the ATMega48 and ATMega328P. Would rebuilding from source for the ATMega328P sort it out?

Looking at the original code, I can see there are many different binaries for the different chips. For the repository I’m using there is just one.

Looking in the two chip datasheets, I can see that the INT0 interrupt vector is different – it is 2 (address 0x001) for the 48 and whist it is still 2 for the 328P, the address is 0x0002. From the 48 datasheet:

“Each interrupt vector occupies two instruction words in ATmega168, and one instruction word in ATmega48 and
ATmega88.”

From the 328P datasheet:

“Each interrupt vector occupies two instruction words in Atmel ATmega328P.”

Looking at the suggested implementations of the vector tables, they are shown as follows:

// ATMega48 vector table
0x000 rjmp RESET ; Reset Handler
0x001 rjmp EXT_INT0 ; IRQ0 Handler
0x002 rjmp EXT_INT1 ; IRQ1 Handler

// ATMega328P vector table
0x0000 jmp RESET ; Reset Handler
0x0002 jmp EXT_INT0 ; IRQ0 Handler
0x0004 jmp EXT_INT1 ; IRQ1 Handler

So presumably one is a relative jump (rjmp) which is a single word (16-bit) instruction, vs an absolute jump which is a two-word (32-bit) instruction.

With hindsight is seems obvious I’d need to rebuild for the ATMega328P, but the initial talk of compatibility lulled me into a false sense of security!

There is no build for the 328P in the listed repository, but going back to the original avr-ay source, there are builds for all supported MCUs, each with variants covering:

  • 2 or 3 channel sound.
  • AY or YM volume tables.
  • Additional speaker output on PD1.

There are configuration options for:

  • Serial, parallel, or both (“standard”).
  • 1.75MHz, 1.78MHz, or 2.0MHz operation.
  • 20MHz to 40MHz (including my required 27MHz).

I’ve now downloaded:

avrdude -c USBasp -p ATMega328P -U flash:w:AY_Emul_260_3ch_m328_ay.hex:i
avrdude -c USBasp -p ATMega328P -U eeprom:w:Conf_parallel_27MHz_1_78Mhz.hex:i
avrdude -c USBasp -p ATMega328P -U lfuse:w:0xee:m -Uhfuse:w:0xdf:m -U efuse:w:0xfd:m

But unfortunately it still isn’t working…

I did notice in the original source, a number of conditional assembler code, based on the initial configuration of MCU_TYPE. But most of it is of the form “if MCU_TYPE==0” which is giving alternative code for the ATMega8. There is one piece of code that implies something different for the ATMega48:

; get byte 0 from EEPROM, check value > 0 or skip USART initialization if value = 0
#if MCU_TYPE == 0 || MCU_TYPE > 1
out EEARH,C00 ; is absent in Atmega48
#endif
out EEARL,C00

I also note that the vector table is all relative jumps:

.cseg
;------------------------------------------------------
; INTERRUPT VECTORS TABLE
;------------------------------------------------------
.org 0x0000
rjmp _RESET

.org INT0addr
rjmp _INT0_Handler

.org INT1addr
rjmp _INT1_Handler

.org URXCaddr
rjmp _USART_RX_COMPLETE

But as each entry has its own origin statement, one presumes that these are correct for the MCU type.

Double checking the hex records for my chosen firmware, and adding some expansions and annotations, I can see:

// Format:
// :ll aaaa tt dd..dd cc
// ++-- CRC
// +----+----- Data
// ++------------ Record type
// +--+--------------- Address
// ++-------------------- Data length

:02 0000 02 0000 FC // tt=02: Extended (Upper) Segment Base Address

// Vector Table tt=00: Data
:02 0000 00 88C0 B6
:02 0004 00 4AC0 F0
:02 0008 00 56C0 E0

// Start of code/data tt=00; Data
:10 0048 00 50C0000101010202030506090D11161D 29
:10 0058 00 242D0000010101010101020202020303 33
:10 0068 00 0505060607090B0D0F111316191D2024 87
...
:10 02F8 00 0092880010928A0092CF05910D932A95 5A
:04 0308 00 E1F70895 7C
:00 0000 01 FF // tt=01: End of File

So yes, it would appear that the vectors in the vector table are indeed on the expected 32-bit boundaries which matches and it has values for vectors 2 and 3, so INT0 and INT1. Vector 1 is RESET.

One oddity, each record is only 2 bytes long, so I guess it is assuming that the missing bytes will be zero? Really, the full records should perhaps be:

:04 0000 00 88C00000 B4 // Needed to recalc CRC
:04 0004 00 4AC00000 EE
:04 0008 00 56C00000 DE

I don’t know the algorithm for calculating the CRC, but I don’t need to. When attempting to download via avrdude any CRC mismatch is reported, detailing what value was expected which allows me to set the correct value for each line at a time!

But as these are instructions rather than addresses themselves, maybe it would be fine. If the PC hits this address, then the instruction will be (presumably) a rjmp which is only two bytes and all would be fine.

But regardless, unfortunately this still isn’t working. I’m now at quite a loss as to what to try next.

I did go back and look at the original firmware I was using and it has the following:

:06 0000 00 70C039C045C0 CC

So I don’t see how this would work on an ATMega328P at all as each vector is only half the expected size.

The reset vector is probably ok, as the first two bytes will be read as a “rjmp” instruction and presumably the next two bytes ignored. But INT0 and INT1 will be jumping off into who-knows-where.

This would match the evidence that the board seems to get initialised but no register writes are processed.

So this at least does confirm that the original firmware was no good for me.

Conclusion

I’ve got to draw a line under this for now. I’m going to hit publish on this post as is, and put this aside for a bit.

Some possible future directions:

  • Solder on the ICSP header to make uploading code a bit easier.
  • Load up some simple Arduino firmware that will indicate if INT0/INT1 are actually getting through.
  • Create a ATMega48 breakout to see if the board would work with the original MCU ok.
  • I’m still not convinced with that clock – it seems a very low amplitude – I wonder if those capacitors are the right values.
  • Port the whole lot to the Arduino environment. This is going to be a fair bit of work as you can’t use assembler directly, but only via asm(“nop”) style directives…

But for now, this one is on pause.

And I’m still annoyed about the error in the ICSP pinout…

Kevin

#arduino #atmega328 #ay38910 #ay38912 #emulation #MakerFail #pcbs

AY-3-8912/8910 Hardware Emulation

The 40-pin AY-3-8910 devices I’ve been playing with are no longer newly available, but they are pretty available if you are happy with a certain questionable quality (more on that here: Arduino and AY-3-8910).

But the slightly shorter version (with fewer general purpose I/O pins), the 28 pin AY-3-8912, seems a lot harder to find, despite being widely used at the time. At least, to find on its own – i.e. not already soldered onto a circuit board. There is apparently also an even smaller AY-3-8913 in 24-pin format and a few other lesser used options too. But the 8912 is the variant most often found in the ZX Spectrum 128, Amstrad CPC, and many home computers from the time.

A key modern option then is emulation and there is a very capable AVR emulation of the sound generator online including some on PCBs that directly fit within the 28-pin footprint of the original.

One is Yevgeniy-Olexandrenko’s avr-ay-board for the AY-3-8910, AY-3-8912 and YM2149F devices, with a 8912-compatible DIP-28 PCB design using an ATMega48.

Another is published on https://www.avray.ru/, but that appears to be the firmware only. There is a board that uses this firmware built for an ATMega8P here and another for a two-device (dual AY-3-8912 for 6 channel support is often called “Turbosound”) here.

I don’t believe either of these approaches emulate the general purpose IO pins of the 8912/8910, which might be an issue using them “as is” in a retro system. I know the ZX spectrum 128 uses the IO for example.

Some options for replacing original AY-3-8912 devices:

But perhaps my favourite so far is the slightly random, “building an AY-3-8910 out of discrete logic” that I must have a proper look at, at some point: https://github.com/mengstr/Discrete-AY-3-8910

This post looks at how AVR emulation of AY devices works in a little more detail and maybe take some starter steps to reproduce my own.

Warning! I strongly recommend using old or second hand equipment for your experiments.  I am not responsible for any damage to expensive instruments!

If you are new to microcontrollers, see the Getting Started pages.

AVR-AY-Board

The avr-ay-board is a fully open source design and can use an ATMega48, 88, 168 or 328. The ATMega328P is very commonly used on an Arduino Uno or Nano.

Full details, including a schematic, gerber files, BOM, and firmware are available here: https://github.com/Yevgeniy-Olexandrenko/avr-ay-board.

It shares a lot of firmware heritage with the source available from https://www.avray.ru/. Up until Feb this year there was a link back to the original source, but that has since been removed and it appears to have mostly diverged some time in 2022. There is a list of differences here, but much of the discussion that follows would probably apply to both versions of the code.

The only difference between the ATMega48, 88, 168 and 328 is the amount of memory. They are named for the amount of flash memory – 4K, 8K, 16K, 32K respectively. But otherwise they are functionally identical. Here is the key data from the datasheet:

Note that the ATMega328PB is an enhanced version of the ATMega328P which itself is a slightly lower power (as I understand things) version of the original ATMega328. Application note “AT15007: Differences between ATmega328/P and ATmega328PB” lists the full set of enhancements, but it includes additional UART, SPI, I2C, and timers, although it is essentially backwards compatible with the 328/328P.

All of this means that a standard Arduino Uno or Nano might be able to run the bespoke AY-3-8912 emulation firmware and with the appropriate pin connections might also be able to emulate an AY-3-8912 in another system. Naturally it will be physically larger than the original chip, but electrically it should all work fine.

The Circuit

The original ABR-AY-Board is relatively straight forward. The full schematic is available in the GitHub repository and shows the following:

  • A minimal ATTMega48P support circuit (capacitors, oscillator, power, LED).
  • Three low-pass filters to filter PWM to an audio output expecting a 1K load (apparently).
  • A mapping onto the AY-3-8912 28-pin pinout.

There used to be a detailed “usage” section on the GitHub but that has since been removed, but from the published schematic (v1.5) the pins are accessed and mapped as follows.

AY-3-8912SchematicATMega48PArduino EquivalentD0-D5D0-D5PC0-PC5A0-A5D6-D7D6-D7PD6-PD7D6-D7A8MISO_A8PB4D12BC1BC1PD2D2BC2SCKPB5D13BDIRBDIRPD3D3CLOCKCLOCKPD4D4RESETRESETPC6RESETTESTMOSI_PWM_BPB3D11IOA7-IOA0N/CCOUT_C / PWM_CPB2D10BOUT_B / MOSI_PWM_BPB3D11AOUT_A / PWM_APB1D9CFG0PB0D8CFG1PD5D5RXPD0D0TXPD1D1VCCVCCVCCVCCGNDGNDGNDGND

There is a UART header (TX, RX, VCC, GND), ICSP header (MISO, MOSI, SCK, RESET, VCC, GND), and two configuration jumpers (CFG0, CFG1).

One point that might cause issues mapping over to an Arduino Uno or Nano is that the avr-ay-board has a 27MHz oscillator, whereas the Arduino only runs at 16MHz. That will almost certainly need some looking at.

The Clocks

So about that 27MHz clock. The default Arduino has a 16MHz oscillator so could this run on an unmodified Arduino?

Looking through the code, there seems to be one specific mention of the CPU frequency:

; --------------------------------------------------------------------------
; Init Timer0
; --------------------------------------------------------------------------

; Fast PWM, TOP = OCR0A
ldi r16, (1 << WGM01) | (1 << WGM00)
OutReg TCCR0A, r16
ldi r16, (1 << WGM02) | (1 << CS00);
OutReg TCCR0B, r16

; 219512 Hz internal update clock
;ldi r16, (27000000 / (1750000 / 8) - 1)
;out OCR0A, r16
OutReg EEARL, YH ; set EEPROM address 2
sbi EECR, b0
InReg r18, EEDR ; load byte 2 from EEPROM to r18
OutReg OCR0A, r18 ; set PWM speed from byte 2 of EEPROM (affect AY chip frequency)

In the commented out code, there is reference to 27000000. But then that appears to be replaced with code that is reading the PWM frequency from EEPROM.

At the start of the main file is the comment:

; ==============================================================================
; Configuration
; ==============================================================================

; EEPROM Config:
; byte 0 - Serial interface enable (1 - enabled)
; byte 1 - Parallel interface enable (1 - enabled)
; byte 2 - PWM speed depending on AY chip frequency and MCU clock frequency
; byte 3 - USART baud speed depending on MCU clock frequency

In the build area there is the main hex firmware and then three configurations with the following contents:

; firmware/v1.0/compiled/config-1.75mhz.hex
:0500000001017A3AFF46
:00000001FF

; firmware/v1.0/compiled/config-1.78mhz.hex
:050000000101783AFF48
:00000001FF

; firmware/v1.0/compiled/config-2.00mhz.hex
:0500000001016B3AFF55
:00000001FF

We can see these differing in the values after 0500000. The next two bytes (0101) map to serial and parallel interface being enabled. These define how the AY-3-8912 registers can be accessed, either using the original device’s parallel data bus or via a newer serial link. The serial link can be used to send register-value pairs to the device rather than use a real AY compatible parallel bus interface.

Then there is a differing byte (7A, 78, or 6B respectively) which is pulled into the timer 0 frequency code and used to set OCR0A in the previous code.

Finally that last byte of the configuration (3A) relating to USART baud, which I infer from older comments in the README file will be 57600, but this is as yet unverified.

On studying the code, it quickly becomes apparent that the whole execution is optimised for specific MCU clock frequencies. This is particularly notable in the interrupt routines, for example, the following:

; ==============================================================================
; Parallel communication mode (BC1 on PD2/INT0, BDIR on PD3/INT1)
; ==============================================================================
ISR_INT0: ; [4] enter interrupt
sbic PinD, PD_BDIR ; [2/1] check BDIR bit, skip next if clear
rjmp LATCH_REG_ADDR ; [0/2]

; [ READ MODE ] (BC1=1, BDIR=0)
; --------------------------------------------------------------------------
; 350ns max to set data bus, 8 cycles to set
; 8 * 37ns = 296ns for 27MHz O.K.
; 8 * 40ns = 320ns for 25MHz O.K.
; 8 * 42ns = 336ns for 24MHz O.K.
; 8 * 50ns = 400ns for 20MHz !!!!
OutReg DDRC, BusOut1 ; [1] output -> low level on D0-D5
OutReg DDRD, BusOut2 ; [1] output -> low level on D6-D7

Here we can see that running at 20MHz (for example) violates the timing constraint to respond with the data on the bus. Running at 24MHz, 25MHz and 27MHz appears to be fine. There are a number of other places in the code where similar comments have been made.

The conclusion seems pretty clear. A standard Arduino Uno or Nano running at 16MHz would not work. Something at 20MHz might do the job with some limits, but there is definitely a reason the board is using 27MHz.

There is a key issue however. AVR 8-bit microcontrollers are typically only specified for up to 20MHz operation. I’ve certainly not found any ATMega48 through to ATMega328 that has a higher frequency specification. There are some newer 8-bit devices that might stretch to 24MHz.

But I’m now wondering if the MCU is being overclocked on this board. It would appear, according to some superficial searching, that people have been overclocking AVRs for years…

Timer Configuration and PWM Output

The emulator is using PWM to produce audio from the AVR. The PWM channels/timers are allocated as follows:

AVR PinTimer OutputCompare RegisterTimerSystem ClockD4 / PD4N/AOCR0A0Channel AD9 / PB1OC1AOCR1AL1Channel BD11 / PB3OC2AOCR2A2Channel CD10 / PB2OC1BOCR1BL1

The first timer, Timer 0, I’ve already mentioned, is used to set the basic internal system “clock” for the emulation. In the real AY PSG the internal clock for tones is set to the external clock / 16 and for envelopes is external clock / 256. In the emulation this is all set in code and the CLOCK input is ignored.

The 8-bit Timer 0 configuration is as follows:

  • TCCR0A/TCCR0B = WGM00 | WGM01 | WGM02 | CS00
  • OCR0A = value from EEPROM (as mentioned previously)

This uses timer 0 in Fast PWM mode (WGM = 7) with TOP = OCR0A and no prescaler. There is a check in the main loop for Timer 0 overflow which is then used to determine if the sound generation should be processed. This effectively sets the CLOCK for the emulation. The AY CLOCK input is meant to be between 1MHz and 2MHz and EEPROM configurations are provided to emulate 1.75MH, 1.78MHz and 2.0MHz external clocks.

In Fast PWM mode, from the ATMega328 datasheet, for Timer 0, the frequency is given by:

  • FreqPWM = FreqCLOCK / (N * 256)

Where N is the prescaler factor, so in this case 1. But this appears to be stated for the case when TOP = 255. If the TOP is reduced, so when TOP = OC0A, then presumably that 256 should be (TOP + 1). Assuming this to be the case, then with a 27MHz clock and the previously mentioned values from the EEPROM, we have

  • 0x7A = 122 -> timer freq = 27 MHz / 123 = 219.5 kHz
  • 0x78 = 120 -> timer freq = 27 MHz / 121 = 223 kHz
  • 0x6B = 107 -> timer freq = 27 MHz / 108 = 250 kHz

These give a basic operating frequency of between 3.5MHz and 4MHz which is twice as fast as the real PSG. I’m guessing that this is because the sound generation code (later) toggles the output value on each period, which therefore requires doubling the frequency to generate the high and low periods.

Note that although this timer is configured in Fast PWM mode, it isn’t actually running PWM, it is just used as a timer. The timer also never “triggers” as such – it is polled for overflow within the main code loop.

The 16-bit Timer 1 configuration:

  • TCCR1A/TCCR1B = WGM10 | WGM12 | COM1A1 | COM1B1 | CS10
  • PB1 and PB2 set to OUPUT for PWM out on OC1A and OC1B.

This uses timer 1 in 8-bit Fast PWM mode (WGM = 5) with TOP = 0xFF. There is no pre-scaling and OC1A/OC1B cleared on compare match with OC1A/OC1B set at BOTTOM (non-inverting mode).

The 8-bit Timer 2 configuration:

  • TCCR2A/TCCR2B = WGM20 | WGM21 | COM2A1 | CS20
  • PB3 set to OUTPUT for PWM out on OC2A.

This uses timer 2 in Fast PWM module with TOP = 0xFF (WGM = 3). OC2 is clear on match and set at BOTTOM (non-inverting again).

The PWM resolution for both Timer 1 and Timer 2 will be 8-bits (0 to 255) and the frequency for the output is given by the same formula used for Timer 0, giving a PWM frequency of:

  • FreqPWM = 27 MHz / (255+1) = 105.5kHz

Bus Access

There is a comprehensive bus access protocol defined in the AY-3-8910/12 datasheet with several possible modes involving the control signals BC1, BC2, BDIR, and A8 plus /A9 (in the case of the 8910). In particular, there is some redundancy in how the “LATCH” is indicated (see section 2.3 in the “AY-3-8910/8912 Programmable Sound Generator Data Manual” – more here: AY-3-8910 Experimenter PCB Design).

For the emulator, BC1 is tied into the AVR INT0 (via PD2/D2) and BDIR is tied into AVR INT1 (via PD3/D3). If the serial interface is used then there is also an interrupt for the UART. BC2 is ignored so all responses are enacted upon as if BC2 is set to HIGH.:

The basic operation, as far as I can see, is as follows:

INT0 ISR - triggered on BC1 -> 1
IF BDIR == 0 // BC1=1; BDIR=0: Read data
Set data lines to OUTPUT
Write BusOut to the data bus
WAIT for BC1 -> 0
Set data lines to INPUT

ELSE BDIR == 1 // BC1; BDIR=1: Latch Address for read
Read ADDR from data lines
Grab value from pseudo register in RAM into BusOut

INT1 ISR - triggered on BDIR -> 1
IF BC1 == 0 // BC1=0; BDIR=1: Write data
Read DATA from data lines
Store value to pseudo register in RAM

ELSE BC1 == 1 // BC1=1; BDIR=1: Latch Address for write
Read ADDR from data lines

There is a pseudo image of all AY registers stored in RAM which is used by the main loop for the sound processing. This RAM image is updated when the AY is written to and can be accessed when the AY is read.

Note that there is no access control. If an interrupt comes in part way through an update to the sound generators they will stop process and then continue from that point unaware than any register updates have taken place. This does mean that if any registers are accessed twice, it is quite possible that they would have changed by the time of the second access.

Similar logic happens within the UART interrupt handler, but instead address and data values are obtained over the serial port and interactions with RAM updated according to the bytes recieved.

I’ve not looked further into the serial handling at this time other than to note that all updating is performed withing the UART ISR which is receive only.

Main Sound Processing Loop

The main logic free runs as follows:

MAIN Loop:
IF Timer 0 Overflow Flag is SET:
Process envelope generator
Process noise generator
Process tone generator for channel A
Process tone generator for channel B
Process tone generator for channel C
Process mixer control
Process amplitude control for channel A
Process amplitude control for channel B
Process amplitude control for channel C
Update PWM values in OCR1AL (ch A), OCR2A (ch B), OCR1BL (ch C)

So the loop essentially pauses until timer 0 overflows at which point all sound generation activity undertakes a single scan and then the PWM sound generation registers are updated.

Before I dive in, I should note that the register definitions are of the form AY_REGnn where nn is a decimal from 00 to 15. The datasheet describes Ro where o is an octal value from R0 to R7, then R10 to R17. I will be using the decimal versions here to match with the code.

I’m not going to work through how the sound generation works in its entirety right now, but I will just include a note about the tone generation. Here is the code for channel A.

; Channel A
subi CntAL, 0x01 ; CntA - 1
sbci CntAH, 0x00
brpl CH_A_NO_CHANGE ; CntA >= 0
lds CntAL, AY_REG00 ; update channel A tone period counter
lds CntAH, AY_REG01
subi CntAL, 0x01 ; CntA - 1
sbci CntAH, 0x00
eor TNLevel, ZH ; TNLevel xor 1 (change logical level of channel A)
CH_A_NO_CHANGE:

All counters (CntAL and CntAH for channel A) are 16-bit values. AY_REG00 and AY_REG01 are the RAM copies of the two tone generator registers for channel A.

We can see that the channel counter is decremented on each scan through the routine implementing the following pseudo code:

counter--
IF (counter == 0):
Reset counter from AY_REG00 and AY_REG01
Toggle logic level for channel A

This means that the output square wave value for channel A will toggle between HIGH and LOW every time the counter reaches zero and that the counter will have to count to zero twice to make a complete cycle of the square wave.

The datasheet states that the tone registers define a 12-bit tone generator period:

The resulting sound frequency is given by the equation:

As we have to count twice to get our square wave output, we can see why the timer 0 “clock” frequency has to be twice the desired running CLOCK of the AY-3-8912. An alternative implementation could have been to add an additional check as part of the countdown to change the waveform half-way through.

This does mean that all sound generator registers are processed twice as quickly as expected so that might have to be taken into account when calculating other parameters.

The main impact would be for the envelope generator, which according to the data sheet runs a frequency CLOCK / 256. There is a EG period counter defined by AY_REG11 and AY_REG12 (R13 and R14) for further subdivision, so a full sweep of the envelope will happen with a frequency of CLOCK / (256 * EGcounter).

The datasheet also notes that “the envelope generator further counts down the envelope frequency by 16 producing a 16-state per cycle envelope pattern”. This means that the frequency required to process each individual step of these 16 states is: 16 * CLOCK / (256 * EGCounter) or CLOCK / (16 * EGCounter).

The Envelope Code is essentially doing the following:

Every LOOP scan:
IF env reg updated:
Reinitialise EG
Reset EGCounter from AY_REG11, AY_REG12
EGPeriod = 31
Re-enable EG

ELSE
IF EG enabled:
EGCounter --
IF EGCounter == 0:
EGPeriod --
IF EGperiod == 0:
EGPeriod = 31
Disable EG

Reset EGCounter from AY_REG11, AY_REG12
Eval = Envelope value

This implies that a full sweep of the envelope takes EGcounter * 32 scans of the main LOOP. As the LOOP is running at twice the frequency of the CLOCK. this gives an EG frequency of:

  • LOOP / (32 * EGcounter) = CLOCK * 2 / (32 * EGCounter) = CLOCK / (16 * EGCounter)

Which matches the datasheet. So the doubling of the LOOP frequency is taken into account by having 32 steps for the EG base period rather than 16.

A few other observations from the code:

  • The envelope period counters are stored in AY_REG11 and AY_REG12 (R13 and R14) and managed using CntEL and CntEH via r26 and r27.
  • The line ‘sbiw CntEL, 0x01’ is a 16-bit instruction and so acts on both r26 (CntEL) and r27 (CntEH) at the same time as a HIGH/LOW 16-bit pair.
  • The counter updating currently happens at the LOOP frequency which is 2 * CLOCK. Every time the counter hits 0 the step is advanced. It therefore takes 32 * counter passes through the LOOP to process the entire cycle of the envelope.
  • The envelope period is managed using TabP which is initilised to 0x1F (31 decimal).
  • Whenever the envelope counter reaches 0 the next envelope period is selected via TabP.
  • The resultant envelope value is stored in Eval which is used as the maximum value for the amplitude calculations later in the loop.

Curiously there are two envelope volume tables provided as options. The first (“AY_TABLE”) distinctly shows the doubling of levels turning 16 values into 32 values. The second (“YM_TABLE”) appears to have some interpolation between values giving a higher resolution envelope.

From wikipedia: “The input clock is first divided by 16 (or by 8 in the YM2149, because the envelope generator has twice as many steps, and thus needs twice as many clocks to complete a full cycle), and then by the 16-bit value.”

So by starting with double the CLOCK frequency, we effectively get YM compatibility “for free”.

Only a single envelope table is required – it defines a linear incrementing pattern that is then used and reused in various ways according to the EG control bits in AY_REG13 (R15) as per figure 7 in the datasheet. I’m not going to dig into that further at this point. I might come back to it in the future.

I’m also not going to dig into the noise generation, mixer or amplitude control at this time.

Closing Thoughts

I really like I feel I know a lot more about how the AY-3-8910/8912 work now and certainly am, as usual, in awe of those who figured all this out and then how to emulate it on a modern (ish) microcontroller.

It is also interesting to note that the emulation hasn’t been updated, as far as I know, for anything more capable than an 8-bit AVR. I guessing it just isn’t necessary and avoiding the whole 3V3/5V logic thing has a certain appeal.

The two commercially available solutions I’ve seen from RC2014 for the WhyEm sound card and the vRetro 28-pin direct replacements, stick with AVR and overclock as far as I can tell. RC2014 using ATMega48AP at 27MHz and vRetro using two ATTiny MCUs and what I think is a 30MHz oscillator.

I would like to see if I can get a standard ATMega328P running the code and then I’d be really interested in seeing if it could be made to run on a Logic Green LGT8F328 “AVR clone” that apparently should be able to run at 32MHz.

I believe I’ve convinced myself not to attempt to build the AY-3-8910 out of discrete logic…

Kevin

#arduino #atmega328 #avr #ay38910 #ay38912 #vretro

Tiki: как норвежцы строили своё IT

В Норвегии есть очень красивые фьорды, самобытные блюда вроде вяленой трески лютефиск, забавные красные домики… А еще там были национальные компьютеры Tiki, еще более самобытные, чем вяленая треска, и более суровые, чем Норвежское море.

https://habr.com/ru/companies/serverspace/articles/929434/

#Tiki100 #z80 #cpm #Kontiki #ay38912 #TIKO #COMAL #intel_8088

Tiki: как норвежцы строили своё IT

В Норвегии есть очень красивые фьорды, самобытные блюда вроде вяленой трески лютефиск, забавные красные домики… А еще там были национальные компьютеры Tiki, еще более самобытные, чем вяленая треска, и...

Хабр

Устройство «музыкалки» AY-3-8910 и эмулятор на Arduino

Астрологи объявили месяц статей про ZX Spectrum, звук и Arduino. Количество публикаций увеличилось вдвое! В прошлый раз я показывал, как можно перенести однобитные, они же «биперные», музыкальные «движки» с ZX Spectrum на Arduino. Но всё-таки это была максимально нишевая тема внутри нишевой темы, весьма узкоспециализированный проект. Сегодня сделаю шаг ближе к народу. Расскажу, как работает легендарный звуковой чип AY-3-8910, как написать его простой эмулятор полностью с нуля, и как проиграть им музыкальный файл формата PT3 на обычной Arduino Nano.

https://habr.com/ru/companies/ruvds/articles/884436/

#arduino #arduino_uno #arduino_nano #ардуино #ay38910 #ay38912 #ym2149f #chiptune #vgm #music #эмуляция #эмулятор #синтез_звука #синтезатор #psg #pwm #pwm_dac #ruvds_статьи

Устройство «музыкалки» AY-3-8910 и эмулятор на Arduino

Астрологи объявили месяц статей про ZX Spectrum, звук и Arduino. Количество публикаций увеличилось вдвое! В прошлый раз я показывал, как можно перенести однобитные, они же «биперные», музыкальные...

Хабр

The great thing about having an Oric AY to BBC Micro SN76489 converter is I can finally port last year's h0ffman track from the No Problem demo released at Nova 2023 to the BBC Micro.

We definitely need more
h0ffman on the SN76489😀

#bbcmicro #sn76489 #oric #ay38912

I’ve created a new music converter for the BBC MIcro that takes AY register dumps from an Oric 1/Atmos emulator and transforms them from playback on the SN76489.

Track: Magnetix
Artist: Twilighte
Year: 1994

https://youtu.be/5LE-v23B-mY?si=JzwM2aAvw9C_x7zu

#bbcmicro #sn76489 #oric #atmos #ay38912

An SN76489 conversion of the Oric AY-3-8912 soundtrack from the game Magnetix by Twilighte

YouTube

Here's a track that benefits from software bass - it won't convert properly without it (i.e. the initial slide).
An #SN76489 conversion of a favourite David Whittaker track:

Track: Glider Rider
Artist: David Whittaker
Year: 1986

#bbcmicro #amstrad #amstradcpc #ay38912

Very quick and lofi video, testing the new AY-3-8912-AVR from vRetro.

This is a modern replacement for the Yamaha chip. To my ears on this initial test, it doesn't sound any different to the real deal.

Tested here in one of the Amstrad CPC 6128 machines I built from scratch a while back.

#ay38912 #AmstradCPC

https://youtu.be/fJWG6qe4a78

Quick test of the AY-3-8192 AVR modern replacement from vRetro

YouTube