Disaster Recovery Test Checklist: What to Capture Before You Start
This article is a practical checklist of the evidence to capture before you click Restore. A disaster recovery test should not begin with someone clicking Restore. It should begin with evidence. Here is a common way these tests go sideways. The team books a window, restores a VM, watches it boot, and calls the test a success. Please see Upgrading Azure AD Connect to Microsoft Entra Connect Sync, and PCI Driver Error: Connection to Deployment Share could not be made.
A week later, management asks which restore point was used, whether it met the recovery objective, and whether the application actually worked. The team did not capture the answers, because everyone was focused on the restore itself.
A disaster recovery test is not only about whether a server boots. It is about proving what existed before the test, what you selected to recover, what changed during the test, and whether the result met the recovery objective.
Please see Steps to Fix the “Invalid OS GUID” Error in MDT, Faulting SecHealthUI: Resolve Windows Defender Notification, and how to Update Your AMD Radeon Display Adapter Driver.
Key Takeaways
Capture evidence before the restore begins, not after the test is over. A VM that boots is not proof that the application recovered. Validate the application and its dependencies.
- Confirm network isolation before you power on any recovered system.
- Document which restore point you selected, where it came from, and why.
- Verify credentials, encryption keys, and admin access before the test starts.
- Sanitize screenshots, or recreate them in a lab, before you share or publish them.
Why Capture Evidence Before a Disaster Recovery Test?
A baseline tells you what the environment looked like before you touched it. Without it, you cannot tell whether a problem you hit during the test was caused by the recovery or was already present.
Evidence proves the backup existed and was healthy before the test. If a job failed the night before and nobody noticed, you want to know that before you start, not after a failed restore. Captured state supports audit and management review. When someone asks whether the recovery met the objective, you answer with records instead of memory.
A baseline makes rollback easier. If you need to undo a change, you already know what the original configuration was. Evidence reduces confusion during troubleshooting. When three people are staring at a recovered system that will not start a service, the pre-test notes tell you what normal looked like.
Capturing the environment first also helps you avoid accidental production impact. Writing down the production IP addresses, hostnames, and DNS records before the test forces you to plan around them.
Finally, a clean set of evidence becomes a reusable test record. The next test starts from a documented baseline instead of a blank page.
Please see How to update Proxmox VE to the latest version 9.2.3 today, Secure Boot 2023 Compliance Across WinPE, MDT, WDS, and ADK: Boot Chain Alignment and PXE Validation [Final Part], and how to Fix an error occurred while attempting to start selected VM on Hyper-V.
Capture the Environment Inventory
Before the test, capture the current state of the environment you are protecting. Screenshot or export the following:
- Hypervisor or cloud platform dashboard, for a top-level view of the environment as it stood before the test.
- Cluster, host, or node summary.
- VM inventory for the protected workloads.
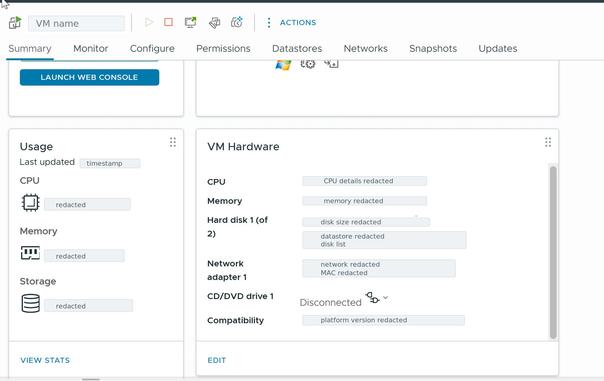
- VM configuration: vCPU count, memory, disk layout and sizes, and network adapters.
- Storage or datastore layout, including where the protected VMs live.
- Restore target capacity, if the test will write recovered systems to a datastore, volume, cluster, or cloud storage target.
- Network names, VLANs, subnets, port groups, bridges, or virtual switches.
- Critical application dependencies, so the recovery order is clear later.
- Current power state of each protected workload.
The labels differ by platform. On VMware vSphere you are looking at clusters, hosts, datastores, and port groups. On Hyper-V you have hosts, virtual switches, and VHDX files. On Proxmox VE you have nodes, storage, and Linux bridges. On Nutanix AHV you have a cluster, hosts, and AHV networks. For cloud workloads, capture the equivalent: instance configuration, attached storage, and the virtual network or subnet.
Capture the view that matches your platform. The goal is a clear record of what existed, not a product tutorial.
Capture this from the main cluster or environment overview screen. For VMware vSphere, use the cluster summary view. For Hyper-V, use Failover Cluster Manager or Hyper-V Manager. For Proxmox VE, use the Datacenter or node summary view. For Nutanix AHV, use the Prism cluster overview. The goal is to show the starting state of the platform before any recovery action begins. Capture the VM inventory from the hypervisor, cloud console, or backup platform before the test starts. Include the workloads in scope for the recovery test, their current power state, and enough context to prove which systems were protected. Redact hostnames or customer names if needed. Capture the configuration view for one representative workload in scope. Show vCPU, memory, virtual disks, and network adapters. This screenshot helps prove the pre-test configuration in case the restored VM has different resources, missing disks, or incorrect network placement.
Please see Failed to Upgrade VIHR Component: Failed to open deployer Service Management Port, The Backup Was Safe: The Data Center Was not: A Real-World Lesson About Hidden Data Center Risks and Governance Failures, and Enterprise Tape Library Administration: Control Path, Firmware, Media Management and Tape Operations.
Capture the Backup Platform State
Now capture the state of the backup system itself. This is the evidence that your recovery source was healthy before you started.
- Backup server or console dashboard.
- The list of protected workloads.
- Backup job configuration for the workloads in scope.
- The last successful run for each job.
- Recent job warnings and errors, so you know the history.
- The restore point list for each workload you plan to recover.
- Repository capacity and health, so you know the backup source is usable and not already under capacity or retention pressure.
- Immutability status, if your repository uses it.
- Encryption status, if backups are encrypted.
- Backup copy or offsite copy status, so you know which copies exist.
- A description of which credentials or service accounts the backup system uses, without exposing the passwords.
Veeam is a common example here, but the same evidence applies to any backup platform. Whatever product you use, you want proof that the job ran, the restore points exist, the repository is healthy, and any immutability or encryption is in the expected state.
Capture the main dashboard or overview screen in the backup console before starting the restore. For Veeam, this could be the console overview, jobs view, or recent session status area. For other platforms, capture the equivalent health or status screen showing the backup environment was available before the test.
Capture the job history or session history for the workload being tested.
The screenshot should show the last successful backup run, the job name, completion time, and status. This proves the recovery source was valid before the test began.
Capture the restore point selection screen before choosing the restore point.
The image should show the available restore points for the workload, including date and time. This gives the recovery team evidence that the selected restore point existed before the test. Capture the backup repository, storage target, or object storage capacity view. Show available free space, repository status, and any health indicator that proves the backup source was usable. Redact repository names, paths, bucket names, or infrastructure details if they expose the real environment. Also capture the restore target storage separately if the restore will write to a datastore, volume, or cloud disk target.
Capture the immutability or retention lock view only if the backup platform or repository exposes it safely.
This may come from the backup console, hardened repository settings, object storage bucket settings, or appliance dashboard. Do not expose bucket names, access keys, tenant IDs, or repository paths.
Please see How to Repair a Corrupt SQL Server Database Without Data Loss, Azure Application Gateway: Practical Configuration Guide, and Azure Managing Subscriptions with PowerShell: From Login-AzAccount to Resource Control and Private Endpoint Verification for Azure File Share”.
Document the Restore Point Selection
The restore point you choose decides what you actually recover. Record it precisely:
- Restore point date and time.
- The backup job that produced it.
- The workload name.
- Application consistency status, if known, such as application consistent or crash consistent.
- Where the restore point lives: local, offsite, immutable, a backup copy, replicated, or archived.
- Your RPO target compared with the age of the selected restore point.
After the test, you should be able to answer one question without hesitation: did we recover from the restore point we intended to use? If you cannot answer that, the test result is hard to trust.
Capture the final selected restore point before launching the restore. The screenshot should clearly show the workload name and restore point timestamp. This is the evidence that answers, “Which backup did we actually choose?”
Capture the details pane, restore wizard summary, or restore point properties view that shows the selected restore point date, time, source job, and consistency type if available.
This is especially useful when comparing the selected restore point against the RPO.
Document Recovery Objectives and Success Criteria
Write down what success looks like before the test, not after.
- RTO: how long the recovery is allowed to take.
- RPO: how much data loss is acceptable.
- Systems in scope.
- Systems out of scope.
- Expected recovery order.
- Expected validation steps.
- Who signs off on success.
- What counts as a failed test.
Example success criteria
The VM boots, and Services start.
- Application login works.
- The data timestamp is acceptable against the RPO.
- DNS resolves correctly inside the test environment.
- Users, or designated test users, can reach the restored service.
- No production network conflict occurs.
A disaster recovery test is not successful just because a VM powers on. A booted VM with a dead application, a stale data set, or a broken dependency is a failed test that looks like a passing one. Decide in advance which of the criteria above must be met.
Please see Azure Arc for SQL Server PAYG: Installation, Connectivity Requirements and Operational Best Practices, how to Assign a Public IP to Azure Virtual Machine (VM), and how to Upgrade Veeam ONE to 13.0.2.6723 to Address Security Fixes.
Capture Application and Infrastructure Dependencies
Many disaster recovery tests fail because the restored workload depends on something that is not in the test. The server itself is fine. What it needs to talk to is missing. Map the dependencies before the test:
- Active Directory
- DNS
- DHCP
- NTP
- Certificate services
- File shares
- SQL or other database servers
- Application servers
- Web servers
- Load balancers
- License servers
- SMTP relay
- External APIs or integrations
- Firewall and NAT rules
A restored application server may boot successfully and still fail if it cannot reach DNS, authenticate against Active Directory, connect to its database server, or check out a license.
Time matters too. In Active Directory environments, Kerberos authentication depends on synchronized clocks. If the test network cannot reach a valid time source and the recovered systems drift too far, authentication can fail.
Decide how each dependency will be satisfied in the test: recovered alongside the workload, stubbed with a test service, or provided by an isolated copy.
Capture the written dependency map, runbook section, whiteboard diagram, spreadsheet, or recovery order table. This does not need to be a product UI screenshot. The goal is to show which systems depend on Active Directory, DNS, databases, file shares, license servers, or other services.
Capture a sanitized DNS view or a lab version of the required records.
This could come from Windows DNS Manager, cloud DNS, an internal DNS appliance, or a test DNS server. Avoid exposing real internal zones, production hostnames, customer domains, or public records.
Capture only the specific firewall rules needed for the test, not the entire firewall rule base.
Use a lab firewall, sanitized export, or filtered rule view where possible. The screenshot should prove that required application ports and isolation rules were reviewed before the test.
Please see Fix Vulnerable Veeam Backup and Replication 13.0.1.2067 and Earlier, how to upgrade Veeam One from v12 to v13, and Integrate Trellix ePolicy Orchestrator with a Syslog Server.
Capture the Test Network Design
Network isolation is one of the most important pre-test items. Get it wrong and the test can affect production. Review this section carefully before any recovered system is powered on. Capture:
- Test network name.
- VLAN or subnet for the test.
- The IP addressing plan for recovered systems.
- Gateway behavior: whether the test network has a gateway, and where it routes.
- The DNS override strategy for the test.
- Firewall isolation rules.
- NAT rules, if the test needs limited outbound access.
- Whether restored systems can reach production.
- Whether production systems can reach restored systems.
- How you will avoid duplicate hostnames and duplicate IP addresses.
Keep the test isolated
Do not accidentally connect restored systems to the production network unless the recovery plan explicitly requires it and the risks have been reviewed and approved. An isolated test network, sometimes called a bubble or fenced network, lets recovered systems run with their original IP addresses and hostnames without colliding with production.
Why isolation matters
Duplicate IP addresses cause immediate problems. If a recovered server uses the same IP address as a live production server, the result is an address conflict and unreliable connectivity. Duplicate hostnames cause confusion and can break authentication and certificates.
A recovered domain controller deserves extra caution. If it is restored incorrectly or allowed to communicate with production domain controllers during a test, you can create Active Directory replication or recovery problems. Keep domain controller recovery tests isolated unless you are following a validated forest recovery or domain controller recovery procedure.
Production DNS registration is another trap. A recovered system that can reach production DNS may create conflicting or misleading records and send clients to the wrong host. Plan a DNS override inside the test network so name resolution stays contained.
Capture the test network definition from the hypervisor, virtual switch, cloud network, recovery lab, or network virtualization platform. The screenshot should show that recovered workloads will connect to an isolated or fenced test network instead of the production network.
Capture the VLAN, subnet, or test network address plan from the network console, hypervisor networking view, or lab documentation.
Redact real subnet details if needed. The purpose is to prove that the test network was planned before restored systems were powered on.
Capture the rule that blocks recovered systems from reaching production, or the rule that allows only tightly controlled traffic required for validation.
This should be a narrow, sanitized view. Do not show the full firewall policy, public IP addresses, VPN details, or sensitive network objects. Capture the test DNS configuration used by restored systems. This may be a test DNS zone, hosts file entry, DNS override rule, split DNS view, or isolated domain controller DNS configuration. The goal is to show how name resolution stays inside the test environment and avoids changing production DNS.
Please see Veeam Backup and Replication: PowerShell must be Remote Signed, how to Prevent Automatic Driver Updates in Windows and Xen-Orchestra, and how to Switch from IP Addresses to DNS for Backup Infrastructure in VBR.
Validate Access Before the Test
A recovery test can fail before it starts if the one person with the encryption key, the backup console, or the firewall access is unavailable. Confirm access ahead of time. Document who has access to:
- The backup console.
- The hypervisor or cloud console.
- Domain admin or break-glass credentials.
- Encryption keys, or the key custodian.
- Repository access.
- Firewall or network changes.
- DNS changes.
- Application admin consoles.
- Monitoring tools.
Then test that the access actually works before the window opens. A documented account that nobody can log into is not access.
Security note: do not screenshot or publish passwords, tokens, secrets, license keys, customer names, public IP addresses, private infrastructure details, or sensitive diagrams unless they are fully redacted. If a screenshot cannot be safely redacted, recreate it in a lab or omit it. The evidence you keep should prove the test happened correctly, not expose how to break into the environment.
What Not to Capture
Some evidence should not be included in a public article, shared report, or customer-facing document unless it is fully redacted. Do not publish the following without sanitation:
- Password fields
- API tokens or secrets
- License keys
- Public IP addresses
- Customer names
- Internal domain names
- Full firewall rule bases
- Backup repository paths
- Service account names
- Cloud subscription IDs or tenant IDs
If a screenshot cannot be safely sanitized, recreate the view in a lab or describe the evidence in text.
Create an Evidence Folder
Decide where the evidence goes before the test, not while you are scrambling during it. A simple, consistent folder structure works:
- 00-Plan
- 01-Before-Test
- 02-Backup-Evidence
- 03-Network-Evidence
- 04-During-Test
- 05-Validation
- 06-After-Test
- 07-Lessons-Learned
Name files consistently so they sort and make sense later. A date prefix plus a short description works well:
- YYYY-MM-DD-before-backup-dashboard.png
- YYYY-MM-DD-restore-point-selected-fileserver01.png
- YYYY-MM-DD-test-network-firewall-rules.png
- YYYY-MM-DD-application-login-validation.png
Consistent names turn a pile of screenshots into a usable record. Six months from now, the file name should tell you what it shows without opening it.
Please see How to remove a Repository from Veeam Backup and Replication, how to Update Veeam Backup & Replication to Build 13.0.1.2067, and how to Fix broken Repository Path in Veeam Scale-Out Backup Repository.
Final Pre-Test Checklist
Use this checklist before you click Restore. It stands on its own.
ItemEvidence to CaptureCompleteRecovery scope approvedWritten scope listing systems in and out, approved by the owner[ ]Success criteria documentedRTO, RPO, and pass or fail criteria recorded[ ]Backup job completed successfullyScreenshot of the last successful run for each workload[ ]Restore point selectedRestore point date, time, and source job recorded[ ]Backup repository health checkedRepository status, capacity, and warning state captured[ ]Restore target capacity checkedDatastore, volume, cluster, or cloud target capacity verified[ ]Immutability verified if applicableImmutability or lock status captured[ ]Encryption key access confirmedKey custodian available and key access tested[ ]Test network preparedIsolated network and VLAN or subnet defined and verified[ ]DNS plan documentedDNS override or test DNS strategy written down[ ]Firewall rules reviewedIsolation rules confirmed with no path to production[ ]Credentials verifiedConsole, admin, and break-glass access tested[ ]Application dependencies mappedDependency list and recovery order documented[ ]Stakeholders notifiedNotification sent and window confirmed[ ]Rollback plan documentedSteps to tear down the test environment recorded[ ]Evidence folder createdFolder structure created and ready to fill[ ]
Conclusion
A good disaster recovery test produces confidence, not just screenshots. The screenshots and notes are proof that the team understood the starting state, followed a plan, protected production, and validated the result. They turn a one-time exercise into something you can repeat and improve.
Capture evidence before the test, validate the application after the restore, and document what you learned before the next outage makes the test real.
I hope you found this blog post on “Disaster Recovery Test Checklist: What to Capture Before You Start” very useful. Please feel free to leave a comment below.
5/5 - (1 vote)
#Backup #businessContinuity #disasterRecovery #DRTesting #HyperV #NutanixAHV #ProxmoxVE #recoveryTesting #RPO #RTO #Veeam #VMwareVSphere