New year, new keytar thread.

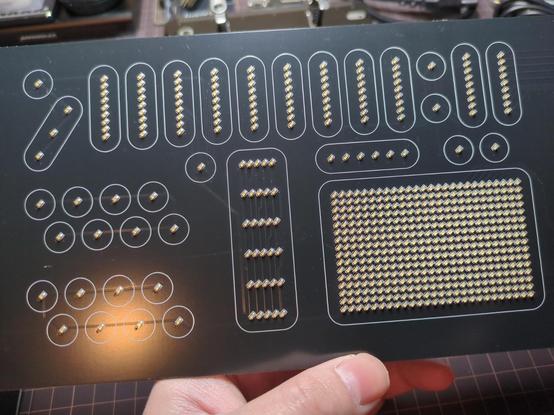
Here's my power hungry charlieplexed LED board. It will serve as both indicators for various MIDI controls, as well as a low-res display of sorts.

The top row are faders: 9 for organ drawbar stuff, and the last 2 for expression and main volume. The group of 16 LEDs at the button left are assignable toggle buttons. The weird thing in the middle, with 6 rows, acts as virtual guitar strings for the strum section. The big LED matrix at the bottom right is either an XY pad or palm mute depending on the mode your in. And the row of 6 LEDs directly above the XY pad is pitch bend.

Hopefully, I'll have the CAD model soon showing how this fits in with the touch panel.

#kicad #pcb #diy #midi #keytar

Nothing exciting yet, but the general layout of the keytar's motherboard has been figured out.

Most of the usual audio and MIDI I/Os. There's a 13-pin mini DIN, similar to the one used on the Roland Guitar Synth, to use as my "omni" cable. I'm hoping to have it break out all of the jacks next to it to a guitar pedal looking hub. That way the keytar can be powered from a single cable that also handles all the audio and midi stuff.

The last of the major boards that make up the keytar (I think). This one has all the analog sensors that track the positions of the velocity sensitive keys. There will be four of these boards, daisy-chained with the connectors on the back, to make up the full 160 note isomorphic keybed.

Still cleaning up and revising these, but I think I can finally get everything into CAD to start the industrial design process.

#kicad #pcb #diy #midi #keytar

Finally getting into the CAD portion of the keytar project.

I guess this can be considered the guts of the "guitar body" for the keytar. The LED board will respond to the capacitive touch panel above it – hopefully indicating fader positions, which buttons are toggled on, virtual string strumming, etc. The beige looking panel on top is a cork gasket to protect the touch panel from the aluminum enclosure.

(Obviously the pins of the cartridge slot will be trimmed down and not magically colliding with the stuff above it. 😅 Still have to decide on the final location when I design the body.)

#freecadfriday #freecad #kicad #pcb #diy #midi #keytar

Huh. You ever spend hours designing a circuit board thinking it will go together a certain way, then look at it and decide you want everything exactly flipped?

I think I can shave off, like, ~9mm of keytar thickness with the MIDI DINs and audio jacks on the otherside of the board. Which may not seem worth it, but it puts it closer to a typical guitar body.

Moving through-hole components *should* be easy enough, but I'm picky and also want the microcontroller on the other side, further from the enclosure for Bluetooth reasons.

Wait. Nevermind. I'm dumb. If I do that then there won't be room for the LiPo battery.

About two and a half octaves of velocity sensitive keytar goodness. There will be four of these modules that can either operate together, as a single keybed, or divided into separate MIDI channels.

#freecad #kicad #pcb #maker #diy #midi #keytar

Working out the enclosure for my metal slab of a keytar. 😅 Very much inspired by early analog synths.

Also my first time using the sheet metal workbench in FreeCAD. The tabs for the wood panel mounts didn't work like I initially expected, but everything went smoothly after figuring that out.

#freecad #cad #maker #diy #midi #keytar

I think I've finally finished the boards for the keytar. Unfortunately, I don't know of a convenient PCB manufacturer in the US that offers assembly. I can solder most of them myself, but the board containing 576 LEDs might be a job for a pick-n-place machine. 😅

I'm considering going through @aislerhq to have them made. Has anyone in the states tried them before? Guess I'm worried what the customs situation might look like. 😬  

More keytar updates soon!

#aisler #kicad #pcb #diy #midi #keytar

Heh, keytar has SynthCarts now.

This is probably the coolest dumb/pointless feature I've ever added to a project.

I (eventually) want to make some digital synths and stuff them into cartridges so they're swappable with the keytar. Excited to make a few and slap some retro cart labels on them.

#freecadfriday #freecad #cad #maker #diy #midi #keytar #synth

Tada. A fully assembled keytar.

This should be enough to start ordering parts and building, but I want to try my hand at making some photo-realistic renders in Blender now. 😅

#freecadfriday #freecad #cad #maker #diy #midi #keytar #synth

The boards for the keytar are finally here. This may be the one I'm most excited about. 576 blinky LEDs that will serve as the main display for the faders, buttons, and XY pad.

#diy #maker #pcbdesign #midi #keytar #synth

@ryan Ya know, all this time while I've been watching you design this thing and it never occurred to me what the individual pieces were going to look like when combined. Suffice to say, this is not the object that I was picturing in my mind. Definitely a different version of "keytar" than the mental image I've had in my head.

That being said, this is freakin' COOL and I'm looking forward to seeing (and hearing!) it when you are finally able to get it built! This is an impressive thing, buddy! 

@SynAck Those kind words mean more than you know. 😅 It looks a lot different than I originally planned so I absolutely get that. I also dropped a bunch of stuff that was becoming too complicated. Happy to hear it's earned some cool points.
@ryan Looks amazing, and it has been a pleasure to follow this project. Very interested to see and hear it.
@Lunalucardrose20 Thanks! I appreciate you checking out my project ramblings.   Hopefully it won't be too much longer before I can show everything it does. Excited to get this thing built and share it.
@ryan Most awesome thing I have seen today by far!
@doragasu Thanks! My projects can be very utilitarian in design, so I wasn't sure how it'd be received. 😅 Excited to get it built and start testing in the real world.