Here is another adventure I haven’t had the opportunity to pursue in its original form. I know it only from its reputation as a tournament module. If you’ve never heard of that before, people would play the scenario at conventions, and they would get points for different objectives. When D&D Beyond released a preview version of this adventure, Descent into the Lost Caverns of Tsojcanth, they included a score sheet in case you want to recreate the experience. That version of the adventure doesn’t include the introduction, and only details the Lesser Caverns.
The Lost Caverns of Tsojcanth wasn’t just well known for being a tournament module or for introducing Iggwilv (Tasha). It’s also where a lot of monsters that went on to be detailed in the Monster Manual II were first published. This included some new demon lords, some iconic demon types, the behir, and the derro.
Original Credits for The Lost Caverns of Tsojcanth
Design and Development: Gary Gygax
Development: Gary Gygax, Allen Hammack, Jon Pickens, Edward G. Sollers
Editing: Edward G. Sollers
Art: Jim Holloway, Erol Otus, Jeff Easley, Stephen D. Sullivan
Playtesting: Jeff Dolphin, Luke Gygax, David Kuntz, Richard Kuntz, Sonny Savage, James M. Ward
Special Thanks: Rob Kuntz
Artwork
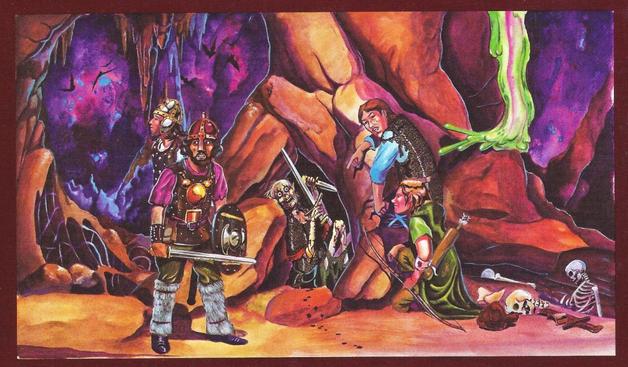
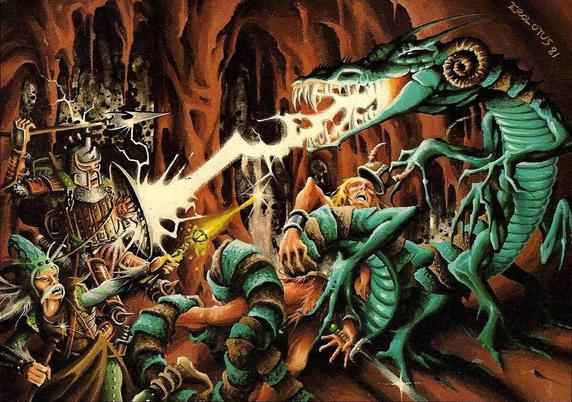
This chapter includes fourteen pieces of art. This includes three maps (including a location map for the Yatil Mountains), seven scenes from encounters, three locations, one character portrait, and an image of the doorway on the Infinite Staircase that leads to this adventure.
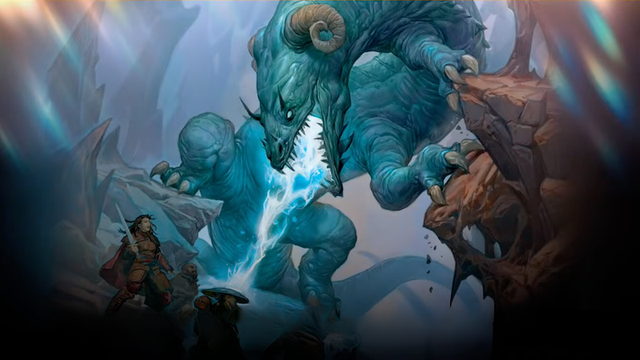
I particularly loved the image of the cavern of corpses and the altar room. The black and purple, and black, red, and dark green of these two pieces really sell the atmosphere of the locations. I’m also a fan of the image of Drelnza that is included in the chapter.
The Framing Device
If you are using Nafas as a framing device, he summons the PCs to give them another mission, this time telling them that a desperate nation is seeking an archmage’s lost treasure, which includes great knowledge and power. Most of the framing devices I’m fine with. They are quick and do the point. But in this instance, it feels a little more nebulous to say “a nation wants this wealth and power” than some of the previous “this person needs help,” or “this person wants to undo the harm they did.”
I think even more than if I was running this as part of a campaign, as a player I would be a little wary of being sent on a mission to make one nation particularly more powerful than its neighbors without a lot of backstory on the balance of power in the region. Is this a nation struggling to survive, that does right by its people, or is this a questionably moral place, seeking power to maintain a stalemate with other questionably moral nations?
This adventure has a canon location in the Greyhawk setting, but this adventure provides alternative locations for using it in Eberron and the Forgotten Realms. I appreciate that the Realms location is near Elturel, which at least namechecks another location from 5e’s history.
The portion of the adventure released earlier this year has both of the above suggestions, but adds in a location to use in Dragonlance. It uses the Speaker of the Suns of the Qualinesti as a potential employer, but given that elves, at least during the War of the Lance era, don’t really trust anyone that isn’t a Qualinesti, and they tend to avoid anything that looks like evil magic, I would probably reframe this as having the PCs hired by one of the Heads of the Orders of High Sorcery, recovering a famous lost spellbook left by one of the Black Robes. If you wanted to name-drop someone, you could even reframe this as a lost laboratory of Fistandantalus.
Adventure Overview
If you are still wandering around trying to find the entrance to this adventure, you may want to backtrack and camp for the night, because there’ll be some spoilers, assuming you may want to be a player in this adventure, or if you want to be surprised.
The adventure starts with the PCs meeting up with an agent of the March of Bissel, who wants to hire them to explore the Lost Caverns of Tsojcanth, minus a ten percent finder’s fee, and one specific item, the artifact known as Daud’s Wondrous Lanthorn. To facilitate this, the PCs are given a basic map of the Yatil Mountains and the paths through it, with a verse written by Iggwilv that gives a clue as to where in the mountains the caverns are located.
The Yatil Mountain map shows multiple mountains, passes through the mountain, and (on the DM’s version) locations where you can place encounters, rather than rolling randomly. The map is broken up into four-mile hexes, which I appreciate as a nod to the Greyhawk campaign maps, which were usually expressed in hexes.
If the PCs can’t decipher the clue on the map, several of the encounters include characters that can share additional hints to the location. Even creatures that are often assumed to be hostile have notes on interacting with the PCs, including a blue dragon, a troll, and a fire giant. The fire giant gives the PCs a mission that might point them at the trolls, and the trolls may give the PCs a mission to eliminate another band of trolls living in the caverns.
The Lesser Caverns
Once PCs find the entrance, they’ll be entering the Lesser Caverns. This is a pretty wide open level that includes an underground river and mushroom farms, in addition to the usual caves that might house some lurking creatures. I’m not going to go room to room, but right off the bat, there is a puzzle that isn’t mandatory, but may push the PCs in a specific direction and may yield some treasure, and I’m just going to say, I would never do what is needed to interact with this puzzle. Not that it’s difficult, it’s just not something I would assume to do when faced with the description.
What I like is that just like the locations outside of the dungeon, there are several places where interacting with some of the inhabitants pays off later. For example, if you are friendly with the pechs, they can help you out if your basilisk encounter leaves one of your party members petrified. The biggest set piece encounters in this section involve two genies, one of whom is bound to guard the caverns, and another genie that has been imprisoned. This is another area where knowing the pechs pays off. The imprisoned genie has an axe to grind with the other genie, who imprisoned her, so the PCs may be asked to deal with the other genie.
If the PCs are really lucky, there is a chance they only encounter a cloaker, some gargoyles, a chimera, and a gorgon. Most likely they’ll float down the river where it’s more likely they’ll flow further down the river, and potentially all the way to the encounter with the trapped marid, which leads to the dao, etc. My point is, this may not be a “explore every room” kind of dungeon, and it should be evident to the PCs that this area is mainly some natural caves that have a few locations intentionally carved into them. It is possible for them to miss some instructions they may need later near the entrance to the Greater Caverns, so if you don’t think your PCs will want to backtrack, you may want to be really obvious when you describe how the clue is hidden.
Greater Caverns
This is where things get weird. This section of the caverns has touched other planes, and the Abyssal influence makes it harder to rest here. There are a few more inhabitants that aren’t automatically hostile, like the behir and a galeb duhr. There are lots of creature encounters and various traps. There is a false altar containing a facsimile of the Demonomicon of Iggwilv that opens a portal to the Abyss if disturbed. There are environmental hazards enhanced by the abyssal influence, and then there is . . . that room. There is a grotto that is basically a dead end, but anyone entering, and anyone within 10 feet of them, is plane-shifted to the Abyss, Elysium, the Nine Hells, or Mechanus. There are short encounters that the PCs can play out to find a portal back from that plane.
This area is one of those things that sounds fun, but may be extremely frustrating to the players. It is possible that everyone in the party isn’t 10 feet from the first person to enter the room, meaning that the party may be forcibly split up, which makes some of those kinds of simple encounters more dangerous. Whenever someone comes back to the grotto, they may get shifted to another plane, unless the randomly rolled plane is the same one they just came from. This is even worse if the PCs do get split up, because then, when they come back, some of them may be safe when they return to the grotto, and some of them may take off again, on the same roll. My advice would be to fudge this, and make sure if anyone in the party goes, everyone does, and maybe think about saying that instead of being immune to being shifted to one plane for 24 hours after they have visited, maybe make them immune to the cavern’s effect for 24 hours.
To reach the inner sanctum of the dungeon, each one of six doors has to be opened. These are arranged in a circle, and each door can only be accessed via a specific tunnel. Each time the PCs open one of these doors, they are teleported to a different location on the level. That means that even if the PCs didn’t encounter some of the hazards, traps, and monsters, the teleportation effect might drop them very close to one of them that they previously avoided.
In the final room, the PCs run into Iggwilv’s daughter Drelnza, who is guarding what’s left of Iggwilv’s treasure in this dungeon. She acts like she was trapped here, giving her a chance to charm PCs and ambush them. If they survive the fight, the Lanthorn is hanging in the chamber, but the rest of the treasure is hidden in Drelzna’s coffin, which is recessed into the stone dias and has to be searched for. Inside that, there is some artwork, gems, and lots of coins, and a number of books that are up to the DM. The suggested books are the various manuals and tomes that boost ability scores, and you may not want to let everyone pump up every stat, but at least one that’s useful to each of your PCs might be nice to have around.
The DM is also told that you could drop the Demonomicon of Iggwilv in the treasure, and directs PCs to Tasha’s Cauldron of Everything for the statistics of that artifact.
Thoughts on Chapter X6: The Lost Caverns of Tsojcanth
I don’t know why I feel the way I do about this adventure, but even though I know this is an older adventure, at least as presented here, it feels a little more like what I expect from dungeons in the current era. Some of the clues aren’t needed to figure out what to do next, they’re just a nice head’s up to help cut down on time. There are a ton of iconic D&D creatures, and a lot of them are set up as roleplaying encounters, at least until someone in the party gets twitchy.
That doesn’t mean there aren’t a few old-school frustrations. I detailed the planar trap in the grotto above, and while I like the simplicity of just needing to go around the passages to open each of the doors to reach the inner sanctum, if the PCs don’t know there are multiple doors, they could get really frustrated if they open a door and then get teleported into another part of the dungeon, without realizing that their destination is probably fairly close to where they need to go for the next door. They may not even know there is a next door, making the puzzle a little harder to finish, especially if they did miss the extra clues.
Despite some of the frustrations, this dungeon feels very D&D to me, and it’s a way better “iconic” experience to show people what older editions of D&D were like than dropping them into the Tomb of Horrors.
If you would like to contribute to my continued bad habit of reviewing new games, you can hit up the affiliate link below if you would l like to check out more Tsojcanth goodness.
https://whatdoiknowjr.com/2024/07/19/what-do-i-know-about-reviews-quests-from-the-infinite-staircase-part-6-chapter-6/
#DD #DD5e #dnd #DnD5e #DungeonsDragons #DungeonsDragons5e #DungeonsAndDragons2014 #TheLostCavernsOfTsojcanth #Tsojcanth