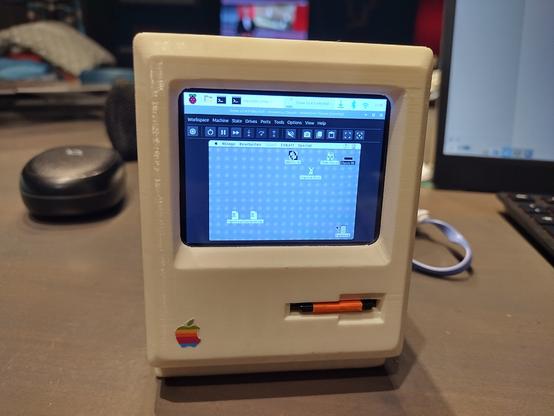
@UpLateGeek @MARCHintosh nice work! That case is *so* hard to get open.

Search for the posts tagged #tinyMac to see some photos of my and other folks’ builds.

There’s plenty of space for a Pi 3A+ and a waveshare 2.8” LCD. I crammed a little audio amp and speakers in mine, too.

Oh look, a wild Maclock has appeared! That must mean it’s time to start my #Marchintosh project, replicating the adorable #TinyMac project. For scientitous research purposes, of course.
#RetroComputing #VintageMac (-ish)
@paulrickards My #MARCHintosh project also involves making a #TinyMac.
While I progressed on the software side (running #BasiliskII on framebuffer, with multiple configs chosen at boot time if a key is held), I lack hardware knowledge.
As your project seems quite advanced, could you share your internal wiring and integration of the CPX to send keys?
Is its internal speaker enough for gaming audio?
Did you also integrate the front knob and buttons?
Thanks in advance.
👨‍💻🤡 "I built" a tiny Mac! Translation: I glued some wires to a Raspberry Pi while watching YouTube tutorials. 📺 Apparently, assembling a pint-sized museum artifact with 63 more RAM is groundbreaking. Who knew #nostalgia could be so... minimal? 😂
https://www.jeffgeerling.com/blog/2026/pint-sized-macintosh-pico-micro-mac/ #tinyMac #RaspberryPi #techhumor #DIYprojects #minimalism #HackerNews #ngated
I built a pint-sized Macintosh

To kick off MARCHintosh, I built this tiny pint-sized Macintosh with a Raspberry Pi Pico: This is not my own doing—I just assembled the parts to run Matt Evans' Pico Micro Mac firmware on a Raspberry Pi Pico (with an RP2040). The version I built outputs to a 640x480 VGA display at 60 Hz, and allows you to plug in a USB keyboard and mouse. Since the original Pico's RAM is fairly constrained, you get a maximum of 208 KB of RAM with this setup—which is 63% more RAM than you got on the original '128K' Macintosh!

Jeff Geerling

The #TinyMac can have a little HD 20SC as a treat.

#RetroComputing #VintageApple #VintageMac

@colin_mcmillen it’s all sealed up now, but if you search for my posts tagged with #tinyMac you’ll see all the work that led up to this.

Also: it’s not pretty and I’m not proud 😆

Anyway, this feels relevant (playing on Linux, obvs, not Mac OS) #tinyMac

Would I do anything different if I did another #tinyMac build?

- I'd love to make use of the touch switch in the top of the case for something, but I snipped the wires off that early on

- similarly, it would be nice to have made use of the dial on the front to control volume

- adding a data enabled USB-C socket, to allow connection of a hub and peripherals would be nice, or a 3.5mm audio jack (although Bluetooth is pretty good for most things)

As the #tinyMac currently stands, I reckon I've spent about £90 on it. I've spent more overall, though, as I've bought a few parts and replaced them with alternatives. Notably I've gone through a few iterations of amplifier and speaker combinations to get rid of the CPU/BT/Wifi noise, and there's an assortment of USB-C sockets and cables in my bits box now.

Final bill of materials:
- Maclock donor case
- Raspberry Pi 3a+
- Waveshare 2.8” LCD
- 10cm GPIO extension cable
- 15cm SD extension cable
- 2x miniature monitor speakers
- USB-C PD trigger
- some wires
- Kapton tape
- hot glue

Plus an SD card, USB-C PSU (borrowed from my Steam Deck), and a Bluetooth keyboard and mouse (any will do, but the Apple ones look neat)

#tinyMac