@knees To add to the chorus of wonderful replies from all ( @tomnorthfilm @shom @tapasinthesun) …here is my method (sorry it's a bit of a book), that works best for me. I tried to approach as well as I could the workflow I was getting from #NegativeLabPro to maintain metadata, as I recently went all-in on the switch to #darktable so I can ditch #Adobe #Lightroom.

When I develop film, I write on a piece of painters tape the film type, speed, speed shot at, and dev time/temp. This gets stuck to the dev tank while developing and then on the piece of wood I hang my negs from to dry above my bath tub. This seems unnecessary if you're only developing a single roll or a single film stock/shooting speed but if you have a mix it’s a lot easier than trying to remember the next day which films were shot at which speeds, etc.

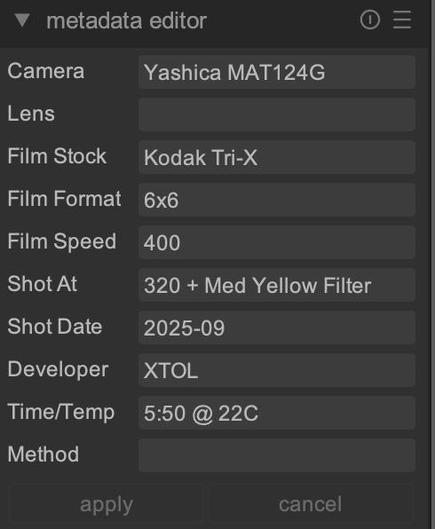
After drying I scan via digital camera and import into darktable. In the light table view, I have a set of custom xmp metadata fields that I use to record these things. If I use multiple lenses in a roll, I leave that blank, and if I am using a camera with a fixed lens, I leave it blank. 4x5 is the only photography that I record the aperture/shutter settings for every single photo, so I don't generally need to label anything like aperture and shutter speed…for me personally that's more time than I’m willing to spend while blasting through rolls of 135 or 120. 4x5 has it written on the negative sleeve if I need to refer back to it.

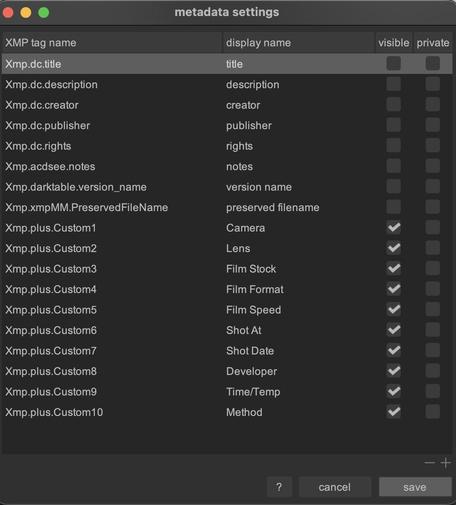
I've attached a screenshot of both the metadata editor in the light table view and the metadata editor preferences showing the specific fields I'm using. I can then also search and filter by these looking through photos (e.g. looking for images that were tri-X pushed two stops or images that were developed in Rodinal 1+25)

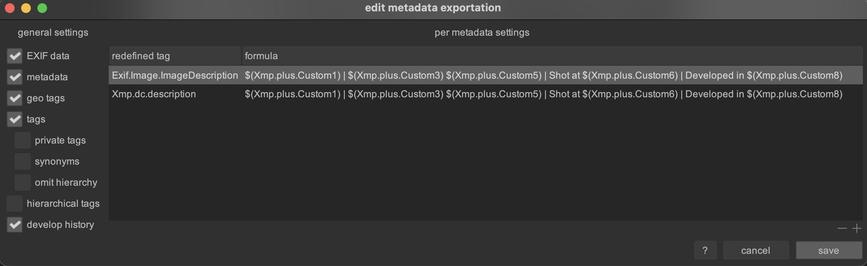
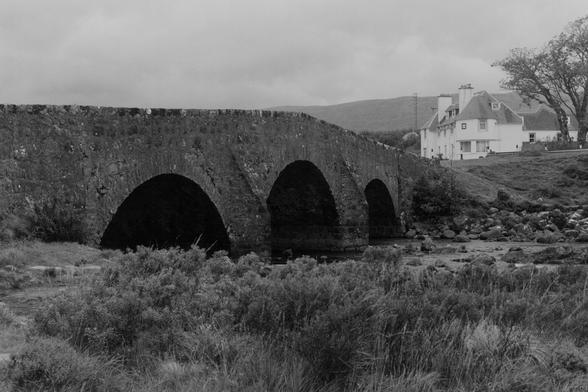
I then edited the export metadata settings to pull the data from some of these fields and concatenate them into the description field (screenshot of those settings added as well) so that for the Mastodon client I use (usually Mona) it automatically pulls in as alt text showing the film stock, developer, etc. (see final pic below). I usually try to manually add additional alt text about the image itself, but at least I'm not having to paste in the film/camera/etc.

If you do want to go down the road of recording extra data for every single image then you can probably just shift around which data fields you want to use to include things like aperture, etc. I don't remember offhand how many custom data fields there are, but you can probably also add/overwrite the standard exif/xmp fields for those values as well, but for my needs that’s avoided entirely...the settings from my digital camera will be what is in those fields, since I don't use/ingest those in any way so I haven't cared enough to clear them out.

Hope that helps you or anyone else reading and you continue to enjoy your journey.

#FilmPhotography #AnalogPhotography #BelieveInFilm #DevelopYourOwn #FOSS

Forgotten Roll: Kodak Ektar 100

A forgotten roll of Ektar 100.

https://islandinthenet.com/kodak-ektar-100/

These pictures come from some of the first rolls I'm home scanning with a #valoi system. I'm using the #valoieasy35 + #fujifilmxt5 + #negativelabpro. My computer is on the verge of crashing every time I ran #negativelabpro, but I'm liking the results!

#photography #believeinfilm

I share a turning point in my film journey: discovering flaws in lab scans — missing details, overexposed areas, and tones that didn’t reflect the negative.

Trusting your own interpretation is key in film photography

Unfortunately, due to some technical issues, this video is a bit shorter than I originally planned.

#shootfilm #keepfilmalive #filmworkflow #negativelabpro #epsonv800 #filmscanner #kodakgold200 #ilfordxp2 #blackandwhitefilm #photography #believeinfilm

https://youtu.be/nUTKOxCKBuA

Lab Scans vs My Scans: Why I Trust My Analog Workflow #analogphotography #filmcamera

YouTube

@kaiser_franz "...If #NegativeLabPro fulfils their goal of making a standalone, that would also be a big step - I love how NLP renders my negatives..."

A stand-alone negative conversion alternative is Filmomat SmartConvert (https://www.filmomat.eu/smartconvert). I think there may be a free trial on that. I keep thinking of giving it a try and then forget. (I don't have LR or PS.)

Filmomat — SmartConvert Negative Conversion Software

Convert DSLR-scanned negatives easy and fast with Filmomat SmartConvert. The new standalone tool for negative conversion.

Filmomat

First attempt at B&W reversal in #darktable via #negadoctor. Don't remember offhand which camera/film stock this was (likely #IlfordHP5 or #KodakTriX) but it was scanned via #NikonD850 and I edited straight from the RAW file. This is from a few months back.

I used negadoctor and the monochome module, then because the image was pretty flat I cranked up the contrast. I may have overdone it, but I really like high contrast B&W so others may disagree.

I also took a digital camera out and about today, and I think that will be my first foray into a digital RAW workflow with darktable.

Clearly, I have a lot to learn - but I'd love to get away from Adobe. If #NegativeLabPro fulfills their goal of making a standalone, that would also be a big step - I love how NLP renders my negatives so having that happen on the front end (either on my MacBook or via WINE on my Linux machine) would also be a game changer.

As always, open to suggestions!

#FilmPhotography #AnalogPhotography #BelieveInFilm #DevelopYourOwn #FOSS #Linux

My new blog is out
"Rediscovering the Negative: Why I Scan My Own Film"

Like many photographers rediscovering film, I assumed a professional lab scan was the best possible outcome — some kind of objective truth of what my negative contained.

Clean curves. High-end Noritsu or Frontier scans. Digital perfection.

But the truth?

A lab scan is someone else’s interpretation of your negative.

https://photography.myvortexcloud.com/blog/analog-workflow/

#FilmIsNotDead #scanfilm #epson #negativelabpro #photography #workflow