Refer to https://pixelfed.social/p/Splines/793554853964898442 for the backstory on this post.

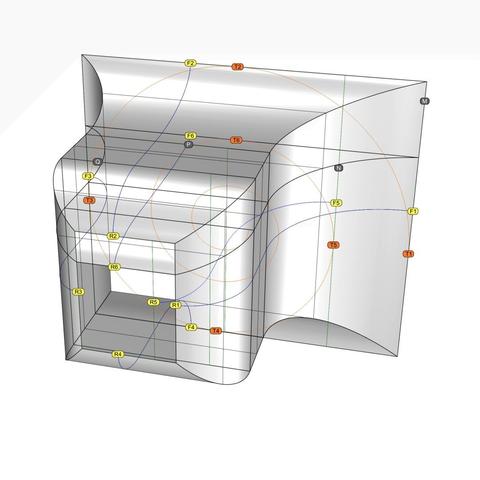
This is a perspective view showing #scroll #scaffolding surfaces #extruded from #primaryCurves F1-R1, F2-R2,…. Be sure to follow these blue curves from back to front and then back again.

Metaphorically speaking, we want to use these blue curves as #walkingSticks to find the curves that meet at the front tangent points T1 through T6 and corresponding tangent point in the rear (not shown), WHILE remaining faithful to the original curves we extracted from #Vignola's original sketches.

This means that the point F1 should somehow move toward T1, F2 toward T2, and so on, with corresponding movements on the rear rectangle, yielding us 6 new #secondaryCurves.

Being "faithful" to the original means that when secondary curves derived from horizontal #primaryCurves are viewed from the top, corresponding curves are indistinguishable from each other, even though they are clearly different curves with distinct trajectories. Secondary curves derived from vertical primary curves must be indistinguishable from each other when viewed from a side.

In order to accomplish this feat, we need the remaining #volute tangent points on rectangles P, Q, and R. That means we first need the corresponding volutes that are used to #modulate the scroll surface.

In https://pixelfed.social/p/Splines/792616677005177924, we used the #scale operation to scale the original volute down from 3x to match the scale of our model using a #uniformScaling factor of 0.33333333.

In https://pixelfed.social/p/Splines/792966507797633558, we can see that the frame rectangles Q and R have independent scaling factors that are different in the X and Y direction. So here we use #nonuniformScaling.

To get the modulating volute for Q, scale the original volute by 56/112 in X direction and 80/128 in Y direction. Scale factors for the modulating volute at R are 28/112 in X direction and 48/128 in Y direction. P is same as Q.
Splines (@[email protected])

#SeeFeelTouchHug In both #art and #engineering, one must be able to both #see and #feel things that might not be there (yet). We were able to "see" the outlines of the #scroll surface from #imageScans of #Vignola's sketches in https://pixelfed.social/p/Splines/793169876757012827 and https://pixelfed.social/p/Splines/793215298082967733. Vignola's images are on a 2-dimensional surface, as are the outlines we extracted from them. We believe the scroll surface also exists, but it is not yet manifest in 3-dimensional space. So, like a visually impaired person, we try to "feel" our way to the scroll surface using the outlines as our #walkingStick. This diagram is identical to that in https://pixelfed.social/p/Splines/793493316852849994 but with the rear ends of the horizontal #primaryCurves marked with R1, R5, and R3, which are paired with F1, F5, and F3, respectively. We know that the scroll surface must #touch the tangent points T1, T2, and so on in front, as well corresponding tangent points in the rear (not shown here to reduce clutter). In https://pixelfed.social/p/Splines/792906324854792619, I mentioned that a scroll starts with a volute in front and is #modulated by as many as six volutes of different shapes and sizes as it reaches the back, with the scroll surface tightly hugging the volutes at EACH contact point in ALL 3 dimensions. In other words, it is not sufficient for the scroll surface to "touch" the #volute #spirals just in the front and rear. It must also "hug" the intermediate #modulatingSpirals. I will first show this technique with 4 modulating spirals using rectangles M, N, P, Q, and R as their frame, and add more later on. Intuitively, we know that if we use curve F3-R3 as our walking stick on the straight vertical extrusion of that curve, we will feel the scroll surface *somewhere* on that extrusion along every point from front to back. We can narrow it down further by excluding portions above and below as we approach rectangle R in the rear.

Pixelfed
This is how a #medallion looks like when #extruded from the #primaryProfileCurves of the #IonicVolute #spirals.

These medallions are not part of the #IonicOrder and can be used as stand-alone pieces.

See https://pixelfed.social/p/Splines/792724394068855690 for how the curves are extruded.
Splines (@[email protected])

We completed the #primaryProfileCurves for the classical flat #IonicVolute in https://pixelfed.social/p/Splines/792616677005177924. To create a 3-dimensional slab with a recessed #channelGroove for the volute, you will need an outline of the volute without the inner #spiral arms. To create the outline, make a copy of the spiral curves and work on the copy so that you don't destroy the originals. Drop a straight vertical line from the start point of outer Arc 1 of the spiral to the maxima or horizontal tangent of outer Arc 5. Trim away all other interior spiral lines and close the curve as shown in the left figure. #Extrude the closed outline curve front to back by 1 part or 8 units in the side view. Extrude the #closedCurve of the inner and outer spirals by 2 parts or 16 units in the side view (but without the 6 unit extention on the top, which is only used when integrating the volute face with the #capital). Perform a #booleanUnion of both solids, and remember to check for #nakedEdges and #nonManifoldEdges. The #volute design can be used outside of the #IonicColumn, such as in a #medallion. For a medallion, you have two options regarding the size of the enclosing circle. You can either use the circle that Arc Zero lies on, or you can use the circle that Arc 1 lies on. Obviously, the latter is more compact. Just remember that the center for the larger circle is #groundZero or point 4 and the center for the smaller circle is point 1. In either case, inset the chosen circle with a concentric circle whose radius is 1 part or 8 units less. The figure on the right shows the outlines of the enclosing circles based on the size of Arc 1 with center at Point 1.

Pixelfed
Extruded City of Color by Kaye Menner Canvas Print / Canvas Art by Kaye Menner

Purchase a canvas print of the digital art "Extruded City of Color by Kaye Menner" by Kaye Menner. All canvas prints are professionally printed, assembled, and shipped within 3 - 4 business days and delivered ready-to-hang on your wall. Choose from multiple print sizes, border colors, and canvas materials.

Kaye Menner Official Website
Extruded City of Color by Kaye Menner Canvas Print / Canvas Art by Kaye Menner

Purchase a canvas print of the digital art "Extruded City of Color by Kaye Menner" by Kaye Menner. All canvas prints are professionally printed, assembled, and shipped within 3 - 4 business days and delivered ready-to-hang on your wall. Choose from multiple print sizes, border colors, and canvas materials.

Kaye Menner - Website