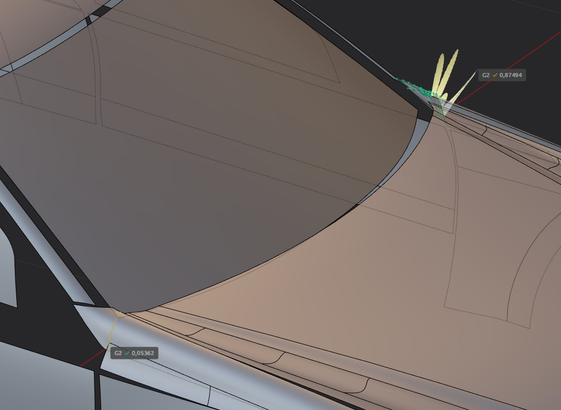
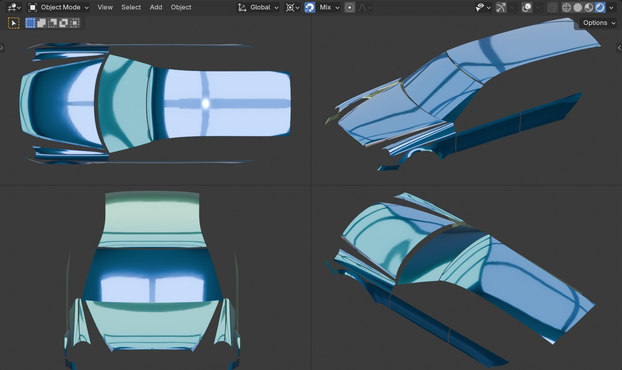
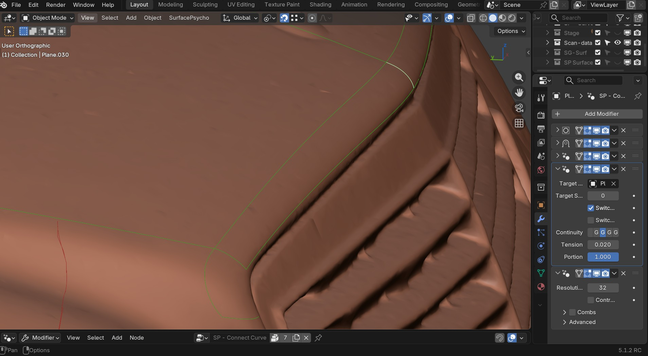
Maybe I'm not great with Plasticity and Class A modeling, but at the bottom left the continuity error from Surface Psycho is acceptable (marked in green), while the one from xNurbs on the same NURBS patch, where I used the "Square" command (xNurbs' dedicated command for Class A patches), has a bigger error, highlighted in yellow, and it's really obvious. Surface Psycho 1, Plasticity 0.
#CAD #b3d #plasticity3d #surfacepsycho #nurbs #blender3d #blender
In my rush to build a model with surface patches on the laser scan, I completely forgot that you can trim surfaces, which is essential. I tried it out on the rear door and side windows of this Mercedes, but I think I’ll need to trim surfaces in other spots too.
I proceed slowly, because I am making so many attempts and tests on how to make surfaces. #SurfacePsycho #CAD #b3d #Blender #nurbs #Blender3D
This is an old exercise from the Autodesk Alias docs.
I’d already tried it back when I started making my first models with Surface Psycho, but I couldn’t get anywhere.
Today I gave it another shot and pulled it off.
Now I think I could even manage to add the fillets and make it almost a Class A model, these are all primary surfaces.
With Surface Psycho it’s all about the order you do things; first you do some stuff, then you do the rest. #CAD #nurbs #Blender3d #SurfacePsycho #b3d
The more variable I add in order to control patches, the more complicated it gets... just trying to get tangency between surfaces with a nice control cage is a nightmare, and I don’t even want to talk about G2 continuity, that’s basically hell... But at least I’ve learned to tweak every part of the surface, from a single vertex to the final result. Maybe one day I’ll pick up a new trick or two... #surfacePsycho #b3d #blender3d #CAD #nurbs
Hi, in the video you can see how to control patch shapes using the loft section curves. As you can see, by adjusting the tension you can selectively tweak the profiles, and that then changes the loft patch. This way, by modulating the tension of individual rows of the control cage, I can get patches with varying tension instead of them all being the same. It’s just an idea to show how is the surfaces control with #SurfacePsycho. Cheers. #b3d #blender3d #CAD #nurbs
This image, it seems something trivial, but in reality it is a Nubrs model, with a higher quality than those I have done in the past, this model in fact has regular Nurbs patches, with pretty nice continuity G2/G3, But I'm still learning. #b3d #Blender3d #blender #nurbs #CAD #classA #SurfacePsycho
Tips on using Surface Psycho's "Crop or Extend Patch" and SP’s Rise or "Lower Degree Bezier Patch", then I made instances with Alt+D now the copies share the same set of CVs. Making instances is really handy.
Now, as you can see in the video, splitting the big surface into three parts gives me a more even and better distribution of CVs, while I still have control over all three patches that can be tweaked with the loft curves. #b3d #surfacepsycho #CAD #Blender3D #nurbs #engineering

Hi, while I was making some new curves I got another idea: to also use the Surface Psycho geometry node to connect the curves "SP - Connect Curve".

This lets you get coincident endpoints G0, or G2/G3 where needed.
Of course, you'll always have to adjust the tension.
That way you'll have the curves ready to create the Patches. 😉 #SurfacePsycho #b3d #Blender3d #engineering #CAD

These are the instruction for the Reverse Engineering Using #Blender and Surface Psycho. showed in the video.. #b3d #blender3d #surfacepsycho #CAD #nurbs

Hey psychos I made a short video, originally it was 20 minutes long, so it’s a bit fast.
I hope you don’t freak out watching it.
In it you’ll see how to reverse #engineer using #Blender and Surface Psycho; I walk through my workflow for creating #NURBS Bezier patches and curves.
I’ll try to make a longer tutorial later with better quality, for everyone else.

Bye, psychos 😅 #CAD #b3d #SurfacePsycho