By the 9th PCB, I finally got the hang of it, but these 7 segments are a bit too small to solder for my liking...

Nonetheless, all work 100% as I have already tested them all (both for shorts and opens by running a simple 1-by-1 LED test).

#soldering #sevensegmentdisplay #led

Minimalist Lo-Fi Minimalism

Whilst I’m not an ardent fan of Philip Glass, (more like an amateur enthusiast), there are certain pieces of his that I do really quite like. The violin concerto goes without saying – some parts of that are wonderful. And I quite like the Low Symphony based on the music of David Bowie.

But the piece I like the most, but really have to be in the right mind for, is his opera Einstein on the Beach. The last time I saw through the whole thing was when it was live-streamed by Elbphilharmonie back in 2023 with the narrative poems read by Suzanne Vega. It was quite something.

But when you think about it, minimalist music actually ought to go quite well with microcontrollers, so this is a short experiment into programmatic minimalism by attempt to capture the essence of one of the movements of Einstein on the Beach – the Knee Play 1.

https://makertube.net/w/5TiaDYBYDfRTp7XKq86ZLH

Warning! I strongly recommend using old or second hand equipment for your experiments.  I am not responsible for any damage to expensive instruments!

If you are new to Arduino, see the Getting Started pages.

Parts list

  • Pi Day MIDI Sequencer
  • MIDI Synth Module configured as follows:
    • Channel 1 – organ
    • Channel 2 – lower voices
    • Channel 3 – higher voices
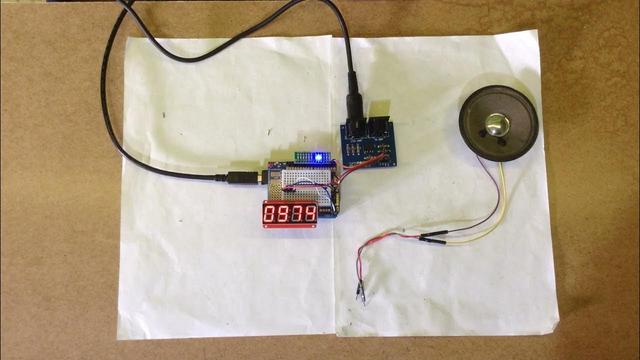
The Circuit

I’ve used the circuit from my Pi Day MIDI Sequencer which is a I2C connected 4-digit seven segment display and a MIDI interface.

The Code

The seven segment display code was well covered in my previous projects so I won’t repeat that here now.

The code supports four tracks of music as follows:

  • Ostinato, sustained bass in the organ part.
  • Two voice parts. These would ordinarily sing the numbers but I’m just having them “ooh” and “aah”.
  • A numbers part. This will actually display the numbers to match the notes being “sung”.

There is an array the top of the sketch with the main detail for a single full pass through the three bars of the main phrase. The three bars have 4, 6, and 8 beats in them and this pattern repeats in various different ways throughout the movement.

Musically there are three passes through this phrase with the bass only. Then there are two instances where the voices join in. From that point onwards the score shows a missing note at the start of one of the bars for the voices – different missing notes create variations of the music.

This is where I’ve gone more programmatic with the code in that I’m not encoding the entire score as written, but instead have a random number generator which picks a random number between 0 and 3 and depending on the result will skip the first beat of bar 1, 2 or 3, or if the result was 0 then it will play all bars fully. One of the benefits of my approach of course is that the music could go on indefinitely.

As the music has a steady pulse to it, I’ve encoded the 18 beats as a step sequencer with 36 steps. This allows me to have some silence between each sung note. The sequencer works as follows:

  • For voices, store a MIDI note number; 0 for a rest; or -1 to continue the previous note.
  • For numbers, store the number; 0 for blank (0 is not used in the music); or -1 to continue the previous state.
  • For the bass/organ – same as for the voices.

Here is the entire sequence for all four parts.

#define STEPS 36
uint8_t bass[STEPS] = {
45,-1,-1,-1,-1,-1,-1,-1,43,-1,-1,-1,-1,-1,-1,-1,-1,-1,-1,-1,36,-1,-1,-1,-1,-1,-1,-1,-1,-1,-1,-1,-1,-1,-1,-1
};
uint8_t ten[STEPS] = {
57,0,57,0,57,0,57,0,55,0,55,0,55,0,55,0,55,0,55,0,48,0,48,0,48,0,48,0,48,0,48,0,48,0,48,0
};
uint8_t sop[STEPS] = {
60,0,60,0,60,0,60,0,62,0,62,0,62,0,62,0,62,0,62,0,64,0,64,0,64,0,64,0,64,0,64,0,64,0,64,0
};
uint8_t num[STEPS] = {
1,-1,2,-1,3,-1,4,-1,1,-1,2,-1,3,-1,4,-1,5,-1,6,-1,1,-1,2,-1,3,-1,4,-1,5,-1,6,-1,7,-1,8,-1
};

I have to keep track of the current bass or voice note playing per channel so I can send an appropriate MIDI NoteOff message when required.

The general logic for playing a step for the bass or voice parts is as follows:

void doBass (int i) {
if (bass[i] == 0) {
// Rest
if (lastbass != 0) {
MIDI.sendNoteOff(lastbass, 0, MIDI_CHANNEL_BASS);
}
lastbass = 0;
} else if (bass[i] < 128) {
// New note
if (lastbass != 0) {
MIDI.sendNoteOff(lastbass, 0, MIDI_CHANNEL_BASS);
}
MIDI.sendNoteOn(bass[i], 64, MIDI_CHANNEL_BASS);
lastbass = bass[i];
} else {
// do nothing
}
}

This is the logic for playing one step of the bass part. It is repeated for the voices too.

Sequence wise, I have several routines that decide which parts of the piece is being performed. There are three main sections:

  • Introduction – three times through the bass phrase only.
  • Two full passes of bass and voices (and numbers).
  • Introduce the randomness to start skipping the first beat of certain bars.

And then I essentially repeat the last step ad infinitum.

Find it on GitHub here.

Closing Thoughts

My initial thought was to use three Arduino tones to perform the piece, then I wondered about just building a “MIDI to numbers” device and adding it to my Lo-Fi Orchestra.

Finally, I settled on using MIDI generated from the Arduino as part of its scheduling of the numbers to display. I think that was the right choice and is a nice balance of useful timbres, suitably minimalist programming, and something vaguely reminiscent of the original.

It also has the advantage that, in true minimalist style, this short sketch could keep playing for as long as I want. Certainly, for as long as the entire opera and much longer if required.

Kevin

#arduinoUno #define #ht16k33 #loficlassical #midi #Minimalism #PhilipGlass #sevenSegmentDisplay

Einstein on the Beach - Wikipedia

Pi Day MIDI Sequencer

If you write your dates month first, then 14th March is recognised as Pi day i.e. 3.14.(2022) in this case.  I’ve long had the idea of doing something MIDI or sequencer related to number sequences.  I’d like to do something with the Online Encyclopedia of Integer Sequences (OEIS) at some point, but as it is Pi day, I thought I’d start with that.

Now using the digits of Pi as the trigger for playing note values is a well trodden path, and calculating Pi to a number of decimal places is a well known and well researched task but to really get going you need quite a bit of computing power.  But what if the increasing time to calculate a digit is inherently part of the “music”?  That was my idea, so I set about looking for an algorithm to calculate the digits of Pi that would run on an 8-bit microcontroller, like my Arduino.

[youtube https://www.youtube.com/watch?v=h6bfRv2vRoU?version=3&rel=1&showsearch=0&showinfo=1&iv_load_policy=1&fs=1&hl=en&autohide=2&wmode=transparent&w=1100&h=619]

Warning! I strongly recommend using old or second hand equipment for your experiments.  I am not responsible for any damage to expensive instruments!

If you are new to Arduino, see the Getting Started pages.

Parts list

  • Arduino Uno
  • Optional: 8 ohm speaker or old headphone speaker with 220Ω resistor.
  • Optional: Ready-Made MIDI Module.
  • Optional: I2C 7-segment display module based on a HT16K33.
  • Optional: 10x LEDS and associated resistors
  • Breadboard and jumper wires

The Circuit

The most basic requirement for this circuit is some means of making a sound.  There are two options for that here:

  • Connect up a loudspeaker (and resistor) to an output pin (I’m using A0 here).
  • Connect up a MIDI interface and plug it into a synthesizer (I’m using one of my Ready-Made MIDI Modules here).

You can pick one or both of these methods.  But whilst satisfies the main aim – of having some music generated from the digits of Pi, it isn’t very interesting to look at!

So this also supports two optional display outputs, both of which are optional:

  • 10 LEDs (and associated resistors) on D2 to D11.
  • I2C 4-digit 7-segment display based on the HT16K33 controller.

In my video, I’ve enabled both types of display, although I’m using one of my “led bars” that has been tweaked for use with the Arduino’s weird pin-spacing, and MIDI output to my MT-32 playing the “Bellsinger” voice.

The Code

The main mechanics are those I’ve used many times before – playing notes, driving LEDs and displays and so on.  To make the options easy to manage, I’ve split all the sound and display handling out into the following functions:

  • displayInit()
  • displayClear()
  • displayNoteOn(digit)
  • displayNoteOff(digit)
  • soundInit()
  • soundNoteOn(digit)
  • soundNoteOff(digit)

Then I’ve used conditional compilation to include the appropriate code in the appropriate place.  Once again I’ve used the HT16K33 library from Rob Tillaart (details here: https://github.com/RobTillaart/HT16K33).

But of course, the real “star” of this show is code to calculate the digits of Pi. Many methods to calculate Pi will store all previous digits and keep calculating to make the value more accurate over time.  This means that you have to keep checking digits and calculating until they stop changing at which point you can assume you know what that particular digit has to be.

That isn’t very practical if I just want to find a single (next) digit.  Most musical applications of Pi will probably store Pi to some number of digits in memory, but I found a discussion on how to calculate the nth digit of Pi. It started with a formula discovered by David Bailey, Peter Borwein, and Simon Plouffe in 1995, which is described in full here.  The downside of this is that it allows you to calculate digits in base 16 (hex), which isn’t really what I’m after.

However, maths doesn’t stand still and there are now forumlas that will calculate the nth digit in base 10 (i.e. decimal).  Here are some resources that talk about this:

In the end I took the code posted to the stackoverflow discussion which has the following opening comment:

/* * Computation of the n'th decimal digit of \pi with very little memory. * Written by Fabrice Bellard on January 8, 1997. * * We use a slightly modified version of the method described by Simon * Plouffe in "On the Computation of the n'th decimal digit of various * transcendental numbers" (November 1996). We have modified the algorithm * to get a running time of O(n^2) instead of O(n^3log(n)^3). * * This program uses mostly integer arithmetic. It may be slow on some * hardwares where integer multiplications and divisons must be done * by software. We have supposed that 'int' has a size of 32 bits. If * your compiler supports 'long long' integers of 64 bits, you may use * the integer version of 'mul_mod' (see HAS_LONG_LONG). */

It only requires a few minor tweaks to run on the Arduino, mostly removing any mentions of the C main and its arguments, and any printf statements.  Thankfully the Arduino has the AVR implementation of math.h available, so that bit can remain unchanged.

I turned the code’s main function into a calcPi() function as follows:

int calcPi(int digit) { /* rest of function */ return (int)(sum*10.0); }

The provided function prints out 9 digits of Pi starting with the requested digit.  It does this by finally multiplying the ‘sum’ by 1e9 (i.e. 1000000000).  To return just a single digit I multiply the sum by 10 and return the integer result, which is just one digit – the digit of Pi for the requested location.

I’ve checked the digits produced against a list of the first 100 digits of Pi and it appears to work fine!  There are apparently more efficient routines, but actually as I’m relying on the timing of the calculation for timing in the music, a less efficient routine is fine.

Find it on GitHub here.

Closing Thoughts

I really like the idea of generative music from mathematical sequences, so I plan to do some more playing in this space at some point.

But I’m really pleased with the idea of using the increasing complexity of the calculation to vary the timing.  I’ve left this running for a few minutes and it reaches the point where changes are noticeably slower relatively quickly. In the 3 minutes and 14 seconds of video, I think it has calculated 78 digits of Pi.

I’m now intrigued to know how often it changes note after an hour.  Or even a day 🙂

Update – later that day…

I left it running for 12 hours, and it seemed to work fine at least up until digit 554, where it had calculated 27705 after 10 hours, and was changing digits approximately every 2.5 minutes.  I was quite keen to see if it would make it up to the Feynman point, which occurs at digit 762.  At this rate, I worked out it would probably take another 9 hours or so, and that was assuming the calculation didn’t get any slower!

But when I checked in again after the full 12 hours, it was reading 74345 which Pi Search tells me occurs position 64405!  So either my Arduino had a major speed injection or something had gone wrong!

I suspect at some point there was an overflow in the calculation that messed things up.  Or course there was a slim possibility that I’d been searching for the first instances of the sequences I was finding but it was actually a second or third occurrence but a bit of quite back-tracking and checking soon ruled that out.  And anyway, a rough calculation backwards of 550 digits in ten hours gives an average calculation time of just over 1 minute which seems much more plausible a rate given where things ended up.

Oh well. I can say I’m good for around 10 hours of “music” this way. It was fun while it lasted 🙂

Kevin

[youtube https://www.youtube.com/watch?v=iE4vosZjoUk?version=3&rel=1&showsearch=0&showinfo=1&iv_load_policy=1&fs=1&hl=en&autohide=2&wmode=transparent&w=1100&h=619] #arduino #led #midi #pi #piday #sevenSegmentDisplay
Pi Day MIDI Sequencer

This is a video of my Pi Day MIDI sequencer in action, playing the notes for the first ~80 or so digits of Pi.Full details here: https://diyelectromusic.word...

YouTube

Silent Stepper Motors Make Electromechanical Clock Fit For a Living Room

Large mechanical seven-segment displays have a certain presence that you just don't get in electronic screens. Part of this comes from the rather satisfying click-click-clack sound they make at every transition. Unfortunately, such a noise quickly becomes annoying in your living room; [David McDaid] therefore designed a silent electromechanical seven-segment clock that has all the presence of a mechanical display without the accompanying sound.

As [David] describes in a very comprehensive blog post, the key to this silent operation is to use stepper motors instead of servos, and to drive them using a TMC2208 stepper motor driver. This chip has a unique method of regulating the current that does not introduce mechanical vibrations inside the motor. A drawback compared to servos is the number of control wires required: with four wires going to each motor, cable management becomes a bit of an issue when you try to assemble four seven-segment displays.

The clock is built up on a large piece of MDF, with all 28 motors on the front and the electronics on the back. Custom mounting brackets and the display segments are all 3D printed, while four large PCBs hold the stepper motor drivers and connectors to hook them up to the motors. Additional PCBs hold an Arduino Mega 2560 that runs the whole show, a DS3231 real-time clock for accurate time-keeping, and a power supply to manage the 40-odd watts consumed by the display.

Apart from showing the current time, the clock also includes an alarm, a strip of LED lights, and a "random word generator": press a button and the display will show a random four-letter word. We're not sure about the exact use case for that feature, but it's a neat addition to a very neat build. If you're into mechanical seven-segment clocks, you're in luck: we've featured ones based on a single stepper motor, tiny ones full of wooden gears, one with protruding segments, and one with lots of servos that make really smooth movements.

#clockhacks #electromechanicalclock #sevensegmentdisplay #steppermotor

Silent Stepper Motors Make Electromechanical Clock Fit For A Living Room

Large mechanical seven-segment displays have a certain presence that you just don’t get in electronic screens. Part of this comes from the rather satisfying click-click-clack sound they make …

Hackaday

Three-Dimensional Design Yields Compact Seven-Segment Hex Displays

Computers, from the simplest to the most complex, aren't very useful if they can't provide feedback to a user. Whether that interface takes the form of a monitor, a speaker, or a simple LED, there's almost always some kind of output. One of the most ubiquitous is the ever-present seven-segment display. They're small, they're easy to use, and, perhaps most important, they're cheap.

While the displays themselves are relatively compact, they often require some sort of driver circuitry -- something that translates a digit into voltage at the correct pins. These drivers can take up valuable space, especially on a breadboard, and can sometimes make using seven-segment displays cumbersome. Thankfully, [John Lonergan] has a great solution: driver boards that sit completely beneath the displays. His dual seven-segment hex display project was born out of necessity -- he needed it for the breadboard CPU SPAM-1, which was getting a bit too bulky. Each module is two seven-segment displays atop a small PCB. Beneath the displays lives an 8-bit PIC microcontroller, which acts as a driver for both of the displays.

It's so easy to restrict ourselves to thinking in two dimensions when working on electronic design -- even designing multilayer PCBs often feels like working on several, distinct two-dimensional areas rather than one three-dimensional one. The concept of stacking components to save space, while fairly straightforward to implement, is a great example of the kind of problem-solving we love to see here at Hackaday. Of course, if you like the idea of 3D circuit design, you have to check out some of these incredible circuit sculptures we've featured in the past.

#hardware #retrocomputing #cpu #microcontroller #pic #sevensegmentdisplay

Three-Dimensional Design Yields Compact Seven-Segment Hex Displays

Computers, from the simplest to the most complex, aren’t very useful if they can’t provide feedback to a user. Whether that interface takes the form of a monitor, a speaker, or a simple…

Hackaday

Incandescent 7-Segment Displays Are Awesome

When we think of 7-segment displays as the ubiquitous LED devices that sprung into popularity in the 1970s. However, numbers have existed for a lot longer than that, and people have wanted to know what the numbers are for quite some time, too. Thus, a variety of technologies were used prior to the LED - such as these magnificent incandescent 7-segment displays shown off by [Fran Blanche].

The displays are basic in concept, but we imagine a little frustrating in execution. Electronics was tougher back in the days when valves needed huge voltages and even a basic numerical display drew a load of current. Built to industrial-grade specifications, they're complete with a big heatsinking enclosure and rugged gold-plated connectors. [Fran] surmises that due to the likely military applications of such hardware, the filaments in the bulbs were likely built in such a way as to essentially last indefinitely. The glow of the individual segments has a unique look versus their LED siblings; free of hotspots and the usual tapered shape on each segment. Instead, the numerals are pleasingly slab-sided for a familiar-but-not-quite aesthetic.

[Fran] demonstrates the display running with a CD4511B BCD-to-7-segment decoder, hooked up with a bunch of 3904 power transistors to get the chip working with filament bulbs instead of LEDs. It's a little fussy, but the displays run great with the hardware sorted.

We'd love to see these used on a very heavy ridiculous watch; nixies aren't the only game in town after all. If you do happen to make one, be sure to let us know. Video after the break.

#mischacks #7segmentdisplay #filamentbulb #sevensegmentdisplay

Incandescent 7-Segment Displays Are Awesome

When we think of 7-segment displays as the ubiquitous LED devices that sprung into popularity in the 1970s. However, numbers have existed for a lot longer than that, and people have wanted to know …

Hackaday