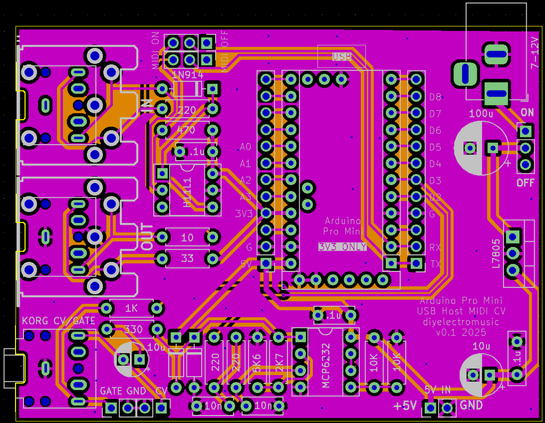
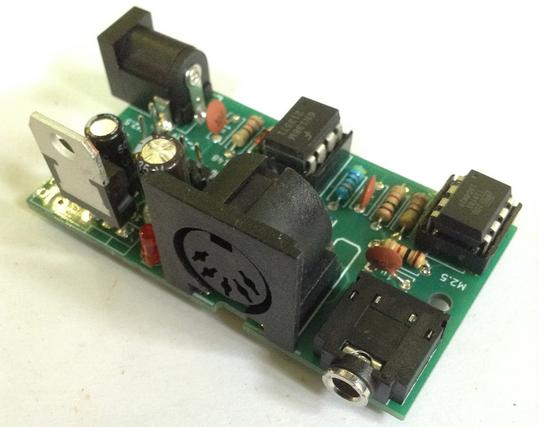
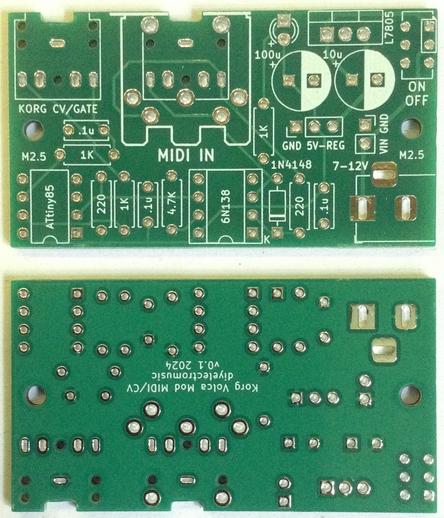
ATtiny85 MIDI to CV

There are a number of projects out there that provide a MIDI to CV function utilising some flavour of the ATtiny family of microcontrollers.  But most of them go from USB MIDI to CV but I wanted a genuine 5-pin DIN MIDI to CV.  This was the result.

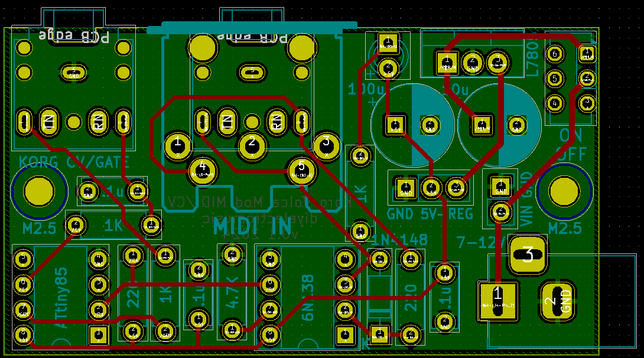
It has taken a basic MIDI in circuit from the Internet (Google will find a few of these kicking around) and pairs it with the ATtiny85 CV out section of Jan Ostman’s cheap USB MIDI 2 CV design (Jan Ostman’s site is no more so I can’t link to it anymore).

The result is as follows.

Update 2025: if you’d like to have this in a module you can just buy and use, take a look at https://lectronz.com/products/midi-to-cv.  Note: I don’t have this, and have no connection with it, I’m just passing this on as I saw it was essentially the same circuit and thought it might be useful!

Update July 2021: Added a TRIGGER output on Pin 5.

I also have a version for the ATtiny2313, but the main changes are as you’d expect.  Basically I was having problems with the ATtiny85 missing MIDI messages and wondered if a hardware UART would be better.  Turned out it was just my dodgy code with no real error checking getting out of sync with the MIDI stream.  But it took trying it on a 2313 to highlight the real issue, so back to the ATtiny85 and now all is well.

Design wise, its fairly simple ATtiny85 wise with the pin usage as follows:

  • SoftwareSerial receive on D3 (PB3) which is physical pin 2.
  • Gate output on D2 (PB2) which is physical pin 7.
  • CV output using the PWM signal tied to OC1A triggered off timer 1, which is D1 (PB1) on physical pin 6.
  • Update July 21: Trigger output on D0 (PB0) which is physical pin 5.

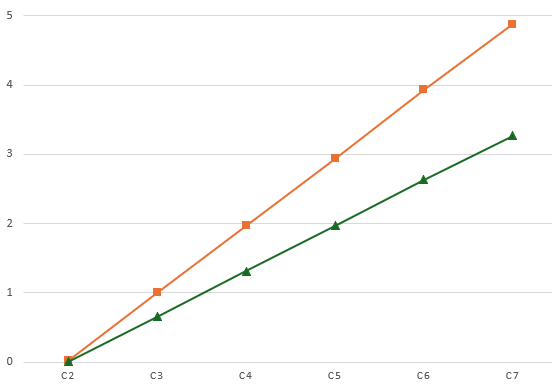
The code uses the same trick that Jan Ostman used in his code – if the top compare value for PWM operation is 239 then there are 240 graduations for PWM.  To cover a MIDI range of C2 (note 36) to C7 (note 96) is 60, so the PWM compare value required for a linear CV voltage output is basically (note-36)*4.

In terms of timer control registers, this all translates over to (refer to the ATtiny85 data sheet):

  • Set PWM1A i.e. PWM based on OCR1A
  • Set COM1A1 i.e. Clear OC1A (PB1) output line
  • Set CS10 i.e. Prescaler = PCK/CK i.e. run at Clock speed
  • Clear PWM1B is not enabled (GTCCR = 0)

The value for the PWM cycle is set in OCR1C to 239, and the compare value is set in OCR1A between 0 and 239, thus representing a range of 0 to 5v giving 1v per octave, assuming a 5v power supply.

When porting to the ATtiny2313, a similar scheme was used, but timer 1 is a 16 bit timer, and the control registers were slightly different, but I still used the 0-239 range.

Reading around the different modes, I ended opting for the use of Fast PWM with the compare value in OCR1A and the maximum PWM cycle value (239) in ICR1.  The timer register settings were thus as follows:

Timer 1 Control Register A (TCCR1A):

  • 7 COM1A1 = 1 COM1A1(1); COM1A0(0) = Clear OC1A on compare match; set at TOP
  • 6 COM1A0 = 0
  • 5 COM1B1 = 0
  • 4 COM1B0 = 0
  • 3 Resv = 0
  • 2 Resv = 0
  • 1 WGM11 = 1 WGM11(1); WGM10(0) = PWM from OCR1A based on TOP=ICR1
  • 0 WGM10 = 0

Timer 1 Control register B (TCCR1B):

  • 7 ICNC1 = 0
  • 6 ICES1 = 0
  • 5 Resv = 0
  • 4 WGM13 = 1 WGM13(1); WGM12(1) = PWM from OCR1A based on TOP=ICR1
  • 3 WGM12 = 1
  • 2 CS12 = 0 CS12(0); CS11(0); CS10(1) = Prescaler = PCK/CK i.e. run at Clock speed
  • 1 CS11 = 0
  • 0 CS10 = 1

Timer 1 Control Register C left all zeros.

I don’t know if it was the version of the ATtinyCore I was using, but the bit and register definitions for Timer1 for the ATtiny2313 didn’t seem to match the datasheet, so I just used the bit codes directly.

In terms of ATtiny2313 pin definitions, the following were used:

  • Hardware serial receive on D0 (PD0) which is physical pin 2.
  • Gate output on D11 (PB2) which is physical pin 14.
  • CV output using the PWM signal tied to OC1A triggered off timer 1, which is D12 (PB3) on physical pin 15.

A quick note on the MIDI serial handling.  My first code was very lazy and basically said:

Loop: IF (serial data received) THEN read MIDI command value IF (MIDI note on received) THEN read MIDI note value read MIDI velocity value set CV out value based on MIDI note value set Gate signal HIGH ELSE IF (MIDI note off received) THEN read MIDI note value read MIDI velocity value set CV out value based on MIDI note value set Gate signal LOW ELSE ignore and go round again waiting for serial data ENDIF ENDIFEND Loop

This generated a very quirky set of issues.  Basically when there was serial data available and a MIDI note on or off command detected, the read of the note and velocity data was returning and error (-1) which I never bothered checking.  Basically the code was running too fast and the next MIDI byte hadn’t registered yet.  So when (-1) was passed on as the MIDI note, it was resulting in a note on code thinking the MIDI note was 255, which was rounded up to the highest note (96).

The result was that I could see the gate pulsing in response to MIDI note on and off messages, but the CV voltage went high as soon as the first MIDI message was received.

The next version used a test that said

IF (at least three bytes of serial data received) THEN

which means that if things get out of sync, eventually bytes are skipped until there are three bytes that equate to a note on/off message.  Crude, but it worked enough to show the principle.

The final code includes proper handling of the “Running Status” of MIDI, as described here: http://midi.teragonaudio.com/tech/midispec/run.htm

November 2020 Update:

I’ve moved the channel handling into the command checking – the code was getting confused in a multi-channel data stream as the channel handling was performed too early and not reset properly.

June 2021 Update:

I’ve fixed a couple of issues with the Note Off handling.  Essentially it wasn’t checking that the Note Off event corresponded to the currently playing note, so if you had overlapping notes, the CV would change, but the Note Off from the first note playing would then stop the second note playing too.

July 2021 Update:

Added a TRIGGER output on pin 5.  Note that this is really at my limit of being able to test, so consider it experimental, but please do let me know how you get on and be sure to report back if there are any issues!

There are now four functions that determine how the GATE and TRIGGER work – gateOn, gateOff, triggerOn, triggerOff.  By default these use HIGH for “on” and LOW for “off” but that is now easily changed in these functions if you need (for example) a negative TRIGGER or somesuch.  They are both 5V signals largely straight out of the ATtiny85’s IO pins.

The width of the TRIGGER pulse itself is set at the top of the file to 1000 micro-seconds (i.e. 1 millisecond).  You can change this to whatever you like, but I’m not sure what would happen if you try to go much shorted than a mS, but see how you go.  Ultimately it is limited by the time it takes the ATtiny85 to run the loop() and the resolution of the micros() function.

I used the 8MHz internal clock for the ATtiny85 so be sure to “set the fuses” (i.e. use the “program bootloader” option) to this effect.

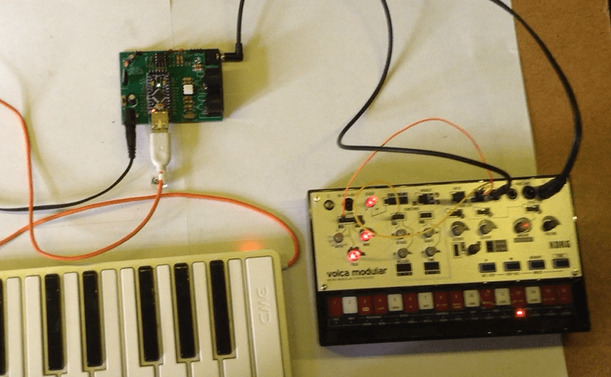
To test all of it together, I used my ATtiny85 MIDI Tester.

I might add some kind of selection for the MIDI channel.  Right now its hard-coded in a #define.  One option might be using an analogue input and a multi-position switch with a resistor network.  Or maybe a “tap to increase the channel” digital input switch.  Or if I use the 2313 version, I could use more pins and use a BCD or hex rotary switch or DIP switches.

Here is the full code for the ATtiny85 version, which can be loaded up from the Arduino environment using the ATtiny85 core by Spence Konde. 

// MIDI to CV using ATTiny85// NB: Use Sparkfun USB ATTiny85 Programmer// Set Arduino env to USBTinyISP (Slow)// Set to 8MHz Internal Clock (required for MIDI baud)//// Update: Nov 2020 - fixed channel handling// Update: Jun 2021 - fixed NoteOff/gate handling// Update: Jul 2021 - added trigger output//#include <SoftwareSerial.h>//#define CVOUTTEST 1//#define MIDITEST 1#define MIDIRX 3 // 3=PB3/D3 in Arduino terms = Pin 2 for ATTiny85#define MIDITX 4 // 4=PB4/D4 in Arduino terms = Pin 3 for ATTiny85#define MIDICH 1 // Set this to the MIDI channel to listen to (1 to 16)#define MIDILONOTE 36#define MIDIHINOTE 96// Output:// PB2 (Ardiuno D2) = Pin 7 = Gate Output// PB1 (Arduino D1) = Pin 6 = Pitch CV Output// PB0 (Arduino D0) = Pin 5 = Trigger Output//// PB1 used as PWM output for Timer 1 compare OC1A#define GATE 2 // PB2 (Pin 7) Gate#define PITCHCV 1 // PB1 (Pin 6) Pitch CV#define TRIGGER 0 // PB0 (Pin 5) Trigger#define TRIGPULSE 1000 // Width of the trigger pulse (uS)SoftwareSerial midiSerial(MIDIRX, MIDITX);byte noteplaying;uint32_t pulsemicros;void setup() { // put your setup code here, to run once: midiSerial.begin (31250); // MIDI Baud rate pinMode (GATE, OUTPUT); pinMode (PITCHCV, OUTPUT); pinMode (TRIGGER, OUTPUT); // Use Timer 1 for PWM output based on Compare Register A // However, set max compare value to 239 in Compare Register C // This means that output continually swings between 0 and 239 // MIDI note ranges accepted are as follows: // Lowest note = 36 (C2) // Highest note = 96 (C7) // So there are 60 notes that can be received, thus making each // PWM compare value 240/60 i.e. steps of 4. // // So, for each note received, PWM Compare value = (note-36)*4. // // Timer 1 Control Register: // PWM1A = PWM based on OCR1A // COM1A1 = Clear OC1A (PB1) output line // CS10 = Prescaler = PCK/CK i.e. run at Clock speed // PWM1B is not enabled (GTCCR = 0) // TCCR1 = _BV(PWM1A)|_BV(COM1A1)|_BV(CS10); GTCCR = 0; OCR1C = 239; OCR1A = 0; // Initial Pitch CV = 0 (equivalent to note C2) gateOff(); triggerOff();}void setTimerPWM (uint16_t value) { OCR1A = value;}void gateOn() { digitalWrite (GATE, HIGH);}void gateOff() { digitalWrite (GATE, LOW); }void triggerOn() { digitalWrite (TRIGGER, HIGH); pulsemicros = micros() + TRIGPULSE;}void triggerOff() { // Turn off the trigger only after a short delay if (pulsemicros < micros()) { digitalWrite (TRIGGER, LOW); }}void loop() {#ifdef CVOUTTEST for (midi_note=36; midi_note<=90; midi_note++) { midiNoteOn (midi_note, 64); delay (500); midiNoteOff (midi_note, 0); delay (500); }#else if (midiSerial.available()) { // pass any data off to the MIDI handler a byte at a time doMIDI (midiSerial.read()); }#endif triggerOff();}uint8_t MIDIRunningStatus=0;uint8_t MIDINote=0;uint8_t MIDILevel=0;void doMIDI (uint8_t midibyte) { // MIDI supports the idea of Running Status. // If the command is the same as the previous one, // then the status (command) byte doesn't need to be sent again. // // The basis for handling this can be found here: // http://midi.teragonaudio.com/tech/midispec/run.htm // // copied below: // Buffer is cleared (ie, set to 0) at power up. // Buffer stores the status when a Voice Category Status (ie, 0x80 to 0xEF) is received. // Buffer is cleared when a System Common Category Status (ie, 0xF0 to 0xF7) is received. // Nothing is done to the buffer when a RealTime Category message is received. // Any data bytes are ignored when the buffer is 0. // if ((midibyte >= 0x80) && (midibyte <= 0xEF)) { // // MIDI Voice category message // // Start handling the RunningStatus MIDIRunningStatus = midibyte; MIDINote = 0; MIDILevel = 0; } else if ((midibyte >= 0xF0) && (midibyte <= 0xF7)) { // // MIDI System Common Category message // // Reset RunningStatus MIDIRunningStatus = 0; } else if ((midibyte >= 0xF8) && (midibyte <= 0xFF)) { // // System real-time message // // Ignore these and no effect on the RunningStatus } else { // // MIDI Data // if (MIDIRunningStatus == 0) { // No record of state, so not something we can // process right now, so ignore until we've picked // up a command to process return; } // Note: Looking for the command on our channel if (MIDIRunningStatus == (0x80|(MIDICH-1))) { // First find the note if (MIDINote == 0) { MIDINote = midibyte; } else { // If we already have a note, assume its the level MIDILevel = midibyte; // Now we have a note/velocity pair, act on it midiNoteOff (MIDINote, MIDILevel); MIDINote = 0; MIDILevel = 0; } } else if (MIDIRunningStatus == (0x90|(MIDICH-1))) { if (MIDINote == 0) { MIDINote = midibyte; } else { // If we already have a note, assume its the level MIDILevel = midibyte; // Now we have a note/velocity pair, act on it if (MIDILevel == 0) { midiNoteOff (MIDINote, MIDILevel); } else { midiNoteOn (MIDINote, MIDILevel); } MIDINote = 0; MIDILevel = 0; } } else { // MIDI command we don't process or not on our channel } }}void midiNoteOn (byte midi_note, byte midi_level) { // check note in the correct range of 36 (C2) to 90 (C7) if (midi_note < MIDILONOTE) midi_note = MIDILONOTE; if (midi_note > MIDIHINOTE) midi_note = MIDIHINOTE; // Scale to range 0 to 239, with 1 note = 4 steps midi_note = midi_note - MIDILONOTE; // Set the voltage of the Pitch CV and Enable the Gate and Trigger setTimerPWM(midi_note*4); gateOn(); triggerOn(); noteplaying = midi_note;#ifdef MIDITEST // Write back ASCII (binary) midiSerial.print (midi_note+36, HEX);#endif}void midiNoteOff (byte midi_note, byte midi_level) { // check note in the correct range of 36 (C2) to 90 (C7) if (midi_note < MIDILONOTE) midi_note = MIDILONOTE; if (midi_note > MIDIHINOTE) midi_note = MIDIHINOTE; // Scale to range 0 to 239, with 1 note = 4 steps midi_note = midi_note - MIDILONOTE; // Only trigger the gate/OFF if it corresponds to the currnent note sounding if (midi_note == noteplaying) { noteplaying = 0; // Set the voltage of the Pitch CV and Disable the Gate gateOff(); // Your choice: Do you want to: // Clear the CV down to zero on NoteOff? // Set the CV to the same note as the NoteOff? // Completely leave it as it was (probably the same note as the NoteOff)?// setTimerPWM(0); // Clear to zero// setTimerPWM(midi_note*4); // Set to midi_note }#ifdef MIDITEST midiSerial.print (0xAA, HEX);#endif}

#attiny2313 #attiny85 #define #else #endif #ifdef #include #midi #midi2cv

USB MIDI to Serial and CV/GATE

This project uses my Arduino Pro Mini MIDI USB CV PCB for a USB MIDI to Serial MIDI and CV/GATE device that has a CV/GATE that is compatible with my Korg Volca Modular.

It takes MIDI NoteOn/NoteOff and translates them into CV that can be used to set the pitch of a CV/GATE synth.

IMPORTANT: I strongly recommend that you do not connect this to your Volcas. I am not an electronics person but have accepted the risk of causing a possibly expensive problem. I will not be held responsible if you end up doing the same.

https://makertube.net/w/puRwMGeELa5zq3YhMrMC4h

https://makertube.net/w/cPjFeqigcrBHgMMPLjPNPb

Warning! I strongly recommend using old or second hand equipment for your experiments.  I am not responsible for any damage to expensive instruments!

If you are new to Arduino, see the Getting Started pages.

The Circuit

This is an application for my completed Arduino Pro Mini MIDI USB CV PCB.

The Code

The board was designed to require a PWM output on D3. With hindsight, D9 might have been more useful as D9 is a “Timer 1” timer on the ATMega328, but D3 is a “Timer 2” timer. The former are 16-bit timer/counters. The latter are only 8-bit.

No matter. I still have 255 levels of PWM to play with.

The initial PWM criteria I wanted were:

  • No prescalar – run at full CPU speed. In the case of a 3V3 Pro Mini this is 8MHz.
  • Use FastPWM mode – this will count up and then reset to zero.
  • Use a TOP value of 255 – the maximum.
  • Use the OC2B output, which is connected to D3. OC2A is not used.
  • Use the mode where OC2B is cleared on compare match; set at 0 (BOTTOM).
  • The PWM value is therefore written into OCR2B.

At some point the code will have to translate from MIDI note number over to a PWM value. My previous project mapped MIDI note C2 (36) onto 0V and went up from there for 5 octaves to C7 (96). This is a range of 60 steps, so actually, revisiting the PWM code, if we change the mode to use an alternative TOP Value of 239, that means each MIDI note corresponds to a specific step of 4. That would be pretty useful!

So the updated PWM criteria is now as follows:

  • No prescalar – still run at full CPU speed. In the case of a 3V3 Pro Mini this is 8MHz.
  • Use FastPWM mode – this will count up and then reset to zero.
  • Use a TOP value of OCR2A, which will be set to 239.
  • Use the OC2B output, which is connected to D3. OC2A is not used.
  • Use the mode where OC2B is cleared on compare match; set at 0 (BOTTOM).
  • The PWM value is therefore written into OCR2B.

The PWM operating frequency is given by a formula in the datasheet, but is basically the time it takes for the counter to count from 0 to 239 and reset, whilst running at 8MHZ. So the PWM frequency = 8000000 / 240 = 33.3kHz.

At such a frequency the (now updated) PWM filter components chosen give a pretty smooth output between 0V and 3.3V, which are them amplified using the OpAmp for a 0V to 5V range.

Note: No interrupts are required for the operating of PWM in this manner. We can just update the PWM value whenever is useful during the operation of the code.

The complete PWM code is thus as follows

void initPwm() {
pinMode(3, OUTPUT);
TCCR2A = _BV(COM2B1) | _BV(WGM21) | _BV(WGM20);
TCCR2B = _BV(WGM22) | _BV(CS20);
OCR2A = 239;
}

void setPwm (uint8_t pwmval) {
OCR2B = pwmval;
}

The value used for PWM will only be active for 0-239. Any value of 240 or higher will just be considered “always on”.

This all means that converting from MIDI to PWM value is now pretty trivial:

#define MIDI_LOWEST_NOTE 36 // C2
#define MIDI_HIGHEST_NOTE 95 // C7
uint8_t midi2pwm (uint8_t note) {
if (note < MIDI_LOWEST_NOTE) note = MIDI_LOWEST_NOTE;
if (note > MIDI_HIGHEST_NOTE) note = MIDI_HIGHEST_NOTE;
return (note - MIDI_LOWEST_NOTE) * 4;
}

Logging the average voltage for each MIDI note (pre and post amplification) gives me the following:

C20.080.08C30.721.06C41.352.03C52.023.01C62.653.95C73.284.90

Plotting these on a graph looks like this:

That is a pretty good linear response, but is slightly under in terms of the top-end output. At 1V/oct a semitone is around 83mV, so dropping 0.1V at the top ought to be dropping a semitone.

But jumping through the octaves it sounds all right to me. It’s definitely not dropping a semitone anyway, so I’m not sure what is going on. I might need to come back to this one!

The rest of the code is fairly straightforward MIDI reception and processing that I’ve done several times before now. There are a few design notes:

  • Automatic MIDI THRU is turned off or both serial and USB MIDI.
  • When a note that is not on the required channel or is out of the C2-C7 range is received, it is ignored.
  • Anything received over USB is automatically sent to the serial OUT and anything received over serial is automatically sent to the USB OUT.
  • NoteOff is only processed if received for the currently playing note.
  • Consecutive NoteOn messages update the CV and replace the previously playing note.
  • There is an option for a GATE type operation:
    • GATE goes HIGH on NoteOn.
    • GATE goes LOW on NoteOff.
  • Or for a TRIGGER pulse type operation:
    • GATE goes HIGH on NoteOn.
    • GATE remains HIGH for a defined time (e.g. 10mS) then automatically goes off.
  • On reception of NoteOff there are several possible options for what to do with the CV:
    • Leave it and do nothing. This allows any envelopes to complete on removal of the GATE signal with no change of CV. But the CV will remain at the last level until a new note is received.
    • Set it to the NoteOff pitch received. Although in reality this is probably going to be the same as “do nothing”.
    • Set the CV to 0. This means there is no “dangling” CV voltage, but the synth will probably respond to the changing CV.
  • I’ve left in a compile-time PWMTEST mode that just plays the different Cs for measuring voltages, and so on.

Find it on GitHub here.

Closing Thoughts

This actually seems to work surprisingly well. I did wonder if the apparent inaccuracies of the output might cause an issue, but it doesn’t seem to.

The PWM filter issue was annoying, but on the one hand, it was a lot easier to build and debug with a PCB in hand; but of course on the other hand, if I’d done it first on solderless breadboard, the problem would have almost certainly be spotted and the design would probably have been right.

This has only looked at a pitch CV. It would be interesting at some point to do some kind of MIDI CC to CV control device.

Kevin

#arduinoProMini #cv #define #korg #midi #midi2cv #usbMidi #volca

Arduino Pro Mini MIDI USB CV PCB Design

This is essentially a version of my Korg Volca Modular MIDI to CV PCB Design merged with my Arduino Pro Mini MIDI USB HOST PCB Design to give me USB MIDI to serial MIDI and CV.

Warning! I strongly recommend using old or second hand equipment for your experiments.  I am not responsible for any damage to expensive instruments!

If you are new to electronics and microcontrollers, see the Getting Started pages.

The Circuit

As previously mentioned this is largely a merging of two existing designs. The main elements are:

  • Arduino Pro Mini (3V3/8MHz) with optional USB Host Shield already attached.
  • 3V3 compatible Serial MIDI IN/OUT circuit.
  • 5V power circuit via a 7805 regulator feeding the VIN of the Pro Mini.
  • PWM output filter.
  • 3V3 to 5V opamp amplifier stage (largely based on HAGIWO’s designs).
  • Korg Volca compatible Gate/CV out via a TRS socket.

I’m using a MCP6232 rail-to-rail dual OpAmp, but I’m only using one of them, so apparently good practice dictates normalising the input of the unused OpAmp to ideally the mid-voltage of the power rails, which I’ve done using two resistors as a potential divider.

The OpAmp is set up for a noninverting amplifier aiming for, as I understand things, a gain of 5/3.3 or ~1.51 as follows:

  • Non-Inv Gain = 1 + R(feedback) / R(toground) = 1 + 2K9 / 5K6 = 1.51

Note: the capacitor in the PWM output circuit is actually an error. It isn’t required for a CV output.

Also, the CV output is amplified to make it a 0-5V signal, but the GATE output remains a 0-3.3V signal.

A note on the PWM Filter.

The circuit was originally pasted on from somewhere else and I have to confess I didn’t think about the differing nature of a PWM circuit for a control voltage compared to audio.

As such, the stated component values of 220Ω and 10nF, with a cut-off frequency of upwards of 70kHz whilst useful for audio, are pretty useless for a CV. In the actual build, I’ve used values of 1K and 100nF which gives a cutoff frequency of around 1.5kHz.

That will teach me to properly think about my requirement before cutting and pasting in one of my previous circuits 🙂

PCB Design

Unlike my last design this one assumes the USB host shield will be fixed to the Pro Mini, keeping the footprint as small as possible.

I’ve allowed for both MIDI DIN and TRS sockets. There is also an option for individual GATE and CV out via jumper headers in addition to the Korg Volca compatible TRS.

I’ve included a MIDI switch with the footprint of a 2×3 set of 2.54mm headers so that could be jumpers or a switch as required. If the Pro Mini is socketed (which isn’t so easy if a USB Host shield is attached, but would be possible with longer pin headers), then the MIDI switch could be omitted. It is only there to disconnect MIDI from the Pro Mini UART when uploading sketches.

There is a bit of space around the 7805 in case a small heatsink is required. There is also the option to power the board directly from a 5V supply via a two-pin jumper header.

The Pro Mini footprint includes the programing header, but this isn’t used on the board and should probably be ignored.

Closing Thoughts

My previous MIDI to CV was code for an ATtiny85, so I’ll need to rewrite the code for the ATMega328 on the Pro Mini to support the USB to Serial MIDI routing in addition to CV and GATE.

Kevin

#arduinoProMini #cv #korg #midi2cv #pcb #usbHost #volca

Here are the build notes for my Korg Volca Modular MIDI to CV PCB.

Warning! I strongly recommend using old or second hand equipment for your experiments.  I am not responsible for any damage to expensive instruments!

If you are new to microcontrollers, see the Getting Started pages.

Bill of Materials

  • Korg Volca Modular MIDI to CV PCB (GitHub link below).
  • 1x ATtiny85 DIP-8.
  • 1x 6N138 optoisolator DIP-8.
  • 1x 1N914 or 1N4148 signal diode.
  • 2x 220Ω resistors.
  • 3x 1K resistors (one optional, for LED).
  • 1x 4K7 resistor.
  • 3x 100nF ceramic capacitors.
  • 1x 3mm LED (optional).
  • 1x 3.5mm stereo TRS pcb mount (see PCB and photos for footprint).
  • Either 1x 3.5mm stereo TRS or 5-pin DIN socket (see PCB and photos for footprint).
  • 2x 8-way DIP sockets (optional, recommended).
  • Header pins (optional).
  • 1x pin jumper (optional).

Power circuit (optional):

  • 1x L7805 regular TO-220.
  • 1x 10uF electrolytic capacitor.
  • 1x 100uF electrolytic capacitor.
  • 1x 2.1mm barrel jack socket (see PCB and photos for footprint).
  • 1x on/off switch (optional).

Power Options

The PCB includes a regulator circuit to take a 7-12V input either via 2.1mm barrel jack or 2-pin jumper headers (red) to create the required 5V power supply.

The switch is optional. If not required, then the highlighted two pins (blue) can be connected with a wire bridge.

Alternatively, a regulated 5V supply can be provided directly via another jumper header (orange) in which case the barrel jack socket and all of the component footprints highlighted in the above photo can be omitted (other than the GND-5V header pins themselves).

When used with the built-in power supply, a link is required between “5V” (part of the orange highlight) and “REG”.

Note: when used with the barrel jack socket, I don’t see any reason why the VIN/GND (red) headers couldn’t be used for a “VOUT” connection too. If that had a couple of jumper wires to a second barrel jack, for example, it could potentially be used to power the Volca too.

See photos as part of the build for more details.

Build Steps

Taking a typical “low to high” soldering approach, this is the suggested order of assembly:

  • All resistors and diode.
  • DIP socket (if used) and TRS socket(s).
  • Disc capacitors and LED.
  • Jumper headers.
  • Electrolytic capacitors.
  • Other components.

Here are some build photos.

The order of installation for the larger components and connectors will depend on the exact configuration and components used. They can be installed last in whatever order makes sense.

Power Options

There are only three valid power configurations as follows.

  • Left: Installation of the jumper between 5V and REG to use the on-board regulator (other header connections are redundant).
  • Centre: External connection to regulated 5V power supply (regulator and power circuitry is redundant).
  • Right: External connection to non-regulated 7-12V supply (barrel jack socket is redundant).

WARNING: Never connect a jumper between GND and 5V across the “GND 5V-REG” headers.

With hindsight, mixing the options for adding external jumper wires (so requiring GND/5V) and linking 5V to REG (so requiring a jumper) was probably unwise, but it seemed like a neat optimisation at the time.

Initial Testing

I recommend performing the general tests described here: PCBs prior to installing the ATtiny85.

It is also worth verifying the operation of whatever power option has been implemented by checking for GND and 5V at the ATtin85 socket:

Then a programmed ATtiny85 can be installed and MIDI reception checked, checking the CV and gate signals with an oscilloscope.

The CV/Gate TRS out is compatible with the Korg Volca Modular, which means it has the following connections:

  • TRS Left channel = Gate: 0V (off) or 5V (on).
  • TRS Right channel = CV: 0V to 5V range.

Programming the ATtiny85

The code for the MIDI to CV converter can be found here: https://emalliab.wordpress.com/2019/03/02/attiny85-midi-to-cv/

To program the ATtiny85 requires the following:

The key things to remember are:

  • Set the programmer to “USBTinyISP” – if you get a choice, I used the “slow” version. Note: you won’t see a “port” with this one, it using the programmer directly.
  • The clock setting requires is “Internal” 8MHz.

There are options in the code for the MIDI channel to listen to, the default being channel 1.

There is also a setting for the MIDI notes that correspond to generating 0V and 5V. The default lowest note is 36 – C2, and the default highest note is 96 – C7, giving 5 octaves across the 0-5V CV range.

In Use

Here are some of the average CV voltage readings I’m getting for various MIDI notes:

  • C2: avge -80 mV; 0V max
  • C3: avge 918mV; 1.2V max
  • C4: avge 1.88V; 2.24V max
  • C5: avge 2.88V; 3.28V max
  • C6: avge 3.84V; 4.16V max
  • C7: avge 4.81V; 4.96V max

Plotting those readings out on a graph (max in orange; average in blue) gives:

So, actually that probably isn’t too bad. The gate seems to work pretty well too.

Controlling the Korg Volca Modular

To hook it up to a Korg Volca Modular requires 3.5mm stereo jack to jack cable between the CV output and the Korg’s CV-IN socket. The two signals (CV/Gate) are then available o the corresponding patch points.

Patch the CV signal to the oscillator (green wire below) and the Gate to the first (AHR) function (blue wire) as follows:

In use, to my ears, the tuning doesn’t sound too bad to me across the range C2 to C7. Not sure about that very bottom C2… but then I wasn’t convinced that 0V really was 0V anyway.

PCB Errata

There are no issues currently known with this PCB however please note:

Check and double check the outputs before you let them anywhere near your Korg Volca! This is “use at your own risk”. I am not responsible for any dead Volcas….

Enhancements:

  • As already mentioned, with hindsight, I probably should have separated out the external, 5V regulated pin headers from the 5V-REG jumper.
  • I wanted a power LED but MIDI activity might have been more useful.
  • I need to get a better power switch footprint! That was a bit of an afterthought and isn’t particularly useful as it stands.
  • Another thing that might be useful would be a second barrel jack socket to allow power to be taken from the same source into the Volca.

Find it on GitHub here.

Closing Thoughts

For a first practical application of both CV/Gate and the ATtiny85, I’m pretty pleased with how this works. It is certainly very responsive for the Korg. It is monophonic of course, as it only generates a single CV output but again that is fine for the Korg.

I know there are mods for a Volca Modular to give it MIDI directly – there are patch points readily available on the PCB inside, as I mentioned before – I just didn’t want to be opening mine up so soon and seeing as CV/Gate is readily available, I don’t really see the need.

I might see if I can knock-up a 3D printed case for this to make a nice, self-contained unit.

Kevin

https://diyelectromusic.com/2024/07/07/korg-volca-modular-midi-to-cv-pcb-build-guide/

#ATtiny85 #korg #midi #midi2cv #pcb #volca

Korg Volca Modular MIDI to CV PCB Design

I’ve been playing with a Korg Volca Modular recently, but it doesn’t have built-in MIDI. There are some conversion kits available (apparently MIDI is broken out on the PCB inside &#8211…

Simple DIY Electronic Music Projects

Korg Volca Modular MIDI to CV Interface

https://makertube.net/w/8sGuu9murrnNiqHHagPmiJ

Korg Volca Modular MIDI to CV Interface

PeerTube

I’ve been playing with a Korg Volca Modular recently, but it doesn’t have built-in MIDI.

There are some conversion kits available (apparently MIDI is broken out on the PCB inside – more here), but it also has a well-specified CV/Gate interface, so this is a design for a MIDI to CV converter with a Korg Volca Modular compatible CV/Gate interface out via a 3.5mm TRS socket.

It isn’t specifically just for the Volca. It should work with any CV/Gate system that is ok with a 0V-5V CV and a 0V/5V Gate.

Warning! I strongly recommend using old or second hand equipment for your experiments.  I am not responsible for any damage to expensive instruments!

If you are new to microcontrollers, see the Getting Started pages.

The Circuit

The Korg Volca has the following CV/Gate input specification (via a 3.5mm stereo TRS jack socket):

  • Gate: Left/Tip: +/- 5V gets mapped down to +/- 3V3 internally.
  • CV: Right/Ring: 0-6V 1v/oct

MIDI to CV is a pretty straight forward job for a microcontroller provided the following is acceptable:

  • Some kind of DAC is required for output.
  • Typical outputs will be up to VCC for the microcontroller (3V3 or 5V).
  • IO can be used to set a MIDI channel.
  • Both Gate and Trigger outputs can be generated, again between 0 and VCC.

As the Korg will accept 0-6V, for a six octave range, I’ve opted to stick with a 5V microcontroller to give me a five octave range.

I’ve decided to use the circuit from here: ATTiny85 MIDI to CV.

I’ve not really done much with the ATTiny on this blog yet, but this is a pretty straight forward circuit and the 8-pin DIP version of the ATTiny85 is pretty easy to work with. More importantly it has a pretty small footprint and needs few additional components for a completely functional build.

I’m not bothering with a way to set the MIDI channel – it will be hardcoded in. The circuit uses PWM to generate the output CV with a filter stage for smoothing.

I’ve included a couple of options for power:

  • 2.1mm barrel jack into a 7805 for a 7-12V input range.
  • A 7-12V feed into the 7805 via jumper headers directly, skipping the barrel jack.
  • A direct (also via jumper headers) 5V regulated feed from an external source.

There is an option to include a PCB-mounted slider switch for on/off, but this could also be replaced with jumper headers for an external switch, or jumpered/soldered across to bypass the switch completely.

The MIDI circuit is a pretty common 5V 6N138 based MIDI IN circuit. Only serial MIDI will be supported.

PCB Design

The design is fairly straight forward. The only slight complication is around the use of jumper headers for the different power options, but I’ll explain these in detail in the build guide.

I’ve included two mounting holes, so I hope to be able to build up a simple enclosure for it.

The PCB can use PCB-mounted 5-pin DIN or TRS MIDI (type A) and includes a power indicator LED.

The output to the Korg is via a 3.5mm TRS stereo socket, so it should be possible to use a standard 3.5mm stereo jack to jack cable between this and the Volca. It should conform to the Volca’s CV/Gate interface specification.

Closing Thoughts

The ATtiny85 is a pretty capable microcontroller and fairly easy to work with, so I’m not anticipating any significant issues.

But I am taking a bit of punt going straight to a PCB with this one.

Kevin

https://diyelectromusic.com/2024/07/07/korg-volca-modular-midi-to-cv-pcb-design/

#ATtiny85 #controlVoltage #midi #midi2cv #pcb

Korg Volca Modular Notes

I’ve managed to get myself a Korg Volca Modular and have been having a bit of fun playing around with it. I’m not going to do a review or get into the detailed specifications – th…

Simple DIY Electronic Music Projects

OKILY DOKILY!

#midi is finally working well enough in the #micropython #synthdiy #muvco that I can tell how it sounds. And that sound is: Like a video game.

Which makes sense, since this is a bare squarewave (barewave) quantized to 1/16th notes and no variation in velocity.

I'm not making the #midi2cv module yet, so beautiful #music will have to wait. I can proceed on whatever-the-fuck I was doing before I started this #sidequest

https://diode.zone/w/mgUy2iet3UL3drs6V6tNkC

MUVCO Part 5

PeerTube