Neural Guitar Pedal – Optimizing NAM for Daisy Seed Arm Cortex-M7
https://www.tone3000.com/blog/running-nam-on-embedded-hardware
#HackerNews #NeuralGuitarPedal #NAM #Optimization #DaisySeed #CortexM7 #EmbeddedHardware
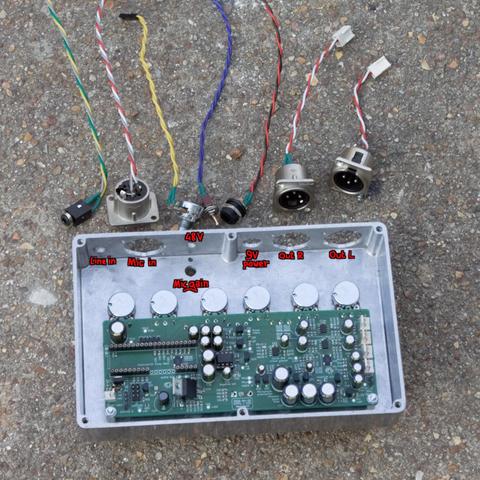
Done. Software is working. I had to make some compromises to fit everything in the available CPU power, taking into account the deadline for the product. However I haven’t used the SDRAM at all, even the 512 kB of SRAM were not fully used.
And as usual with the #DaisySeed, I added a multi-notch + multiband noise gate to filter out the noise from the input, way too high for a professional product IMHO. This always has been a PITA with the Seed. Maybe the Seed2 DFM has better noise figures, I’ll have to try it.
There will be probably some slight modifications on the FX depending on the band feedback.
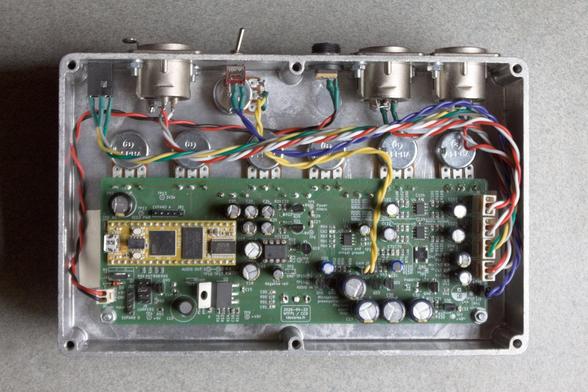
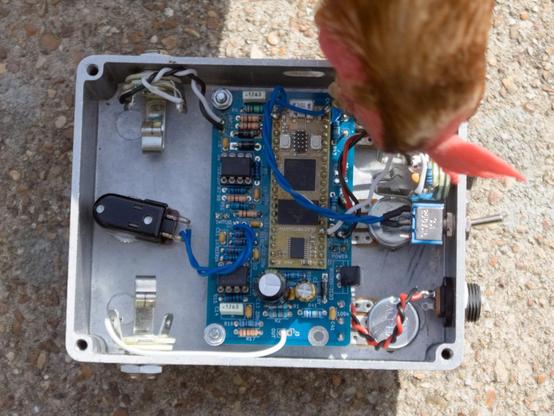
It’s coming together. The circuit passes elementary tests for powering and analog processing. Enclosure drilled and assembly about to be completed.
Software still in development, it shouldn’t take long now.
Neural Guitar Pedal – Optimizing NAM for Daisy Seed Arm Cortex-M7
https://www.tone3000.com/blog/running-nam-on-embedded-hardware
#HackerNews #NeuralGuitarPedal #NAM #Optimization #DaisySeed #CortexM7 #EmbeddedHardware
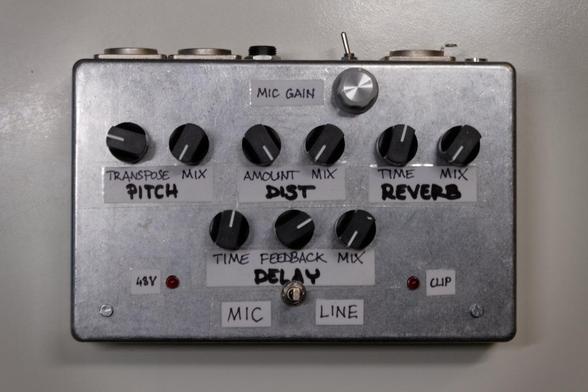
Follow-up: schematics, PCB and source code for the #Bazoche effect pedal platform released on this page:
https://ldesoras.fr/elec/bazoche/bazoche-eng.html
#audio #electronics #GuitarEffects #stompbox #dsp #delay #distortion #DaisySeed
Another #GuitarPedal completed.
A few years ago I designed a pedal with a complex effect (but just a single knob and an expression pedal as controls) for a guy but in the end that wasn’t what he was looking for and he didn’t pick it up. So I had this pedal stuck with me. 😑
Recently a friend asked me for a long delay effect with a 15 second memory and the footswitch only muting the delay input (FX always on duty). It was an opportunity to #recycle the old pedal, based on a #DaisySeed board. So I drilled new holes in the enclosure to host 3 knobs.
But wait, there’s more. ➡️
Descubrí un patch caótico con una porción de El nido de la perra (así bauticé a mi sistema heterogéneo de síntesis). Es capaz de hacer cosas muy pequeñas y muy agudas.
Disfrútenlo y si quieren denle like y sub. :-)
#modularsynth #synthjam #daisyseed #abacus #asmr
Las cosas muy pequeñas
https://www.youtube.com/watch?v=OdDkbk7GL20

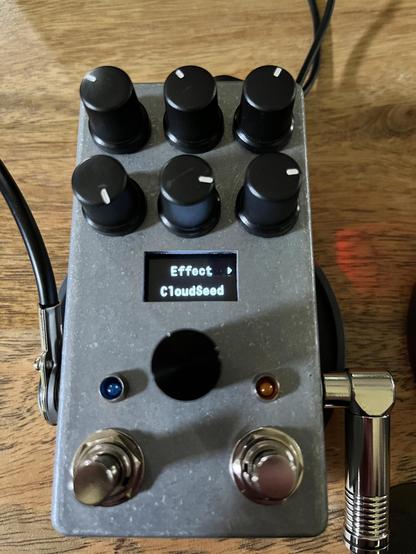
Tonight’s project: Soldered and put together a Daisy Seed based chip guitar pedal. Already got it flashed with examples from https://github.com/bkshepherd/DaisySeedProjects/blob/main/Software/GuitarPedal/README.md
Getting ideas about what I want to try to modify or cobble together. This patch (shown as “Cloud Seed” on the display) is a nice shimmer reverb, and there’s also chorus, tremolo, delay, a looper, a metronome, and more in the examples.
I’m not a C++ programmer but I’ve done enough Arduino programming and professional Rust programming that I can figure this out. The DSP stuff will be what I have to learn.
My little daisyseed synth project is currently stalling on the whole "C++ is just the WORST language" problem.
There's a class in the DaisySP library which is *almost* what I want. So I should be able to just subclass it and work from there, right?
Well, no, because none of the functions that I want to override are declared "virtual", so I'd have to edit and re-build the library.
I'm sure this is all in the service of runtime efficiency, at some level. But, you know - it's a 480MHz ARM processor. I think a little indirection wouldn't be a huge deal.
I will just write the whole thing from scratch, all 100 lines or so of it. But it's *IRRITATING*, you know?
Finally gotten around to having a look at my Daisy Seed.
My "notes to self" to get to a musical "hello world" are now up here: https://diyelectromusic.com/2024/12/18/getting-started-with-daisy-seed/

