Out with the Kodak 3-A Folding Pocket camera: Some street art around Aveiro

My second outing with the Kodak 3-A Folding Pocket camera was just as much fun as the first test with this camera, but not as successful. From my expired film box in the cupboard I picked a roll of Lomography ISO 100 colour film, which expired in 2023.

Loading the camera was easier than the first time, I roughly know what I’m doing now. I stopped winding when I came across the ‘start’ arrow and closed the back. This time I wound forward for 20 half turns, which is the position that the Camerhack.it website suggests the film was in the right position for the first exposure. After each exposure I wound the film forward eight half turns to the next frame.

*Edit (16 February 2025): Comparing this roll of film with that taken on my first outing with this camera, two things are immediately apparent. Firstly, winding the film on by 20 half turns was too much. This left too large a leader before the first frame. Secondly, I think that I actually wound the film too far between frames, 10 half turns instead of 8. Comparing the image spacing with the first outing, I reckon that in fact 7 half turns between frames is ideal. So on the next outing I’ll try 18 half turns from the ‘Start’ marker and 7 half turns between frames.

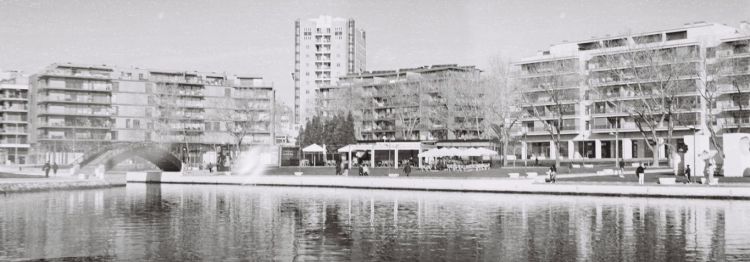
This time I headed to Aveiro to record some street art. There’s one excellent example near the railway station, and I discovered other on the other side of the city near the Yacht Club. Actually, I had intended to go to the Yacht Club but the area was being resurfaced and I couldn’t gain access. 

As before, I left the shutter speed of the 3-A on 1/100 second and rated the film at its box speed of ISO 100. I used the app Camera Meter to judge the apertures I should be using, which for this exercise was between f16 and f22. With my four exposures in the bag I dropped my film off at the lab and within a few hours the zipped files dropped into my inbox. 

Again the images were a little ‘thin’ to my mind. Having looked at the negatives from the first outing they actually looked fine, so I didn’t adjust the exposure, but I’m wondering if I should open the aperture by one stop above the meter reading to get a better exposure. *Looking at the negatives the images are definitely murky and overexposed. In future, when I’ve made the reading I’m going to close the aperture by one stop. Hopefully, this will give a better exposed image. 

Sadly, apart from my first image the framing of the subsequent images was quite poor, and I’m not sure why. Perhaps I didn’t have the viewfinder quite level. Also, the street art near the station was framed completely wrongly. I’m going to have to go back and do that again. Lastly, I only got three frames out of the roll, and I’m not sure why. It’s a bit fiddly to get to the shutter, and I reckon that perhaps I didn’t press the shutter lever properly.

*Edits made on 16 February 2025, after examining the negatives.

If you are on Mastodon, you can now follow this blog directly. Just go to Mastodon and follow my WordPress account at @keithdevereux.wordpress.com. All new posts will be automatically updated to your timeline on Mastodon.

#122Film #Autographic #Bellows #Camera #Experimental #Film #Kodak #Panorama #Retro #Vertorama #Vintage

The Kodak 3-A Folding Pocket camera: An economical panoramic camera for the twenty-first century?

Over the Festive season, aside from eating and drinking far too much, I received my 120 film adapters from camerhack.it. Last week I made some film masks for the Kodak 3-A and 1-A Autographic Jr cameras, and last weekend made the first attempt to load the 3-A, which seemed to go well.

I’ve a box of various films deliberately left in the cupboard just to play with, and I loaded the 3-A with a roll of Ilford XP2 that expired in 2022. Loading a ‘real’ film, and not just the paper backing, into the 3-A was quite straightforward, though of course I was a bit nervous about winding it on too far.

I stopped winding when I came across the ‘start’ arrow and closed the back. From that point I wound forward for 17 half turns at which point I guessed that the film was in the right position for the first exposure. 

Since the weather had improved dramatically from the dull and dreary weather or last week, it was a lovely sunny day when I headed to Aveiro. From my test I knew that I only had four frames, and as this was a trial run to see if the camera was working (and that my modifications were not going to completely ruin the film) I chose simple subjects that I could guess would frame properly in the reduced film gate.

The area around the Melia Ria hotel is one of my favourite locations in Aveiro. The cube-shaped hotel is located on the edge of a large artificial lake that once formed the loading and unloading dock for a once thriving pottery factory, now Aveiro’s city hall. About ten years ago the hotel enjoyed uninterrupted views of a park and the cityscape of Aveiro, but since then there has been almost continuous development of apartment blocks, which are out of the reach of most people.

It’s good (?) for me, though, since the blocks make a lovely cityscape that come closest to allowing me to capture something like a downtown metropolis. To view my shots with the 3-A, I drew an imaginary line across the centre of the viewfinder and tilted the camera until it was as level as I could manage. Then I made sure there was plenty of space top and bottom of my subject and took the shot.

The shutter speeds of the 3-A are accurate, so far as I can tell, which is remarkable for a 100-year-old camera, but I left it on 1/100 second an rated the film at its box speed of ISO 400. I used the app Camera Meter to judge the aperture I should be using, which for this exercise was f32. With my four exposures I took two around the Melia Ria hotel and a further two of the canals in the centre of the city. 

On my way back to the railway station I dropped my films off at the lab and within a few hours the zipped directories dropped into my inbox. Opening the images, I was thrilled to bits. It actually worked! There were no scratches on the negatives and no overlapping of frames. After winding seventeen half turns for the first frames, I wound the film on with seven half turns for the second and third frames, and six half  turns for the last frame. 

The images were a little ‘thin’ to my mind, and I’m wondering if I need to open the aperture by one stop above the meter reading to get a better exposure. I find something similar when metering for the Instax Wide film with the 9×12 folding cameras, so maybe it’s something to do with the adjustments at the dawn of the twentieth century. Who knows, but I’ll test again.

At the end of the day, I was literally thrilled. There were a couple of light leaks in the first frame, which I reckon is from where I load the film, original 122 films would have had a longer leader to account for the longer film gate, but the 3-A is definitely coming out with me again, and soon (hopefully before the end of the current Shitty Camera Challenge). 

Addition: Looking at the negatives, the first image of the Melia Ria hotel is quite close to the start of the film, and shows light leaks, and after the last frame is about a further 10cm of film. Therefore, I reckon that if I make three extra half turns after the start line, or 20 half turns in total, then I should have enough space to fit four full frames on the film, with a little bit of space at the end.

If you are on Mastodon, you can now follow this blog directly. Just go to Mastodon and follow my WordPress account at @keithdevereux.wordpress.com. All new posts will be automatically updated to your timeline on Mastodon.

#Autographic #Bellows #Camera #CameraHack #Experimental #Film #FrugalFilmProject #Kodak #Retro #Shittycamerachallenge #Vintage #122Film

Using 120 film in 100-year-old folding cameras

I’ve had a number of vintage Kodak folding cameras for a while now, and back in November I added another that I’ve been after for a long time, the massive Kodak 3-A Folding Pocket camera, to the collection. (It still tickles me how a giant heavy camera like the 3-A could ever be considered as a ‘pocket’ camera.)

The Kodak 3-A Folding Pocket camera

Soon after receiving the 3-A I finally got my act together and ordered some adapters from camerhack.it so that I could use 120 film with these cameras, since hunting down rolls of 122 or 116 film would be fruitless or expensive (or both). I have three vintage cameras that I would like to use with 120 film, the Kodak 1-A Autographic Jr, which takes 116 film, the Kodak 3-A Folding Pocket camera, which takes 122 film, and a roll film back for the KW Patent Etui, which takes 118 film.

A selection of 120 film adapters from CamerHack.it

I ordered the three sizes of adapter from camerhack.it and they arrived last week. So this past weekend I’ve had great fun preparing the cameras to use with 120 film. The first thing I needed to do with each folding camera was make a mask to cover the film gate so the films don’t curl. I’ve been studying various options and the best one seems to be to make a rectangular mask that fits over the whole of the film gate.

120 roll film paper in the back of the Kodak 1-A Autographic Jr folding camera.120 roll film loaded into the back of the Kodak 1-A Autographic Jr with 116 CamerHack adapters.120 roll film loaded into the back of the Kodak 1-A Autographic Jr with 122 CamerHack adapters.

I measured the dimensions of the film gate and calculated the width of the space needed to overlap the edges of the 120 film by about 5mm each side. To get the dimensions right I used the paper backing from a roll of 120 film. This was probably a little too much, but I wanted to make certain that the film would run smoothly through the camera and be supported all around. The material was thin plastic from a cheap envelope, but quite sturdy. To minimise the chances of the plastic scratching the film I sanded the edges of the frame with sandpaper. I hope this will be enough. 

The film mask for using 120 roll film in the Kodak 1-A Autographic Jr.The film mask for using 120 roll film in the Kodak 3-A Folding Pocket camera.

I checked the fit of the mask and glued it into place in the back of each camera (there’s no going back now). I also added a thin wedge of magic sponge to the space under the wind-on spool, which I hope will ensure there are no ‘fat’ rolls and the 120 film will wrap tightly around the take-up spool. This is a lesson I learned from using the Agfa Clack on the Frugal Film Project a couple of years ago. 

The 120 film mask mounted in the Kodak 1-A Autographic Jr.The 120 film mask mounted in the Kodak 3-A Folding Pocket camera.

The final step was to calculate the number of turns I need to wind on the film to get nicely separated frames. I know that I’ll get about five frames from the 1-A, and four from the 3-A, but how many turns of the wind-on knob will I need with my cameras? Camerhack.it have a nice guide on their website for each of the adapters, but for my cameras it was a little bit off, so here is what I found. Bear in mind that this was with just the paper roll, no film included so these might be in error, but this is what I will try with the first roll, which will be purely experimental anyway.

The 118 roll film back for use in the KW Patent Etui.

After checking the two cameras I turned to the 118 film back. This doesn’t actually need a mask installed, it is fitted with a dark slide, but of course I need to check the number of turns. The 120 roll with adapters fitted snugly in the film back and I wound on the film until I could see the ‘start’ line in the window. I then started turning and marking the paper where I thought each frame would be. I reckon that I’ll get about seven frames out of a single roll of 120 film, but I think this is an overestimate. The first roll will certainly be interesting. 

120 roll film loaded into the 118 film back with 118 CamerHack adapters.With film mounted in the 118 film back, I started counting from when the arrow was visible in the window.

The weather forecast for the next few days is unsettled, with rain and winds forecast, but next week hopefully I’ll be able to take these cameras out on a test run. I’m certainly looking forward to seeing the results. 

A Summary of the half turns needed to use 120 film in the different vintage cameras.

If you are on Mastodon, you can now follow this blog directly. Just go to Mastodon and follow my WordPress account at @keithdevereux.wordpress.com. All new posts will be automatically updated to your timeline on Mastodon.

#116Film #118Film #122Film #Adapters #Autographic #Bellows #Camera #CamerHack #Experimental #Film #FrugalFilmProject #Kodak #Retro #Shittycamerachallenge #Vintage

Filling the Gaps: The Kodak No. 3-A Folding Pocket Camera (Model C)

The Kodak 3-A Folding Camera has been on my ‘to have’ list for a while, to go alongside my other early twentieth century cameras, the Kodak 1-A Autographic and the diminutive Kodak Vest Pocket camera. The 3-A is anything but diminutive though,  measuring 240 x 120 x 50 mm (folded) and coming in at a weight of over 1kg (1110g). This monster (my better half insists my vintage cameras are little monsters, but that doesn’t really apply here) popped up on the Kamerastore website and even though it was described as, ‘the lens has a lot of fungus inside [and the] camera is generally worn’, it is still mechanically sound and just requires a good clean.

The Kodak 3-A was originally launched in 1903 with the model A, and this was followed by several variations; the model B (1903-4), the B2 (1904-6), the B3 (1906-8), the B4 (1908-9), the B5 (1909-12), and finally the model C, from 1912-15. In 1914 the model C and further variations were fitted with the autographic back as standard and marketed as the Kodak 3-A Autographic.

The Kodak 3-A Folding Pocket camera takes 122 film, which was last made in 1971. The film is 8.25cm wide, compared to 6cm for 120 film, and the frame size is 14cm long. The format was known as ‘postcard size’, as negatives could be contact printed onto a postcard backing. Of course, if I want to use the camera with 120 film I’m going to need an adapter, so I’ve ordered a set from camerahack.it. The 3-A is  fitted with a Bausch & Lomb Rapid Rectilinear two element lens and the Kodak Ball Bearing shutter with speeds of 1/25, 1/50 and 1/100s plus B (bulb) and T (time). Aperture is determined by the dial on the front underneath the lens and ranges from f4 to f128. 

When it arrived it was clear that this 3-A had been well used. Some of the leatherette was missing and in other places it was cracked. The whole camera was quite dirty and dusty and both lenses were spotted with dirt and fungus. Inside, the camera was not too bad, and the bellows were surprisingly dust free. However, the body and lenses certainly needed a good clean. Before attempting to clean the camera I thought that I would try to date it a little more accurately.

The Kodak 3-A Model C was made between 1912 and 1915, though after 1914 it was fitted with the Autographic back, which used special film that allowed the user to write a few details between the frames. This particular model was made in the US, there are manufacturers marks indicating that it was made in the US under the bellows and on the film back. According to David Purcell, in his breakdown of the No 3A Folding Pocket Kodak Camera, in the US the 3-A was fitted with red bellows as standard until 1912, when the design was changed to using black bellows. According to Purcell, the lowest serial number of the Model C is 266821. The serial number of my Model C, found behind the stand on the front of the camera, is 334758. So I reckon this dates my 3-A Model C to roughly about 1913/14. It’s still a 110 year-old camera in decent working condition, which is amazing.

Before I started cleaning the camera I did a check of the bellows with my little LED light and they are quite light tight. The first thing I did was remove the lenses and soak them in hydrogen peroxide to (hopefully) clean the lenses and kill any remaining fungus inside the lens. (Later I removed the little lens in the viewfinder and popped that into the hydrogen peroxide, too.) Then I gave the body a good clean with a soft cloth before opening the camera and cleaning that inside and out. The bellows and shutter assembly were cleaned with a jet of air.

Once the camera body was done I cleaned the viewfinder. This has a little metal hood, so it was actually not too bad inside, but the lenses and mirror got a good clean with a cotton bud and alcohol. Sadly, the mirror was quite dirty around the outside and couldn’t be readily cleaned. 

Then I turned my attention to the lenses. These had been soaking in the hydrogen peroxide for a while by now so I removed each lens, dried them off, and gave each a quick rub with a soft cloth. The difference was amazing. The  haze and fungus were gone and the lenses were clear. Each was restored to it’s original position, and the viewfinder lens screwed back into place. The camera is now ready for testing, although before I can use it properly I really need to replace the red window.

Starting in December, just a few days away now, is the next Shitty Camera Challenge, and since I came across this camera it’s certainly a contender. In the meantime, though, I plan to make a test exposure before actually running a roll of film through this wonderful camera. I made a quick check by placing a used Instax Wide film into the camera and it fits perfectly. So in the next part of this post we’ll se what we get with Instax Wide. I’m then going to have to wait for the adapters to arrive before I can use 120 film.

If you are on Mastodon, you can now follow this blog directly. Just go to Mastodon and follow my WordPress account at @keithdevereux.wordpress.com. All new posts will be automatically updated to your timeline on Mastodon.

#122Film #ArtDeco #Autographic #Bellows #Camera #Experimental #Film #FrugalFilmProject #Kodak #Retro #Shittycamerachallenge #Vintage

Load 120 film into 122 film cameras with FAK122 adapters KIT!

These Adapters let you load normal medium format 120 film in cameras made for the 122 film spools (cameras like old Kodak No. 3A Folding BROWNIE).

CamerHack film photography adapters