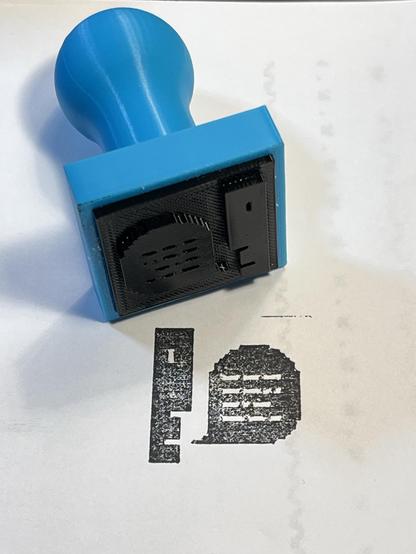
Tried to make a stamp today with my 3D printer using PLA for the handle and TPU for the stamp. Results are meh. Maybe the flow rates aren’t right which leaves the gaps. I did use the iron feature on the top layer too.

#RetroComputing #3DPrinting

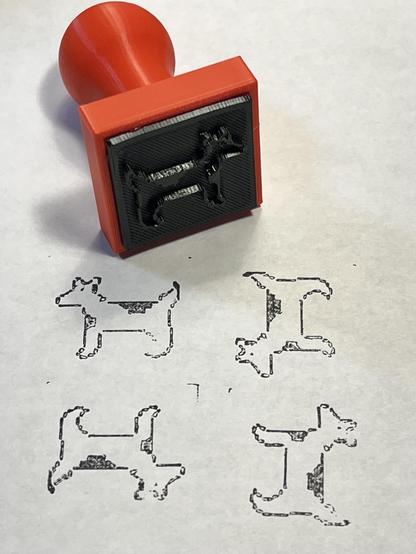
That’s somewhat better. 100% infill (was 20%) and top iron at 20% flow (was 10%). Also using the TPU (85A) manufacturer settings file for Bambu P1S.

#RetroComputing #3DPrinting

LaserWriter 8 Page Setup

#RetroComputing #3DPrinting #Clarus #Moof

Stamps, stamps, stamps!

#RetroComputing #3DPrinting

@paulrickards
Are you using an open source file (stl or obj) for the stamp? Would like to make stamps too! Inspiring!

@AasaMariaHedberg I started with this model for the handle. Then sized a 10mm tall base that was 5mm larger than the artwork. Extrude the stamp part 2mm tall. And then the print settings in the previous posts. Have fun!

https://www.thingiverse.com/thing:2763926

TPU Stamp by conorwalsh

Custom stamp for use with a standard ink pad.The stamp is divided into 3 parts the main stamp body, a cap for the stamp to stop the ink from drying and a replaceable section for the text which should be printed in TPU.To add text use your preferred design tool to add 5mm tall text and extrude 2mm up, the stamp can accommodate 1 or 2 lines of text. Don't forget to mirror your text before you print!

Thingiverse
@paulrickards Brilliant! πŸ’Ύ
@billgoats Now I'm curious about printing wax seal stamps like the ones you use.
@paulrickards Oh, that'd be fun! I wonder how the heat of the melted wax would be against the stamp. I get my wax sticks off ebay; they're not very expensive and have a wick down the middle like a candle.
@billgoats It's possible it might deform the stamp. I'm attaching the TPU stamp to the handle with hot glue and that's enough to deform the PLA.
@paulrickards Or it might meld together. Or you do need to wait for the wax to cool before you lift the stamp off, so that might just take a long time... will be interesting to find out!

@paulrickards @billgoats do it and report back. I'm curious what filament would work best

Usually seals are done in metal to suck the heat from the wax quickly. So you'd need something with good thermal conductivity

@paulrickards the floppies are super cute! I was wondering if I could make something similar using Blender. It's the only 3D software I know a little but I'm well aware that it's not so great for 3D printable models 

@byruit I'm sure Blender would work fine. I did these in Tinkercad. More details:

https://mastodon.social/@paulrickards/115338590186938978

@paulrickards @sindarina Using TPU for the stamp image part?
@paulrickards you cracked the secret formula! Now tell us the details. TPU settings?
@andypiper Answers in the thread!
@paulrickards now I know what I'm doing tonight

@paulrickards Ooh... these are SO NICE!
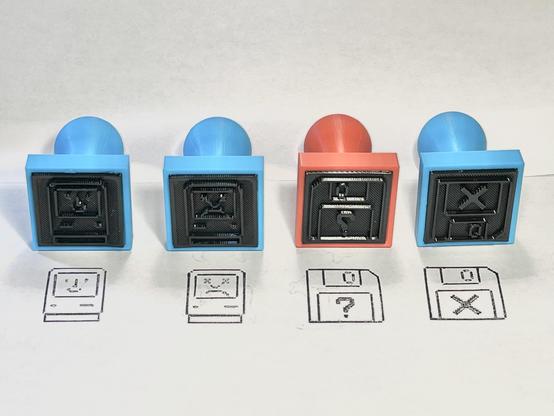
Btw: Do you know my icon cards? πŸ˜ƒ

https://makerworld.com/en/models/32512-apple-macintosh-icon-plates#profileId-30616

Apple Macintosh Icon Plates - Free 3D Print Model - MakerWorld

Download this free 3D print file designed by LAYERED. Boost MeDeveloping these models is a true labor of love, but it requires significant time, effort, and numerous tests to ensure they are easy to print. Each test print uses filament, and perfecting the models can take many iterations.If you enjoy my work, your support would mean the world to me. It helps me keep creating high-quality, innovative designs and motivates me to push further.Thank you for your support, and stay healthy! 🀞🏼Susan Kare is an American artist and graphic designer, who contributed interface elements and typefaces for the first Apple Macintosh personal computer from 1983 to 1986. She was employee #10 and Creative Director at NeXT, the company formed by Steve Jobs after he left Apple in 1985. β€“ WikipediaWell, as a tribute to all these great graphical elements I made a set of plates with the most favorite ones. Just put them down with the included base, frame them all together or individually and hang them on the wall or use them as refrigerator magnets. To get the pixels clean and sharp, I recommend to print everything with a 0.2mm Nozzle. A 0.4mm nozzle will also work, but it will be better with the 0.2mm. The print time with the finer nozzle is about twice as high as with the larger ones. Color it as you want and print it upside down, if possible on a structured PEI plate. This guaranties a smooth surface. The current set of plates is designed so that you can stand them up with the base. If anyone needs cutouts for small magnets on the back, please let me know. I will gladly fulfill your wishes. Also if you want a specific icon to go with it, please contact me. Actual these icon plates are available:AlertBombCommandFillFloppy DiskHappy MacMac ClassicMacPaintMoof the DogcowSad MacSpray PaintTrashcan

@paulrickards πŸ˜πŸ‘πŸ‘πŸ‘
@paulrickards you’re doing Dog’s work πŸ™πŸ»
@paulrickards omggggg these are adorable! !!!!
@paulrickards that’s almost a new form of art. Cool
@paulrickards I'm experimenting with rubber stamps, carved with a 10watt diode laser. Looks great with 4 passes at 20% power.
This video :
https://youtu.be/jWzRObBwMmM?si=ZnPjVHaMqeD1GM-l
was very inspirational for me, it's showing how to do it. But I used free lasergrbl and it works ok too, but doesn't have the "ramps" feature (explained in the video)
Make a Rubber Stamp with a Diode Laser Engraver (Lightburn)

YouTube
@paulrickards I did this a while back on my Prusa. Ironing was definitely key.
@paulrickards is that the β€œAMS compatible TPU”? If not, did you use it in an AMS?
@pixel No, this isn't compatible with the AMS so I'm feeding it manually from inside a heated enclosure. But the extruder hasn't been able to pull with enough force to make the reel rotate so I have to nudge the wheel to make slack so it feeds properly.
@paulrickards thanks! I just bought a roll for the first time a couple weeks ago and haven’t used it yet so I was curious what shenanigans I was in for 😊

@pixel This is my first time using TPU. It strings a little but otherwise seems OK. It's flexible but not very stretchy.

I left it loaded in the printer overnight and the next morning it broke off in the extruder when I unloaded it. I had to take it apart to clear it. I recommend unloading it when you're finished.

@paulrickards I'm surprised the stamp works as well as it does. I would've thought you'd need a softer surface to pick up the ink. When I saw the first photo, I nearly suggested printing a mould to cast a stamp out of silicone rubber, but you hardly need it. I'm not usually one for print lines but they contribute a neat texture here.
@MrDOS Yeah it's not too bad. The bottom of the stamp was printed in TPU which is flexible so that likely helps in ink transfer with pressure.
@paulrickards I guess it probably defeats the point of a hand stamp but you could also tweak settings outside the print itself such as using a hand-press (like https://woodzillapress.com/product-category/a5-lino-press/) to add additional, consistent pressure. No idea how well the plastic would hold up under the added leverage though!
A5 hand lino press – Woodzilla Press

@paulrickards I can hear that stamp.

@paulrickards

I suppose the 3D printing aspect lets you get the pixelization over hand carved.

FWIW I've seen "rubber" stamps and plates for letterpress made with photopolymer process.

https://en.wikipedia.org/wiki/Photopolymer#Fine_printing

Photopolymer - Wikipedia

@paulrickards You're getting very close to 3D printing save icons that you can then print onto other things.
@NF6X @paulrickards
Why the heck did they make 1980s magnetic data storage media look like save icons, anyhow? Seems rather bizarre.
@paulrickards thanks to you I just learned about ironing!
@paulrickards maybe just my traditionalist approach but I feel like a reduction approach like using a cnc wood carving machine on rubber/linoleum would be better for making the stamp. Someone had that set up at Makerfaire this year.
@paulrickards Back in the day when I was in the stamp business we had two choices: rubber pads carved with a laser and polymeric resin sensible to UV light (the process is similar to having a negative and developing a photo).
The second process is similar to what some 3D printers do so maybe those are a better choice than the filament technique.

@paulrickards What's the infill on your TPU?

Looking at your open spot, it seems like that might be where it buckled away from the paper. If you haven't tried at 100% infill, I'd definitely try it that way.

Totally disregard if that's already the case but it's where my brain went with the image.

@gooba42 The default infill, which I think was 20. Trying again at 100%.

The buckled edges were from under-extrusion on the first few layers on the bottom caused by the filament reel not spinning inside the dry box as it was being pulled out. It's on a cardboard reel which I suspect is the problem.

@paulrickards I was just figuring that the big blank spot looked like a place where the geometry was open enough for the infill to squish where everything else was reinforced by perimeters.
@paulrickards It's a lo-fi rendition of a lo-res icon! Much pleasing. Very art. πŸ’š
@paulrickards The stamps I use at work seem to be a reason print with a flexible resin.

When i looked into FFF stamps the suggestion was resolution was possibly an issue. I'm not sure if it's practical, but maybe print vertically?

I'd love to see if you're able to improve the stamping with a FFF print. I'm not able to do resin printing anymore, so if it works for you that would be great to see :3
@paulrickards It does have a certain lo-fi je ne sais quoi to it though!
@paulrickards next one will be better!
@paulrickards I recently read about a foam layer between the handle and the rubber part, maybe it'd distribute the force better?
Still you really want to find a laser cutter for that, and use the available sheets.
@paulrickards I like the idea and the texture in the stamp though. πŸ‘

@paulrickards

The extremely low surface energy of TPU might be working against you by preventing it from picking up much ink. Try TPE (like eSun eLastic) instead, if your printer can handle it.

@ali1234 @paulrickards can one just abrade it with some sandpaper to improve that?