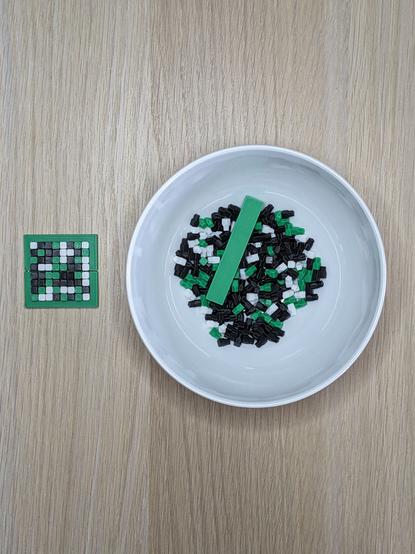
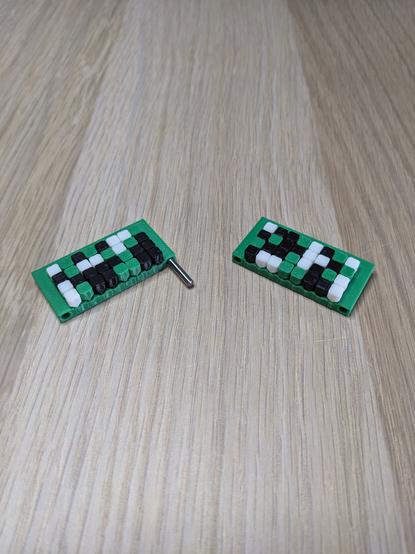
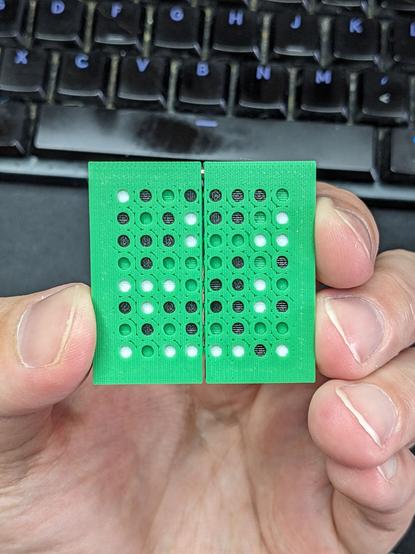
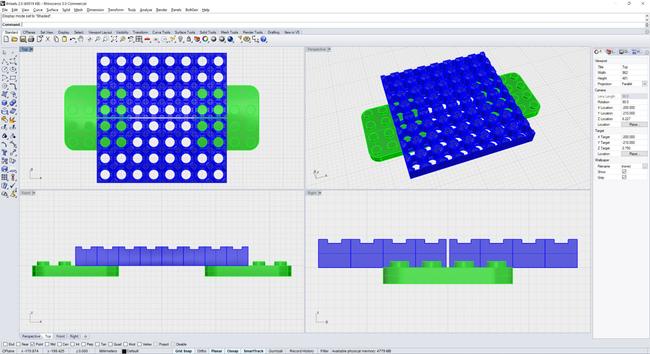
Ask your doctor today if Bowl O' Plastic is right for you! The next step in my #Thrixels madness is seamlessly joining multiple panels together to support larger mosaics. Here's a test with no extra clearance - not only is there a gap, it's exacerbated by the tiles pushing the thin substrate walls outwards, so those will have to be cut away in the next attempt.

That metal pin is from the #GravisGamePad project - I will need to find a different "dowel" material.

#3DPrinting @3dprinting

@3dprinting a tripartite working solution: the eggcrate-like substrate, a Lego-like grid for the substrate to snap to and join with, and the #Thrixels themselves. I think with smaller (8x8) joining pads that click in more positively, this system could be expanded in size almost indefinitely. I think only internal joining edges need the #frek subtracted away, otherwise the thrixels can lean out over the edges. Also, I think there's room to expand the top tile surfaces slightly! #3DPrinting

@3dprinting okay, with a tiny (0.1mm!) tweak to the Lego-like part's diameters, they actually do click together and feel like Lego - at least the first couple of times, but that should be enough for final assembly of a finished workpiece, so I'm calling that part done.

I've also embiggened and squared up the top surface of the tiles (also tested a larger rounded-off design) - now I get to tune out (as much as possible) the weird inset wiggle in between the edges of each square. #3DPrinting

@3dprinting I am rapidly reaching the point of diminishing returns on tweaks to this (if I'm not already well past it). There's a couple more tiny changes I want to try to fill in the gaps in between tiles, but at this point I'm playing with literal fractions of millimetres here, and some time tomorrow I'm going to remind myself nobody else will ever look as close at these things as I am doing now.

Perfection is the enemy of good, as they say!

#3DPrinting

@3dprinting two changes here: two perimeter layers on the top surface rather than one, and concentric ironing added. The former seems to have made no difference except maybe to make the grid line up worse, but the ironing has flattened the top surface and eliminated the streets-and-lanes effect of previous versions.

I'm going to try two more things before calling this "good enough": printing the last layers at 50% speed, and bowing out the sides on the top layers very slightly. #3dprinting

@3dprinting and here's the scale of what I'm trying to effect here: the bounding box of the top edge seems to be 3.90-4.00mm (perfect!), with the bowing-in at around 3.8mm - so I'll first try a tiny curve that's just 0.1mm wider on each side to compensate. #3dprinting

@3dprinting okay, but that's like... basically perfect? New version on the left, old on the right in the photo.

Filament coming out of a round nozzle is never going to turn a 90 degree angle flawlessly, so the corner gaps will be there no matter what I do, but the side gaps are basically gone, and the biggest visual inconsistency now is the height of individual tiles, which A) is impossible to see head-on, and B) has no chance in hell of being tuned out in 3D printing this decade. #3dprinting

@3dprinting Nine hundred individual functional #Thrixels parts printed on a single plate, with 100% yield. I don't know if there's a world record for this, but it's certainly a personal best - and I'd like to try 2,000 at a time when I'm in full production mode. #3DPrinting
@3dprinting while the white tiles finish printing tonight, here's a sneak peek at tomorrow's print: base parts big enough for a 29x29 QR code with a border of white for contrast, plus enough joiners for the whole thing to be stable and solid. The magenta bits are 0.2mm wide and are used to subtract frek from the mating edges, so they'll have clearance to tile seamlessly. This will be a ten hour print on its own, even though it's only 56g - and 9.7g of that is the support material! #3DPrinting
@3dprinting the QR code mosaic project is running a day late thanks to a surprise wireless router failure and flow-on effects, but the tiles, base pieces and joiners are all ready to go. The bases click together in a way that is more satisfying than I could ever have hoped - it honestly feels almost as sturdy as Lego, and almost mocks me for handling as gently as I am so far. Tomorrow, some art appears! #3DPrinting
@3dprinting words can't adequately express the satisfaction of clicking this together, so here's a video of what it sounds like. #3DPrinting
I did not intentionally scale the paper map to almost exactly a 4mm pitch to match the actual mosaic, but that seems like a good idea to replicate in future - another "best practice" lesson learned. Time to attempt a time lapse video - wish me luck!

Whether you're into #3DPrinting, or a fan of #BlueMonday by #NewOrder, you'll want to check this video out. This is a fully 3D printed tile mosaic system that can be extended seamlessly, with any colours you can print the tiles with.

Check it out here: https://www.youtube.com/watch?v=UazUBZNo9vs

My video shooting and editing skills are rudimentary at best, but I think it tells the story I wanted to tell - let me know if you'd want to see more videos like this!

@3dprinting

3D printed QR code mosaic timelapse

YouTube

13 hours to print less than 60 grams of PLA? Sure, why not! Today's the day I embark on the final proof-of-concept test for making large #Thrixels mosaics, and this print is two of the four base pieces that will be combined to make up the whole. Now taking guesses as to what classic bit of pixel art I will be recreating here!

#3DPrinting @3dprinting

Months of design work, most of a week with the printer completely occupied, and all I have to show for it is this dopey fish silhouette.

Another couple of days, though, and this has the potential to become my #3DPrinting magnum opus.

@3dprinting

In the spirit of sharing failures as well as successes, I wasted an entire printer-day by rushing to set up a whole plate of #Thrixels in the morning and copied and pasted the wrong model - I nearly ended up with a thousand individual *holes* instead of mosaic tiles, which would've been totally useless.

Not a big waste of filament - if I'd let it finish, it would've been 70g or so - but losing a day of time on the project (I wasn't around to clean/reset) is irritating.

#3DPrinting @3dprinting

This is what I was expecting to see instead.

This is going to be dope. So far I've had one tiny failure so far with this process, and that cost me about ten tiles on a plate of about 900, so it's pretty reliable - I'm sure I've lost more by dropping them on the floor trying to pour them into the sandwich bags I'm using to sort and store them.

I've also printed my own little removal tool for them - it's just a hollow bar that slips over a row of tiles, and gives me leverage to snap the whole row away at once.

#3DPrinting @3dprinting

Substantial, visible progress has been made today. This particular image requires 2,561 green #Thrixels, of which I've printed about a third, but every other colour is now in place.

Unlike with the QR code, where I went line by line, I'm doing the outline and all other details first before simply filling the rest of the space with green.

The result of this strategy is that, as of today, it looks like someone chroma-keyed a #dopefish. Should be finished next weekend!

#3DPrinting @3dprinting

Tried something today that really didn't work. At the corners where the base pieces meet, I cut out one part of the substrate so they can join seamlessly, and thought I'd try that throughout the substrate. This takes 30% less material (a few grams) and 30% less time (hours, on a big one) to print, but results in a base that's surprisingly hard to line the tiles up in, and even harder to get a consistent surface in the end, so that's a dead-end idea.

#3DPrinting @3dprinting

I did finish assembling the #dopefish though, so that's a win. I'm not thrilled with how visible the seams are - I think the larger a single base piece is, the more it will warp up in the middle, so what you're seeing is the confluence of multiple warped edges. It should be less visible once pressed into a frame and viewed in better light, and future projects will use smaller base pieces to minimise this.

#3DPrinting @3dprinting

@timixretroplays that's a dope-ass lookin start to a fish
@timixretroplays @3dprinting This is really cool! After watching the QR code assembly, I couldn't help but think that the assembly process could benefit from a pick and place system something like the following: https://www.crowdsupply.com/citrus-cnc/simplepnp
Or maybe just print the thrixels in place?? Don't mind me though. I like reading about the development process you've been doing. ;-)
SimplePnP

Your personal open hardware PCB assembly machine

Crowd Supply

@lenzj thanks!

The assembly process is why I'm doing this - it's like putting together a jigsaw puzzle I've designed myself. Plus it's not just dropping bits into place, they click in with some force and you really need human finger dexterity to find the right fit each time.

Printing them in place is possible, if I bought three more AMSes for my X1, but that defeats the purpose - I want to make things and then make something out of them, not make a thing to make something for me.

@timixretroplays That makes perfect sense. Its analogous to trying to automate a jigsaw puzzle or Lego assembly. Doing that would take all the fun out! Again, kudos for your efforts on this. Your comment about the satisfying tactile click as each piece goes together makes even more sense now. Very creative!

@timixretroplays @[email protected] "I'm sure I've lost more by dropping them on the floor trying to pour them into the sandwich bags I'm using to sort and store them."

If only you had a device that you could use to create a scoop or funnel to safely put the Thrixels (that is what you called them right? I am still waking up) into a baggie. That would be so awesome. But alas, it is not meant to be.

@mutthew @timixretroplays @3dprinting You can print something like this: https://www.printables.com/model/441038-countsort-tray with one of the sides removed and you can easily transfer the #Thrixels into the bags.
Printables

@Siff @mutthew yeah, it should be a trivial problem to solve, and that design of tray looks ideal. I could also just use bags that are the width of my build plate ๐Ÿ™‚ I'll have a think about what might fit best into my workflow here.
@Siff @mutthew so I went a little mad and designed this thing. The concept is that the whole width is available for collection, the reservoir is tall enough to collect a lot at once, and then once full it should be a simple matter of tilting it to one side and pouring it out through an area only 3cm wide for accuracy. I may yet make it even wider and even more unhinged. This was a super fun exercise in managing curving geometry! #3DPrinting @3dprinting @[email protected]
@timixretroplays @[email protected] .... You know. You might be onto something there!
@timixretroplays @3dprinting That looks... DOPE! ๐Ÿ˜
@Liquidream I think you understand the scale of this project

@timixretroplays @3dprinting

World's smallest and most complex Go board.

@JustJimWillDo please don't make me start thinking about making a Go board and pieces, I have enough projects on already ๐Ÿ™ƒ
@timixretroplays @[email protected] Are you considering releasing the STLs for use or purchase at some point?
@dlehman @3dprinting I would love to see other people making stuff with this, the question is what would be a meaningful way to share it - just the STLs of the tiles and base wouldn't be useful without combining them into an actual pattern worth making. Ideally someone would come along and parameterise the base to generate shapes from pixel art, but I don't know anything about doing that, so if someone volunteered I'd happily share the files under #CreativeCommons for that to happen. #3dprinting
@timixretroplays @[email protected] What are you thinking would be useful to parameterise? Just allow output of an arbitrary rectangular size (height x width) of the base, or arbitrary shape? eg.
@dlehman straight X and Y would be the MVP - it's trivial to do manually but that would enable non-3D-modelers to use the system. Creating a shape from a low-res PNG would be next. The big one though would be auto segmenting base pieces for larger mosaics, and shaving them down to fit together - there's too much material (#frek!) for them to tile as-is, but snipping 0.2mm off the mating surfaces lets them tile seamlessly. #3dprinting
@dlehman my printer's build space is 256x256mm, more realistically closer to 23 or 24cm square, divided by 4mm gives 60x60 pixels maximum for a single base piece. To make a #dopefish mosaic (which I plan to!) would require drawing the outline, and then intelligently splitting it into four quarters. That feels hard enough to do that my plan for now is to manually design the bases for each piece I plan to make, but a program to do it automagically would enable others to do it too.
@dlehman it's entirely possible someone's already written such a program - the same problem would need to be solved in any physical #PixelArt medium, like fusebeads or cross stitch. I did find a thing that counts the number of unique colours in an image - I wrote something to do that myself in 2011 but this one is better: https://townsean.github.io/canvas-pixel-color-counter/
Pixel Color Counter

A web app that counts the number of pixels in an image per a unique color.

@dlehman oh, and the last problem to solve is finishing and framing. Most tiles sit very snuggly, but turning a mosaic upside down will cause some to fall out. Brushing some clear-drying glue over it is one option. I plan to get clear acrylic laser cut to form a frame to surround each workpiece I finish.

This is what I mean about sharing meaningfully - there's no point to the usual "neat! STL?" without planning start to finish, unless all you want is a very niche #3DPrinting torture test.

@dlehman oh, and the other last problem after splitting the mosaic is generating a useful representation of it to use as a reference while you actually make the thing, maybe even highlighting individual rows as you go. Then maybe helping keep track of which sections are complete so you don't lose track of where you're up to in the whole project. Maybe this isn't a job for openSCAD unless it's got a PNG plugin or something ๐Ÿ˜‚
Still thinking about this today. I think the way forward would be a Python script or something to analyse, histogram and scale a starting PNG file into a useful grid, then output it as a whole or in parts for a multi-section mosaic. It could output a binary map of tile placement for each grid, and that can be passed to something that can manipulate a set of 3D files to generate base sections to print. Then you print up the coloured tiles based on the histogram, print some images, and off you go.
I still have no idea about what tool would handle the latter - no doubt OpenSCAD could do it, or a script in Rhino3d, or maybe some fancy command-line tools for combining models together. With individual STLs for middle, edge and corner pieces to make up the bases, and coordinates saying what goes where and which edges join to others, the hardest part is not doing the math, but finding a way to automate it in whatever binary format the 3D model will end up as.
@timixretroplays This is a good excuse for me to start learning more about OpenSCAD and what it can (and canโ€™t) do.
@dlehman I know nothing at all about it, just that I've seen it mentioned alongside parameterising of parts. Maybe someone more familiar with #OpenSCAD could jump in and see what it could do in this case. There may also be other apps better suited to the task - I wouldn't expect it to handle any of the project management aspects of it, but it's a total unknown for me.

@timixretroplays

One can easily overtune a profile and start hulicination changes and umperfections. The secret is to know and recognize the capabilities and limits of the manufacturing process and exploit its weirdness.

@3dprinting #3dprinting

@timixretroplays Wow, that is looking great! Thanks for sharing the iteration process along the way.
@dlehman thanks, I appreciate you saying so! I've hoped these posts aren't too repetitive because it is that process of evolution I want to try and share, rather than just a completely finished and perfectly polished end product.
@timixretroplays Itโ€™s something I have to relearn regularly: the first few iterations are usually not great, but donโ€™t give up now, youโ€™re just finally getting somewhere!