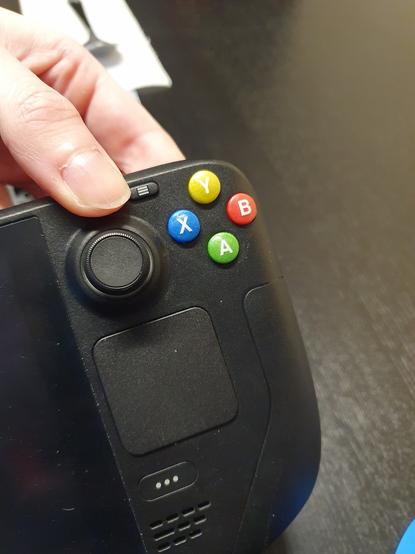
My partner kept mentioning that he wanted coloured buttons for his #SteamDeck. After losing my fear of opening up the deck thanks to replacing fan & SSD an idea started forming for a surprise & #projects entry.

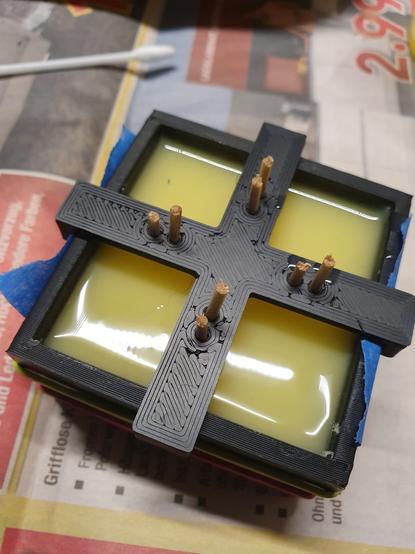
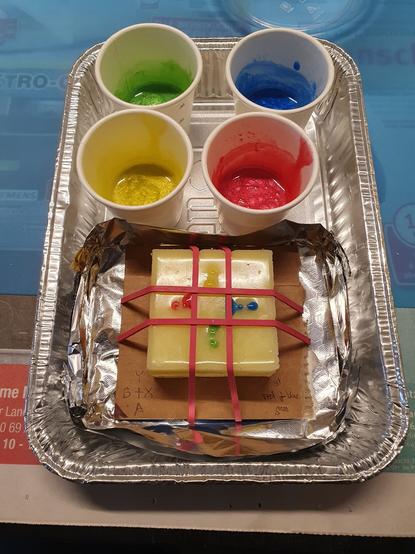
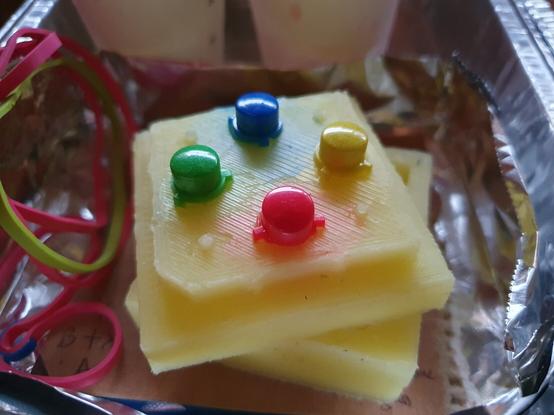
So - in secrecy - I designed a 3d printed box to create a 2 part silicone mold of the buttons (taken from my deck), cast them in epoxy resin, applied rub on letters & sealed those in with UV resin.

Really happy with the result, as is he 😊 And this is just v1, got some bigger plans 😁

@foosel

πŸ‘ πŸ‘ πŸ‘ πŸ‘
A great job, congrats!

@foosel WTF that looks amazing! Also, since the coloring is massive, no matter how much he uses them they will never loose color! (though maybe the letters wear off eventually) 🀯 πŸ‘

@DJGummikuh v2 will also work around that by making the letters inlays 😊 already have them printed on the resin printer. will be a multistage process, first a top layer of clear resin, then the inlays secured with UV resin, then more clear resin and finally a contrasting backlayer.

Or at least that is the plan 🀣

@foosel Does he know? :D
@DJGummikuh yes, because that's going to require too many steps to do in secret in a shared flat πŸ˜…
@foosel wow, that looks very good!
@foosel oooh! That's an excellent process. I got given some of the two part silicone for Christmas, I'll have to try that.
@Emily_S I plan to do a more detailed write up in shape of a blog post, I hope I'll find the time for that on the weekend.
@foosel Geil! I'm jealous. πŸ˜‰

@foosel Wow 😍, the color looks incredibly like Smarties πŸ˜…

Good times when gamepads had colored buttons πŸ€“

@kiview @foosel that looks awesome. I have a sticking shoulder button. Maybe I should get over my fears and bite the bullet and open it up

@philw @kiview I was really afraid of it before I swapped my (noisy) fan and upgraded the SSD, but compared to a lot of other stuff that I've disassembled in my life Valve really made it easy. The worst of swapping the buttons isn't opening the case but removing the right trigger because that is clipped on tightly, and even that is fine if you follow the iFixit guide.

Personal tips: iFixit guide and tools as recommended therein.

You've got this!

@foosel oh wow these are so cool!
@foosel Damn! That's awesome!
@foosel Very nice work. I had forgotten that stereo lithography has a long history in mold making. You have inspired me to consider similar applications. Thanks for posting.
@coderipper That's all FDM and original buttons though, however v2 will involve SLA as well ^^
@foosel Really Really nice! I like it! 🀩
@foosel amazing! Side note: they also look like off-brand M&Ms (or Smarties) that I want to eat.
@yonomitt @foosel Extra chewy M&M's. Don't melt in your hand or your mouthπŸ˜β€‹

@foosel AWESOME! I've been wanting to do exacly this but just haven't spent the time to
A) Practice making silicone molds and resin casting
B) Disassemble my deck to cast the keys.

Do you plan to release the stl's for 3d printed parts?

@ticktok Yes. Plan is to do a write-up in shape of a blog post, with pictures and files. Hopefully this weekend, but no promises.

Btw, first time ever for me, both for silicone and resin. Done from last to this Monday. Steamdeck disassembly is amazingly trivial with the right tools, iFixit has you covered with amazing and official guides plus tools and also parts as needed.

@foosel nice! yea I've watched the disassembly as I already have a 1TB m.2 I'm planning on swapping in as well so disassembly is already on the todo list. I'm hopeful to do my deck and make new buttons for all my steam controllers as well.(and I might do the hall effect analog stick mod to my deck at some point)
@foosel that is such a good look on the Deck. Amazing work!
@foosel Am i the only onw who sees M&M ? 🀣
@zwangseinweisung no, at least not based on my replies 🀣 #forbiddenSmarties
@foosel I would prefer Smarties too but M&Ms are more international
@foosel That's just awesome! Looks really good 😍
@foosel do you do anything special to mix your silicone
@vegetablegremlin weigh it, mix it, de-gas it in a food vacuum thingy, pour it, wait. That's it.
@foosel oh the food vacuum thats a good idea
Degassing Epoxy Resin On The (Very) Cheap

Anyone who’s tried to encapsulate something in epoxy resin knows how much of a hassle air bubbles can be. If you’re trying to get a perfectly clear finish, the last thing you want is a …

Hackaday
@foosel niiiiice. They look like m&ms ;)
@foosel I want to try mould making on 3D printer sometime. Just need the right project. Btw thanks for all the work on octoprint. It really adds tremendously to the usability of cheap printers.
@foosel
You done real good...
They are awesome !
@foosel I don’t want to open up my deck - but damn, buttons like this would be worth it. They look fantastic πŸ˜€
@foosel The results look so professional! Excellent work!
@foosel
Wow, this looks marvellous! I love the idea - but as you described, I have quite some fear of opening the deck up ... πŸ˜…
I'll just adore your work until, one day, I might have to open our deck, too 😁
@DrFerrous
@foosel this reads like a _proper_ lovestory.
@foosel they look like candy buttons 😲
@lexi Everyone keeps saying that πŸ˜‚ They are less M&M looking in person though. I used Mica powder to colour the resin and that gave it a somewhat metallic finish.
@foosel Very nice technique! The buttons look as if they came that way from the factory.
@foosel This looks awesome! Great work!
@foosel wow, this is amazing! Makes me want to try out silicone molding & casting now!