The Ultimate Guide to the Salesforce Screen Flow File Preview Component

The Spring ’26 Release introduced the File Preview Screen Flow Component. This native tool allows Admins to embed document viewing directly into the flow of work. In this post, we’ll explore the technical requirements, real-world observations, and the strategic implications of this functionality.

Beyond the “Files” Tab: Why This Matters

Historically, viewing a file in Salesforce required navigating to the “Files” related list, clicking the file, and waiting for the standard previewer to launch in a separate overlay. If you were in the middle of a Screen Flow, perhaps a guided survey or a lead conversion process, leaving that flow to check a document meant breaking your concentration.

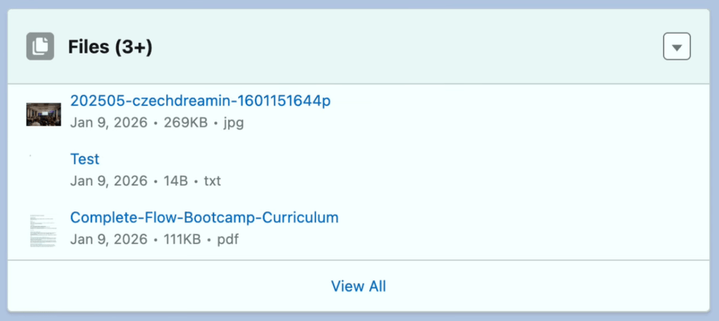
Salesforce introduced a file thumbnail preview that shows visually what is in the file without having to click into it. Please note that the thumbnails show beautifully in the Single Related List component for lightning record pages. In the multiple related list view, I did not see the thumbnails.

In addition to the lightning record page and related list functionality, Salesforce introduced a file preview component that allows the user to see the preview of the file they have just uploaded, or they find attached to an object record in Salesforce.

Technical Blueprint: Configuring the Component

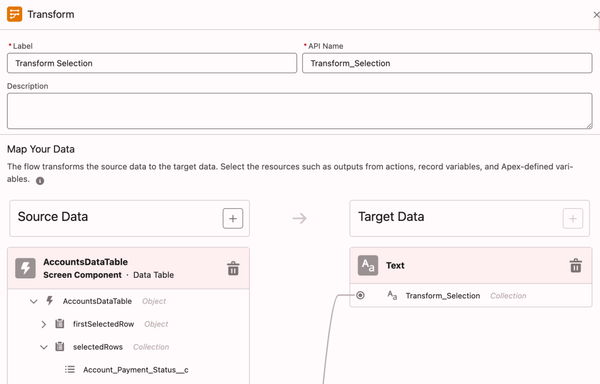
Setting up this component requires a shift in how Admins think about file data. Files data model is unique. To make the component work, you need to navigate the relationship between ContentDocumentLink, ContentDocument, and ContentVersion.

Core Attribute Requirements

 When you drag the File Preview component onto a screen in Flow Builder, you must configure the following:

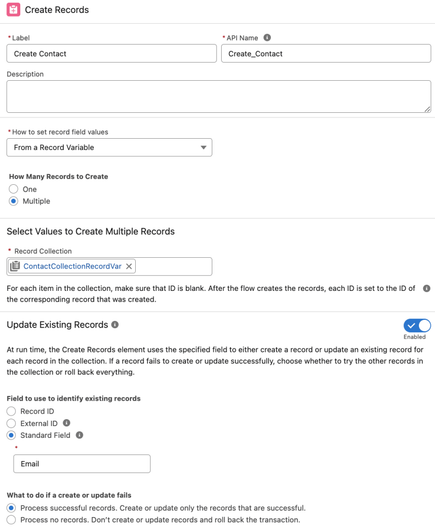
  • Content Document ID (Required): This is the most critical field. The component needs the unique 18-character ID of the ContentDocument record. It will not accept the ContentVersion ID (which represents a specific iteration) or the Attachment ID (the legacy file format). Please note: the preview component always shows the latest version of the file.

  • Label: This attribute allows you to provide instructions above the preview window. This is highly effective for compliance-heavy roles, where the label can say: “Verify that the signature on this ID matches the physical application.”

  • API Name: The unique identifier for the element within your flow logic, following standard alphanumeric naming conventions.

Using Conditional Visibility

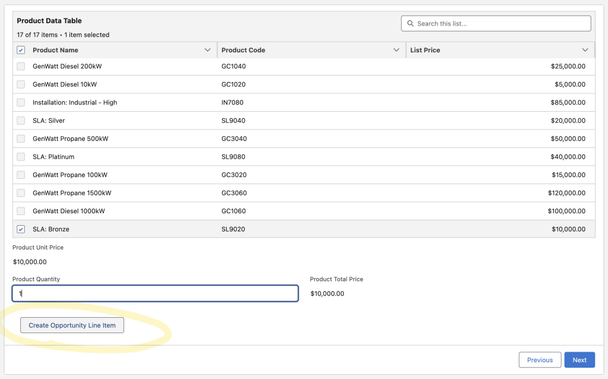
Because the preview window takes up significant screen real estate, it should not be set to “Always Display”, if it will be driven by a data table reactively. Salesforce allows you to specify logic that determines when the component appears. You can set it to display only if a specific file type is selected in the collection and hide the component if the ContentDocumentID variable is null to avoid showing an empty box.

Lessons from the Field: Our “Around the Block” Test

In our recent hands-on testing, we put the component through its paces to see where it shines and where its boundaries lie.

[youtube https://www.youtube.com/watch?v=_k3F2eX4rdM?version=3&rel=1&showsearch=0&showinfo=1&iv_load_policy=1&fs=1&hl=en-US&autohide=2&wmode=transparent&w=640&h=360]

The File Extension

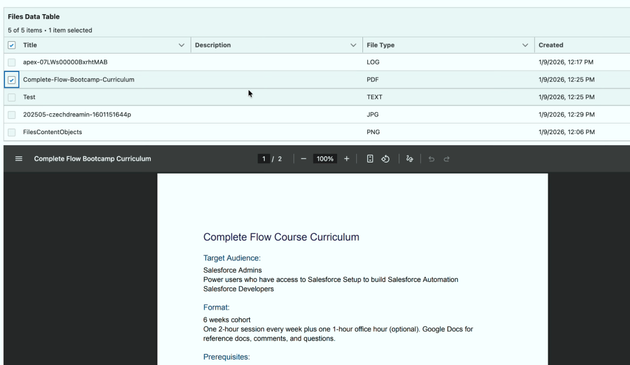
The previewer is highly dependent on the browser’s ability to interpret file headers and extensions. During our test, we uploaded a standard log file. While the content was technically plain text, the file had a .log extension. The component struggled to render this because it didn’t recognize it as a standard format. However, once we switched to a .txt extension, the preview was crisp and readable. The admin takeaway here is that if your business process involves non-standard file types, you may need to implement a naming convention to ensure files are saved in formats the previewer can handle: primarily .pdf, .jpg, .png, and .txt.

Real-World Use Case

How can you use this component in a live production environment? Here is a scenario where the File Preview component adds immediate value:

Imagine a customer service representative handling a shipping insurance claim. The customer has uploaded a photo of a broken item. Instead of the agent navigating to the “Files” tab, the Screen Flow surfaces the photo on the “Review Claim” screen. The agent sees the damage, verifies the details, and clicks “Approve” all on one page.

Conclusion: A New Era of Flow

The File Preview component represents Salesforce being a holistic workspace. By integrating document viewing into the automation engine of Flow, Salesforce has empowered Admins to build tools that feel like custom-coded applications without writing a single line of Apex. As we saw in our testing, the component is robust and user-friendly. Most importantly, it keeps users focused. Whether you are streamlining an approval process or simplifying a complex data entry task, the ability to see what you are working on without leaving the screen is *chef’s kiss.*

Explore related content:

What’s New With Salesforce’s Agentblazer Status in 2026

Add Salesforce Files and Attachments to Multiple Related Lists On Content Document Trigger

Profiles and Permissions in Salesforce: The Simple Guide for Admins

#Automation #Salesforce #SalesforceAdmins #SalesforceDevelopers #SalesforceHowTo #SalesforceTutorials #Spring26 #Winter25

Top 9 Salesforce Winter 25 Flow Features

As we edge closer to the Winter 25 release, it’s the perfect time to explore the new Salesforce Flow features! This release introduces significant updates like the Flow Trigger Explorer and new trigger order functionality. These tools not only simplify the management of complex automations but also provide a more intuitive user experience for Salesforce admins and developers. Let’s unpack some of the new features!

1. Transform Data into More Target Resource Types

In the Transform element, you can now use more target resource data types, such as Text, Numbers, Currency, Boolean, Date, and Date/Time. Previously, the Transform element’s target resource only supported complex data types, such as Record or Apex-defined.

This feature is especially useful when creating a text collection of record Ids.

🚨 Use Case 👉 How The Transform Element Saves You Loops

2. Create or Update Records Efficiently The New Create

You can now use the Create Records element to create or update records based on whether a specified field value exists in the database. The Create Records element makes the process of saving records easier and faster, as you no longer check separately for existing records. By merging create and update into one element, you configure and maintain the flow more easily while reducing potential errors from separate operations.

Create Records with matching record check now supports collections.

🚨 Use Case 👉 Create by Checking a Matching Record in Flow (includes limitations)

3. Email Action: Expand Recipients to 150 Including CC and BCC

This is huge for many Orgs: The maximum total number of recipient email addresses is increased from 5 to 150. The updated action now supports CC and BCC recipients. Any address entered in the CC field receives a copy of the email, and those in the BCC field also receive a copy, but their email addresses are hidden from all recipients.

4. Action Button (Generally Available)

With the Action Button component, the running user can trigger a screen action with the click of a button on a screen. The screen action runs an active autolaunched flow, and the results of the autolaunched flow can be shown on the same screen as the button. This component means fewer screens so users can complete screen flows more quickly and with fewer mistakes. Previously, users clicked through multiple screens to get the same functionality.

🚨 Use Case 👉 How to Use the Action Button Component in Screen Flow

5. Prefill Support For The Repeater Component

Collect User Input to Modify a List of Records from a Screen: You can now use the Repeater component to update existing record collections so it’s easier for end users to change a collection of records in a screen flow. Previously, the Repeater component in the Screen element supported only creating records.

6. Select Multiple Choices with Choice Lookup Component

You can now configure the Choice Lookup component to accept either a single selection or multiple selections (up to 25), making it more flexible for your business processes. Previously, only the Lookup component supported selecting multiple options through a lookup field.

7. Launch Another Prompt Flow as a Subflow In a Prompt Flow

Prompt flows did not support subflows before Winter 25. With this release, the Subflow element is available for prompt flows. You can now break your automation into building blocks and reduce the complexity of a prompt flow. To perform a common task, you can call another reusable prompt flow from within a prompt flow. Prompt flows can use the Subflow element to reference only other prompt flows.

8. See Scheduled Flows Limit in Debug Details

This is a big deal for people who hit this limit before: The schedule-triggered flows in your Org can only process up to 250,000 records within 24 hours. This usage against this limit could not be checked via REST API unlike some of the other flow limits. Now, you can view the maximum number of scheduled flows that your org can run daily, helping you stay under the limits. Previously, the panel showed only the ID of the record on which the debug operation ran and the number of records impacted. This additional information helps you plan and execute more efficiently, avoiding the frustration of halted flows.

9. Various Cool UI Updates

Errors and Warning Pane

The new tabbed Errors and Warnings pane lists issues that prevent you from saving and activating your flow as you work in an easy to scan format. The pane includes links to the Flow Builder canvas that help you identify the source of issues. You can show or hide the new pane with the Show Error button, which includes a notification badge that displays the total number of issues to address.

Flow Save Button Gets An Update

New design for Save As Button: The default action is Save As New Version. Right side chevron icon menu will take you to the Save As New Flow choice.

Flow Tips For Best Practices

New best practice tips in Flow Builder help you identify designs that can slow down your flows and increase the risk of reaching Apex governor limits. These tips appear in the Flow Builder canvas and provide guidance on how to improve your flow. By addressing these suggestions, you can ensure that your flows are running efficiently and avoid potential performance issues.

Deselect Data Table Rows When in Single-Row Selection Mode

This update is especially useful when you allow your user to go back to a Data Table in flow: Running users can deselect a row in a Data Table component that’s set to single-row selection mode, because we now use checkboxes instead of radio buttons to select or deselect rows. To return to the previous functionality and use radio buttons, in the row configuration section, select Require User to Make a Selection.

Find Flow Child Resources More Easily

This is a huge timesaver: When referencing the child resource of an element in a flow, such as a screen component within a Screen element, now you can search for and select it directly in the updated resource menu. Previously, you had to first select the element of the child resource, and then select the child resource. This change applies to these child resources: Screen components, screen actions, Decision element outcomes, and Wait element configurations.

Additional Notes

Restrict User Access to Run Flows (Release Update)

This is a very important update that is coming in the near future. I wanted to draw your attention to it, as it’s best we prepare for it early. Salesforce restricts a user’s ability to run a flow with this update enabled. A user must be granted the correct profile or permission set to run the flow. When enabled, this release update deprecates the FlowSites org permission, which gave all users in the org access to run any flow. With this update, flows run more securely because only users who are granted correct profiles or permission sets can run flows. This update was postponed the enforcement date to Winter 26.

Enable EmailSimple Invocable Action to Respect Organization-Wide Profile Settings (Release Update)

The Send Email invocable action adheres to organization-wide email address profile settings with this update enabled. This update was first made available in Summer 23 and was scheduled to be enforced in Spring 24, but we postponed the enforcement date to Winter 25.

Enforce Sharing Rules when Apex Launches a Flow (only for API v. 62.0)

This versioned update enforces sharing rules when an Apex class that’s declared using the with sharing keyword launches an autolaunched flow that runs in the default context. To enforce sharing, the Apex class must be declared using the with sharing keyword.
Previously, the flow ran in system context without sharing even when an Apex class was declared using the with sharing keyword launched the flow.

Einstein functionality received a few updates in flow, but they are all in beta for this release.

Enjoy

Explore related content:

Top 7 Salesforce Spring 25 Flow Features

How to Use the Action Button Component in Screen Flow

Create by Checking a Matching Record in Flow

Top 12 Salesforce Summer 24 Flow Features

Winter 23 Flow Formula Syntax Check

#ActionButton #Apex #Data #Email #Features #Lookup #NewRelease #Salesforce #Subflow #Update #UseCases #Winter25

How The Transform Element Saves You Loops

Salesforce Flow Transform Element allows you to reshape data on the fly within your flow. Think of it as a tool that acts like a data transformer that adjusts, formats, and cleans up your data before it moves to the next step in your process. Transform Element gives you the superpower of applying formulas, performing calculations, or converting data into a different format that your flow or subsequent actions require.

With the Winter ’25 release, the transform element now supports primitive data types as well. This means you can start with a record collection, transform data, and update a text or a number collection.

The new functionality opens up a whole new area of applications for the transform element. First and foremost, you no longer need to loop each record in a record collection to extract just one field value.

Let’s say you want to update multiple records in one update element. Salesforce introduced the IN operator that you can use to specify which records will be updated. The use of the IN operator is very powerful, but it accepts a text collection of record Ids. And up until Winter ’25, the only way to populate this text collection from a record collection was by looping. Loops are no longer required.

Another helpful feature you can use is the “Add” operator in the assignment element. With “Add,” you can combine one text collection with another, allowing you to accumulate multiple text collections into one.

A Screen Flow Example

Let’s say you want to use the data table to allow the users to select multiple accounts for which they want to close all the open cases. You want to let them pick from the data table in multiple steps, adding all selected accounts to a single list of selected accounts. Once done and confirmed, you will close all open cases for all selected accounts in one shot.

Transform Instead Of Loop

Before Winter ’25, this solution required either looping or multiple update executions. With the new transform element, you can complete the whole operation in two SOQLs and one DML without looping.

Let’s Build This Flow Together:

  • Start your screen flow.
  • 2. Add a get to retrieve all the Accounts in your Org (For this example, I assumed there are less than 50K Accounts in the Org. Also bear in mind the data table limitations.)

    3. Add a screen to show the Accounts to the user. Allow multi-selection and activate the search box.

    4. Add a transform element and transform the selected records in the record variable to a text variable of Account Ids.

    5. Add this text collection to another text collection you created that accumulates the final list of Accounts.

    6. Add a screen with a toggle component that asks the user whether they finished selecting.

    7. If the user hasn’t finished, send them back to the first screen. If they’re done, move on to the next step.

    8. Get all Accounts where the Id is IN the text collection.

    9. Show the user the final read-only data table of selected accounts. If they are OK, let them proceed to case closure by clicking next.

    10. Add an Update element to close all cases where AccountId is IN the text collection.

    11. Add a success screen to confirm the transaction has been completed.

    Conclusion

    You have successfully created a very efficient iterative UI experience. This method efficiently minimizes resource usage against Salesforce’s governor limits, making it ideal for record-triggered flows – as well as screen flows – where efficiency is crucial. Additionally, you can apply this approach to a list of cases to accumulate related recordIds without looping, such as with Contacts and Accounts.

    If visual learning is more your style, check out this video tutorial 👇🏼

    Explore related content:

    Can You Use DML or SOQL Inside the Loop?

    6 Things You Can Do With The Transform Element

    How to Use the Repeater Component in Screen Flow

    Integrating the New Flow Action Button From Summer ’24

    #assignment #Collection #HowTo #Salesforce #ScreenFlow #Text #Transform #TransformElement #UI #Update #Winter25

    Help And Training Community

    Salesforce