The Best iPhone Camera Apps of 2021
Just as there is hardly a one-size-fits-all best DSLR or best mirrorless camera for any given user, there is certainly not any single best application for everyone. Users’ needs and preferences vary wildly, especially considering the extensive capabilities of today’s iPhones.
Updated 7/1/2021 by Matt Williams: Added FiLMiC Firstlight to the new category "Best iPhone Camera App for Image Quality."
It is estimated that nearly 1.5 trillion photos will be taken this year alone. Of those, approximately 92% will be snapped by smartphones, so shouldn't you try and get the best possible photo with them? These iPhone camera apps will certainly help you do that.
Certainly, a large percentage, if not a majority, of the vast number of photos taken are casual snapshots or what I’d call “non-photography photos” -- images taken for non-artistic purposes, like snapping a photo of a document for later reference.
A smaller percentage, though, are photos taken by amateurs and professionals alike who are seeking a higher level of image quality and output. In this case, users may and often do seek out third-party applications to put them in the driver’s seat -- whether it be manual control and RAW or simply applying a preset filter to upload to social media.
The issue facing these users are the perhaps hundreds, if not thousands, of third-party options available in the App Store. If you’re like me, you may end up trying (and paying for) half a dozen or more apps over the years. So, our goal here is to provide a list of the best apps to help steer you in a direction that will save you time (and money) with the best application – and therefore best photo results – to fit your needs.
What We’re Looking For
To make matters at least somewhat simpler, we’ve broken down our list into several categories to cover a wide, if not exhaustive, range of options for iPhone users. Some users value ultimate control and others value simplicity; some seek to milk every ounce of image quality possible from their camera and others simply want a quick path from the camera to Instagram or Facebook. There’s an app for just about anyone or anything these days, so we’ve selected a few outstanding choices that run the gamut of what most people expect out of their iPhone camera.
We’ve broken our list down into seven categories:
**
**
Best Professional iPhone Camera App: Halide Mark II
Above all others, Halide offers the most comprehensive set of controls and features of any iOS camera app to date. From histograms, to focus peaking, to long exposures up to fifteen seconds, Halide offers an extensive and exhaustive suite of features that will satisfy even the most demanding user. The swipe gestures (for example, swipe up or down for exposure compensation) are incredibly handy and keep the layout simple and clean, though they can take a bit of time to master before you'll be able to reliably capture quick snapshots.
One of the newer (and best) features of Halide is its excellent ProRAW support. So far this only applies to the iPhone 12 Pro and 12 Pro Max, but presumably, ProRAW will become a standard option in future iPhone models. ProRAW has the advantage of combining RAW image quality with the computational photography that allows iPhone cameras to punch so high above their weight class.
Read more: Apple ProRAW Review: The Best Way to Shoot RAW on an iPhone
Upon Apple’s introduction of ProRAW, Halide did a deep dive into its workings and was ultimately successful in combining the best of their app with the advantages of Apple’s new format. This article from Ben Sandofsky (co-founder and developer of Lux Optics, who makes Halide) goes deep into the science of ProRAW, how it differs from standard RAW, and how they integrate it into their app.
It should be noted that Halide is solely for taking photographs -- there are no editing or processing options in the app itself.
Best iPhone Camera App for Image Quality: FiLMiC Firstlight
Firstlight iss developed and produced by FiLMiC Camera, the same team that made the excellent and incredibly popular FiLMiC Pro app for smartphone filmmaking.
Upfront, know that most of what Firstlight offers over Halide relates to its implementation and use of the ProRAW format. So, if your phone is an older model and does not support ProRAW, there will not be much for you to gain by using Firstlight -- though there are a few very neat features, like its film simulations, that are better than the competition.
Firstlight is, like Halide and ProCamera, a professional camera app designed for serious photographers who want to maximize the imaging capabilities and potential of their iPhone. And, like those apps, it has many of the same extensive features that allow you to control every aspect of your photo -- manual exposure, shutter and ISO priority, gridlines, manual focus with peaking, zebras, histograms, and so on.
Firstlight can shoot both standard RAW and ProRAW (as well as JPEG, HEIC, and TIFF). It has a bevy of film simulations, like most apps, but unlike those other apps, FiLMiC went the extra mile in terms of how those simulations are implemented. While other apps use soft-light composite, Firstlight uses what they call ISO Adaptive Mode -- the app converts digital noise to variable-density grain. In other words, the actual grain sizes and granularity change based on the sensitivity and level of noise. This is something you cannot achieve with the standard “film look” filter overlays in other apps. FiLMiC even built a light meter from scratch to optimize scene-by-scene metering for the best exposure.
But above all else, Firstlight is capable of the absolute best image quality you can get on a smartphone. I was at first dubious given that there is not a whole lot of difference between Halide’s ProRAW and ProCamera’s ProRAW, so how much better could Firstlight's be? But after side-by-side testing and over a month of use, I came away incredibly impressed at what the FiLMiC team has accomplished here.
What Firstlight gives us is something I have never seen -- ProRAW capture that is essentially always as good -- or better -- than standard RAW capture.
The reason we added an additional category instead of replacing Halide with Firstlight is that I cannot recommend the app as the absolute best when taking into consideration everything as a whole. Specifically, the user interface needs work and making adjustments is slow and tedious. But for pure image quality, Firstlight is unbeatable.
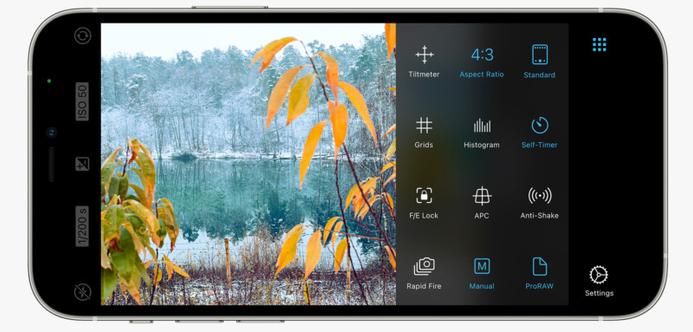
Best All-in-One iPhone Camera App: ProCamera+
ProCamera is a close second to Halide and like Halide, it offers a high degree of manual control across dozens of settings. It also includes ProRAW support, though Halide’s integration is a notch above which we found produced cleaner and more malleable results.
However, unlike Halide, ProCamera includes a fairly extensive built-in editing suite which even supports features like portrait mode (provided your phone does, of course). If you’re looking for the best app out there to both capture and edit, this is it.
Of all the advanced-level applications mentioned here, I think this one has the most intuitive layout with a very easy learning curve, provided you understand the essentials of exposure and editing. If you’re an amateur user completely unfamiliar with the basics, this app would make it easy to see how different exposure parameters affect an image and could be a useful learning tool. If you’re not interested in that and only desire higher degrees of automation, ProCamera is likely overkill.
Worth mentioning is one of ProCamera’s more unique features, which sets it apart from many of its peers: integration with Adobe which means you can send photos directly to your Creative Cloud storage. If that is not relevant to you, it won’t get in your way, but it’s there if you need it.
Best Free iPhone Camera App: Adobe Lightroom CC
For those familiar with the standard version of Lightroom and the Adobe Suite in general, it may seem strange to see this listed as a free app, but it is! It does require registration, which you can easily do via your iCloud or Gmail account, but the entire application functions for free with the exception of syncing across multiple devices via Adobe Cloud -- that obviously requires an Adobe subscription. Naturally, if you already pay for Lightroom, just simply sign in with your Adobe ID.
Not only is Lightroom one of the best mobile photo editors out there, but its built-in camera has extensive features that make the entire app worthy of all-around use. Full manual exposure and focus control, RAW capture, Lightroom presets, watermarks, and of course all of the color correction and editing features you’d expect from a mobile version of Lightroom.
As a bonus, and unlike the desktop version, it’s surprisingly simple to navigate the app as a first-time user. Adobe managed to compress the best features of the full-blown program into a very user-friendly, but still feature-rich, mobile camera suite.
Best iPhone Camera App for Filters: VSCO
VSCO is one of the most popular iOS camera apps on the market and offers over two hundred presets including popular “vintage” looks that attempt to emulate film stocks such as those from Ilford, Kodak, Agfa, and others. VSCO also includes a fairly robust image capturing system and gives you the ability to take full manual control of exposure settings. It also includes some basic post-capture editing. Beyond photos, VSCO also supports recording video, looping videos (DSCO), and double exposures.
Like most apps, there is a stripped-down free version, but to fully unlock all the presets and features will require a subscription. Unlike other apps, VSCO has an entire community for members with bonus content -- including tutorials -- and weekly photo challenges that add to the value of that subscription.
As one of the most highly rated photography applications available in the App Store, VSCO is certainly worth a look, especially if you value a large library of quick and easy filters.
_Editor 's note: A previous version of this section mentioned VSCO supported RAW capture. VSCO did at one point but has since stopped, though users can still edit RAW files in the VSCO app on iOS only. _
Best iPhone Photo Editing App: Darkroom
Like VSCO, Darkroom is one of the highest-rated photo apps available for iOS users, but Darkroom goes well beyond VSCO with its editing capabilities and offers pro-level features in a very beginner-friendly layout.
The interface and design are among the best out there as it sports an extremely clean and easy-to-use RAW editor with all the expected adjustment sliders and curves, batch editing, portrait mode adjustments, content-aware frames, and a library of filter options (including the ability to create your own), plus ProRAW and HDR support.
Not only is Darkroom a powerful editing app but it’s also a very competent video editor, which is not something many other apps can claim to include. Finally, like Lightroom, there is a desktop version that you can get access to if you subscribe to the mobile version (or vice versa), another bonus that is a rarity among competitors. The overall user experience is actually not unlike Lightroom, but a bit cleaner and beginner-friendly, too.
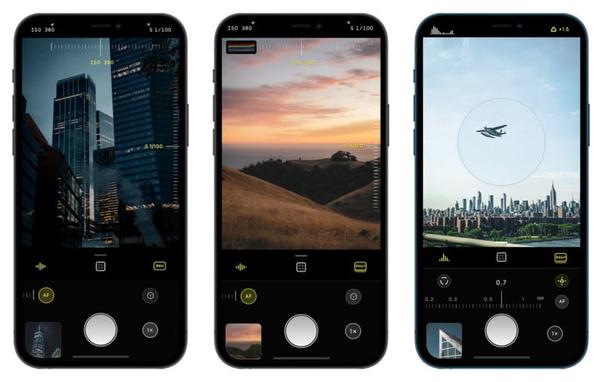
Best iPhone Accessory App for Stills and Video: Mark II Artist’s Viewfinder
Most of us think of smartphone cameras as we do other cameras: devices with the sole intent of taking photos (or video). But they can also double as incredibly useful photography tools -- in this case, as a viewfinder emulator for photographers and cinematographers. There are a number of options available on the App Store, but none are as feature-packed and complete as Artist’s Viewfinder.
For those with smaller, easily portable cameras this may seem like a trivial feature, but for photographers and cinematographers who work primarily off a tripod, the ability to previsualize your shots and frame precisely -- or scout locations -- before moving your entire set up can be a godsend and save untold amounts of time.
Artist’s Viewfinder has an insanely impressive catalog of “virtual” cameras and lenses to choose from. Want to know what the frame of your Linhof Master Technika with a Leaf Aptus 75 digital back and Rodenstock Apo-Sironar 55mm lens will look like? This app has it. RED Komodo in DCI 6K with a Zeiss 32mm Ultra Prime? This app has it. Name a camera – stills or cinema – and it’s in here.
The app supports the use of add-on lenses (including 1.33x and 1.55x anamorphic), includes thirteen aspect ratio options, allows you to view multiple acquisition formats (such as a 2K crop from a 4K sensor), custom focal lengths, custom cameras and backs, tons of frame line options, and all the usual manual exposure and focus controls of other apps plus RAW image capture. Photos that are taken within the app are stored with metadata that includes the simulated camera and lens information along with optional geotagging. There is also a very useful track logging option, stored in the standard GPX format, that can be referenced later or sent to assistants, crew members, or rental houses.
It’s worth noting that this app works best if your iPhone has both the standard lens and the ultra-wide, otherwise you’ll be unable to simulate anything below roughly 26mm full-frame equivalent. And, of course, it works even better if you have the ultra-wide, wide, and telephoto trio.
Best iPhone Camera App for Filmmaking: FiLMiC Pro
FiLMiC Pro is probably the most well-known and well-regarded video app that exists, and for good reason. It’s been used professionally to shoot everything from Netflix features, to a Zack Snyder short film, to high-profile music videos, to popular Sundance indies.
It offers just about everything you could ask for in a video app: full manual exposure tools, frame rates from 1 frame per second up to 240 frames per second for slow and fast motion, timelapse recording, zebras, histograms, focus peaking, manual focus pulling, false color, up to 150Mbps encoding in 4K, an array of pro audio features, integration with certain DJI, Zhiyun, and Movi gimbals, and so much more.
Anamorphic support, which includes automatic de-squeeze, pairs perfectly with both 1.33x and 1.55x anamorphic lenses such as those from Moment or Beastgrip. It even allows LOG gamma recording for maximum dynamic range and flexibility in post. Dolby Vision HDR support is available on 12 series iPhones as is 10-bit SDR.
Some of these features -- like LOG gamma -- are only available if you purchase the Cinematographer’s Kit for an additional $13.99. Also available is FiLMiC Remote ($9.99), which allows you to use a second iOS device (iPhone or iPad) as a wireless monitor or to control the recording device, which is particularly handy for crane/jib/slider shots or simply to relieve the camera operator from the responsibility of pulling focus. There is even a clean HDMI out feature on offer. You can purchase FiLMiC Pro and FiLMiC Remote as a bundle for $19.99 while purchasing them separately will cost $24.98.
#guides #mobile #software #technology #adobelightroomapp #adobelightroomcc #artistsviewfinder #bestiphoneapp #cameraapp #darkroom #darkroomapp #filmicpro #halide #halidemarkii #ios #iphone #previsualization #procameraapp #procameraplus