🔥 Ah, the sweet irony of needing a PhD in terminal commands just to activate your "AI copilot" in Autodesk Fusion 360. Who knew installing an extension could be more complex than designing the International Space Station? 🚀 Apparently, the future of CAD is spending 10 seconds in terminal—because who doesn't love a good command line dance? 💃🕺
https://fusion.adam.new/install #AIcopilot #AutodeskFusion360 #CADdesign #TerminalCommands #Complexity #HackerNews #ngated

🚨📐BREAKING NEWS: #Noctua has bestowed upon us their sacred 3D CAD models! Finally, you can pretend to be an engineer without leaving your gamer chair. But first, navigate the labyrinthine Vercel Security Checkpoint—because nothing screams "cutting-edge technology" like disabling JavaScript. 🙄🔧
https://www.noctua.at/en/3d-cad-models #3DModels #Engineering #VercelSecurity #TechNews #CADDesign #HackerNews #ngated
https://www.noctua.at/en/3d-cad-models #3DModels #Engineering #VercelSecurity #TechNews #CADDesign #HackerNews #ngated
FluidCAD – Parametric CAD with JavaScript
#HackerNews #FluidCAD #ParametricCAD #JavaScript #TechInnovation #CADDesign

Fabrication Accuracy Through Sheet Metal Design Detailing
Precise documentation helps manufacturers avoid production errors. Sheet Metal Design Detailing Services provide detailed models, cut lists, and fabrication drawings. These deliverables improve planning, reduce scrap, and help maintain consistent manufacturing quality.
Know more: https://www.hitechdigital.com/sheet-metal-design-services
#SheetMetalDesign #SheetMetalFabrication #CADDesign #MechanicalEngineering #ManufacturingEngineering
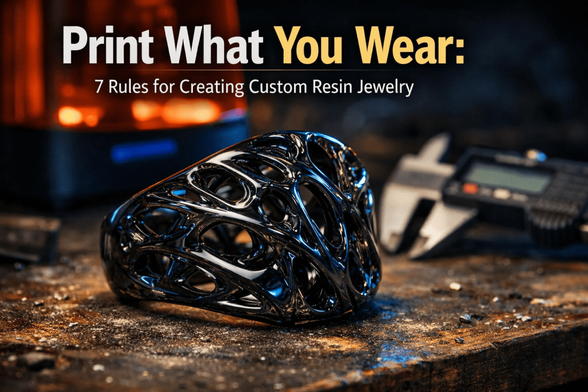
Print What You Wear: 7 Rules for Creating Custom Resin Jewelry
1,235 words, 7 minutes read time.
Redefining Wearables Through Precision Engineering
Jewelry design has historically been a game of fire, hammers, and precious metals, but the digital age has handed the keys to the workshop over to the 3D printing enthusiast. We are witnessing a shift where the resin printer is no longer just a prototyping tool; it is the final production line. Creating direct-to-wear resin jewelry allows for geometries that traditional casting simply cannot handle—interlocking lattices, impossible overhangs, and materials that mimic glass or ceramic. This is about taking the precision of a machinist and applying it to fashion. It is time to stop printing shelf-dust collectors and start fabricating functional, wearable art.
The Hardware: Why Resolution is King
If you are thinking about using an FDM printer for this, stop immediately. Trying to print a ring on a filament machine is like trying to perform surgery with a chainsaw; the tool is too blunt for the operation. For wearable jewelry, layer lines are the enemy. They trap dirt, irritate the skin, and look unprofessional. You need the microscopic precision of Stereolithography (SLA) or Digital Light Processing (DLP).
Modern MSLA printers with 4K or 8K monochrome screens are the standard here. These machines cure layers at around 35 to 50 microns, creating a surface finish that feels injection-molded rather than printed. When a client or a friend picks up a piece of jewelry, their thumb should glide over it without catching a single ridge. If the hardware can’t deliver that level of smoothness right off the build plate, it isn’t fit for the job.
Material Science: Durability and Safety
The biggest mistake rookies make is grabbing a bottle of standard $20 grey resin. Standard resin is brittle; drop a printed ring on a tile floor, and it will shatter like cheap glass. For jewelry, you need engineering-grade materials. Look for resins labeled “Tough,” “ABS-like,” or specialized high-impact formulas. These materials have a modulus of elasticity that allows the piece to absorb shock rather than snap.
More importantly, you must respect the chemistry regarding skin contact. Uncured or improperly formulated resin is a skin irritant. If you intend to wear these pieces against the skin for long periods, you should invest in biocompatible resins—materials certified for short-term or long-term bodily contact. Using industrial sludge for a pendant is a recipe for contact dermatitis. Treat your materials with the respect they demand, and ensure the final polymer is inert and safe.
Designing for Photopolymer Physics
When you design for resin, you are fighting against the forces of suction and gravity. A digital model might look invincible in Blender or ZBrush, but the physics of the peel force in the printer tank will test its limits. Jewelry often features thin walls and delicate prongs. You must ensure your wall thickness rarely dips below 0.8mm, or you risk structural failure during the peel process.
You also need to account for shrinkage. Photopolymers shrink as they crosslink and cure, typically between 0.5% and 1.5%. A ring sized perfectly to 18mm in CAD might come out at 17.8mm in reality—enough to make it uncomfortable or unwearable. Calibration is not optional; print calibration cubes, measure them with digital calipers, and scale your models in the slicer to compensate. It’s a game of millimeters, and precision is the only way to win.
Strategic Orientation and Supports
Placing supports on a piece of jewelry is an art form. Every support tip leaves a divot or a nub that must be sanded away. You never want to place supports on the “A-side” or the face of the object. Orient your object so that the heavy lifting is done on the back or the interior surfaces that won’t be seen.
Furthermore, angle your prints to minimize the cross-sectional area. Imagine diving into a pool; you want to enter the water cleanly, not do a belly flop. The same logic applies to the build plate entering the resin tank. A 45-degree angle usually reduces the suction force, ensuring that your delicate filigree doesn’t get ripped apart mid-print.
The Post-Processing Gauntlet
The print finishing is where a hobbyist becomes a professional. Once the print is off the plate, it must be washed thoroughly. Any uncured resin left on the surface will leave a shiny, sticky residue that ruins the texture and is unsafe to touch. Use a two-stage wash with high-percentage Isopropyl Alcohol (IPA) to strip every micron of liquid resin.
Curing is the final chemical lock. The UV light solidifies the polymer chains, giving the jewelry its final strength. However, over-curing can yellow clear resins and make tough resins brittle. Follow the manufacturer’s recommended times religiously. For an ultra-smooth finish, wet sanding with high-grit sandpaper (up to 2000 grit) under running water will polish the resin to a gem-like luster.
Final Aesthetics and Assembly
Raw resin looks like raw resin. To elevate the piece, you need to master finishing techniques. Clear coats or UV-resistant varnishes not only protect the wearer from the material but also give the piece a “wet” look that mimics precious stones or glass. Some makers even use electroplating kits to deposit a thin layer of real copper or nickel over the resin, combining the geometric freedom of printing with the cold feel of metal.
Finally, do not rely on 3D printed mechanical parts for clasps or chains. They will fail. Incorporate real metal hardware—jump rings, silver chains, and findings—into your design. Mixing the futuristic aesthetic of a complex 3D print with the traditional reliability of metal hardware creates a product that feels substantial and premium.
The Future of Independent Fabrication
We are standing at the edge of a new era in manufacturing, where the factory fits on a desktop. You have the tools to create complex, durable, and safe wearable items that defy traditional manufacturing limits. The only barrier left is your willingness to learn the chemistry and the craft.
We want to know what you are forging in your resin tanks. Are you experimenting with clear resins or high-impact engineering blends? Drop a comment below and share your victories or your failures. If you want to stay ahead of the curve with more deep dives into advanced fabrication, subscribe to our newsletter. Get to work.
Call to Action
If this post sparked your creativity, don’t just scroll past. Join the community of makers and tinkerers—people turning ideas into reality with 3D printing. Subscribe for more 3D printing guides and projects, drop a comment sharing what you’re printing, or reach out and tell me about your latest project. Let’s build together.
D. Bryan King
Sources
- Formlabs: Advanced Materials for Direct Jewelry Printing
- All3DP: The Expert Guide to Tough and Engineering Resins
- AmeraLabs: Understanding Skin-Safe and Biocompatible Resins
- Siraya Tech: User Guide for High-Strength Blu Resin
- Chitubox: Compensating for Resin Shrinkage in Slicers
- OrthoCosmos: The Science of Biocompatibility in 3D Printing
- Zortrax: Advanced Post-Processing for Resin Models
- Autodesk: Precision Software for Jewelry Design
- Monocure 3D: Techniques for Painting and Sealing Resin
- Hackaday: Electroplating 3D Prints for Strength and Style
- Blender Artists: Modeling Complex Geometries for Wearables
- MatterHackers: Abrasive Techniques for Smoothing 3D Prints
Disclaimer:
The views and opinions expressed in this post are solely those of the author. The information provided is based on personal research, experience, and understanding of the subject matter at the time of writing. Readers should consult relevant experts or authorities for specific guidance related to their unique situations.
#3dPrintedPendants #3dPrintedRings #3DPrinting #4kMonoScreen #8kResinPrinter #additiveManufacturing #biocompatibleResin #BlenderForJewelry #buildPlateAdhesion #CADDesign #ChituboxSettings #clearCoatResin #curingChamber #customJewelry #desktopManufacturing #digitalCraftsmanship #digitalFabrication #diyJewelry #DLPPrinter #electroplatingResin #engineeringResin #fepFilm #impactResistance #isopropylAlcohol #jewelryDesign #jewelryMaking #jewelryModeling #latticeStructures #layerHeight #LycheeSlicer #makerMovement #micronResolution #mslaTechnology #organicModeling #orientationStrategy #photopolymer #polishingResin #postProcessingResin #resinDurability #resinExposureTime #resinFinishing #resinPrinting #resinSafety #resinShrinkage #resinSupports #resinTankMaintenance #resinWashing #Rhino3D #sanding3DPrints #skinSafe3dPrinting #SLAPrinter #stlFiles #toleranceCompensation #toughResin #UVCuring #watertightMesh #wearableTechnology #ZBrush
KL Deemed to be University Students Win Top Honours at IndiaSkills Competitions
#TycoonWorld #KLDeemedToBeUniversity #KLUniversity #IndiaSkills2025 #IndiaSkills #AdditiveManufacturing #AdvancedManufacturing #MechanicalEngineering #EngineeringExcellence #SkillIndia #WorldSkills #FutureReadyEngineers
#StudentAchievement #AcademicExcellence #InnovationInEngineering #3DPrinting #CADDesign #IndustryReady

KL Deemed to be University Students Win Top Honours at IndiaSkills Competitions
#NewsUpturn #KLDeemedToBeUniversity #KLUniversity #IndiaSkills2025 #IndiaSkills #AdditiveManufacturing #AdvancedManufacturing #MechanicalEngineering #EngineeringExcellence #SkillIndia #WorldSkills #FutureReadyEngineers
#StudentAchievement #AcademicExcellence #InnovationInEngineering #3DPrinting #CADDesign #IndustryReady #SkillBasedEducation
🚨 BREAKING: Guy discovers 3D printers can print complex shapes! 🤯 In a dazzling display of self-congratulation, Will Morrison embarks on an epic quest to... print a marble fountain. 🏆 Spoiler: He uses lots of CAD and talks about it for 5 minutes. 🎉
https://willmorrison.net/posts/marble-fountain/ #3Dprinting #CADdesign #Innovation #MarbleFountain #TechDiscovery #HackerNews #ngated
https://willmorrison.net/posts/marble-fountain/ #3Dprinting #CADdesign #Innovation #MarbleFountain #TechDiscovery #HackerNews #ngated
Marble Fountain
I really enjoy procedural generation, especially systems designed to work with hardware outputs. After starting work at Formlabs in September of 2023 and gaining access to much nicer printers than I was used to, I started wanting to tackle some large algorithmic structure projects. Complexity is free in 3d printing, the limit of design geometry is mostly how much time you’re willing to spend in CAD. I wanted to print the most complicated art piece I could think of.
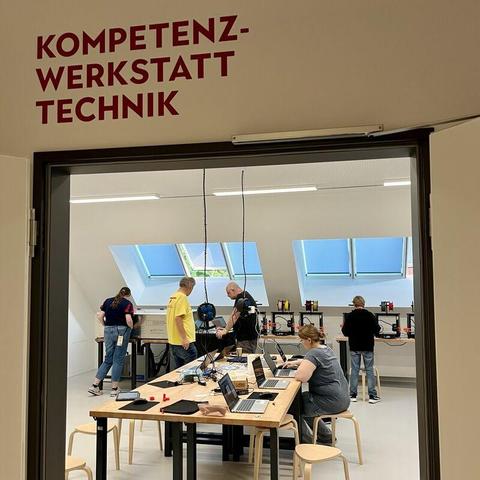
Ferienabenteuer statt Langeweile: Kommt vorbei in der Zukunftswerkstatt im Torhaus des Museums der Arbeit @museumderarbeit
Im Workshop „First Steps 3D-Druck & Lasercutting“ entsteht aus eurer Idee ein echtes Objekt!
Jugendliche (ab 14) und Erwachsene
📅 Termine:
25.08., 11 Uhr
27.08., 11 Uhr
28.08., 11 Uhr
👉 Dauer je 2 Std
Infos & Anmeldung: https://tickets.shmh.de/
#Sommerferien #3DDruck #LaserCutter #zukunftswerkstatt #historischemuseenhh #CADdesign