Festive Food Photography: Shooting with Christmas Lights

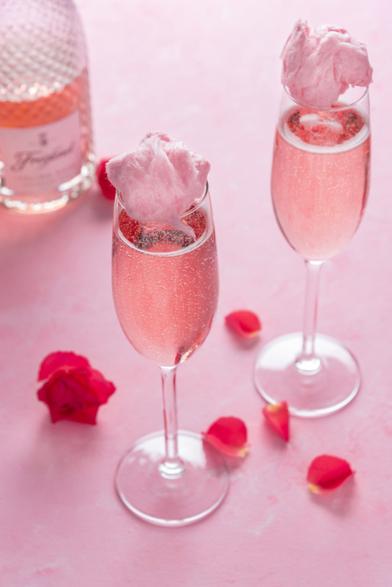
If you're wondering how you can shoot some stunning Christmas food photography, try shooting with holiday festive lights. In this video, I will go through in detail how to shoot with Christmas fairy lights. These lights will bring some festive spirit to your food photography and add sparkle to your Instagram feed this holiday season.

First of all, I want to say a huge Merry Christmas to everyone. I love this season and my husband would probably say I love it too much. One of the best things about Christmas for me is the food and if you've been scrolling through Instagram this holiday season and seen some of the delicious food on there, you may have noticed people using festive lights to add some of the Christmassy feel to their food photography. I am going to give you some great tips for using festive lights in your own food photography to help you create some magical Christmas images!

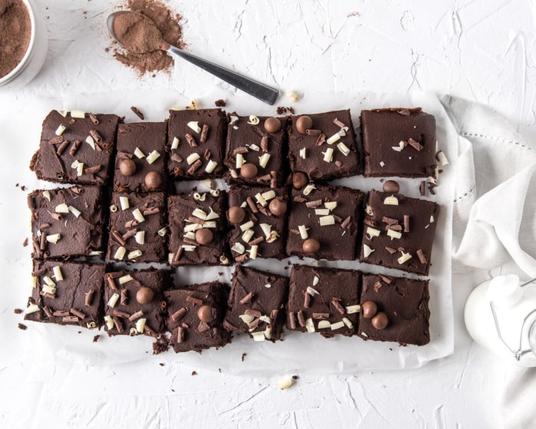
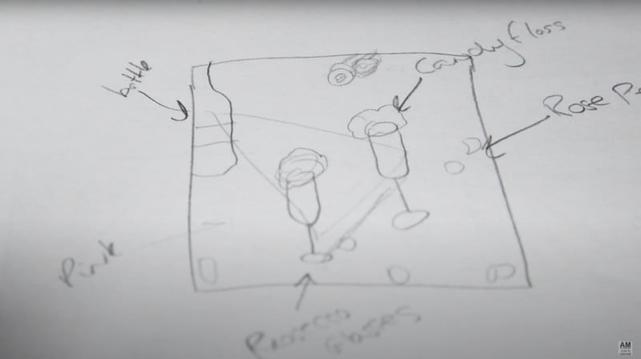
To get started, first you need to select your lights and pick something suitably festive to photograph. I decided on mini pies for this shoot and some little snowflake fairy lights. When choosing any props or lights, just remember your main subject is still the food, so don't go overboard with any Christmas decoration. It is my recommendation to stay away from the big bulky rainbow-colored lights.

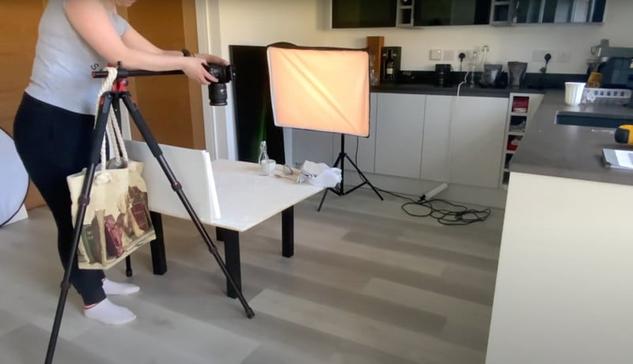
To light your subject you will want to use flash. Although the fairy lights are going to be visible, they will not be lighting the subject. Don't think of them as lights so much as props.

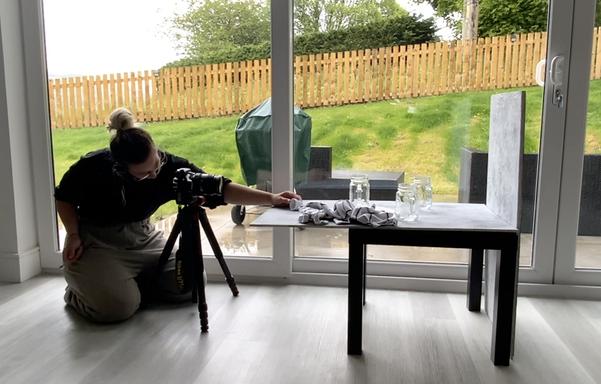
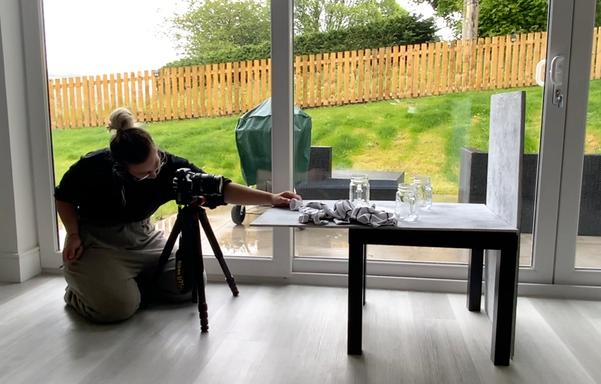
When you have your whole set ready to go, it's important to turn out the room lights and shut any blinds if you're shooting in the daytime. Usually, I don't worry about this when shooting with flash because I have my shutter speed quick enough so that most if not all ambient light doesn't affect my subject.

However, our goal is to also make the lights visible and a much slower shutter speed than I would normally use is needed here to compensate. Without working in darkness, this would mean the room lights and window lights would change my lighting completely. The brighter your fairy lights are, the quicker you can have your shutter speed. Each shutter speed is going to give a slightly different look to your lights, the slower the shutter speed, the brighter the lights will be. For my lights, a shutter speed of about 1/5 of a second worked great for the look I was going for. Because it was so slow though, a tripod is really a must with this shoot.

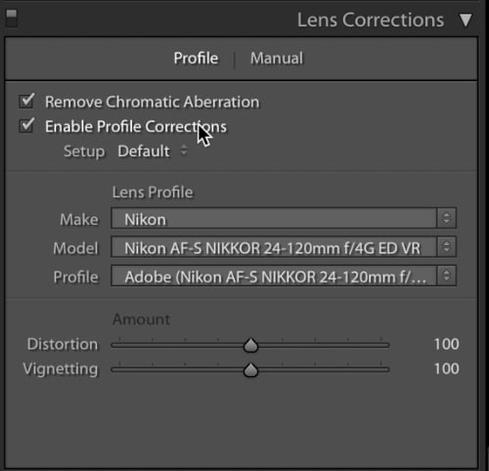
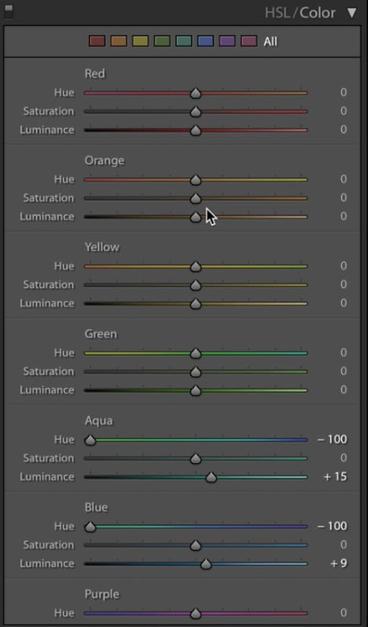
Another camera setting to be aware of is your aperture and changing this will also affect the appearance of your festive fairy lights. A smaller f-number -- a wider aperture -- is going to make these lights more blurry in the image. This is one of the ways to add that lovely bokeh to a photo and a great effect used in a lot of food photography. While effective, it's important to make sure we still have our subject in focus. An aperture too wide would mean only a small part of our image may be in focus. A smaller f-number -- or narrower aperture -- would make the lights more in focus, but also they will appear a little smaller. There is no right or wrong way here. It's completely what you prefer or what look you're going for in your image.

I hope this has given your some tips for your shooting with your own Christmas lights over this festive period. For more tips on food and drink photography check out my YouTube channel.

About the author: Amie Prescott is a professional photographer, and food photography combines two of her favorite things: food and photography. Prescott put a good spin on lockdown by using the bad situation to create YouTube videos in an effort to help people looking to learn food photography.

#tips #tutorials #amieprescott #christmas #cookies #food #foodphotography #tutorial

How to Make Food Photos Pop in a Bright and Clean Set

If you follow food photographers on Instagram, I am sure you have seen some of the light or what I would describe as "airy" food photos that are popular at the moment.

This dreamy, bright way of photographing food is a great way to make the food itself really pop and stand out, while still looking extremely tasty and not stark or sterile. If you want to have a go at trying this style, I have put together a few tips you can try.

Like I say with most of my tips, these are tips and not hard and fast rules that absolutely need to be followed to the tee.

Pick a Proper Background

This first tip is an important one: pick a proper background. It is important to choose a white or very light background for this style of image because even if you go ahead and do everything else right below but you use an incompatible background, there is no way that photo is going to have that dreamy aesthetic that makes these photos desirable.

A white or light background also acts as a large reflector in your scene and will bounce any light around in a way that hel[s soften shadows which contributes to that lightness we are aiming for in this style.

Select the Right Props

Similar to the previous tip, make sure to select props that continue the aesthetic. Using lighter-colored props is important because darker props are going to either darken the overall feel of the photo or just stand out like a sore thumb and become distracting. It's important to remember with food photography of any type that props are always supposed to add to an image, never distract from the main subject.

Aim for Soft Light

For this type of photo, we're going to want to aim for soft light. This is going to reduce any harsh shadows in the image, which creates darker areas in the image that we want to avoid. If you are using natural light, you will want a window with some indirect light or a really cloudy day. If these aren't possible, placing a large sheet in front of your window will help diffuse the light and therefore make it softer.

In my work, I mainly use studio strobes and my modifier for soft light is a softbox -- I mean, it's in the name! Using one will create some lovely soft light and there is also an extra layer of diffusion material in the middle (called a baffle) to help soften the light even further. If you are using artificial or natural light you can also use a reflector to help bounce some of your light back into the scene to help soften any shadows in the image. Just place your reflector opposite the light to bounce the light back into your scene. Just make use we don't reduce the shadows too much, some shadow is needed to stop the image from looking too flat and two-dimensional. If you think your image is looking a little flat, move the reflector further away from the light.

Nail Perfect White Balance

Make sure you have the white balance spot on. Although this is a very important part of all photography, it can be very noticeable when taking these kinds of photos if it is even just slightly out because we usually have a lot of white in the image, and as it suggests in the name, white balance can change the whites in an image a lot. The white areas in an image can start to look very blue or orange when you have the incorrect white balance which is very obvious, even if it is only very slightly off.

To get this spot on, I usually use a grey card but you can also manually set this in your camera. I try to make sure this is always correct in camera, but if you aren't 100% it can be corrected in either Lightroom or Capture One.

Keep the Set Simple

Keep it simple. Although you may have a few different prop ideas for your shoot, you don't need to go straight in with them all. It's very easy to cross that line from light and airy, to just a bright photo that's a bit busy. Having too much going on in an image is going to take away that dreamy, airy feeling we aim for here. A few ways to keep a scene simple is to only use a few props, making sure all of them are relevant to the shoot, and keeping the color pallet neutral. You can also keep it simple and not too busy by adding in some negative space. Negative space is going to give your photo room to breathe.

Expose for the Highlights

Expose for the highlights! Because this style of image is so white and highlight-dependent, you want to make sure that you do not blow out any of the highlights in the image. For most cameras, it is a lot easier to lighten up shadows than bring back the detail in a blown-out highlight.

Check out the video to see me put these tips into action with a chocolate cake shoot, or watch other videos on my channel for more food and drink photography-related videos.

About the author: Amie Prescott is a professional photographer, and food photography combines two of her favorite things: food and photography. Prescott put a good spin on lockdown by using the bad situation to create YouTube videos in an effort to help people looking to learn food photography.

#tips #tutorials #amieprescott #bright #educational #food #foodphotography #softlight

How to Make Food Photos Pop in a Bright and Clean Set

How to nail the bright and airy aesthetic.

Five Tips to Make Better Beverages Photos

Here are a few tips to help you improve, or maybe get started with, drink photography. Drinks can be quite tricky: you have unpredictable liquids and glasses with reflections, so these tips may come in handy. Just remember, like all of my advice, these aren't die-hard rules, but instead they are just a few things that you can choose to consider with your photography.

Tip 1: Have a Plan

My first tip for drinks photography is to have a plan. When photographing drinks, you're not going to want them to sit there for a while as your prepare your scene. If you do, ice will melt, beer will look flat, condensation will drip off and most drinks just don't sit for long and stay looking fresh. Having a plan in mind will help you speed up the whole shoot, giving you more time to focus on getting that perfect image with your drink looking its best.

When I plan out my shoots, I think about what props I'll use, which backgrounds, and how I will have my lights. I will also draw a sketch out of any compositions I have in mind. Don't worry about making these drawings too detailed or artistic, I am not a great drawer at all -- it's only for my use they certainly aren't going to be hanging in a gallery.

Tip 2: Clean Your Glass and Use Gloves

This one may seem obvious, but it's really easy to just assume a glass is clean if you take it out of your cabinet. What isn't so obvious to your eyes but will be really obvious in the photo is how much lint and small bits may be on the glass. To save you a lot of time editing out in Photoshop, give your glasses a good clean with a micro-fiber or lint-free cloth beforehand.

Holding up to a light can help see any possible bits or smudges. Also, I recommend using gloves when handling your glassware as the last thing you want on your nicely polished glass is a fingerprint.

Tip 3: Use the Correct Glass

When shooting drinks, there is usually a typical glass for each drink: a mojito is served in a tall glass, an old-fashioned in a rock glass, for example. It is important to use the correct glass for drinks because it helps identify the drink. If you have clear liquid in a martini glass, it instantly looks like a martini, even though the liquid could be anything. Not only this, but if you don't I am sure you'll have bartenders on social media telling you, you've used the wrong glass -- It's important to them.

Tip 4: Add Texture

With most drinks, they tend to be quite smooth and you find they can feel a little textureless. Not all drinks, obviously, but for example, a cappuccino has a lovely frothy texture on top. To add texture to the image, we use garnish and props. Just make sure they're relevant to the image since the point of props is to add to an image, not to distract from the main subject. A garnish is a great way of adding some interest to your drink, and most will usually be served with one, so it makes sense and will add that texture we are looking for. This can be anything from a mint leaf, to some sugar around the edge of a glass. Make sure whatever you use, makes sense with your drink -- For example, mint and lime for a mojito.

Tip 5: Back Light Your Drinks

This tip will not work for all drink shoots, but a great way to light your drinks, especially if they are a clearer liquid, is to light them from behind. This can give drinks a lovely glow and helps with the pesky reflections you can get when shooting drinks.

To backlight your image, you just need to place your light directly opposite your camera, and then your subject between it. Then the light will shine right through the drinks giving it that lovely glow look. This won't be suitable for all drinks; drinks that are thicker may cast too much shadow on the front of the image, so a side light may be needed. If you are having problems with reflections, you can adda a reflector to the front of the image to bounce a bit more light back in.

Watch the video above to see me put these tips in action during a Rose Prosecco shoot, or check out my channel for more food and drink photography videos.

About the author: Amie Prescott is a professional photographer, and food photography combines two of her favorite things: food and photography. Prescott put a good spin on lockdown by using the bad situation to create YouTube videos in an effort to help people looking to learn food photography.

#educational #tips #amieprescott #beveragephotography #drinkphotography #drinks

Five Tips to Make Better Beverages Photos

Nail your next beverage shoot.

How to Make a Simple DIY Background for Food Photography

I have made many DIY backgrounds for my photography. Honestly, too many. It gets really addictive. If you have been thinking of creating some for yourself or how you can improve your photography collection for very little money, these tips on creating your own DIY background are going to be super helpful.

This is my easiest DIY background, so if you've been looking at some tutorials and thinking it's a bit beyond your artistic skills, this one is for you.

The Ingredients

First of all, what you're going to need for the board:

1. A sheet of plywood. It doesn't need to be massive, I usually go in between about 2x3ft-3x4ft. Try to get it a decent thickness, about 10mm so we know it will stay sturdy when we apply paint to it.

These boards can be painted on both sides so you can get 2 out of each board. If you go to your local hardware store, here in the UK I suggest B&Q, they can sell you massive sheets and cut them down to size, giving you a few board options from one big sheet. (A great way to add a few surfaces to your collection for as little as possible)

2. Tester pots of paint. Decide what color you want your board to be. I recommend starting with more neutral colors, I do have some whacky ones like pink and orange, but I definitely use my neutral ones a lot more. If you have a color in mind for a particular shoot, then great.

We are going to need a whole load of paint, so I usually get tester pots from hardware shops, again making this super cheap. For this board, I recommend getting 2-3 colors, usually a similar color in different tones. (I do have a large pot of white, as this is something I use a lot).

Alternatively, you can get one color, and add white or black to create different tones. This is what I did for this pink board, using red and adding white in different amounts. Always get matte finish paints, we don't want anything with a gloss finish, or we will have a real reflection issue when we come to photograph on the board.

3. A sponge. Just a regular, run-of-the-mill kitchen sponge.

4.Matte sealer. I struggled to find this at my hardware shop, people with bigger shops may have more luck. I got mine from Amazon. This clear matte sealer will help seal the board so we can wipe it without ruining it.

The Process

Step 1. Get everything ready. Ideally, you would be doing this outside, but if like me you can't rely on the weather, make sure you cover your flooring to protect it from paint.

Step 2. (optional) If using a lighter color on your board, you can give your board an initial white primer color, this will help the paint soaking into the board and that woody, orange color peeking through. If you're using a dark color, this is not necessary.

Step 3. Add your colors of choice onto the board in a few blobs, add more of one if you want one to be a dominant color. (Don't forget to mix up your colors beforehand if wanting to use the white and/or black to create different tones.)

Step 4. With your sponge dab the paint and blend it all over the board. (Careful not to over mix the paint or the different colors or tones will be a big mess).

Step 5. Leave it to dry. I know this is not the most fun part, but it's important to leave your board to fully dry before carrying one. The colors can change slightly when it's completely dry and if you want an extra coat you risk over-mixing if it is still wet.

If you decide your board needs an extra coat, or something a little different in some areas, repeat step 4 until satisfied.

Step 6. Now our board is ready, it's time to seal it. It's important your board is fully dry to do this, so be patient with the waiting. Make sure you are either outside or have windows open for this step as the fumes from the sealer probably aren't the safest for breathing in.

With the matte sealer, cover the board evenly and then leave to dry. Repeat this 2-3 times to give it a good coating. This will allow you to wipe your board if you spill on it (important for food photography). This is no magical solution though, if you spill red wine on it, it will probably still stain, so extra careful with trickier stains.

I hope you enjoyed this tutorial!

About the author: Amie Prescott is a professional photographer, and food photography combines two of her favorite things: food and photography. Prescott put a good spin on lockdown by using the bad situation to create YouTube videos in an effort to help people looking to learn food photography.

#doityourself #tutorials #amieprescott #backdrop #background #diy #foodphotography #homemade #howto #make

How to Make a Simple DIY Background for Food Photography

A step-by-step tutorial by food photographer Amie Prescott on creating a simple DIY background for food photos.

How to Edit Food and Drink Photos Shot with Hard Light

As photographers, we generally aim to shoot perfectly to where our photos require minimal to no editing. But for some of us, the editing process can be just as creative of a process as the photography side. I am going to share exactly how I edited this hard light image to create something a little more dramatic than I can achieve in-camera.

I may not try and get the perfect photo at the time of capture, but I do like to make sure the exposure is right in-camera, as not having to worry about fixing exposure in the editing process makes it a lot more fun.

The first thing I do in Lightroom for every image is in the lens correction column: I tick the distortion box which will correct any distortion the lens you used created. It is a very clever tool that knows what lens you used and roughly how it has distorted the image.

If you look at the straight-out-of-camera image, I shot this old fashioned on a light blue background, but I really wanted the final image to have a more green or turquoise color. So in the HSL panel, I took the aqua and blue and brought the hue to the left to give it a lovely green tone. I think this helps really make this drink feel summery and makes the whisky pop. As I only used the color sliders of the aqua and blue, only the background was affected by this change. I also increased the luminance a little with these two to lighten it up, adding to the summery light and airy feel to the image.

Now I have the background at the color I was looking for, I next go up to the basic panel. My first step here is to lower the drag the highlight slider to the left, darkening them, and take the shadow slider to the right, lightening them.

This makes the image look a little undersaturated but I will fix that in the next step where I do the opposite with the whites and blacks. I lighten the whites and darken the blacks which add that contrast back but with more of a punch. I don't use the exposure or contrast panel to do this as it affects the image as a whole instead of the specific tones in the image. Also in the basics panel, I increase the clarity slider just slightly, to add some detail to the image.

The next step in my usual editing process is to sharpen the image. I first add a sharpen mask by selecting the option key and increasing the sharpen mask so the sharpening will only affect the drink and glass, and not the bottle of whisky. Now that the mask is on, I can increase the sharpening amount as much as needed. Not too much, but enough to make the image crisper.

For my next step, I go back down to the HSL panel and make some small tweaks to the orange color, increase the saturation a little and decrease the luminance to make that old fashioned and whisky look a bit more of a deeper orange. I didn't do this when I changed the background as I knew the other edits will have changed the color and tone slightly.

I find the orange swirl in the drink was looking a little dull and dark at this point, so using the brush tool I draw over the swirl so it is only affecting the area I want it to affect. With the mask on, I increase the exposure, the shadows and increase the saturation.

My final area to edit in Lightroom is the tone curve panel, I brighten the highlights and darken the shadows adding a last boost of contrast. This makes an S shape with the curve.

That is everything in Lightroom, but just to finish this image up I open the image in Photoshop and using the patch tool, I clean up the background and any marks on the glass because no matter how careful I am, there are always marks!

And that's it! Below you can see the image I started with on the left and the finished edit on the right:

For more videos all about food and drink photography, check out my YouTube channel.

_About the author: Amie Prescott is a professional photographer, and food photography combines two of her favorite things: food and photography. Prescott put a good spin on lockdown by using the bad situation to create YouTube videos in an effort to help people looking to learn food photography. _

#educational #tips #amieprescott #beverage #beveragephotography #drinks #editing #editingtips #food #foodphotography #foodphotographytips #hardlight

How to Edit Food and Drink Photos Shot with Hard Light

Make your beverage photography pop with a few simple editing tips.

How to Improve Your Flat-Lay Food Photos

If you have scrolled through Instagram, I am sure you have seen the lovely, well framed and fun flat-lay food photos there. Flat-lays are images taken from above, which involves having your camera at a 180-degree angle and showing your subject flat on the surface.

They are becoming increasingly popular all over the internet, making it essential to know how to take the perfect flat-lays. Below are a few tips to help you improve your food photography flat-lays.

1. Consider What is Facing the Camera

Nearly everything can look great in a flat-lay image, you just have to pay attention to what is facing the camera. Take a cake, for example. Whole, it is going to look great straight on, but not so good as a flat-lay -- you're just going to have a nicely decorated circle. But, if you cut it into slices and have these as your subject, a flat-lay would be the best angle to shoot these. Don't be afraid to cut and change your subject to suit a flat-lay more.

2. Add Layers

Adding layers into your flat-lay is so important. Just because it is called a "flat" lay, you don't want to keep the image flat, this is going to make it feel very two-dimensional. To add layers into your flat-lay you want to add props under or on top of your subjects. This is going to add some depth to your flat-lay. A layer can be anything from the plate the subject is sat on, to a sprinkle of salt on top.

3. Use Negative Space

Negative space is an area of an image that doesn't have anything in it, prop or subject. I'm not saying this is something you're going to want to have in all of your flat-lays as some images will look better closer and fuller, but sometimes taking a step back and giving your image room to breathe can really help improve your flat-lays. Adding some negative space can really balance images out making them much more visually interesting. It is also a great tool when working with brands as you leave room for logos and text.

4. Simple Color Schemes

With a flat-lay, I usually recommend keeping a simple color scheme. If you have created a larger scene with a lot going on, bright colors can make things feel a bit too busy or distracting. I usually keep to about two or three different colors and use more neutral tones. This helps your subject stand out which can be further enhanced by the textures and shapes of the subject. However, there is nothing wrong with bright and vibrant flat-lays, and there are some great examples of these at the moment. That said, I would definitely recommend keeping things neutral to being with.

5. Have Props and Subjects Going Out of the Scene.

Having some of your subject or added props leaving the scene is a great way to add some visual narrative to an image. This makes people think there is more going on outside the scene they can see, adding something to the story element of the image. It makes it feel like the actual set is bigger than it really is.

6. Experiment with Aperture

Usually, I will recommend shooting flat-lays at a bigger F-number, around f7 to f11. This is going to make sure all of your subject is in focus and everything is clear which is a normal look for flat-lays. However, sometimes it is great to add a bit of interest to a flat-lay by experimenting with the height of subjects and using a wider aperture (smaller f-number). This can give your flat-lays a bit of a different look, and helping them stand out from the many flat-lays out there.

To see these tips in action and some behind the scenes of the cereal bar shoot, check out the video above. For more tips on creating amazing food photography check out my channel.

_About the author: Amie Prescott is a professional photographer, and food photography combines two of her favorite things: food and photography. Prescott put a good spin on lockdown by using the bad situation to create YouTube videos in an effort to help people looking to learn food photography. _

#educational #tips #amieprescott #flatlays #food #foodphotography #howto #overhead #overheadcamera

How to Improve Your Flat-Lay Food Photos

Overhead camera angles flatten your subject, but they don't have to be two dimensional.

10 Props To Use for Better Beverage Photography

With summer in full swing here in chilly Scotland, the slightly warmer weather has made me want to a more summer-themed series on my YouTube channel. To finish off the few prop videos I have been doing, and to start a summer drink series I decided to list 10 of my favorite drink photography props.

Just remember these are not essential for all drink photography, most a just a luxury in a prop collection so it's best to have an idea about exactly what you will want to shoot and maybe pick a few things that suit your own style or drinks best.

Glasses

This may seem really obvious, but in the world of bartending and cocktails, the correct glassware is very essential. They're not forgiving either, so it's best to do your research and know what glasses are used for particular cocktails when you want to photograph them. If you aren't quite sure what drinks you're going to want to photograph it's best to start with some glasses that are a bit more versatile like high ball and rock glasses. There are a number of different cocktails served in these. If you know what you want to be shooting, for example, martinis, you're going to want to get martini glasses.

Cocktail Shaker (Other Cocktail Making Implements)

A cocktail shaker or other utensils are used in cocktail making. These are a great way to add some story to the image. Like it's just been freshly made. I have a glass cocktail maker which helps in photography as it's not reflective like metal ones. You can find matte metallic ones too which are also great for this!

Fancy Spirit Glasses

I am a huge whisky lover, yes one of my favorite things about Scotland. Some of the whiskies I have come in the most interesting bottles and these are great for photography. They can add some interest and hint towards what's in a drinks. A gin bottle next to a cocktail is going to help the viewer know it's a gin cocktail. However, doesn't need to actually need to be the same whisky or gin (unless shooting for a particular brand), I wouldn't be using any fancy whiskies in cocktails.

Fancy Decanters

Similar to the spirit bottles, this is a fancy way of storing spirits and displaying them in an image. A really elegant way to hold your whisky, or brandy in the back of a drink photoshoot. Especially if the bottle it came in is lacking in some character.

Serving Containers/Jug

As it's summer, garden parties are going to be quite popular and a way to add that communal or sharing scene to an image is to have more of your subject ready to be served up in either a sharing jug or container. One I have that I love is a large Kilner jar with a tap. I am never going to manage 3ltrs of mojitos myself(shh), so having this in an image gives it a sense of being shared which is great for setting a scene in your image.

Pouring Jug

These are smaller than the serving jugs, these smaller jugs are great to pour into other drinks, maybe like it's being served. This is a great way to add action and a human element to your images.

Boards or Trays

These are great to either have your drinks sitting on to frame the subject or add some height into an image. A great way of adding some depth. Another use for trays is to have garnish being cut or served up on a small chopping board. Another great way to add some depth as it's adding in some extra levels into the image.

Extra Decorations

I have put a few things under this category otherwise this list would go on forever. By extra decorations, I mean anything that is added to the top of a drink for decoration, such as stirrers, umbrellas, cocktail sticks, and straws. These are a great way to add more interest to your drinks and add to the story. Add an umbrella and a stirrer to a drink and it gives it a fun beachy vibe, a staw adds a fun childish feel to an image, and a cocktail stick can add more of an elegant rich vibe.

Ice Ice Baby

Although you're not going to serve ice with all drinks, this is a summer drink series so ice is going to be a big part. There are a few different types of ice and it's important to serve it with the right ice. Crushed ice is used for a lot of the more summery long cocktails, and a large ice cube will be more for a whisky. Ice is a great way to help drinks look refreshing, an important factor for summer drinks. I have some great ice cube trays from amazon for large cube ice and round ice! Great way to add some interest to an image.

Garnishes

Last, but definitely not least on this list is a garnish. Maybe one of the most important props on this list. Nearly all of your drink photos will include some garnish. They are a great way to add some interest to your drink and let people know what is in it. A martini really looks similar to water, add olive and it's instantly recognizable as a martini. Adding things like lime and mint can help a drink feel refreshing, and cinnamon and orange will help it feel warmer -- a great way to help your viewer taste an image.

_About the author: Amie Prescott is a professional photographer, and food photography combines two of her favorite things: food and photography. Prescott put a good spin on lockdown by using the bad situation to create YouTube videos in an effort to help people looking to learn food photography. _

#educational #tips #amieprescott #foodphotography #foodphotographytips #pour #pouring #props

10 Props To Use for Better Beverage Photography

Elevate your beverage photography with the skillful use of props.

Pour Shots: How Best to Add Action into a Food Photo

If you follow the food photography community on Instagram, I am sure you will have seen some lovely, dreamy images with syrup or chocolate being poured over some equally lovely-looking food. If you're not sure how to make these kinds of photos, I'm here to help.

"Pour shots" are a great way to add some interest to food photography by creating action and adding a human element. If you have been wondering how you can create these types of images, or wondering how to improve your own I have put together some great tips for you.

Does it Pour?

My first tip would be to check what are you pouring out of pours nicely. Some jugs have a nice lip which helps them pour out liquid smoothly -- other jugs or cups may trickle down instead of pouring out smoothly. I recommend that you double-check how your chosen vessel pours liquids before the shoot because you don't want to have a whole shoot set up only to find that you're ready to pour, your jug isn't great at the task and has made a mess of your whole scene. This problem is more common with liquids with a more runny consistency.

Get the Right Consistency

More viscous liquids -- like melted chocolate -- can be a bit too thick to pour. In this case, you can add a little hot water to loosen it, which can help it pour or drip smoother. On the other end of the scale, if you want to thicken a liquid you can add a mixture of corn starch and water to thicken it up.

Choose Backgrounds Wisely

When picking your background color or tone, make sure you have in mind what you are going to be pouring or sprinkling -- we don't want it to blend into the background making it difficult to see. It's best to pick a background that really helps it stand out. For example, if you use a white background and sprinkle on some white icing sugar, the icing sugar is going to be hard to notice. Do the same on a black background and it is going to really stand out.

Stand in the Right Location

This might sound really obvious, but we need to know where we are going to stand when actually performing the pour. You would be surprised how easy it is to forget this step. We don't want to be blocking the light, casting a shadow, or obstructing the subject. I recommend placing yourself in a position, perform a "fake pour," and take the photo so that you can see if your position or the lighting needs to be adjusted.

Check out my video above for more tips or to see some behind the scenes of these tips in action. For more videos all about food photography, check out my YouTube Channel.

_About the author: Amie Prescott is a professional photographer, and food photography combines two of her favorite things: food and photography. Prescott put a good spin on lockdown by using the bad situation to create YouTube videos in an effort to help people looking to learn food photography. _

#educational #tips #tutorials #amieprescott #foodphotography #foodphotographytips #pour #pouring #props

Pour Shots: How Best to Add Action into a Food Photo

Pour shots add action and a human element.

How to Use Props to Add Depth to Your Food Photography

Props are a vital part of most food photography. They can help you add interest and story to your scene, but they can also help you add depth. To that end, here are a few tips to help you use props to add depth to your images.

Firstly I am going to give a few tips for adding depth to a straight-on shot, but these will also work for a 25 to 45-degree angle shot as well. When planning my shoots, I mentally split the image into layers: you have the middle layer where our main subject will usually be, but then we have the foreground and background as well. If we leave these blank, it can leave the image feeling a little too two-dimensional.

There is nothing wrong with having the subject and only that, but to add some depth to the image we need to add props into the background and foreground. This will give the image those layers. It doesn't have to be anything substantial -- sometimes the simplest props work the best. For the foreground, I recommend something that helps draw your eye into the image. For this particular scene, I added a small pot with coffee beans and linen coming from in from the front side to help frame the subject. For the background, you can get away with the higher, bigger props. This also helps add some height to the image.

Another way to add depth is to wide-open apertures, somewhere between f/2 and f/4 works great to create some lovely soft bokeh. Also, increase the distance between your subject and props that are in the foreground and background -- this will help throw them out of focus. Having your foreground and background props out of focus helps create a dreamy scene and adding to the depth in your image.

Now for adding depth to your flat lays. This can be a bit trickier because, well, it's in the name: They're flat lays, which makes adding depth to an intrinsically flat visual even more challenging. But it can be done: with some taller props, we can add to our foreground.

One thing that is becoming more popular is having some tall plants in the scene. These are a great way to add some foreground to our flat lays, and they also add some interesting shapes into a scene and can really draw your eye in. Just remember with the taller props, keep them to the side because in the middle they are going to take over a scene.

For the background layers, lift your subject up and place something under your subject. Chopping boards, plates, boxes, and linens are just a few of the great props we can use to add some background to our flat lays. Just one to two of these can really improve your flat lay photos.

These points aren’t rules as there’s no right or wrong with food photography, but rather they are just a few things I think about when creating my images and I think they will be useful for anyone looking to create great food photography.

In the video above, I also give a few tips on how to make sure you don't go overboard. Because props are important but they're not more important than the food itself. For more videos on food photography, check out my YouTube channel!

_About the author: Amie Prescott is a professional photographer, and food photography combines two of her favorite things: food and photography. Prescott put a good spin on lockdown by using the bad situation to create YouTube videos in an effort to help people looking to learn food photography. _

#educational #tips #tutorials #amieprescott #athome #education #food #foodphotography #foodphotographytips #howto #photographytips #props

How to Use Props to Add Depth to Your Food Photography

Add depth to your food photos using props!

How Best Photograph Food with a Straight-On Perspective

The straight-on angle is great for food photography because it gives your subject a sense of grandeur and can make it jump out of the picture. This angle is well suited to foods that are tall or layered as from this angle you can get a better idea of its scale or better reveal those layers.

I am sure you've seen many amazing food photos on Instagram taken from the straight-on angle. If you've been trying to create images like those and are looking for some tips, I have put together some of my favorites in the video above. There are no hard or fast rules to photography, but what I discuss are some of the things I think about that allow me to create great images.

The first tip I can give anyone looking to create food photography from a straight-on angle is knowing when to use it -- not everything will suit this angle, so choose your subject wisely. In this particular example, I chose pancakes and because they are stacked tall, this angle is a great way to show the height and see all those lovely pancake layers.

My next tip is all about the backgrounds you choose for your photograph. Unlike what I call "flatlays" -- which refer to shooting straight down -- and some other angles, when shooting from a straight-on angle you are going to need to consider the background behind your food, not just what the food will be seated on.

There are a few ways of doing this: you can select a background that is the same color as your table surface, use different colors for each, or sometimes maybe even add a scene in the background such as a restaurant or kitchen. Whichever you choose, do so from the perspective that different background combinations are going to create different feelings for your images.

One thing to make sure of when selecting a background is to make sure that whatever it is, it is not too distracting. It may be tempting to use a whacky background to make an image stand out, but the most important thing to remember is that the background isn't supposed to be the focus, the food is: the subject is what should be really standing out.

Another tip I have for food photos taken at this angle is all about your lens focal length. Now, this one definitely isn't set in stone as each image you take will need to have its focal length determined each time, but for these straight-on shots I usually shoot between 70mm to 120mm.

As a note, these focal lengths refer to lenses as they are on a full-frame camera. If you are using a crop sensor, that would be roughly 50mm to 85mm, depending on your specific crop factor.

This focal length helps compress your scene and add depth. A wider focal length can make your image feel flatter, which you want to avoid. Additionally, these longer focal lengths also make it much easier to integrate bokeh, which can look great. Another good thing about these focal lengths is that they're best for avoiding lens distortion which can make your photos look as though your subjects are about to fall over. While you can usually fix this kind of thing in post-processing, it doesn't hurt to get it fixed in-camera.

The video above has even more tips on how to make great food photos using the straight-on perspective, and for other videos about food photography make sure to check out my YouTube channel!

About the author: Amie Prescott is a professional photographer, and food photography combines two of her favorite things: food and photography. Prescott put a good spin on lockdown by using the bad situation to create YouTube videos in an effort to help people looking to learn food photography.

#educational #tips #tutorials #amieprescott #athome #education #food #foodphotography #foodphotographytips #howto #photographytips

How Best Photograph Food with a Straight-On Perspective

Not everything is best photographed with this angle, but it can be very useful for tall or layered foods.