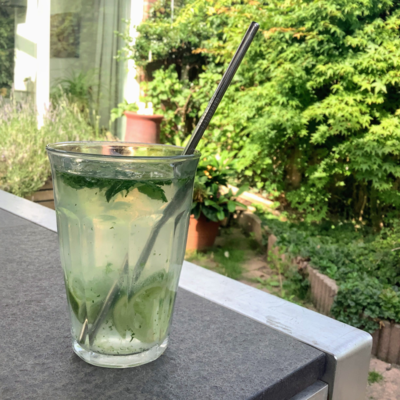
Powerade Sports Drink
(This post is being modified)Time for a refreshing drink, have a lovely Sunday!
#refreshingdrink #beveragephotography #goldenlife #summerdrinks
Five Tips to Make Better Beverages Photos
Here are a few tips to help you improve, or maybe get started with, drink photography. Drinks can be quite tricky: you have unpredictable liquids and glasses with reflections, so these tips may come in handy. Just remember, like all of my advice, these aren't die-hard rules, but instead they are just a few things that you can choose to consider with your photography.
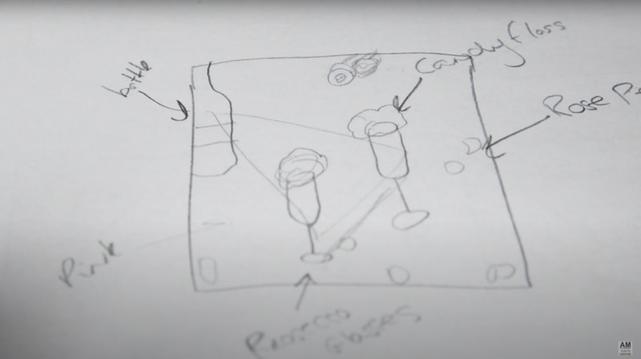
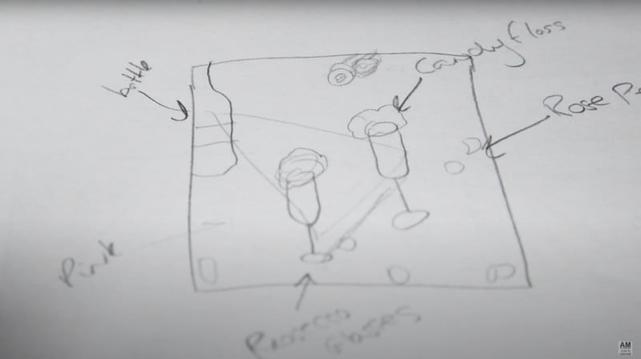
Tip 1: Have a Plan
My first tip for drinks photography is to have a plan. When photographing drinks, you're not going to want them to sit there for a while as your prepare your scene. If you do, ice will melt, beer will look flat, condensation will drip off and most drinks just don't sit for long and stay looking fresh. Having a plan in mind will help you speed up the whole shoot, giving you more time to focus on getting that perfect image with your drink looking its best.
When I plan out my shoots, I think about what props I'll use, which backgrounds, and how I will have my lights. I will also draw a sketch out of any compositions I have in mind. Don't worry about making these drawings too detailed or artistic, I am not a great drawer at all -- it's only for my use they certainly aren't going to be hanging in a gallery.
Tip 2: Clean Your Glass and Use Gloves
This one may seem obvious, but it's really easy to just assume a glass is clean if you take it out of your cabinet. What isn't so obvious to your eyes but will be really obvious in the photo is how much lint and small bits may be on the glass. To save you a lot of time editing out in Photoshop, give your glasses a good clean with a micro-fiber or lint-free cloth beforehand.
Holding up to a light can help see any possible bits or smudges. Also, I recommend using gloves when handling your glassware as the last thing you want on your nicely polished glass is a fingerprint.
Tip 3: Use the Correct Glass
When shooting drinks, there is usually a typical glass for each drink: a mojito is served in a tall glass, an old-fashioned in a rock glass, for example. It is important to use the correct glass for drinks because it helps identify the drink. If you have clear liquid in a martini glass, it instantly looks like a martini, even though the liquid could be anything. Not only this, but if you don't I am sure you'll have bartenders on social media telling you, you've used the wrong glass -- It's important to them.
Tip 4: Add Texture
With most drinks, they tend to be quite smooth and you find they can feel a little textureless. Not all drinks, obviously, but for example, a cappuccino has a lovely frothy texture on top. To add texture to the image, we use garnish and props. Just make sure they're relevant to the image since the point of props is to add to an image, not to distract from the main subject. A garnish is a great way of adding some interest to your drink, and most will usually be served with one, so it makes sense and will add that texture we are looking for. This can be anything from a mint leaf, to some sugar around the edge of a glass. Make sure whatever you use, makes sense with your drink -- For example, mint and lime for a mojito.
Tip 5: Back Light Your Drinks
This tip will not work for all drink shoots, but a great way to light your drinks, especially if they are a clearer liquid, is to light them from behind. This can give drinks a lovely glow and helps with the pesky reflections you can get when shooting drinks.
To backlight your image, you just need to place your light directly opposite your camera, and then your subject between it. Then the light will shine right through the drinks giving it that lovely glow look. This won't be suitable for all drinks; drinks that are thicker may cast too much shadow on the front of the image, so a side light may be needed. If you are having problems with reflections, you can adda a reflector to the front of the image to bounce a bit more light back in.
Watch the video above to see me put these tips in action during a Rose Prosecco shoot, or check out my channel for more food and drink photography videos.
About the author: Amie Prescott is a professional photographer, and food photography combines two of her favorite things: food and photography. Prescott put a good spin on lockdown by using the bad situation to create YouTube videos in an effort to help people looking to learn food photography.
#educational #tips #amieprescott #beveragephotography #drinkphotography #drinks


How to Edit Food and Drink Photos Shot with Hard Light
As photographers, we generally aim to shoot perfectly to where our photos require minimal to no editing. But for some of us, the editing process can be just as creative of a process as the photography side. I am going to share exactly how I edited this hard light image to create something a little more dramatic than I can achieve in-camera.
I may not try and get the perfect photo at the time of capture, but I do like to make sure the exposure is right in-camera, as not having to worry about fixing exposure in the editing process makes it a lot more fun.
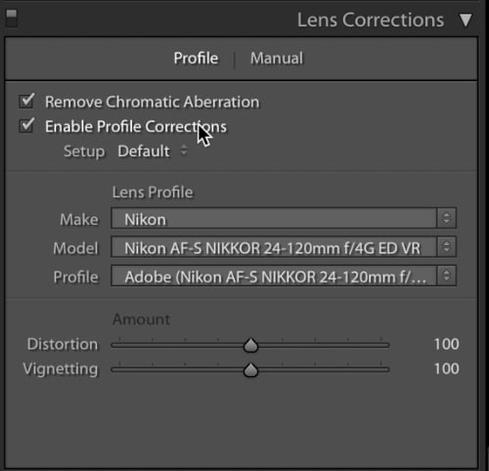
The first thing I do in Lightroom for every image is in the lens correction column: I tick the distortion box which will correct any distortion the lens you used created. It is a very clever tool that knows what lens you used and roughly how it has distorted the image.
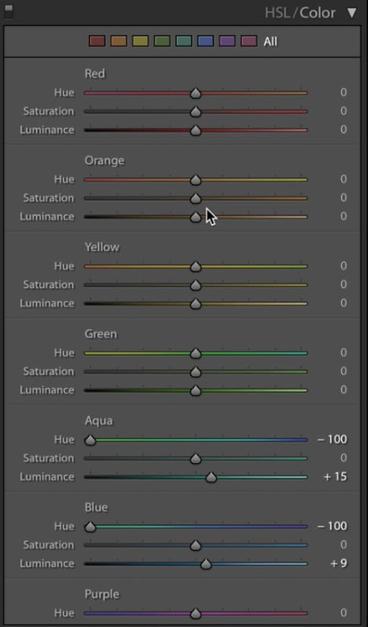
If you look at the straight-out-of-camera image, I shot this old fashioned on a light blue background, but I really wanted the final image to have a more green or turquoise color. So in the HSL panel, I took the aqua and blue and brought the hue to the left to give it a lovely green tone. I think this helps really make this drink feel summery and makes the whisky pop. As I only used the color sliders of the aqua and blue, only the background was affected by this change. I also increased the luminance a little with these two to lighten it up, adding to the summery light and airy feel to the image.
Now I have the background at the color I was looking for, I next go up to the basic panel. My first step here is to lower the drag the highlight slider to the left, darkening them, and take the shadow slider to the right, lightening them.
This makes the image look a little undersaturated but I will fix that in the next step where I do the opposite with the whites and blacks. I lighten the whites and darken the blacks which add that contrast back but with more of a punch. I don't use the exposure or contrast panel to do this as it affects the image as a whole instead of the specific tones in the image. Also in the basics panel, I increase the clarity slider just slightly, to add some detail to the image.
The next step in my usual editing process is to sharpen the image. I first add a sharpen mask by selecting the option key and increasing the sharpen mask so the sharpening will only affect the drink and glass, and not the bottle of whisky. Now that the mask is on, I can increase the sharpening amount as much as needed. Not too much, but enough to make the image crisper.
For my next step, I go back down to the HSL panel and make some small tweaks to the orange color, increase the saturation a little and decrease the luminance to make that old fashioned and whisky look a bit more of a deeper orange. I didn't do this when I changed the background as I knew the other edits will have changed the color and tone slightly.
I find the orange swirl in the drink was looking a little dull and dark at this point, so using the brush tool I draw over the swirl so it is only affecting the area I want it to affect. With the mask on, I increase the exposure, the shadows and increase the saturation.
My final area to edit in Lightroom is the tone curve panel, I brighten the highlights and darken the shadows adding a last boost of contrast. This makes an S shape with the curve.
That is everything in Lightroom, but just to finish this image up I open the image in Photoshop and using the patch tool, I clean up the background and any marks on the glass because no matter how careful I am, there are always marks!
And that's it! Below you can see the image I started with on the left and the finished edit on the right:
For more videos all about food and drink photography, check out my YouTube channel.
_About the author: Amie Prescott is a professional photographer, and food photography combines two of her favorite things: food and photography. Prescott put a good spin on lockdown by using the bad situation to create YouTube videos in an effort to help people looking to learn food photography. _
#educational #tips #amieprescott #beverage #beveragephotography #drinks #editing #editingtips #food #foodphotography #foodphotographytips #hardlight


How to Leverage Hard Light in Summer-Themed Drink Photography
We all love soft light because it adds that dreaminess to food and drink photos that will always be great. However, recently I have been seeing more people use hard light in their food and drink photography.
If you want to jump on this hard light bandwagon I have put together a few tips for creating hard light, and examples to show you how the light can affect your images. I would definitely recommend giving hard light a try because it's always useful to have some diversity in your portfolio when it comes to lighting.
If you would like to have more of an idea when looking at other's work if they are using hard or soft light, look at the shadows they create. Hard light will create harsh, defined shadows and soft light will create softer shadows with more of a gradient.
The first thing we need to create hard light photography is, without sounding too obvious, some hard light. If you use artificial light, like flash strobes or continuous lights, you're going to want a hard reflector or the light's bare bulb.
Unlike our much-loved softboxes, these won't have any layer of diffusion over them. The diffusion in softboxes helps soften the light, so undiffused light will be harder and harsher. Hard reflectors are usually a lot smaller than softboxes and come in many sizes. The smaller the light source is, the harder the light will be. If you're using natural light, you will have to depend on the sun and weather. That's not great for me since I live in the United Kingdom. For hard light photography in natural light, you will need a cloudless sky, and a window with direct sunlight. On a cloudy day, the clouds act as a diffuser for the sun turning the sky into a giant softbox so you will have to wait until those clouds pass for the hard light.
The shadows in the hard light images can become really interesting and I think this is one of the reasons they are becoming more popular at the moment. This is especially true with drinks photography because the glasses can create some really interesting shadows and reflections with the light. Test out a few of your glasses to see how the patterns on them change the shadows and reflections.
Other things that can affect the shadows in hard light photography are the angle and height of the light. The angle your light is at is going to affect the direction of the shadow, this is the same with soft light photography but it may be more important to remember as the shadows with this style of photography tend to be darker and longer, which is going to be important to remember when thinking about composition in the image.
You are not going to want a long dark shadow going through your main subject, this would be quite distracting. To change this with natural light you're going to have to move yourself and your subject as you can't move the sun around.
The height of the light is going to affect the length of the shadows. The lower the light, the longer the shadow and the higher the light, the shorter your shadow.
By changing both the angle and height of your light you can manipulate these interesting shadows to fall over your image in the right position for your image and composition. There are no right or wrong combinations of these, it's just best to figure out what works best for the image you're creating.
Other small changes can also affect your image so it's always a good idea to experiment in different ways you can manipulate the light. For more information on hard light photography, check out this video. Or for more tips on food and drink photography, check out my YouTube Channel.
_About the author: Amie Prescott is a professional photographer, and food photography combines two of her favorite things: food and photography. Prescott put a good spin on lockdown by using the bad situation to create YouTube videos in an effort to help people looking to learn food photography. _
#educational #tips #tutorials #beverage #beveragephotography #foodphotography #foodphotographytips #hardlight #lighting #reflector #softbox #softlight

