Saturday night experiment 🌙🍬

BabĂ  Candy — a candy inspired by the classic BabĂ , only in Naples 🇼đŸ‡č

I worked on the mockup in GIMP, but I didn’t go crazy with it 😄
For placing everything inside the package with lights, shadows and details I used Photopea.

Just a little creative experiment for the evening.
Good night everyone ✹

@GIMP #PackagingDesign #Mockup #GraphicDesign

This High-Res Photoshop Tote Bag Mockup Makes Your Merch Designs Look Print-Ready Instantly

I think that mockup quality separates serious brand presentations from amateur ones. Clients notice. Art directors notice. And anyone scrolling through a portfolio on their phone in under three seconds definitely notices. This Photoshop tote bag mockup from mego-studio earns its place in a professional toolkit—not because it looks polished, but because it looks real. There’s a specific visual authority that comes from a well-lit lifestyle shot, and this one delivers it cleanly.

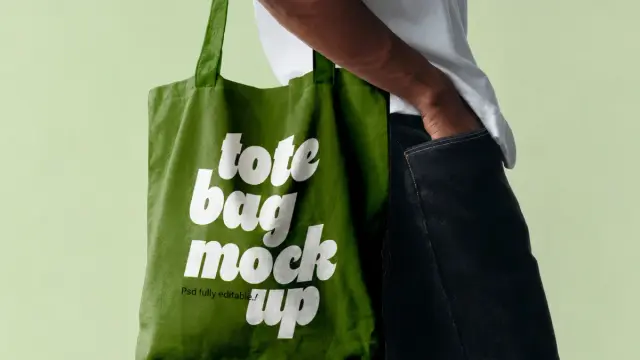
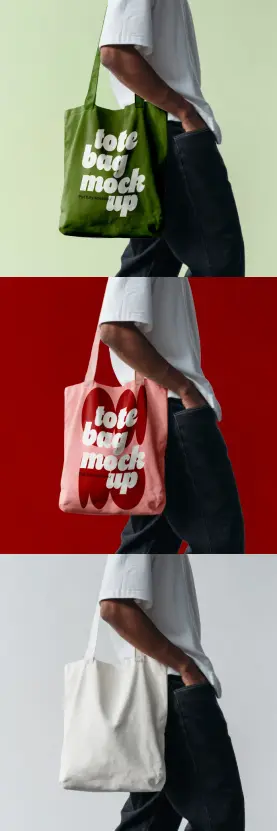
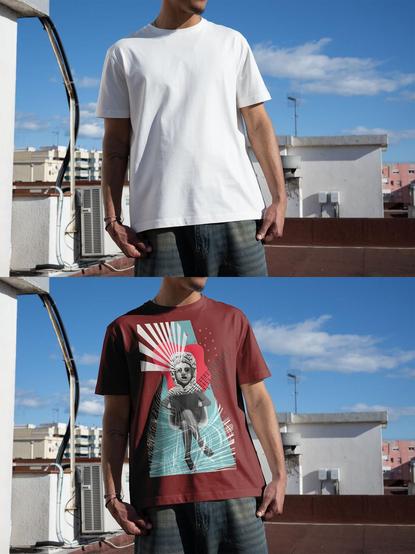
The mockup features a model holding a canvas tote bag against flat-color backgrounds. Three color variations ship with the file: an olive green version, a dusty pink with a bold graphic overlay, and a clean, off-white neutral. Each variation sits against a matching backdrop—sage, crimson, and light gray—giving you three fully styled, camera-ready scenes in a single download. That kind of art-directed coherence rarely comes packaged this efficiently.

So why does a tote bag mockup PSD like this matter right now? Because the merch economy is booming, independent brands are launching faster than ever, and the gap between a brand that converts and one that doesn’t often comes down to presentation. A flat lay on a white table no longer cuts it when your competitor is showing their design on a body in context with real fabric texture and natural shadow.

Download the mockup from Adobe Stock

Please note that this mockup requires Adobe Photoshop. The latest version can be downloaded from the Adobe Creative Cloud website; visit this link.

High-res Photoshop Tote Bag Mockup by mego-studio. Download the mockup from Adobe Stock

What Makes This Photoshop Tote Bag Mockup Different From Generic Templates?

Most free mockups online share a recognizable problem: they look like mockups. The lighting is too even, the angle is too predictable, and the bag looks like it was photographed in a vacuum. This mego-studio file avoids that trap entirely.

The photography itself carries creative intent. The model’s torso, cropped just below the shoulder and above mid-thigh, puts the tote at the visual center without distracting with a face. The white oversized tee and dark denim create a styling context that reads as contemporary streetwear without being trend-dependent. It works for a coffee brand, a bookshop, a fashion label, or a graphic artist selling prints.

Furthermore, the resolution is a genuine differentiator. At 3072 × 3072 pixels, this file handles print-quality output without degradation. You can zoom in, export at high DPI, and hand the file directly to a print vendor. That matters enormously when you’re working across both digital and physical deliverables for the same client.

The Resolution Standard: Why 3072 × 3072 Pixels Changes the Workflow

Resolution is one of those specs designers mention in briefs but rarely think about until something goes wrong. When a mockup ships at 72 DPI and 800 pixels wide, it looks fine on a phone screen. But export it for a pitch deck, a printed lookbook, or a trade show display, and it falls apart immediately.

This high-resolution tote bag mockup runs at 3072 × 3072 pixels. That gives you a square-format file large enough to crop for Instagram, resize for presentations, export for digital ads, and still have room for print use. The fabric texture, the shadow beneath the handles, the gentle wrinkle along the bag’s lower panel—all of it holds at close range.

Consider this a baseline expectation for any professional mockup workflow. If your mockup can’t survive a zoom-in, it can’t survive client review.

How to Use This Tote Bag Mockup in Photoshop

Opening the file reveals a layer structure built around Smart Objects. That is the core mechanic that makes this mockup fast to use. You do not need to manually distort, warp, or mask your design. The Smart Object handles all of that automatically once you drop your artwork in.

Here’s the practical sequence. Open the PSD file in Photoshop. Locate the Smart Object layer in the Layers panel—it will typically be labeled something like “Your Design Here” or have a small icon indicating an embedded layer. Double-click it. A new Photoshop window opens. Paste or place your design into that window. Save and close it. Photoshop applies your artwork to the tote bag automatically, wrapping it to the fabric surface with the correct perspective, shadow, and texture overlay already baked in.

Additionally, changing the bag color takes roughly ten seconds. The file includes color layers you can adjust directly using a Hue/Saturation adjustment layer or by modifying the fill layer’s color value. Want the bag in navy? Adjust the hue slider. Want it in terracotta? Same process. You never need to rephotograph anything.

Placing Your Design: A Step-by-Step Smart Object Workflow

Step one: open the PSD in Photoshop CS6 or later, or in any recent version of Adobe Photoshop. Step two: find the designated Smart Object layer in the Layers panel. Step three: double-click the Smart Object thumbnail to open the embedded document. Step four: place your artwork—an EPS, PNG, AI, or JPG file all work—into the Smart Object window. Step five: scale and position your design to fit the canvas. Step six: save the Smart Object window using Command+S or Ctrl+S. Step seven: return to the main PSD. Your design now appears on the tote bag, correctly mapped to the fabric surface.

That entire process takes under two minutes for an experienced designer. For someone newer to Photoshop, it still takes under five. The learning curve is almost nonexistent because the file does the technical work for you.

Three Color Scenes and What Each One Communicates

Color in mockup photography isn’t decorative—it’s editorial. Each of the three scenes in this file sends a different visual signal, and choosing the right one for your presentation context is a small but meaningful decision.

The olive green version against the sage background reads as organic, calm, and contemporary. It suits brands in the wellness space, independent bookshops, sustainable fashion labels, or anyone whose visual identity leans toward earthy, muted tones. The color feels considered rather than loud.

The dusty pink version against the crimson background is the boldest of the three. The high-contrast pairing creates visual energy that stops a scroll. Use it when you want the mockup itself to generate engagement, not just serve as a neutral container for your design. This scene is ideal for social media posts, portfolio thumbnails, and anywhere you need immediate visual impact.

The off-white version against the light gray background is the utility scene. It reads as clean and neutral, making your design the only variable in the frame. Use it for client presentations, lookbooks, and any context where you want the product to speak without the background competing.

The Contextual Staging Framework: Matching Scene to Brand Voice

Here’s a framework I’d call Contextual Staging: Before choosing a mockup scene, identify the dominant emotional register of the brand you’re presenting. Is the brand warm or cool? Bold or restrained? Narrative or functional? Match the mockup’s color scene to that register rather than defaulting to whichever version looks most impressive in isolation.

A bold brand paired with the neutral gray scene feels deflated. A quiet, refined brand placed in the crimson scene feels anxious. The mockup is not just a container—it is part of the brand communication. Treat it that way.

Why Lifestyle Mockups Outperform Flat-Lay Photography for Merch Brands

Flat lays have their place. They work well for product detail shots, e-commerce thumbnails, and technical documentation. But for brand storytelling and merch marketing, they consistently underperform against lifestyle imagery.

The reason is simple: people buy context, not objects. A tote bag held by a person in real clothes on a real body communicates how the product feels in daily life. It answers the implicit question every potential buyer is asking—”Can I see myself carrying this?” Flat lays cannot answer that question. Lifestyle shots can.

This is precisely why a lifestyle tote bag mockup PSD like this one creates stronger conversion potential than a folded-fabric version on a table. The model stance is relaxed, the composition feels casual rather than staged, and the whole image reads as something that could appear in a brand’s actual Instagram feed without looking like a mock-up at all.

The Authenticity Gap in Merch Presentation

Call it the Authenticity Gap: the visual distance between how a product looks in a mockup and how it looks in real life. Wide gaps create distrust. Tight gaps create confidence. The best mockups close that gap so completely that buyers don’t think about the mockup at all—they think about the product.

This file’s Authenticity Gap is narrow. The fabric drape looks physically accurate. The handle shadow falls correctly. The bag’s proportions are consistent with a real canvas tote. Accordingly, your designs placed inside it inherit that credibility. That is not a small thing when you’re trying to sell merch to a skeptical audience who has seen too many obviously fake renderings.

Who Should Use This Photoshop Tote Bag Mockup

The range of professionals this file serves is broader than it first appears. Graphic designers presenting merchandise concepts to clients use it to show work before production begins. Independent merch brands use it to sell designs before committing to a print run. Brand strategists use it in identity presentations to show how a logo translates to physical objects. Illustrators selling their work as products use it to build Shopify listings and social media content without ever ordering a physical sample.

Moreover, it works equally well for freelancers pitching single clients and for studios running multiple projects simultaneously. Because the Smart Object workflow is so fast, you can generate fresh mockup variations for different clients in minutes rather than hours. That speed has real economic value when you’re billing by the project.

Mockup Velocity: A Metric Worth Tracking

I want to introduce a concept worth adding to your workflow vocabulary: Mockup Velocity. This is the number of presentation-ready design variations you can produce per hour using a given mockup file. High Mockup Velocity means your files are well-structured, your Smart Objects are clearly labeled, and your resolution is high enough that you never need to regenerate for different output contexts.

This mego-studio file has high Mockup Velocity by design. Three scenes, one download, Smart Object editing, full-resolution output. If you’re running a design business, that efficiency compounds over time into real hours saved and more competitive project timelines.

Photoshop Tote Bag Mockup for Social Media: Format and Output Considerations

At 3072 × 3072 pixels, this file is natively square—a format that works perfectly for Instagram feed posts, product thumbnails, and digital ads. You do not need to crop or reframe anything for standard social output.

For Instagram Stories or TikTok thumbnails, extend the canvas and place the mockup image within a 9:16 frame. Furthermore, for LinkedIn posts, the square format works without modification. And for Pinterest, consider placing two or three mockup variations vertically to create a comparison pin that performs well with merch audiences.

Additionally, the high resolution means you can crop tightly for detail shots—the fabric texture, a close-up of your artwork on the bag—without losing quality. Those detailed crops often outperform full-product shots in engagement because they reward visual curiosity.

Export Settings for Maximum Versatility

Export the final mockup as a JPEG at 90% quality for web and social use—file size stays manageable and quality loss is imperceptible at normal viewing distances. For print or client delivery, export as a TIFF or high-quality PNG to preserve full resolution. For digital ads, a PNG with a transparent background version is useful if the mockup file supports layer isolation of the bag against a clean edge.

The Bigger Picture: Mockups as Brand Infrastructure

Here’s a perspective that doesn’t get enough attention in design discourse: mockups are brand infrastructure. Every time a client sees your design presented in a believable, well-lit, real-world context, they build confidence in both the product and in you as the designer who thought carefully about presentation.

Cheap mockups erode that confidence. They introduce visual noise—obvious compositing, mismatched lighting, unnatural fabric behavior—that makes the client focus on the container instead of the idea. Good mockups disappear. They let the design speak, and they let the designer look competent without having to explain anything.

This Photoshop tote bag mockup from mego-studio sits firmly on the right side of that line. The photography is editorial, the resolution is professional, and the editing workflow is fast enough to fit into real project timelines. That combination is harder to find than it should be, and it’s worth acknowledging when a file actually delivers on all three.

Prediction: The Mockup Standard Will Keep Rising

Clients are increasingly visually literate. They’ve seen enough polished brand content online that their baseline expectations for how a presented design should look have risen accordingly. Mockup quality that felt impressive in 2018 now reads as average. The files that differentiate designers in 2026 and beyond will be those that look indistinguishable from actual product photography.

That raises the bar for everyone in the ecosystem—mockup creators, designers, and clients alike. Files like this one are part of that upward pressure. They make it easier to meet the new baseline without investing in actual product samples, and that accessibility benefits independent designers disproportionately. Use that advantage.

Download the mockup from Adobe Stock

Frequently Asked Questions

What software do I need to use this Photoshop tote bag mockup?

You need Adobe Photoshop. Any version from CS6 onward supports Smart Objects, which is the core feature this mockup relies on. The more recent your Photoshop version, the smoother the Smart Object editing experience will be, but even older versions handle the workflow without issues.

Can I change the bag color in this mockup?

Yes. The file includes editable color layers that let you adjust the bag’s color using Hue/Saturation adjustment layers or by modifying fill layer values directly. You can match the bag to any brand color without needing to rephotograph or recompose anything.

What resolution is this tote bag mockup PSD?

The file is 3072 × 3072 pixels, making it suitable for both high-resolution screen output and print applications. At that size, you can export for social media, digital advertising, lookbooks, and print presentations all from the same file.

How do I place my design onto the tote bag?

Double-click the Smart Object layer in Photoshop’s Layers panel. A new window opens where you place your artwork. Save that window, return to the main PSD, and Photoshop will map your design onto the tote bag automatically. The entire process typically takes under two minutes.

Is this mockup suitable for commercial use?

Licensing terms are set by mego-studio. Check the license documentation included with the file or review the terms on Adobe Stock. Most professional mockup files from established studios permit commercial use for client work and personal projects, but always verify before using a file in a commercial context.

Can I use this mockup for print-on-demand product listings?

Yes. The 3072 × 3072 pixel resolution is more than adequate for print-on-demand platforms, e-commerce product pages, and Shopify or Etsy listings. Export at high quality, and the image will display sharply across all standard display sizes.

What file formats can I place into the Smart Object?

Photoshop Smart Objects accept PNG, JPEG, EPS, AI, PDF, and native PSD files. Vector artwork placed as an EPS or AI file retains its sharpness regardless of how large you scale it within the Smart Object canvas, making vectors the preferred format for logos and typography-based designs.

Check out other professional graphic design templates here at WE AND THE COLOR.

#adobePhotoshop #AdobeStock #design #graphicDesign #mockup #photoshopMockup #toteBag

#GitHub's interface if the platform had been created by #Borland in the 90s 😎

[Source: https://xcancel.com/ponceto91/status/2050901293124726900]

#mockup

đŸ‡§đŸ‡· Apresentando esse trabalho de alteração da topografia em malha 90°/45°. O comando pedia movimentação de terra, e como geralmente evito fazer isso, tentei preservar essa identidade com os perfis do terreno natural que ainda aparecem nos planos dos arrimos.

🇬🇧 Presenting this work of changing the topography using a 90°/45° mesh. The briefing required earth movement, and as I usually avoid doing it, I tried to preserve this identity with the profiles of the natural terrain that still appear in the plans of the retaining walls.
.
.
.
#arquitetura #architecture #urban #urbanism #UnB #universidade #university #uni #maquete #mockup #calunga #topografia #topography #arquiteturadechĂŁo

đ—Ÿđ—Œđ—Žđ—Œđ—¶đ—œđ˜€đ˜‚đ—ș:

#LogoIpsum #Design #Mockup

https://thewhale.cc/posts/logoipsum

The Lorem Ipsum of logo.

Shower Curtain Mockup - Downloadable Room Scene PSD Shower Curtain Mockup - Instant Download PSD Photoshop file by divineandplayart https://www.etsy.com/listing/1370763442/shower-curtain-mockup-downloadable-room?ref=rss&utm_source=dlvr.it&utm_medium=mastodon #ShowerCurtain #Mockup #InteriorDesign #HomeDecor #Photoshop

A handheld iPhone Photoshop mockup in a warm daylight setting—3500×2500 px, smart object-based screen placement, and a transparent background variant for full compositing control. https://weandthecolor.com/this-customizable-iphone-mockup-psd-file-is-the-smartphone-template-designers-actually-need/209209

The article covers the workflow for inserting your own design, explains why PSD mockups deliver precision that AI-generated compositions can't match, and introduces original frameworks like the Precision Placement Principle and Environmental Credibility Effect.

#photoshop #mockup #iphone

This Customizable iPhone Mockup PSD File Is the Smartphone Template Designers Actually Need

Presentation is everything. You can design the most thoughtful app interface or the most beautifully crafted mobile website, and still lose a client pitch because the presentation felt flat. That’s not a design problem — it’s a context problem. And a well-crafted iPhone mockup fixes it instantly.

This particular Photoshop mockup does something most smartphone mockups don’t. It puts the device in a hand, under natural daylight, against a warm neutral wall with soft window shadows. The result is a scene that feels lived-in and real. Consequently, your design doesn’t just look finished — it looks believable.

So why does that matter so much right now? Because audiences have trained eyes. They spot an over-polished, sterile device that renders immediately. Meanwhile, contextual, human-centric visuals keep stopping thumbs on social feeds. This smartphone mockup is built for exactly that moment.

Download the mockup from Adobe Stock

Please note that this mockup requires Adobe Photoshop. The latest version can be downloaded from the Adobe Creative Cloud website; visit this link.

A smartphone Photoshop mockup of a hand holding an iPhone in a daylight setting. Download the mockup from Adobe Stock

What Makes This Photoshop Mockup Stand Out From the Crowd?

Most iPhone mockup files give you a floating device on a gradient or a plain white background. Clean, yes. Memorable, rarely. This PSD takes a different approach entirely.

The composition centers on a hand holding the iPhone at a natural upright angle. Soft daylight streams in from the upper left, casting gentle window-frame shadows across the beige wall behind. The overall palette — warm cream, soft gold, natural skin tones — creates what I’d call Ambient Authenticity: a visual environment that reads as real without any distracting noise.

The file ships at 3500 × 2500 px, created by an Adobe Stock contributor. At that resolution, it holds up on retina displays, large-format print, and full-width website banners. Furthermore, the second version of the mockup comes with a transparent background, giving you full compositing flexibility. You can drop it onto any color, texture, or photograph you like.

The Photoshop Mockup File Structure

Open the PSD, and you’ll find a clearly labeled Smart Object layer. That’s your insertion point. Double-click the Smart Object thumbnail, and a new document opens. Place your design there — an app screen, a UI prototype, a wallpaper, a brand visual, anything that fits a smartphone screen. Then save and close. Photoshop updates the screen automatically, with all the natural lighting, shadows, and reflections intact.

The Smart Object system is the core reason this smartphone mockup workflow beats hand-building a comp from scratch. You place your design once, and the file handles everything else. The screen perspective, the subtle glare, the way light hits the bezel — all of it is baked in. You don’t touch it.

Why a PSD Mockup Beats AI-Generated Device Compositions

AI image generation is everywhere right now. Tools like Midjourney, Firefly, and DALL·E can produce device scenes in seconds. So why bother with a Photoshop mockup at all?

Here’s the honest answer: precision. When you generate a smartphone composition with AI, you’re making educated guesses. You describe what you want, and the model interprets it. Sometimes that’s close. Often it isn’t. The screen content is almost always wrong — blurry, garbled, or invented. Typography doesn’t render correctly. UI elements get distorted. Aspect ratios rarely match your actual design file.

With this iPhone mockup PSD, what you place is what you get. Your design appears exactly as intended, at full sharpness, at the correct proportions. There’s no iteration loop of refining prompts and hoping the next generation is better. You open the file, insert your artwork, save, and done.

Introducing the Precision Placement Principle

I use the term Precision Placement Principle to describe the fundamental advantage of Smart Object-based mockups over AI-generated alternatives. The principle holds that creative control and output fidelity are inversely proportional to the interpretive distance between designer and result. In simpler terms, the more layers of interpretation between you and your final image, the less accurate your result. A PSD mockup removes those layers entirely.

This isn’t a knock on AI tools — they’re genuinely useful for mood boarding and rapid ideation. But for a client deliverable, a portfolio piece, or a social media post that represents your actual work, the Precision Placement Principle applies. You need the real thing on screen, not an AI’s best guess at it.

How to Add Your Design to the iPhone Mockup Screen

The process is fast, even if you’ve never worked with Smart Objects before. Follow these steps, and you’ll have a polished result in under five minutes.

Step One: Open the PSD File

Launch Photoshop and open the downloaded file. The Layers panel will show a clearly labeled Smart Object layer — usually named something like “Your Design Here” or “Screen.” That’s the only layer you need to interact with.

Step Two: Open the Smart Object

Double-click the Smart Object thumbnail in the Layers panel. A new document opens — this is the screen canvas. It shows the exact dimensions your design needs to fill.

Step Three: Place Your Design

Drag your artwork, app screenshot, or UI design into this canvas. Resize it to fill the area. Keep your design within the guides if any are provided. Then go to File → Save (not Save As). Close this canvas.

Step Four: Review the Result

Photoshop instantly updates the mockup with your design embedded in the screen. The lighting, reflections, and shadows all apply automatically. If anything looks off, go back to the Smart Object and adjust. Export the final file as a PNG or JPEG at full resolution.

The whole workflow is non-destructive. Your original design file remains untouched. You can swap in different screen designs as many times as you need.

Smartphone Mockup Use Cases: Where This File Earns Its Place

This iPhone mockup isn’t a one-trick asset. The combination of high resolution, transparent background option, and natural lighting makes it versatile across a wide range of professional contexts.

App Design Portfolios

UX and UI designers need context shots for their case studies. A raw screen recording or flat screenshot doesn’t communicate the same experience as seeing your interface in a real hand, in a real environment. This mockup solves that immediately.

Client Presentations

Showing a client their new mobile website or app design in a hand-held context builds confidence. It removes the cognitive gap between “here’s what the screen looks like” and “here’s how this actually feels to use.” Additionally, it signals professionalism at every touchpoint of the pitch.

Social Media and Marketing Visuals

The warm, editorial quality of this scene works exceptionally well on Instagram, Pinterest, and Behance. The natural lighting and human element create visual warmth that performs consistently well in feeds. Furthermore, the transparent background version lets you place the device over branded backgrounds without any masking work.

App Store and Product Page Graphics

Apple’s App Store and Google Play both benefit from device lifestyle shots alongside flat screenshots. This smartphone mockup gives you that lifestyle context without requiring a photography setup or hiring a hand model.

What the Lighting Actually Does for Your Design

It’s worth spending a moment on the photography itself. The light in this mockup isn’t generic studio lighting. It’s a specific quality of indirect daylight — the kind you get in a bright room with a window to one side, not direct sunlight. The result is soft, directional, and warm.

This matters for two reasons. First, it gives the scene a time-of-day quality that feels specific and real. Second, it creates gentle window-shadow geometry on the background wall, which adds visual depth without any visual noise. The shadows frame the device without competing with whatever you put on screen.

I call this the Environmental Credibility Effect: the phenomenon where realistic ambient light conditions cause viewers to accept a composed image as a genuine photograph, even when they know intellectually it’s a mockup. The effect increases trust in the design being presented, because it’s perceived as something already in the world rather than something hypothetical.

iPhone Mockup vs. Generic Smartphone Mockup: Does the Device Matter?

Short answer: sometimes. The iPhone’s design language is globally recognized. The pill-shaped Dynamic Island cutout at the top, the brushed aluminum frame, the precise bezel proportions — these signal “premium mobile device” to most audiences, regardless of their own phone brand. For apps targeting iOS users specifically, showing the design in an iPhone mockup is an obvious choice.

For broader audiences or cross-platform products, the specific device matters less than the quality of the presentation. A high-quality smartphone mockup with realistic lighting and a human hand will outperform a technically accurate but sterile device render every time. The human element is what makes the image land.

The Transparent Background Version: Full Compositing Control

One of the most practical features of this PSD is the transparent background variant. Remove the background, and you have a smartphone mockup you can place anywhere.

Want to position the phone over a branded gradient? Done. Over a textured paper background? Drop it in. Over an architectural photograph or a lifestyle shot? Completely achievable. The transparent version turns this from a standalone mockup into a compositing element that fits into any visual system you’re building.

This flexibility is something AI-generated images fundamentally can’t replicate. You can’t go back into a Midjourney output and remove the background without losing image quality and dealing with edge artifacts. With the PSD, the transparency is built in from the start.

How This Photoshop Mockup Supports Modern Design Workflows

Design workflows have accelerated significantly. Clients expect faster turnarounds. Social content cycles are shorter. Portfolio updates happen more frequently. In that context, any tool that reduces the time between “finished design” and “polished presentation” has direct business value.

This iPhone mockup PSD fits neatly into that reality. It’s a reusable asset. Once you own it, you can use it for every mobile project that fits the aesthetic. The Smart Object system means screen swaps take minutes, not hours. And the output quality is consistently high, regardless of how many times you use the file.

I think of high-quality PSD mockups as part of a designer’s Presentation Infrastructure — the set of assets, templates, and tools that make professional output fast and reliable. Just as a copywriter has go-to headline frameworks or a photographer has lighting presets, a designer needs a core set of mockup files that they trust and reach for repeatedly. This smartphone mockup earns that spot.

Downloading and Licensing This Mockup From Adobe Stock

This PSD file is available through Adobe Stock, created by a professional contributor. Adobe Stock licenses are clear and commercial-use friendly. When you download a file through Adobe Stock, you receive a license that covers use in client work, marketing materials, social media, and portfolio presentations.

Download the mockup from Adobe Stock

For designers already on Creative Cloud, Adobe Stock integration is built directly into Photoshop. You can license and open the file without leaving the app. Furthermore, watermarked preview downloads are available before purchase, so you can test the composition with your own screen content before committing.

Frequently Asked Questions About This iPhone Mockup PSD

What resolution is this smartphone mockup?

The file is 3500 × 2500 px, making it suitable for large-format print, retina digital displays, and full-width website use.

Do I need advanced Photoshop skills to use this iPhone mockup?

No. Working with Smart Objects is a beginner-to-intermediate Photoshop skill. If you know how to open a file, double-click a layer, and save a document, you can use this mockup.

Can I use this Photoshop mockup for commercial client work?

Yes. Adobe Stock licenses cover commercial use. Always review the specific license terms at the time of download to confirm the scope of permitted use.

What’s the difference between the two versions of the mockup?

The file includes a version with the warm neutral wall background and a version with a transparent background. The transparent version gives you full compositing flexibility for placing the device over any background.

Why use this PSD over an AI-generated iPhone composition?

AI tools can’t accurately reproduce your specific design on a device screen. They interpret, approximate, and often distort UI content. This PSD places your exact design — at full fidelity — into a photorealistic context. The result is precise, repeatable, and professional every time.

What types of designs work best in this mockup?

App interfaces, mobile websites, wallpapers, brand identity screens, and UI prototypes all work well. Any design formatted to standard smartphone screen proportions will fit cleanly into the Smart Object.

Can I change the background color if I don’t want the warm wall?

Yes. Use the transparent background version and place it over any color, gradient, texture, or photograph in your own Photoshop document.

Is this the same as a smartphone mockup generator tool?

No. Online mockup generators are browser-based and typically export at lower resolutions with limited customization. This PSD gives you full native Photoshop control at high resolution, with all the compositing options that entail.

Check out other premium graphic design templates for professionals here at WE AND THE COLOR.

#AdobeStock #design #graphicDesign #iphone #iphoneMockup #mockup #photoshopMockup #smartphone #smartphoneMockup
Modor: ottimo generatore di mockup AI basato su browser

mockup con Intelligenza Artificiale

Web Apps Magazine