MHW-3Bomber F74 Navigator Grinder
Share
Article
The F74 Navigator Grinder
Unwrapped
Exit Chute Design
Branding
Auger
Hopper Lid
Dosing Cup
Bottom of Dosing Cup
Power Cord
Back Legs
Navigator Box
F74 Navigator Grinder
Testing the Grinder
Closeup of Exit Chute
The Grind Dial
Hopper
Hopper Detail
Lid Instructions
Grinder Brush
Angles and Materials
Inside the Dosing Cup
Back Vent
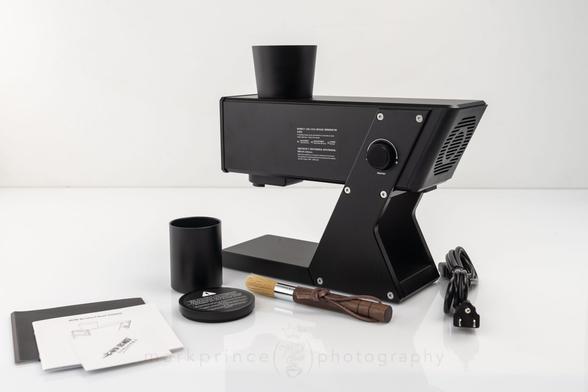
Machine in the Box
Back of the Box
Out of the Box
Hopper Lid
Grind Dail Sticker
Open the Lid
Control Dial
F74 Navigator Grinder
Whereto Buy
Manufacturer Website
Buy from Supplier
Buy from Amazon (US)
Buy here to support CoffeeGeek!
Buy from Kitchen Barista
Not a CoffeeGeek Sponsor.
Out of the Box
The MHW-3Bomber F74 Navigator doesn’t so much arrive as land.
At 7.5 kilograms, you know you’ve received something substantial. The outer box is neat and I appreciate the eco-friendly limited use of printing and graphics on the brown cardboard, but crack it open and those feels change. You’re greeted with dense, custom‑cut polystyrene, shaped precisely to the grinder’s industrial frame. It’s effective armour for shipping, though a definite loss for the environment. Protective plastic bags cover the grinder and its parts.
For a brand that markets itself as cutting‑edge, a more sustainable choice in packaging would make a stronger impression. I really hope MHW-3Bomber takes this to heart one day, as other manufacturers, like Rancilio and Breville, are doing.
The main box for the Navigator. 3Bomber is going for good eco-branding here with just black ink on the cardboard boax.
Yeah… that logo. Not for everyone.
Opening up, there’s a couple of mini manuals (containing basic info about the grinder) and… polystyrene.
We don’t like this stuff at CoffeeGeek. Coffee already has a massive carbon footprint and high waste costs. We don’t need this
The machine and accessories as you find them in the box, with even more polysterene.
Everything is wrapped in a kind of plastic, I wasn’t able to confirm if it is biodegradable.
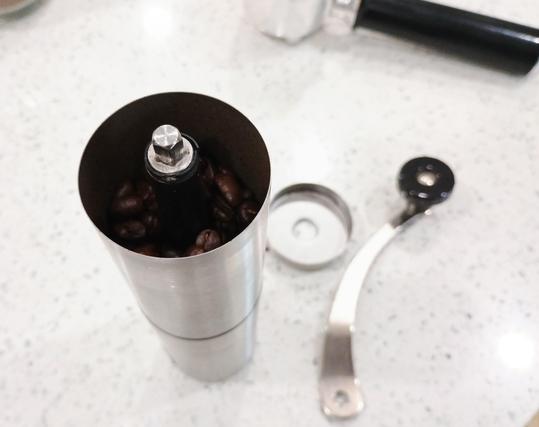
The grinder and parts, unwrapped.
Getting to the grinder itself requires removing more polystyrene and the dosing cup.
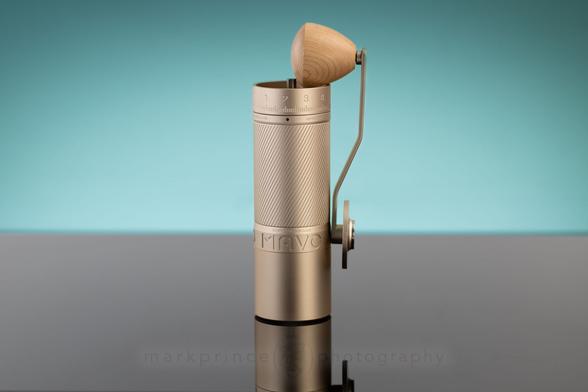
Lifting the Navigator free, the weight is reassuring. It’s not large, but it feels like a dense block of engineering magic. The dimensions – 10cm wide, 32cm deep, and 28cm tall (4″ wide, 12.6″ deep, and 11″ tall) – make it surprisingly compact. Yet the dense weight keeps it firmly planted on the counter when the motor spins up.
The design is unmistakably MHW‑3Bomber. No soft curves, no attempts at looking like kitchen décor. Instead, sharp lines, exposed bolts, thick structure legs, and an industrial personality. In black or white, it commands attention without pretending to blend in. If you liked the functional, precision‑first look of their Blade R3 or the Sniper grinder, you’ll find the Navigator in the same spirit, only bigger, louder, and meaner.
The angles and materials on the grinder are start and robust, and almost brutalist in design.
The back of the grinder has a big vent cutout, and it is also some of the only plastic on the entire grinder.
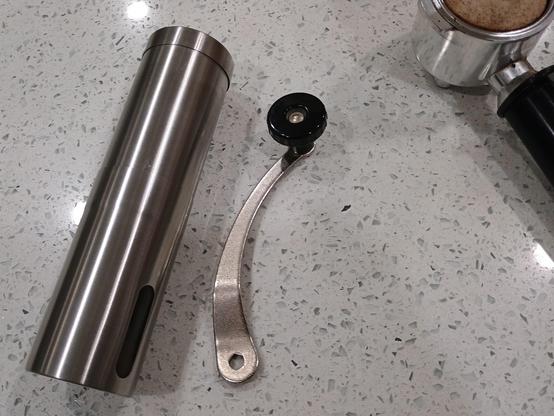
The dosing cup is nicely finished in the same textured matt black as the grinder. But it can get stuck inside 58mm filter baskets.
The main lid for the hopper, in its plastic bag for shipping.
There is a pull-off sticker on the lid with some fairly random non-related information about the grinder.
The grinder brush is okay. I prefer softer bristles for this kind of tool.
The hopper lid is very well designed, with a silicone rim for “soft” seating and also a bit of an air tight seal.
The back legs of the grinder are thick aluminum, powder coated with a textured black paint.
The single control point dial; press to start and stop, press 2sec to change modes, rotate to change RPMs
Thankfully, 3Bomber’s branding of this grinder is fairly subtle – this front plate (you could stick some black electrical tape over if you like) and the side dial when it lights up.
Front and centre sits the grind adjustment dial. The dial claims 90 “steps” on its visual indicators, and the manufacturer says each tick represents a 0.01mm burr movement. That’s plenty fine enough for espresso, though we’ll see if real-world use matches that claim in the full review.
But the feel is what’s really impressive. The dial delivers a seriously premium touch-point experience, with dampened resistance and a firm clack at the end stops. It’s a unique hybrid system. Visually, you get indicators from 0 to 9, with ten tick marks between each number (and a larger one at the halfway point between each number). As you rotate it, there’s a very subtle, tactile feel of “clicks”, but the dial doesn’t actually lock into them. You can easily sit it right between those marks.
It’s one of those “you have to try it hands on to know what I’m talking about” kind of things. You end up with the tactile feedback of a stepped grinder but the infinite precision of a stepless one.
This was a highlight for me – the “action” of the dial is very nice, and very repeatable. With a fine touch, you can park it between ticks.
Above the grind dial is a removable sticker with 3Bomber’s recommended settings for various brewing methods
The hopper lid fits very securely; more machine instructions here, kind of a catch all.
The hopper has an anti-popcorn device built in and the lid can be used as a sort-of bellows to blow out any stray grinds.
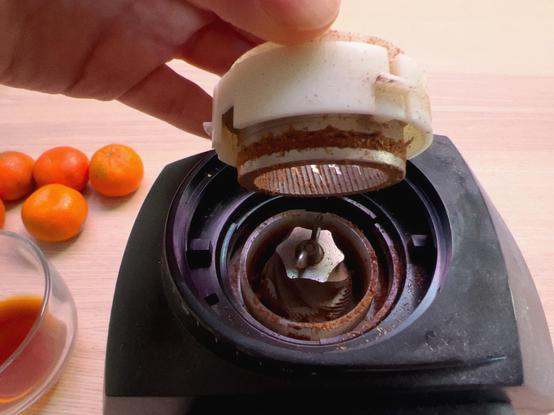
The hopper is also magnetized and slots into the top of the machine via click channels. The grinder won’t run without it in place.
The third of the three main labels on the grinder, this one details how to use to control dial. Memorize then peel it off.
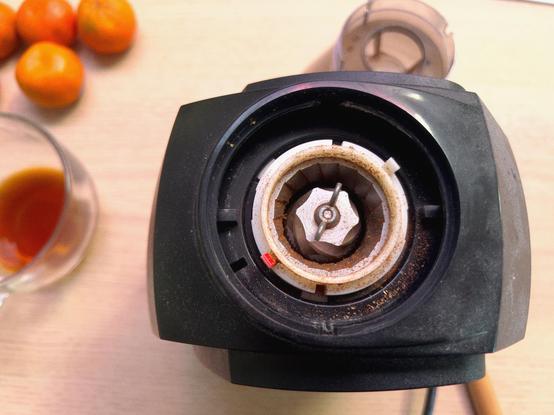
The burrs themselves, uniquely sized 74mm titanium‑coated flats, hide behind the front dial and mounting plate. If you peek down through the hole where the hopper sits, you see the machine’s auger system, itself attached to the unseen back burr plate. Out of the box, alignment is spot on excellent, at least with our test unit. The Ti coating is there for wear resistance and to keep grinding temperatures down, which should help preserve delicate flavours. On paper, this sits at the top of its class.
We will have further photos of the burrs very soon, but for now, here’s two detail shots.
The auger / prebreaker for the F74 Navigator, visible when you remove the hopper.
There’s no knocker installed on the grinder (IMO, there should be).
Quick aside: every coffee forum has folks obsessing over “burr swapping” like it’s a rite of passage. The F74’s 74 mm burrs? Rare size, wider footprint, not meant to play musical chairs. And honestly, you don’t want to swap them. These burrs were built to sync with the auger, which controls flow and pre‑breaks beans so the grind’s on point. Hold off until 3Bomber makes additional, brewmethod-specific burrs for this grinder; in the meantime the OGs are doing just fine without a $400 order to SSP.
The F74 is equipped with an ionizing coil – two of them in fact – which are supposed to aid in the reduction of static and also lower the grinder’s retention of grinds. They’re located at the exit chute area. We will be testing that a bit in this First Look, but will do our thorough tests in the Full Review coming in the next few months.
The catch cup is just… okay. Honestly, after using the awesome catch cup with the Lagom Casa recently, the F74’s version just isn’t in the same class, even if it’s better than what ships with most DF grinders.
It feels nice enough at first. It’s a 50-gram magnetic container that slides into place with a satisfying snap, and the silicone base is a nifty touch that prevents scratching while still sliding securely. But the workflow is where it falls apart for me. Every time I tried to dose coffee into a 58mm portafilter basket, the cup got wedged, making it a PITA to remove. I quickly learned I can’t use it to dose on its own and have to pair it with a dosing collar, which feels redundant.
This is such a classic MHW-3Bomber move. If there’s something I’ve learned about them over the last few years, it’s that they can come up with some very innovative, unique ideas, but there always seems to be a few areas they just needed to pay more attention to. The dosing cup’s design is a perfect example of that.
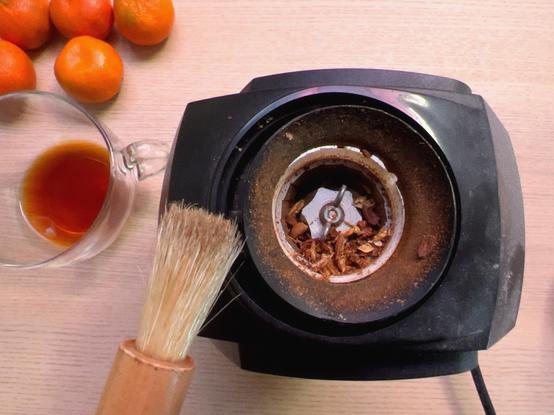
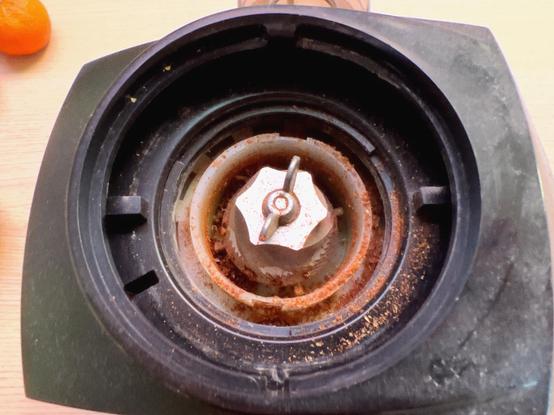
Here’s the exit chute, seen with a shot mirror. Note the declumper built in, and the ionizer coils.
The grinder can build up retention (hence needing to clean it out often with a brush). You can just make out the 2 ionizer coils. A knocker would go a long way here.
You still get stray grinds with this grinder; it isn’t a true zero retention design, but its close.
In this closeup, note how close the exit and declumper is to the actual burrs; also note the two ionizing coils. They can be overwhelmed by grinds and chaff if you don’t clean this area often. Again, a knocker could be a possible solution.
The bottom of the dosing cup (the magnet’s inside) has a silicone base that isn’t super grippy (by design) but prevents the cup from scratching the grinder base.
The dosing cup inside also has the textured black paint, but we noticed it does tend to attract chaff on the side walls.
On the right side of the machine is the multi-function control dial, fronted by a bright LED display that shows the current RPMs and grinder mode. This is also how you access the F74’s three modes: just press the dial for two seconds, then rotate to pick your poison.
There’s the A1 mode, which senses when the hopper’s empty and kicks in a quick reverse spin to clear grinds; A2, the full hands-free auto option; and M, old-school manual control. Simple enough once you’ve tried them, even if the naming is a bit clunky. Beeps accompany every mode change, as well as each time you change the RPM by 100, and they cannot be turned off. Consider yourself warned (it’s loud).
The mode and action dial; when the machine is in standby mode, it shows the 3Bomber Logo, the current mode, and current RPMs.
the dial is the grinder’s single control point (other than the front grind dial). It doesn’t have the finesse of the dials on an OXO product, but it’s not bad.
We put the usual 3+ kilos of old, stale coffee through the grinder to season everything up (sidenote – I wish more manufacturers would pre-season their burrs, like Mazzer and Mahkonig do). Once that was done, the true first use started, and here’s what I got.
An 18g espresso dose at 1200 RPM is through in under 7 seconds. At 800 RPM for a 19g pour‑over grind, we got about 8 seconds (both grind speeds measured after we fully seasoned in the burrs). The initial measurements of retention were quite nice: about .2g on the espresso side, and down to .1 on the pourover range. This was with the auto reverse mode enabled. Not bad at all for a fresh-out-of-the-box grinder.
Grinds were very fluffy and consistently placed as they fell into the cup. Combined with the speed, this was particularly impressive. I do have to say, this first use showed a lot of promise for the F74 Navigator.
The MHW-3Bomber grinder occupies a surprisingly small footprint, side to side, though it does sit deep.
Using The
It’s a sign of good design and engineering when you open a product and don’t really need to use the manual. I basically skimmed the instructions for the F74 Navigator to learn how the control dial worked, and that was about it.
Operating the grinder quickly became second nature. Start with the grind setting: dial in the luxurious-feeling, dampened dial up front to your preferred fineness level. Next comes your dose of coffee: the 50g hopper is designed for single dosing, keeping your workflow tight and on track. Snap the hopper lid on (this mainly helps reduce grinding noise; the hopper itself has a anti-popcorn device in place), If you like hot starts, run the grinder and drop your beans in. Cold starts? The 400W brushless motor has no issues at all with loading up the beans then running the grinder, if you prefer that way. Even if you used baked ultra light roasts.
The hopper has an anti-popcorn device built in and the lid can be used as a sort-of bellows to blow out any stray grinds.
I found espresso liked to live in the area between 0.7 and 1.2 on the grind selection dial. That’s actually a really nice dial in range, especially since the selections are effectively stepless. I should note, MHW-3Bomber ships this grinder with the grind dial not truly zero’ed out when you set it to zero. This is because they wanted to give more range in the coarser grinds. You can easily recalibrate the dial by pulling it out (it is held in place with magnets) and setting it to your new zero point. I’d leave it as is, and we did just that on our espresso tests.
AeroPress (we like to grind fine for AeroPress) sits in the 4-5 range, and pour-over grinds for V60, Kalitta Wave, and Melitta cone have their happy zone in the 5.5 to 6.5 range on the grind dial. For our full review, we’ll really get into this, testing grind particle size to find the factory-set zero point grind settings that match our CoffeeGeek standards for various brewing methods.
But let’s cut to the chase: the actual grind quality here is excellent. My espresso shots had a syrupy sweetness, viscous body and flavour note highlights that I’d say is perhaps on par with the Mazzer Philos I recently tested.
It’s not just an espresso one-trick pony, either. For pour-over, the variable RPMs give you fantastic control, delivering grinds with impressive clarity and nuance you can tweak and play with. This firmly places the F74 near the top of the class for any sub-$1,200 grinder in this category.
And that RPM control is not just a gimmick or fad, but a banger of a tool to really take your coffee extractions to the next level. This is where the fun begins. Lower settings like 800 RPM deliver cleaner, more transparent brews, and help with minimizing dust production in coarser grind settings. Higher settings around 1100-1200 RPM yield smoother, sweeter espresso shots with that viscous oomph I personally seek out. You can grind the same beans twice at different speeds and taste two distinct cups: not a bad trick for a single grinder.
Early testing of the grinder, mainly pulling shots through various Breville espresso machines.
Modes are easy to switch. A1 will probably be the most popular for its auto‑reverse, which does a bit of clearing out stray grounds, keeping retention low. A2 offers one‑touch automation, grinding hands‑free and stopping when out of beans. M puts you in full control, useful when experimenting with tricky beans.
The grind itself is fast. An 18 gram espresso dose takes 6 to 7 seconds depending on RPM. For filter coffee at 800 RPM, expect 8 to 9 seconds. Grounds land cleanly in the magnetic catch cup, with very little clinging thanks to the vertical chute, built in dual ionizer coils, and reverse spin.
Noise is the one workflow hazard with the F74 Navigator, and one area where I kind of shook my head at what the folks at 3Bomber were thinking here (remember how I mentioned those “classic MHW-3Bomber moves” in the OTB section? This is another one). At idle, the motor is absolutely whisper quiet. Add beans, and the volume spikes close to 85 decibels. It’s a screechy burst of noise, and you will notice it. But that’s not my main concern.
It’s the beeping. Oh my stars, the beeping. Every setting change comes with an audible and annoying chirp. And you can’t disable it. You’ll either tune it out or grow to resent it. Can you guess where I’m at?
After running a few KGs of coffee through the grinder, we started testing in earnest.
Daily cleaning is easy with a quick brush, although I often forget to do it. The next morning I usually regret that when I see errant chaff sticking here and there.
Here’s the ironic part: the grinder has dual ionizer coils specifically to reduce static and retention, but their design and placement seem to invite buildup anyway. Once that exit chute gets a light coating of grounds, the coils just… stop doing their job. I’ve found that as long as you give the chute a quick brushing each morning, the coils stay clear and work as intended for the rest of the day.
It’s a manageable quirk, but this is definitely another one of those “MHW-3Bomber, please fix this” areas for a future version.
For a full burr chamber clean, you’ll need a screwdriver and hex wrench. Not ideal, but manageable. We’ll get a lot deeper into that for the Full Review.
Overall, the F74 Navigator rewards curiosity and experimentation. Adjusting grind size, changing RPM, and swapping modes all feel intuitive. The output is consistently fantastic and perhaps even class-leading. It’s early days, but so far the Navigator feels like the rare grinder that is both fun to tinker with and consistent enough to trust.
The main grind selection dial on the grinder is easy to use, and easy to read.
The Navigator enters an extremely competitive space where a handful of grinders have already set the bar.
The Timemore Sculptor 078S ($799 USD) is one. Its design is sleek and modern, the kind you’d happily leave out on a minimalist kitchen counter. It uses 78mm burrs and has a clacker system for static. The F74 Navigator’s burrs, on paper are smaller (74mm vs 78mm) but their extra wide footprint means they provide more cutting surface. Of the two the Navigator is more robust and beefy, and it has the ionizer coil system and the auto reverse feature.
We do not have a Sculptor for testing, though I did borrow one for a few days just to see what it was all about. Between the two, the Timemore is more pretty, but the F74 is way more feature packed, better overall build quality, and IMO, just a better grinder overall. It also feels like it’s built to outlast grinders like the Sculptor.
Then there’s the Option‑O Lagom P64 ($1,650 USD). This grinder is completely loved by the enthusiast world. It kind of started the whole “let’s swap the burrs” trend. Option-O is most definitely a boutique brand, doing small production runs. Their QC is industry leading and the fit and finish of all their grinders is beyond question. The P64 also has variable RPMs (200-1400), and a 300W brushless motor. It really did set the standard for a while on what an enthusiast coffee grinder could be.
The F74 Navigator nearly matches the P64’s RPM flexibility, and perhaps surpasses it on burr geometry and size. The auger pre-feed and cutter system adds weight on the F74’s side of the scale. Consider that it’s half the price of the P64, and that scale starts tipping heavily. It’s not as refined or downright “beautiful” like the P64 is, but it delivers cutting edge (heh) tech and developments that the P64 needs to catch up to.
Speaking of boutique grinders, the Zerno Z1 ($1,250-$2,000 USD) is as close to true boutique and bespoke as we can get these days, with customizable touches, and serious burr capability. The catch, beyond pricing which can climb through the roof depending on how you want yours built, is availability: you may wait months for one. The Navigator, by contrast, is in stock and ready to ship. It may not offer the bespoke appeal, but in day‑to‑day use, the results in the cup might be nearly identical and the quality quotient on taste might even tip the F74’s direction.
(NB, we were in discussions about getting a Z1 for testing and review, and those discussions, while paused, are still ongoing).
Finally, the DF83 V2 ($650 USD) pushes the affordability angle with 83mm burrs (and third party burrs in this size are more readily available if you want to really experiment). It’s solid, straightforward, and a favourite among budget‑minded home baristas. It does feel like last decade’s choice tool (even though it’s only been out for a few years). The DF83 also lacks the Navigator’s variable RPM, which makes the MHW‑3Bomber more versatile for those who want to experiment.
In short, the Navigator threads a needle. It may not match the polish of the Lagom or the bespoke nature of the Zerno, but it delivers performance on par, and perhaps even a bit better, at a fraction of the price. Against Timemore, it trades elegance for rugged intent. And versus the DF83, it offers extra control without jumping into boutique pricing.
Conclusion
The MHW-3Bomber F74 Navigator is a grinder that wants to play in the big leagues without charging big league prices. From the moment you unbox it, the Navigator communicates something, and that something is “I’m not playing kid games any longer”.
The grinder is heavy, solid, and built with an industrial aesthetic that often puts function ahead of curves or polish. The grind dial feels luxuriously solid, the magnetic catch cup is another touch point that makes you smile, and the vertical chute with auto reverse keeps retention surprisingly low.
The 74mm titanium coated burrs, 400 watt brushless motor, and variable RPM system make the F74 Navigator a serious playground for home baristas who like to tinker and taste the results. Espresso shots come out syrupy and sweet. Pour overs show clarity and separation. Brew with a Chemex and Kone filter at low RPMs and you get noticeably fewer fines and a cleaner cup. Retention is nearly negligible, and the magnetic cup plus the chute design keep workflow smooth and consistent.
There are frustrations. The ever‑present beeping is impossible to silence. Grinding volume screeches to the point where your early morning brews need to include an apology to your still-sleeping spouse. The packaging is dense polystyrene, which feels like a missed opportunity for a company that wants to be seen as forward thinking in 2025 by going all eco-friendly in their packaging. And if you are someone obsessed with burr swapping, you will be disappointed, because this grinder was not designed for it.
Still, for $650 to $759 USD (before any Trump Taxes applied extra), the F74 is very difficult to dismiss. You are getting control and consistency that normally require much more expensive grinders. That is why the Navigator earns comparisons to high end machines like the Lagom P64 and Zerno Z1. It may not carry boutique branding or furniture grade looks, but in terms of results it belongs in the same conversation.
We will keep running coffee through the Navigator in the coming months, because it is too fun not to. If you already own one, or if you are considering adding it to your home coffee arsenal, let us know what you think in the comments. We are curious to hear if you are grinning at it or cursing at the beeps, and your comments will help shape our upcoming deep dive.
Where to Buy the
Manufacturer Website
Buy from Supplier (US)
Buy from Amazon (US)
Buy here to support CoffeeGeek!
We use affiliate links to a) Amazon, and b) manufacturers only. Any links to vendors (including CoffeeGeek Sponsors) are not income generating links. Further details about our commission and affiliate link policies can be found on our Terms and Conditions Page. The use of any affiliate links have no effect on our editorial policy or review objectivity.
#coffeeGrinder #f74Navigator #firstLook #mhw3bomber #singleDoseGrinder