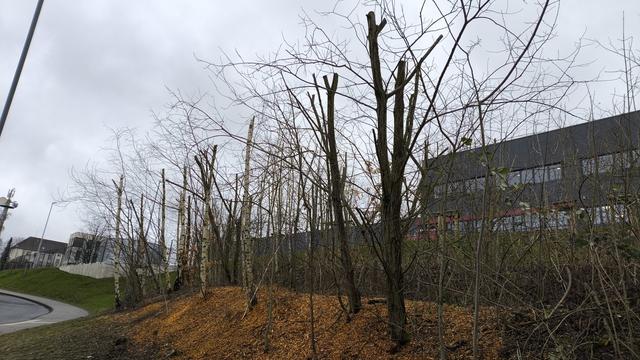
Echt jetzt, #Coroplast?
Wir glauben, #Baumpflege geht in #Wuppertal anders!
I've talked about some of this on Mastodon before, such as creating #coroplast and #blackout material #WindowBlocks to prevent the heat from our long 53°N summer days getting into my unit (circa 2021) or adding thermal window film to reduce heat even more (circa 2025) without simultaneously creating a dark and depressing #bunker-effect for the entire summer.
Doing all of this required various materials, time and of course, money. While all these (and other) mitigations were experiemented with and created/installed over several years, which spread out the up-front cost, the irony is not lost on me that these approaches have culmulatively cost as much as as least two in-window #AirConditoners would. 🙄
9x
Coroplast, bobby pins provide low-cost alternative to Pelican case dividers
Camera bags and cases are where our gear “lives” when it’s not in use.
We count on these cases to hold everything safely rather than just let it roll around banging into each other. I had someone who thought moving my camera gear from one bag to another could be done in a few minutes, just like she just dumps the contents of her purse into a new one.
Frankly, I’m still configuring my bag as time goes by and I try to keep the gear I use most in the most easily accessible parts of the bag. In that case, it’s a matter of moving hook-and-loop style dividers around the bag.
If you use a hard case, similar to Pelican (you can get some decent generic Pelican-style cases at Harbor Freight), you know that the “pluck and pull” foam inserts are great for holding your gear safe and snug — until you get something new and need to reconfigure it.
Pelican offers an alternative in the form of dividers that can be configured to the inside of the case, or even a drawer. But it will set you back close to $200.
There is a way to get around this for far less money.
Tom Buck on YouTube is one of several people showing how to replicate the Pelican dividers using coroplast, adhesive foam sheets and bobby pins.
https://youtu.be/87sSMFX7y9g?si=nuZxl4IAhu40hTQ0
If you remember, I showed you how to make a speedlight grid out of coroplast, taking advantage of the holes in the material to restrict the light. Those same holes will allow you to secure your dividers by inserting the bobby pins between segments.
The foam goes on the outside of the coroplast to provide cushioning for your gear. And the nice thing is, if you need to reconfigure, you’re not going to be out a lot of money.
I’m considering using this approach for a case for my speed lights and triggers. Is this something you would try?
#Coroplast #DIY #PelnicanCase #photography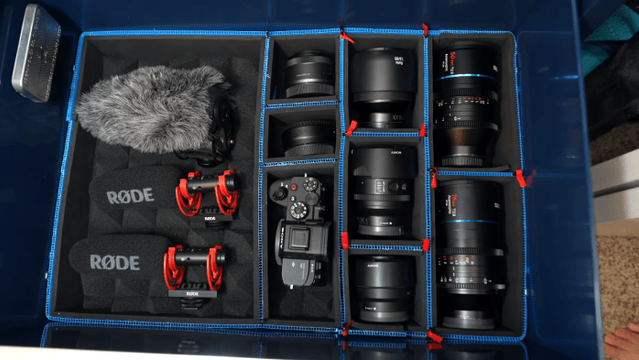
Duct tape is easiest to remove from coroplast (but both masking tape and painters tape work fine) for securing and replacing filters.
Also: having a #coroplast #frame allows for making a custom holder for the top fan regardless of fan size/style.
Been using these for 4 years now and they are excellent.
2/3

Angehängt: 1 Bild +++ Großspenden-Ticker +++ NEU: 55.000 Euro an die #FDP von der Coroplast Fritz Müller GmbH & Co. KG. Dasselbe Unternehmen hatte der #CDU zehn Tage zuvor 100.000 Euro gespendet. https://www.bundestag.de/parlament/praesidium/parteienfinanzierung/fundstellen50000/2024/
How to keep cool in a heat wave with wildfire smoke
An easy and inexpensive DYI step-by-step video tutorial.
We describe a cost-effective way to reduce the heating of your home. The example provided is for skylights, as this is low-hanging fruit but applies to windows.
#Skylights #Cooling #HeatWave #SpaceBlanket #RadiantHeating #Coroplast #ClimateChangeHow #Skylight #Heating #forestfire #smoke #DYI #Tutorial #Video

Bike On Over To The Campground
Like many of us, [Paul] enjoys occasionally hitching up his tow-behind camper and heading out to the wilderness to get away from it all at his favorite campsite. Unlike the vast majority of those who share his passion for the outdoors, though, [Paul] is hitching his camper up to a bicycle. Both the camper and the bike are custom built from the ground up, and this video shows us a little more details on [Paul]'s preferred mode of transportation.
While he is known for building custom vehicles of one sort or another, this latest one is a more traditional bicycle frame that he has modified only slightly to fit a recumbent-style seat and a small gas-powered motor. Even though the motor is decades old, it started right up and gives the power needed to pull the custom camper. [Paul] builds one-person campers like this out of corrugated plastic for durability and light weight, and this one is specifically designed for his size and sleeping style. It includes everything needed for a night under the stars, too, including a stove, storage compartments, and a few windows.
With the bike and camper combined weighing in at just over 200 pounds, the motor can be used as a pedal-assist device thanks to the clever engineering behind a front-wheel-drive pedal system on this bike. With all of that custom fabrication, [Paul] is free to head out to the wilderness without all the encumbrances (and high price) of traditional motor vehicle-based camping. For those curious about some of [Paul]'s other vehicle creations, take a look at this tiny speedboat for one.
#transportationhacks #bicycle #camper #coroplast #fabrication #gas #motor #trailer #transportation #vehicle #welding

3D Printering: Corrugated Plastic for Cheaper & Easier Enclosures
Clear acrylic panels have long been a mainstay of 3D printer enclosure designs, but they can also add significant cost in terms of money, shipping, weight, and hassle. An alternative material worth looking at is corrugated plastic (also known by its trade name coroplast ) which is cheap, light, an excellent insulator, and easy to work with. Many enclosure designs can be refitted to use it instead of acrylic, so let's take a closer look at what it has to offer.
What's Wrong With Acrylic?
It's not just the purchase price that makes acrylic a spendy option. Acrylic is fairly heavy, and shipping pieces the size of enclosure panels can be expensive. Also, cutting acrylic without special tools can be a challenge because it cracks easily if mishandled. Acrylic cuts beautifully in a laser cutter, but most laser cutters accessible to a hobbyist are not big enough to make enclosure-sized panels. If you are stuck with needing to cut acrylic by hand, here are some tips on how to get by with the tools you have.
It is best to source acrylic from a local shop that can also cut it to size with the right tools for a reasonable price, but it is still far from being a cheap material. There's another option: corrugated plastic has quite a few properties that make it worth considering, especially for a hobbyist.
What's Good About Corrugated Plastic?
Most of us know corrugated plastic as the stuff lawn signs are made of. Using it in enclosure design isn't a new idea (here's a printer enclosure made entirely from it, and here is a CNC mill enclosure using it as well) but instead of making an entire enclosure out of it, it can make more sense to use it only as a panel material. There is no need to design a new enclosure from scratch. One can use an existing design and swap the acrylic panels for corrugated plastic ones.
Corrugated plastic, also known as Coroplast.
Corrugated plastic offers quite a few advantages:
It can be easier to source than acrylic sheets, and is certainly much easier to work with. Any sign shop or plastics supplier likely has it on hand in a variety of colors.
There are a few disadvantages, however.
Corrugated plastic material being 4 mm thick instead of 3 mm means it is not necessarily a drop-in replacement for acrylic in existing designs. But not every enclosure is constrained by panel thickness.
Using Corrugated Plastic in Enclosures
The two easiest ways to use this material are: create an enclosure by adding panels to an existing structure, or use an existing design but replace the acrylic with corrugated plastic. Below are examples of both.
Make an Enclosure From an Existing Structure
Here is an enclosure I built into a metal IKEA BROR shelving unit, and it easily houses a Prusa Mini 3D printer. The BROR is made from angled metal pieces that contain regularly spaced holes. This makes it very convenient to turn a shelf section into an enclosure just by mounting a few side panels; the regular shelf surfaces provide a top and bottom.
Not only do corrugated plastic panels fit easily behind the angled metal posts, but a few short screws through the convenient holes is all it takes to fully secure them. Windows can be made by cutting a hole, and gluing or taping a clear plastic sheet to one or both sides. CA glue and most other adhesives work fine on corrugated plastic.
The only inconvenience I encountered was when it came to fashioning a door for the front. Instead of making cabinet-style doors with hinges, I took advantage of the lightweight nature of the material to create a simple removable cover. The shelf frame is steel, so I glued several strong magnets into a separate sheet to create a magnetically-attached removable front cover. I can close the front up completely, or leave a gap for airflow as needed. The result is simple, attractive, and cost very little apart from the shelf itself.
Replace the Acrylic in an Existing Enclosure Design
The only problem with refitting an existing enclosure designed for 3 mm acrylic sheets is that 4 mm corrugated plastic may not fit because they are slightly thicker. While it's always possible to simply cut and peel away material until it fits, for best results, panel-retaining parts should be redesigned to accommodate the thicker material.
For example, I like the Prusa V2 LACK enclosure design and its 3D-printed parts, but the next time I build one I will use corrugated plastic panels instead of acrylic. In preparation for this, I have redesigned the necessary parts to accept 4 mm thick material.
Fortunately, Prusa provides not only STL files for their design, but also the CAD files. While it is possible to modify parts that exist only as STL files, in general having access to CAD format files makes this kind of task much easier.
An Under-Represented Material
For 3D printers, enclosure design is still a problem that isn't entirely solved. "Soft" enclosure options like photo tents or fabric grow boxes meant for plants are an option for the cost-conscious, but there are also ways to reduce the cost of more traditional designs. Corrugated plastic offers a lot of advantages in that regard.
The idea of using corrugated plastic in enclosures isn't new, but it does seem under-represented. Do you know of enclosures that make effective or particularly clever use of it, or do you have any tips of your own? We definitely want to hear about it, so share your thoughts in the comments.
#3dprinterhacks #featured #hackadaycolumns #3dprintering #cnc #coroplast #corrugatedplastic #enclosure

