Speedlights for photography.

When I started out on this semi-professional photography journey I purchased a Godox TT685ii-N and I've been really pleased with its performance.

I always had it in mind to buy a second speedlight to allow two-light portrait setups but I thought I would go better than the TT685ii.

Looking at the downsides of that speedlight:

  • Use of AA size batteries
  • No battery level indicator

I decided that the Godox V860iii-N would be a good bet. In most aspects its specification is identical to the TT685ii but it employs a Li-Ion battery (and advertises more shots per charge and a faster recharge time) while having a battery level indicator.

I expect the V860iii to replace the TT685ii in general usage and the latter will become my secondary/spare light source.

#photography #speedlights #godox

Big Studio Results with SPEEDLIGHTS

ISO1200 is a photography blog. Learn with the best photographers & filmmakers about lighting, strobes, cameras,DLRS. Tips & tricks photograph.

Photography Blog Tips - ISO 1200 Magazine
Today’s informal headshot shoot went well. I had a chance to get setup and do a few test shots before ‘Go Time’ which helped to settle the nerves!
#OlympusPhotography #OM1 #Portrait #Photography #SpeedLights

I’ve agreed to do a headshot photoshoot for all the leaders and staff people at my local church this Sunday.

It’s not the kind of photos I usually make, but it’s not too far beyond what I’ve done before. It’s always fun and energizing for me to push a bit beyond my ‘usual’ photography.

Spent this evening checking over my soft box, and re-learning wireless flash.

My wife has kindly agreed to be my model tomorrow so I can get some direct practice!

#Photography #SpeedLights

When I'm shooting in the studio I frequently use six or more lights. For a long time I relied on Cactus RF-60 lights and a V6 trigger, but now they've all died and I'm using Godox. But with seven lights in the arsenal, I needed to use two triggers at the same time. But how?

This is how. 😊

https://nfgphoto.com/blog/hotshoe-splitter-for-multiple-flash-triggers/

#godox #cactusimage #speedlights #offcameraflash

Hotshoe Splitter for Multiple Flash Triggers – NFGphoto

Speed alert sign. No traffic on the road. I am standing still in front of the sign, and it says I am 34, 4 over the speed limit. #speedlights #speedlimits #driving
Camtraptions Launches Solar Panel for Camera Trap Speedlights

Allows strobes to remain operating in the field "indefinitely."

PetaPixel
Profoto Launches Magnetic Octa Softbox for A and C-Series Strobes

Designed to be quick and easy to deploy.

PetaPixel

How to Shoot Clean Glassware with Speedlights on a Black Background

In this tutorial, we share our lighting setup for a piece of glass stemware using minimal gear. To mimic this shot, you will need a black background, stripboxes, and speedlights.

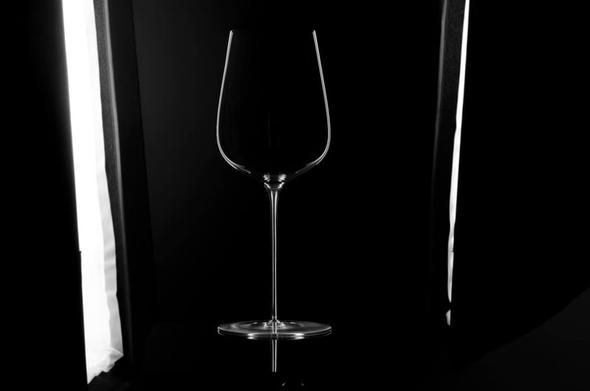
We start by using two strip boxes (8-inch by 36-inch) to modify our speedlights. Stripboxes help shape the light into a tall vertical face, which will help us precisely illuminate the parts of the glass we want to be defined.

The most important aspect of catalog photography is accurately conveying the product to the viewer. By placing the stripboxes symmetrically behind the glassware, facing inward, we can create stark highlights down the stem, revealing the shape and flattering the glassware.

To get a more 3D look, we can use a single stripbox to illuminate the glass edge, allowing us to prioritize the second light on the front of the wine glass bowl. By placing a highlight on the bowl, we can give the viewers a sense of three-dimensional space, and better convey the material finish of the glass. By adding a gradient (with the addition of a cheap nylon diffuser panel) we flatter the glassware even further, complimented by the reverse reflection symmetrically opposite it.

In post-production, we have a few options at our disposal when dealing with a symmetrical piece of glassware. For example, if there is a particular area that is unflattering due to the asymmetrical lighting approach, we can flip the lighting from the alternative side using a feathered mask in Photoshop. Additionally, we can introduce lighting from additional exposures like base or rim lights which we may not want to have firing during main exposures, to avoid accidental reflections in the glass.

By taking a bit of time to move striplights around a room, light placement to flatter certain areas of the glassware becomes intuitive. Whether you’re lighting glassware for a white or black background the most important aspects are accurately conveying the edges of the glassware, while managing to flatter it within a flat canvas.

_About the author: Dustin Dolby from workphlo, is a Canadian product photographer and educator on YouTube. You can find more tutorial’s on Dustin’s workphlo YouTube Channel or Skillshare, and purchase their custom light stand attachments on the workphlo online shop. _

#educational #tips #tutorials #blackbackground #dustindolby #education #glassware #howto #lighting #setup #simple #speedlights #stripbox #tutorial

How to Shoot Clean Glassware with Speedlights on a Black Background

A simple technique to create stunning results.

Does your flash distance really matter? - DIY Photography

If you’re new to studio flash photography, you may be a little confused about how everything works. The types, sizes, and shapes of light modifiers, the light’s placement and distance from the subject… There’s a lot to learn, and in this article, we’ll focus on the distance of the flash from your subject. Does it […]