A Diamond In The Rough? How A Plan For A Full-Spectrum Conversion Went Astray

I’ve been doing a fair bit of film photography just lately. There’s a new Shitty Camera Challenge coming up in June, and my participation in the Frugal Film Project with the Rapid format Welta Penti II led me down a Rapid film system rabbit hole that I don’t think I’ll ever escape from. But there’s always a technique that’s near and dear to my heart, making digital aerochromes, and sometimes the desire to produce a digital aerochrome can be quite overpowering. 

If you’re not aware, ‘back in the day’ Kodak made a colour infrared film stock called Aerochrome. It would produce the most amazing looking infrared images where vegetation, which normally comes out white with black and white infrared films, would appear shades of a lovely rich red. Sadly, I never got to use Aerochrome, and Kodak withdrew the emulsion in around 2009. However, there is an alternative. 

Originally developed (no pun intended) for use with black and white infrared film, Joshua Bird devised a method that mimics the look of Aerochrome film. Using green, red, and infrared filters, Bird made an infrared ‘trichrome’ that really is a good reproduction of Kodak’s old film stock. Of course,  I’m not really in a position to use black and white film, and I’m impatient, so I came up with a solution that uses Joshua Bird’s technique with digital cameras. 

The slight snag is that the best digital cameras to use with this technique are older CCD sensor cameras, and not the CMOS sensor cameras of today. Fortunately, there are plenty of old point and shot cameras around, and here in Portugal an excellent source of cheap digicams is the Computer Exchange (CEX) website. In addition to specific models, they sometimes offer ‘generic’ digital cameras for just a few Euros, and whenever one appears on the website I am tempted to buy it. After all, the most I’ve paid is about 5€ and with postage I can get a working digicam for less than the price of a pint in the UK. What can go wrong?

Of course, you don’t actually know what you are going to get, as apart from the resolution of the camera in the description the rest of the website entry is also generic, even the image of the camera. That said, of the several ‘generic’ cameras that I have bought from CEX they’ve mostly been from reputable manufacturers, there’s never been a fake Canon or Nikon, and sometimes I’ve received a real gem, like the Samsung Digimax U-CA3 that cost the princely sum of 1€ and produces the most wonderful digital aerochromes. 

So I had this urge to pick up a cheap digital camera and convert it to full-spectrum so that I can make some digital aerochromes. This involves taking the camera apart and removing the infrared cut filter that is fitted over the sensor.  You can always use an uncovered camera, especially ftom the noughties when the cut filters weren’t as efficient as they are nowadays, but removing the filter is always better,  and besides it means that you can take infrared images hand-held.

Anyhow, last weekend a 7MP ‘generic’ digital camera appeared on the CEX website for 4€, and yesterday the doorbell rang. It was the postman with a small envelope from CTT (the Portuguese postal service). Bringing the pack inside, I was completely surprised with what I found: a Beautiful little Sony CyberShot W17 in its faux leather case. OK, it’s a little like a brick in its design, but I knew instantly that there was no way that I could bring myself to tear this one open to remove the cut filter.

First introduced by Sony in 2005, The Sony CyberShot W17 is a 7.2MP digital compact camera with a 7.9-23.7mm Carl Zeiss Vario-Tessar lens. It has various automatic exposure modes, but can also be used manually, although I haven’t figured out how to do that yet. In the early noughties, camera manufacturers hadn’t standardised on the memory storage system,  and Sony was no exception. The W17 uses the Sony Memory Stick, a proprietary storage format that uses a long, thin plastic card. These are not that easy to get a hold of nowadays,  but fortunately, this camera included a 256MB Memory Stick Pro (a shorter version of the Memory Stick) and a Memory Stick adapter. I couldn’t actually believe my luck, as often as not these are all stripped out of the devices and sold separately. 

As well as a few normal shots in colour, I set the mode to black and white and took some images with colour and infrared filters to make a digital aerochrome. Back home, I downloaded the images from the memory stick onto my laptop and fired up GuIMP photo editor. Immediately I could see that the infrared response of the sensor was really good. My method for making digital aerochromes, from the article by Joshua Bird, used the digital images taken with infrared, red and green filters. The images were layered as red, green and blue layers, respectively. The blending mode for the red and green layers was set to addition and the results were spectacular! With beautiful pastel red vegetation and natural looking buildings and sky.

All in all, the Sony CyberShot W17 is a lovely little camera. The results are clean, if nothing special, but the infrared response was delightful. I’m definitely not going to modify this one for full-spectrum, though, so it looks like my search for a cheap noughties point and shoot camera just for conversion will have to wait a while.

If you are on Mastodon, you can now follow this blog directly. Just go to Mastodon and follow the ‘Snapshot’ WordPress account at @keithdevereux.wordpress.com. All new posts will be automatically updated to your timeline.

#Aerochrome #Camera #CyberShot #Digicam #Digitalcamera #Photography #Retro #Shittydigital #Sony #Urban #Vintage

The Holga 25mm Lens For Micro Four Thirds Mirrorless Cameras

When I got my first micro four-thirds mirrorless camera, an Olympus Pen E-PL1 with broken image stabilization, it wasn’t to use with ‘real’ lenses but to use with a cheap kit of plastic lenses, the Lomography Experimental Lens Kit. Since then I’ve added several more E-P series cameras to my collection, and now have a whole range of different lenses, including the amazing Panasonic Lumix GF1 camera and it’s now-dedicated 20mm f1.7 lens. 

But one lens I’ve always wanted was a Holga, for micro four-thirds. The snag is that these are quite rare nowadays, and no matter how hard I searched, I have never found one. Until now, that is. Of course, it was in the ‘Not Passed’ category of the Kamerastore website, with, ‘flaws that will affect typical use’. But since this was just that the ‘focus mechanism is stiff and difficult to use’, and it was otherwise functional, at 15€ it seemed like a bargain. 

The Holga 25mm lens is a fixed f8 aperture lens with a manual focus. It’s all plastic and has a plastic aperture hole surrounded by a halo of even smaller holes. I think that this is to give the images the ‘Holga look’ with an obvious vignette. Fitting the lens to the camera is simple enough, and from the front the Olympus looks just like a slightly posh Holga. The camera is best used in aperture priority mode, and like its film equivalent the lens is quite light hungry, so an ISO of at least 400 is recommended if you want a reasonably fast shutter speed.

I mounted this onto the E-PL2 and headed out on a trip to Aveiro. I wasn’t really too interested in the subject matter, and it definitely shows from the resulting photos. Yes, the focusing is really stiff, but it’s smooth and with a firm twist moves quite well. It certainly seems easier to use than the model featured on a Fotodiox video on YouTube. There are actually a few variations of this lens available. The Fotodiox video featured a Holga lens for Panasonic micro four-thirds cameras (although that one was used on an Olympus), but my model is labelled for use with Olympus Pen micro four-thirds cameras.  I don’t really think it makes much of a difference,  though.

But what of the images? I think ‘soft’ is the best description. I didn’t really play with different focus distances, just left it on the mountains (which I guess is infinity) and snapped away. I did like most of the images, and the vignette is certainly pronounced. Oddly, this lens seemed to perform much worse than my actual real Holga camera for 120 film, which has hardly any vignette and is a camera I really love. But then again, perhaps quality was the last thing on the minds of the Holga lens developers at the time.

I’m definitely taking the Holga lens for micro four-thirds out again. In fact, we went out to Nazaré a couple of days later and I took my ‘proper’ Olympus mirrorless camera and lenses with me. It turned out that I hardly used them, and I really missed the Holga lens. Next time, maybe.

If you are on Mastodon, you can now follow this blog directly. Just go to Mastodon and follow my WordPress account at @keithdevereux.wordpress.com. All new posts will be automatically updated to your timeline on Mastodon.

#Digital #Experimental #Holga #Microfourthirds #Olympus #Plastic #Shittydigital

Three Cameras from 2024: My favourite experiences this year

A couple of years ago, with the encouragement of Stephen Dowling of Kosmo Photo, a group of camera bloggers were asked to write about three cameras they had discovered that particular year and what each one meant to them. That was a really good idea, I thought, I’m always picking up something new and it’s interesting to take a quick look back at the fun I’ve had over the year. So again I present you with the three cameras that I have most enjoyed using during 2024.
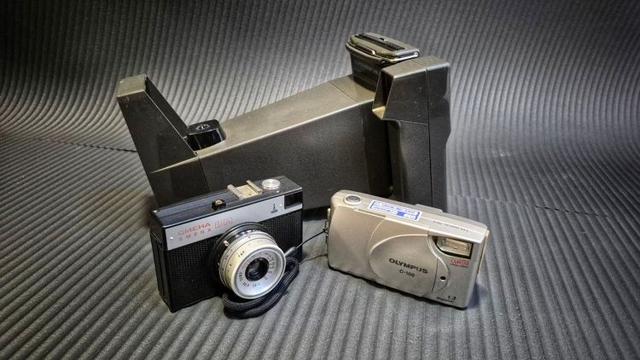
The Lomo Smena 8M 

It seems to me that the Lomo Smena 8M is like Marmite, you either love it or hate it. It does have some little foibles, like the lever that cocks the shutter which hits your finger if the camera is held wrong and ruins the exposure, or the difficulty of turning the rewind knob, and it of course it’s unusual in not having a fixed take-up spool, but I’m firmly in the ‘I love it’ camp. I had bought one because it has a really well-regarded lens, the classic Triplet T-43 4/40, which I have seen converted to use with micro four-thirds mirrorless cameras. I thought at the time that if the camera was a dud I could alway take off the lens and use it with a digital camera. In the event, the Smena 8M is fantastic and I’m never going to fiddle with it. After a few rolls, the Smena 8M has rapidly become my favourite 35mm camera. 

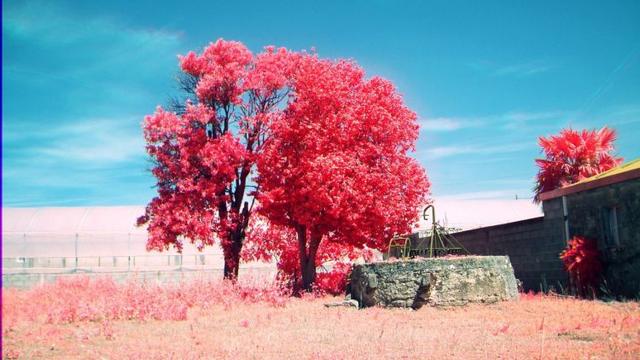
The resolution of the lens is fabulous, for such a cheap-looking camera, providing lovely sharp images so long as you get the zone focusing right (which is always my biggest failing). For me it is perfect for experimentation, and when I chose to make my first roll of redscale film, using Harman Phoenix, the Smena 8M was the camera I immediately turned to. And I must say I was delighted with the results. 

The Polaroid Big Shot 

I first became aware of the Big Shot some time in 2022, when the Shitty Camera Challenge was promoting its Autumn challenge, Instant Regret. At the same time I learned of its connection with the artist Andy Warhol, who used a Big Shot extensively in his work. Originally this was a $20 camera launched by Polaroid in 1971, and it was only produced for two years before being withdrawn from sale. The story goes that Andy Warhol bought a bulk load of Big Shots so that he could continue using his beloved camera after its demise.

With a single shutter speed of 1/50s, and a focal distance limited to about 1m, the Big Shot was an unusual beast in that it was designed for one job, taking portraits. The Type 100 pack film that the Big Shot uses was withdrawn by Polaroid in the mid-2000s, and it’s Fuji equivalent in 2016, so if you want to take photographs with the Big Shot then you’ve got to be a little bit creative. I’ve made some nice plastic mounts for the Big Shot, which takes one piece of Instax Wide film. It’s not exactly practical, being limited to one exposure at a time, but I’m thrilled to have brought such a classic camera back to life.

The Olympus Camedia C-100

For a long time I’ve wanted to get my hands on a glitchy camera, one that’s working but the sensor is way past its prime. I found the Camedia C-100 in a camera shop in Porto in their ‘Outlet’ section. These are cameras that fall short of being in good enough condition to sell at normal retail prices so are offered with the caveat that: ‘Outlet products are sold as damaged for parts or decoration without warranty or return’.

The sensor in the C-100 is failing, and I reckon that it’s overexposing by around 10 stops. I’ve invested in a cheap ND2-400 variable ND filter, and on its maximum setting the results are quite ‘good’. In really low light there’s no need for an ND filter, and on a tripod with colour and infrared filters the results are amazing. The Camedia produced some lovely digital aerochromes, and I even had a little fun with some trichromes and Intentional Camera Movement. 

Honourable Mention: The Panasonic Lumix GF1 (with Panasonic 20mm f1.7 pancake lens)

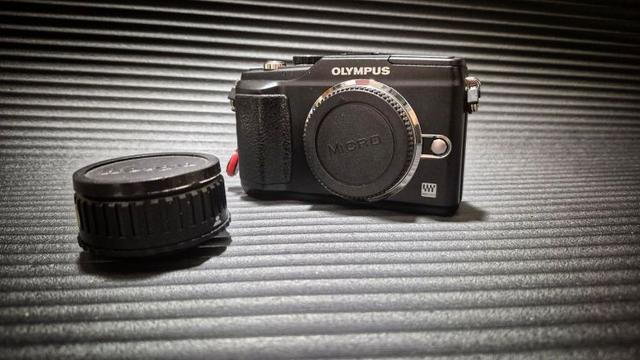
This is actually a late entry to my favourite cameras of the year as I’ve only had this combination for a couple of weeks and I’ve not really used it to its best. A while ago I picked up a Panasonic Lumix GF1 micro four-thirds mirrorless camera. I was actually looking for a used Ricoh GRiii, but this camera was one-tenth of the price and it has a really good reputation, even 15 years after its release. Besides, I thought, it would go nicely with my other Olympus Pen series mirrorless cameras. 

Although it will take any micro four-thirds lens, the one that I really wanted for this camera was the Panasonic 20mm f1.7 pancake lens. The biggest snag was the price. Even in poor condition, the 20mm f1.7 goes for well over €150 and that was just far too much for me. However, I found one on the Kamerastore website for less than half the price. It was in the ‘Not Passed’ category, since ‘the aperture mechanism doesn’t work properly’, read the description, ‘it randomly selects aperture instead [of] the one chosen by [the] user’. 

When the lens arrived I mounted it onto the Panasonic Lumix GF1 and it clicked securely into place. I reckoned a walk around the block would test the lens and so I took several images, on Program mode, Aperture priority mode, and Shutter priority mode … and I couldn’t tell which was which,  the lens behaved perfectly. I even tried a few close up images, and the blurred background at the widest aperture was, frankly, spectacular. Actually, all of the images were spectacular and this camera and lens combination is hard to beat. Now I’m smitten, and the Panasonic GF1 and 20mm f1.7 lens combination will be a permanent arrangement. Hopefully next year I’ll get to see more of what it can do.

So these are the cameras I have most enjoyed using during the year. If you are reading this and fancy entering your own three cameras, please go ahead, and if you could add a link to this post, that would be awesome, and I’ll try to update the post with each entry as I find them.

Have a good year and see you in 2025.

If you are on Mastodon, you can now follow this blog directly. Just go to Mastodon and follow the ‘Snapshot’ WordPress account at @keithdevereux.wordpress.com. All new posts will be automatically updated to your timeline.

#Abstract #BigShot #Camedia #Film #Glitch #Glitchy #ICM #Instant #Instax #Shittydigital #Smena8M #Vintage #YearInReview

The Kodak Easyshare Z710, a 7MP noughties digicam

It’s been a while since I picked up a ‘generic’ camera from the CEX website, but last week they were advertising a ‘generic 7MP camera’ for 4€. I like these as you are never quite sure what you are going to get and for a few Euros the outlay is minimal. This time it turned out to be a Kodak Easyshare Z710 digicam from 2006. 

The Kodak Easyshare Z710 is a general point and shoot camera with a 7.1MP CCD sensor and a 38-380mm zoom lens. This 10x zoom was one of its selling points at the time, alongside the Easyshare brand, which meant you could share images straight to a computer with either the USB connection or an optional docking station. The camera has 32MB of internal memory, enough for about 10 images, and although there is a slot for an SD cards use was described as ‘optional’. Fortunately the camera will read my 2GB SD cards so downloading images is not a problem. 

As usual,with all new cameras I took the Z710 across the road to test it with my favourite tree and well. The colour images were competent enough, nothing special, but let’s face it, this is a basic point and shoot camera. Then I brought out the colour filters to make a trichrome and the 720nm infrared filter to see what the infrared response was like.

I took one colour photograph with the infrared filter and then set the camera to black and white so that I could make some trichromes. It was a bit fiddly to find tge right options in the menu, but I took photographs with red, green, blue and the 720nm Infrared filter. Back home I loaded the images into GuIMP and using the infrared, red, and green filtered images (for red, green and blue layers, respectively) made a digital aerodrome.

I also took the colour infrared image and channel swapped the red and blue channels. Often this can be ‘hit-or-miss’ but this time the channel-swapped photograph came out really well. Mind you, the infrared photographs were full of noise.

On the whole I was really happy with how this camera performed, especially on the tree, where the afternoon autumn sun was behind me. With the shed in the field the sun was to one side, so the light was not ideal, but the aerochrome and channel swapped infrared image came out well. I don’t think this is a special camera, by any stretch, but for €, what’s not to like?

If you are on Mastodon, you can now follow this blog directly. Just go to Mastodon and follow the ‘Snapshot’ WordPress account at @keithdevereux.wordpress.com. All new posts will be automatically updated to your timeline.

#Aerochrome #Digicam #Digitalcamera #Kodak #Photography #Retro #Shittycamerachallenge #Shittydigital #TrichromeEverything #Vintage

Starting the beginning of July there’ll be a new Shitty Camera Challenge and I’ve been thinking about what I might do this time around. I have a couple of ideas, but just lately I’m really enjoying experimenting with a new to me camera, the Canon Powershot G12. The snag is that at 10MP the G12 is not Shitty Camera compliant, and even if it was the camera is just too darn good to use in the Challenge, so I felt that I needed a backup. Something that behaves just like the Powershot G12 but with half of the pixels.

And that’s where the Powershot G5 comes in. Originally I found a slightly flakey G5 from the Kamerastore website and then a second one came from the CEX website, advertised as a ‘generic’ camera but in beautiful condition, for the princely sum of 3€. The PowerShot G5 was the fourth in the G series of digital cameras, introduced by Canon in 2003. It seems to me that ergonomic design was not at the forefront of the designers’ minds when they made the Powershot G5 as the best way to describe its look is, ‘la brick’. With a 5MP CCD sensor, it features a 4x zoom, an optical viewfinder and a swivelling colour LCD screen. Images are stored on CompactFlash cards, since during the noughties every camera manufacturer seemed to have their own medium for storing photographs.

So I thought it might be a good idea to remind myself how these G5s perform. The G5 from the CEX website was in pristine condition when it arrived, although the battery was not the original Canon battery. On the other hand, the Kamerastore G5 was in slightly worse condition, described as ‘glitchy’ with a flickering LCD screen, but otherwise working fine. I knew that they both performed well in natural colour, and black and white, but when I tried to make trichromes and digital aerochromes the Kamerstore G5 gave a decidedly strange response.

On consecutive days I took the G5s across the road to my favourite tree and well and around the block in tge woods gehind the house and put them through their paces. With the cameras in programme (P) mode and the ISO set to its lowest setting (50), in colour mode I took one natural colour image and then a second image with the infrared filter for red/blue channel mixing. I then set the G5s to monochrome mode, to one image without a filter and then subsequent images with red, green, blue, and infrared filters to make trichromes and digital aerochromes. Back at home I used GuIMP photo editor to red/blue channel mix the colour infrared image and made trichromes from the red, green, and blue filter images. TO make the digital aerochromes I used the infrared, red, and green filter images for the red, green and blue laters, respectively. Blend mode between layers was set to ‘addition’.

The results were fabulous. There was no sign of the strange results from my first experiment and both G5s behaved admirably. I also tried a few infrared channel swapping images and these worked too. Though I have to G5s to chose from with the Shitty Camera Challenge I think I’ll start with the older ‘glitchy’ Powershot G5 and use the Canon LA-DC58B lens filter adapter, which is a little plastic gizmo that fits to the front of the lens of the G5 and allows the use of 58mm circular filters.

If you are on Mastodon, you can now follow this blog directly. Just go to Mastodon and follow the ‘Snapshot’ WordPress account at @keithdevereux.wordpress.com. All new posts will be automatically updated to your timeline.

https://keithdevereux.wordpress.com/2024/07/14/getting-ready-for-the-next-shittycamerachallenge-with-the-canon-powershot-g5/

#Aerochrome #Canon #Digicam #Powershot #Shittycamerachallenge #Shittydigital #Tree #Trichrome #TrichromeEverything

Getting ready for the next #ShittyCameraChallenge with the Canon Powershot G5

Starting the beginning of July there’ll be a new Shitty Camera Challenge and I’ve been thinking about what I might do this time around. I have a couple of ideas, but just lately I&#8217…

/ˈsnæp.ʃɒt/

Finally I got my hands on a real glitchy camera, with a sensor well past its prime, the Olympus Camedia C-100, a 1.3-megapixel fixed-focus digicam released by Olympus in 2001. I reckon the camera is overexposing by around 10 stops, and normal daylight images are completely blown out, but I have a cheap variable ND filter, that on its maximum setting produces much more ‘natural’ images.

Of course, what I like to do with most new (to me) noughties digicams is see how they work for making trichromes, and what their infrared response is to make digital aerochromes. So off I went ‘around the block’ to the woods behind our house armed with my trusty travel tripod, the Camedia C-100 and a collection of filters, including the variable ND filter. 

The snag with this camera is that it doesn’t have a black and white mode, although you can desaturate a colour image through the menus. So what I did was to screw the Neewer variable ND filter to each of the red, green and blue filters and take the photographs through this. Because the 720nm infrared filter already has about a 10-stop filter factor I just used the filter on its own, and thus seemed to work. Of course, with the sliding cover I couldn’t fix the filters to the front of the lens so had to hold them in front of the camera, so this was prone to some light leaks.

On the whole it worked a treat. The failing sensor produced quite pale images, even with the combined ND/colour filter arrangement, but when the images were combined together in GuIMP photo editor produced some lovely ‘painterly’ results. When making the RGB composites in GuIMP I first desaturated the colour images and then chose the colour levels for the red, green and blue layers. 

If you are on Mastodon, you can now follow this blog directly. Just go to Mastodon and follow the ‘Snapshot’ WordPress account at @keithdevereux.wordpress.com. All new posts will be automatically updated to your timeline.

https://keithdevereux.wordpress.com/2024/07/02/the-shittycamerachallenge-trichromes-aerochromes-and-more-with-the-olympus-camedia-c-100/

#Abstract #Aerochrome #Digicam #Digitalcamera #Glitch #Glitchy #ICM #IntentionalCameraMovement #NeutralDensity #Sensor #Shittycamerachallenge #Shittydigital #Trees #TrichromeEverything #Camedia #Olympus

The #ShittyCameraChallenge: Trichromes, Aerochromes and more with the Olympus Camedia C-100

Finally I got my hands on a real glitchy camera, with a sensor well past its prime, the Olympus Camedia C-100, a 1.3-megapixel fixed-focus digicam released by Olympus in 2001. I reckon the camera i…

/ˈsnæp.ʃɒt/

I like the Powershot G-series cameras. I have a few of the A-series cameras, which were the consumer versions compared to the higher specification ‘G’ cameras, but I always try and nab a G series PowerShot when they come around. I already have the brick-like PowerShot G5 (actually two, since I picked one up from the CEX website as a ‘generic’ digital camera) and the PowerShot G12, which was supposed to be glitchy but is presently my take anywhere camera.

So when I spotted a Canon Powershot G6 on the Kamerastore website I had to add it to my collection. Of course it was in the ‘Not Passed’ category, with ‘flaws that will affect typical use’. In this case, the ‘rear screen occasionally flickers and does not always work properly. The top screen has some bleed, but everything is still visible. Otherwise [it is] working normally.’

The Canon PowerShot G6 is a digital point-and-shoot camera released by Canon in 2004. The G6 has a 7.1MP CCD sensor and like most of the early G-series cameras saves images to CompactFlash cards. The normal minimum focus distance is 0.5m but it also has a 5cm super macro mode that I am keen to try. It has a sleeker appearance than the brick-like PowerShot G5 and it looks more like it’s smaller A-series brethren like the Powershot A720. It’s  still big and bulky like the G5, though. 

When the camera arrived, the first thing I had to do was charge the battery. Fortunately this one came with a charger and a few other cables, so it wasn’t a case of needing my trusty universal charger. After charging the camera it powered up nicely and it was time for a sojourn across the road with my little collection of filters to my favourite tree and well for a quick test and to seè what it’s infrared response was like.

The normal colour palette came out quite nice and natural, but nobody is interested in that. Juggling the menus to black and white mode was really easy, as all Canon cameras of the time, and even today, have retained a similar menu structure. I took monochrome images with the red, green, and blue filters and then colour and black and white infrared images to make aerodromes and to try some channel mixing. Trichromes and aerochromes were made using GuIMP photo editor.

The infrared response was not bad at all, on program mode the exposure was about 1s and the images came out quite nicely. Trichromes were a little muted, but nice and natural looking and the aerochromes were nice, but nothing special (imagine that, me saying that aerochromes from a camera were, ‘meh’). But what I really liked was the results from the channel mixing. Well, one of them.

Channel mixing for me has always been a bit ‘hit-and-miss’, and the PowerShot G6 is no exception. What I’ve always done is to take an image with the camera set on ‘normal’ colour mode with an infrared filter and then use that as my starting point. Actually, I think my biggest mistake is not setting a custom white balance before I take the shot, so it’s likely this that creates such variable results.

Once the file is in GuIMP I set an auto white balance and then open the channel mixing tab. There, in the red channel I set the red setting to 0 and the blue setting to 1, and in the blue channel I set the blue channel to 0 and the red channel to 1. 

Normally the channel mixed files come out with a distinct blue tinge, as in the first image of my favourite tree and well, which I’ve only included because of the edges where I clearly didn’t hold the infrared filter properly over the lens, but the second image came out really lovely, almost like a digital aerochrome. 

I’m not sure exactly why this worked like this. With the first image, of the tree, the sun was behind me, directly on the subject. But with the second image, of the field, the sun was to the subjects left, shining more from the side. Perhaps this made the difference, but who knows? But I certainly liked it.

If you are on Mastodon, you can now follow this blog directly. Just go to Mastodon and follow the ‘Snapshot’ WordPress account at @keithdevereux.wordpress.com. All new posts will be automatically updated to your timeline.

https://keithdevereux.wordpress.com/2024/09/01/filling-in-the-gaps-the-canon-powershot-g6/

#Camera #Canon #Digicam #Digitalcamera #Powershot #Retro #Shittydigital #TrichromeEverything #Vintage #photography #URBAN

Filling in the Gaps: The Canon PowerShot G6

I like the Powershot G-series cameras. I have a few of the A-series cameras, which were the consumer versions compared to the higher specification ‘G’ cameras, but I always try and nab …

/ˈsnæp.ʃɒt/
About two years ago I spotted a 'new' to me (originally from around 2011) tag by the Portuguese street artist Dalaiama on a junction box in Alfarim. Finally, yesterday I had the chance to capture it for the #ShittyCameraChallenge
#Graffiti, #StreetArt, #Dalaiama, #ShittyDigital, #SummerInMeco,

I’ve mentioned before about getting my hands on a glitchy camera, you know, one that’s working but the sensor is way past its prime. I had the Vivitar Vivicam, but that failed on me last year, and I have the kiddies circuit-bent camera from Freedom Enterprise, which is ideal but is not ‘naturally’ glitchy. Then, in the last few weeks was the supposedly glitchy Canon Powershot G12, which has been anything but glitchy so far (though I live in hope) and has almost become my take anywhere camera. But so far I’ve failed to find a really naturally glitchy camera. Then, a few days ago, that all changed.

I was randomly surfing the web, checking out the Kamerastore website and a few other places for nothing in particular, when I visited the Cano Amarelo website. Cano Amarelo is a shop in Porto run by Nuno, a lovely guy from whom I have got a lot of my old film cameras. Just lately, Cano Amarelo has Ben offering sub-standard cameras in an ‘Outlet’ section. These are cameras that fall short of being in condition to sell at normal retail prices so are offered with the caveat that: ‘Outlet products are sold as damaged for parts or decoration without warranty or return’.

There among the Outlet cameras, in fact it was first on the list, was this wonderful little Olympus Camedia C-100 digital. Normally I would pass this one by, I have more than enough noughties digicams and I prefer to get ‘generic’ cameras from the CEX website, which can sometimes be a treasure trove, but I paused and clicked on the entry and looked at the sample images (Nuno always posts some photos taken with the cameras on sale, which is really helpful) and froze. The interior images were wonderful, the colours were distorted and there was a glow to the image that I wasn’t sure was because of haze in the lens or just the sensor failing.

The exterior image was something else completely, and it’s hard to describe without actually seeing one. There was certainly something there, but it was almost impossible to make out. Of course, I was smitten and placed the order straight away. Well  not straight away, first I contacted Nuno to see whether he had a SmartMedia card available. I have a couple, but I wanted one to go with this camera, and even though the SmartMedia card cost twice as much as the camera, it was worth it.

Before we go on, here’s a little bit of background about the Olympus Camedia C-100 E-10 SLR. The C-100 is a 1.3-megapixel CCD sensor and a fixed-focus lens released by Olympus in 2001. There’s no zoom function, although there is a digital zoom which no one should ever be using, and it’s fully automatic which means there are next to no changes you can make to the image you are taking, like monochrome mode for my beloved aerochromes. It literally is ‘point-and-shoot’. With four AA batteries installed it’s a heavy beastie, and the sliding lens cover means that I can’t fix a filter thread to the camera, so if I ever want to make trichromes or aerochromes (I do! I do!) then I’ll have to hold these over the front of the lens.

The C-100 uses SmartMedia storage cards to save images, so of course in addition to  SD cards, and CompactFlash cards you’ll need to add some of these to your collection of noughties storage devices. There are no options to change the style of image that you are taking, but you can navigate the rather clunky-looking early twenty-first century menu to transform full colour images to sepia or black and white. I’ve not tried this yet to see if it will make a copy of the image file or if you’ll lose your ‘carefully crafted’ colour original. 

So, as mentioned earlier the sensor is failing (I had another ‘f-word in mind, but we’ll keep it civil) and I reckon that it’s overexposing by around 10 stops. I’ve invested in a cheap Neewer ND2-400 variable ND filter for some intentional camera movement (ICM) with my Powershot cameras, so it seemed like a good idea to use that filter with the C-100 and see what happens. And it works! The vastly overblown natural image is made much more legible holding the variable ND filter on its maximum setting over the lens. It’s still a little overexposed on bright sunny days, but in overcast weather or in shadow the results are quite ‘good’.

Indoors, the C-100 behaves like any ‘normal’ camera, though you can take photos in hand-held in low light. In really low light it’s also good for intentional camera movement by waving the camera around erratically during exposure — there’s no need for an ND filter here. The images are also really hazy and have a glow about them. I’m not sure whether this is because of haze in the lens or just a ‘feature’ of the failing sensor, but it’s certainly a bonus with this already amazing camera (‘amazing’ for all the wrong reasons, of course).

If you are on Mastodon, you can now follow this blog directly. Just go to Mastodon and follow the ‘Snapshot’ WordPress account at @keithdevereux.wordpress.com. All new posts will be automatically updated to your timeline.

https://keithdevereux.wordpress.com/2024/06/27/the-olympus-camedia-c-100-from-y2k-to-the-shittycamerachallenge/

#Abstract #Digicam #Digitalcamera #Glitch #Glitchy #ICM #IntentionalCameraMovement #NeutralDensity #Sensor #Shittycamerachallenge #Shittydigital #Trees #Camedia #Olympus

Olympus Camedia C-100

Flickr
Just as a Shitty Camera Challenge 'aside' here are two images of the same scene taken with the glitchy Olympus Camedia C-100. The first image is straight out of the camera — no filters, nothing. The second is with the variable ND filter set at its max level (about ND400). OK, I might have overdone it a bit with the filter factor this time ...
#ShittyCameraChallenge, #ShittyDigital