YES SUCCEEDED!!!
Just rendered an image at 944×1152 (slightly above 1024×1024) using Flux1-Schnell-FP8 on my 6700 XT, and it works! (Image 1 is the Real-ESRGAN 2× upscaled version)
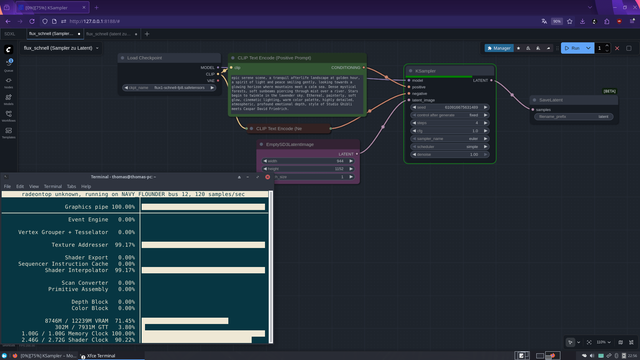
Workflow 1: Sampling (Image 2)
Prompt executed → UNet generates the latent
Step 1 (model load + latent generation) took 419 seconds
Output: Latent tensor saved to disk
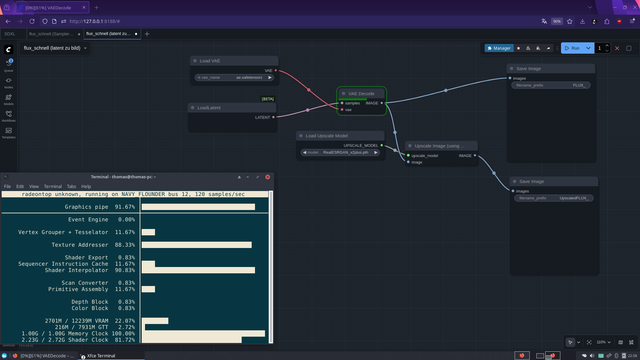
Workflow 2 : VAE Decode (Image 3)
Latent loaded → VAE decodes the image
Duration: 7.5 seconds
Advantage: UNet doesn’t need to stay in VRAM → VRAM freed, even on 12 GB GPUs
The problem with the stock LoadLatent Node
Dropdown only shows files if they were produced / annotated by a previous SaveLatent Node
Node is designed to pass latents inside a graph, not load arbitrary files from disk
Purpose: prevents accidentally loading wrong files
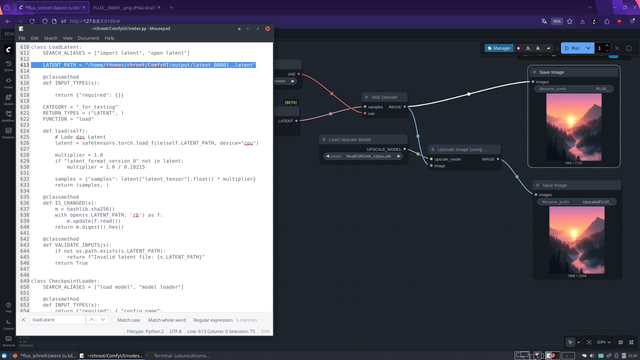
Workaround (Image 4)
Edited /ComfyUI/nodes.py, class LoadLatent
Hardcoded latent path → Node now loads directly from disk
Result: Workflow 2 runs instantly, UNet can be unloaded
Timing
Step 1 (model load + latent generation): 419 s
Step 2 (VAE decode): 7.5 s
Result: High-res images on a 12 GB RDNA2 GPU are now possible on Flux1-Schnell-FP8 without ComfyUI crashing! (Image 5 is the original output)
This might actually become my new Flux workflow: render quick 512×512 previews first (which works perfectly on RDNA2 GPUs), sort out the good ones, extract the seed from the PNG metadata, and then re-render only the selected images with the same seed using the split workflow at higher resolutions. This way, high-resolution Flux1-Schnell-FP8 renders become possible on 12 GB RDNA2 GPUs D:
Question at the end: Has anyone ever done this before? Because I have no clue xD
#ComfyUI #flux #Flux1SchnellFP8 #FP8 #AMD #RDNA2 #VAE #AIArt #Pixelfed #HighResolution #GPUOptimization #LatentWorkflow #AIWorkflow #AIHacks #RealESRGAN #Upscale #AIExperiment #CreativeAI #DigitalArt #AICommunity #python #linux #opensource #foss
Just rendered an image at 944×1152 (slightly above 1024×1024) using Flux1-Schnell-FP8 on my 6700 XT, and it works! (Image 1 is the Real-ESRGAN 2× upscaled version)
Workflow 1: Sampling (Image 2)
Prompt executed → UNet generates the latent
Step 1 (model load + latent generation) took 419 seconds
Output: Latent tensor saved to disk
Workflow 2 : VAE Decode (Image 3)
Latent loaded → VAE decodes the image
Duration: 7.5 seconds
Advantage: UNet doesn’t need to stay in VRAM → VRAM freed, even on 12 GB GPUs
The problem with the stock LoadLatent Node
Dropdown only shows files if they were produced / annotated by a previous SaveLatent Node
Node is designed to pass latents inside a graph, not load arbitrary files from disk
Purpose: prevents accidentally loading wrong files
Workaround (Image 4)
Edited /ComfyUI/nodes.py, class LoadLatent
Hardcoded latent path → Node now loads directly from disk
Result: Workflow 2 runs instantly, UNet can be unloaded
Timing
Step 1 (model load + latent generation): 419 s
Step 2 (VAE decode): 7.5 s
Result: High-res images on a 12 GB RDNA2 GPU are now possible on Flux1-Schnell-FP8 without ComfyUI crashing! (Image 5 is the original output)
This might actually become my new Flux workflow: render quick 512×512 previews first (which works perfectly on RDNA2 GPUs), sort out the good ones, extract the seed from the PNG metadata, and then re-render only the selected images with the same seed using the split workflow at higher resolutions. This way, high-resolution Flux1-Schnell-FP8 renders become possible on 12 GB RDNA2 GPUs D:
Question at the end: Has anyone ever done this before? Because I have no clue xD
#ComfyUI #flux #Flux1SchnellFP8 #FP8 #AMD #RDNA2 #VAE #AIArt #Pixelfed #HighResolution #GPUOptimization #LatentWorkflow #AIWorkflow #AIHacks #RealESRGAN #Upscale #AIExperiment #CreativeAI #DigitalArt #AICommunity #python #linux #opensource #foss