Filling The Gaps With Another 35mm Folding Camera: The Zeiss Ikon Contessa (533/24)

I’ll come out and say it: I didn’t need this camera. It was just an impulse buy from the Kamerastore website. But I like Zeiss Ikon cameras, and this one was 35mm, and a folder (it doesn’t look like it, but it has little bellows inside), and I just had to have it. I HAD to. Of course, it was cheap, about 40€, which I understand is a great price for a Contessa. Naturally, it was in the ‘Not Passed’ category of the Kamerastore website, with ‘flaws that will affect typical use’. In this case, the ‘shutter overexposes and needs service. The rangefinder calibration is off. The light meter does not work, [and it] has a lot of dust, haze, and fungus inside the viewfinder’. The fungus had been killed by UV light, and I hoped (one day) I might get inside it to clean this out.

The Zeiss Ikon Contessa (533/24) is a manual 35mm rangefinder camera. Produced between 1950 and 1955, it was a quite high-end camera for the day, and it looks like it. Turning it over in your hands, the Contessa is a heavy beast (clocking in at around 600g), but has a minimalist appearance. All there is on the top plate of the camera is an indicator dial for the type of film, and the dial and window for the camera meter. On the bottom of the camera are two large wheels, one to advance the film and one to rewind, and a button in the centre of the advance wheel that disengages the wind-on mechanism to rewind the film. In the middle of the bottom of the camera is the frame counter. All of the other controls of the camera are hidden behind the lens flap.

Like many folding cameras from the Zeiss Ikon range, the Contessa has a flap on the front that pops out to reveal the lens. The shutter release button is also in this assembly, and this can be disconcerting when you’re turning the folded camera around in your hands as there’s no obvious shutter button on the top plate, where these things are normally found. It has a Compur-Rapid shutter, which makes it an early version of the Contessa, and from the serial number (O45505), I reckon it was made between 1956/57. The shutter has nominal speeds of 1s—1/500s (+ B), but according to the description the camera overexposes, so my first attempts at using this camera will probably be a bit of a guess. It comes with a Zeiss-Opton 45mm f2.8 Tessar lens, with apertures from f2.8 to f22. 

It has an uncoupled light meter, which is behind a flap on the front right of the camera, but of course that doesn’t work in my Contessa. Outside in the daylight, the meter is used with the flap down. But indoors, and in low light situations, the flap can be raised to reveal the full selenium cell. I did come across a method of revitalising the selenium cell, and I may well give this a try later. Similarly, the rangefinder is out of alignment and at some stage I might try working on that. The most serious fault with this Contessa is that the shutter speeds overexpose, but I have a ‘plan’ for that.

The interesting thing about this camera is that it’ll only work with film loaded. There are two sprocket wheels below the film gate that lock on to the film sprockets and a hold the film firmly against the film plate. These turn for the required spacing between frames then lock the film in place. The wind on wheel only turns the sprocket wheels while the film is loaded, and the shutter cannot be cocked until the next frame is locked in place. It can actually be done with the back open and the wheels turned by hand, but it’s fiddly.

To load the camera, open the film back and load a 35mm cassette. Pull a length of film to the wind on spindle, making sure that the film sprockets feed through the sprocket wheels. When the film is secure on the spool, close the back. On the bottom of the camera, rotate the film counter dial until the arrow is pointing at the diamond. Then wind on the film. It will automatically stop when the counter reaches ‘1’ and the camera is ready to use. When the film is finished, and the wind on wheel can’t turn any more, press the button in the centre of the wind on wheel and using the rewind wheel wind the film back into the cassette. The button disengages the wind-on mechanism and allows the film to be rewound. Keep pressure on the button when rewinding. 

I have a whole load of offcuts in the refrigerator, little rolls of film that were left over after respooling 35mm films into Rapid canisters. Each 12-exposure Rapid canister requires a length of about 60cm of film, and generally I can get two Rapid canisters worth out of a 36-exposure roll of film. However, I discovered that the offcut left over from each roll is about 8 exposures long, so I’ve started making one Rapid canister from each roll, and using the rest in a regular 35mm camera, which works out at about 20 exposures. 

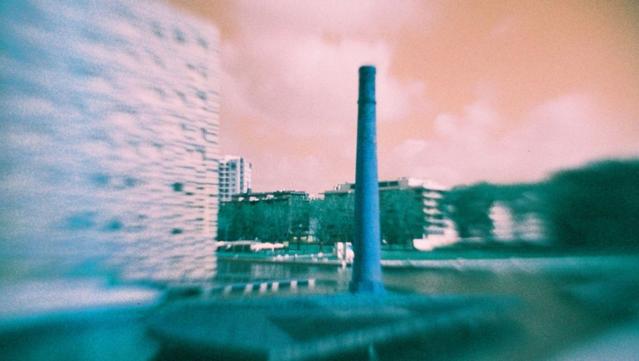
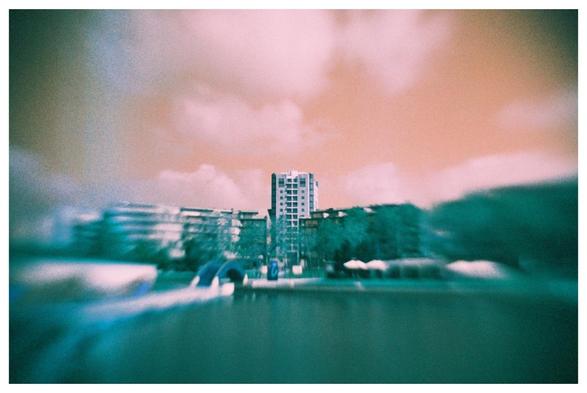
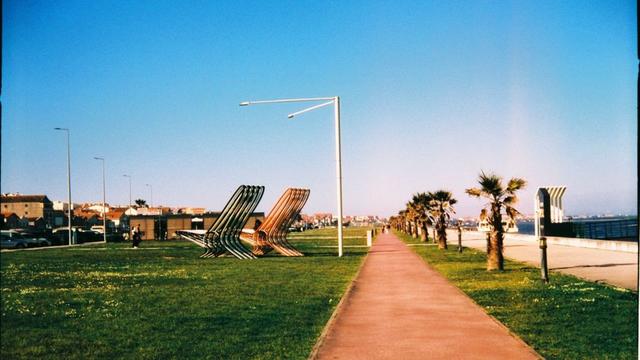
I took an offcut of Harman Phoenix I (expired 12/2025), and loaded it into the Contessa. I’m aware that the Contessa is over exposing, so I assumed that the 1/200s shutter speed setting was actually exposing at 1/100s. Using the Camera Meter app, I set the aperture accordingly for a 1/100s exposure. We took the Contessa to Vagueira, along with the Ilford Pixie with some really expired film, and used the camera around the town. It turned out that I must have tried to make two Rapid canisters worth out of this 35mm roll, since I only got 8 exposures out of the roll.

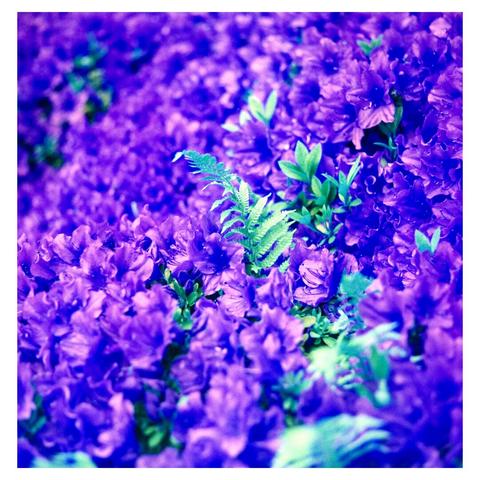
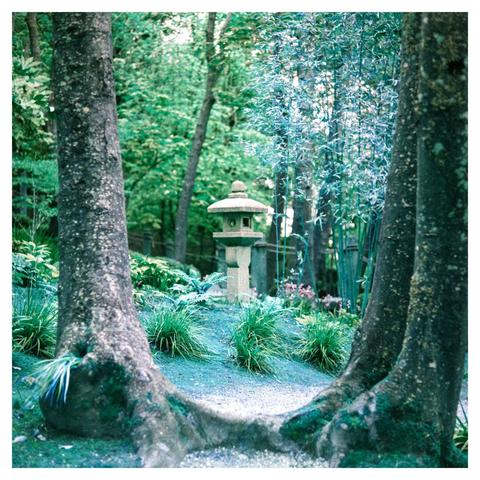
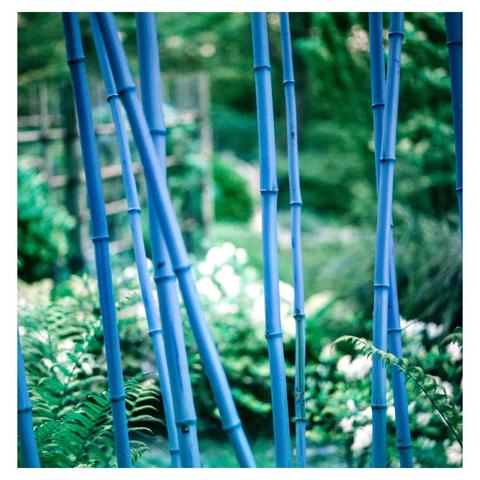
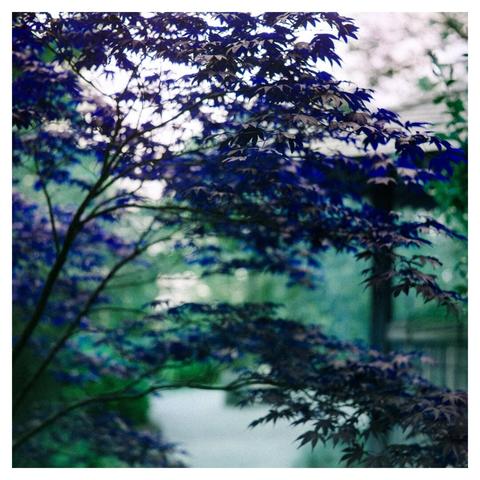
After respooling the film into the cassette, I took the exposed film to the Forever Blue in Aveiro for development. I wasn’t sure what I was going to get from this, if anything at all, so I went for the ‘develop only’ option. When I got the negatives back (forty-five minute turnaround from Forever Blue, thank you lads) they were absolutely  amazing and it looks like I might have nailed the exposure. The negatives were scanned with an Epson Perfection v750 Pro flat bed scanner and Epson Scan software. If you’re interested, I’ve posted the whole series in an album on my Flickr.

https://flic.kr/p/2sjGa4B

There were only a few images on this offcut, but I absolutely loved them. The photographs shown are basically how they came out of the scanner. I didn’t have to (or want to) make any adjustments at all. The Contessa is definitely going to be one of my ‘day out’ cameras, even with its limitations.

https://flic.kr/p/2sjE1zx

If you are on Mastodon, you can now follow this blog directly. Just go to Mastodon and follow the ‘Snapshot’ WordPress account at @keithdevereux.wordpress.com. All new posts will be automatically updated to your timeline.

#35mm #Belca #Beltica #Contessa #CostaNova #Folder #Harman #HarmanTechnology #Phoenix #Portugal #Rangefinder #Vagueira #ZeissIkon
I think the colours have been partly corrected by my image scanning software, but I love the result!

📷 Mamiya C220
🎞️ Harman Switch Azure 125

#irelandanalog #harmantechnology #analogphotography #japanesegarden #garden #gardendesign #gardenlover #japanesestyle #ireland #irelandtravel #discoverireland

Filling The Gaps: The Ilford Photo Pixie 35 II

It’s not that easy finding anything about the Ilford Photo Pixie 35 II. Apart from a couple of Reddit posts, practically every entry, and video, is a boilerplate product entry on an online shop. I couldn’t even find anything on the Ilford website. But I’m getting ahead of myself here. I was idly scrolling through BlueSky the other day, when I came across the most wonderful image from @Stigofthedump. It was of a building in a cemetery, but what made it special was the most incredible blur of the lens around the edges of the image.

As you may know, I love this kind of effect, and I’ve created similar digitally using the homemade ‘Deakinizer’, a wide-angle converter held reversed over the lens, and with film by reversing the front lens of a single element camera like the Agfa Clack. But this was the first time I’d seen this effect coming straight out of camera, and I had to know more. Turns out it was from a fairly new camera released by Ilford in October 2025, the Pixie 35-II. It didn’t take me long to decide that I must have one of these, though I was put off by the 80€ price tag. Then, a couple of entries popped up for Pixies on sale for 50€ in our local electronics store, and that was enough, I placed an order.

Reading around about the Pixie, and as I mentioned there wasn’t much, revealed that Stig’s images were definitely typical for this camera. The Pixie has a fixed 32mm plastic lens with three available apertures (f/6.4, f/16 and a pinhole option of f/100) and distance focusing of 0.3—2m and 2m—infinity. It has a single shutter speed of 1/100s and bulb mode. And that’s it. There’s a plastic ‘viewfinder’ on the top of the camera which shows whatever is in focus, but this covers just the centre of the frame and the rest of the images is soft and blurred.

When the camera arrived, my first impression was that it was a 3D printed camera, and everything about the Pixie screams self-assembly. In fact in one ‘review‘ of this camera it says it comes ‘fully assembled ‘, and that got me wondering. In a comment on Stig’s original image, @thereisnocat mentioned that the Pixie ‘doesn’t appear to be available in the U.S., just in Europe and Asia. Based on a camera from Gakken, the Japanese magazine that occasionally features kit cameras you build yourself’, and Stig had confirmed that Gakken was imprinted on the lens surround.

I wasn’t really familiar with Gakken, so that was my next rabbit hole to look into. Gakken is a Japanese publisher that produces a range of magazines. Each edition of the magazine Otona no Kagaku, which translates as ‘Science for Adults’, contains a kit of a featured product with that issue, and back in 2009, in issue 25, Gakken included a self-assembly TLR camera, which became known as the Gakkenflex, and has become something of a cult item. If you look at the taking lens of the Gakkenflex, and compare it with the Pixie, there is definitely a resemblance. as if Ilford/Gakken have taken the Gakkenflex and rejigged it slightly to fit into a 35mm body.

Like the Pixie, the Gakkenflex has this wonderful blurred effect around the edges of the image, and though the Pixie has more options for aperture selection, the Gakkenflex and Pixie feature one fixed shutter speed. The Pixie is pure ‘self assembly’ in appearance, and I can imagine it coming flat packed in a magazine instead of ready assembled in a box. Everything about the Pixie is basic, from the wholly plastic body to the cheap construction as you turn it over in your hands. Yet at the same time that’s part of its appeal, and I couldn’t wait out take it out for a test.

The weather has been quite poor just lately, although really those sort of conditions are quite well suited to the Pixie, which recommends using ISO 400 film. But I wanted to try a roll of Harman Switch Azure in this camera and with a box speed of ISO 125 was waiting for a sunnier day. Eventually, the weather cleared and the sun came out. I had previously decanted some Harman Azure into a Rapid canister, so the remaining film I loaded into the Pixie, about 20 frames, I reckoned. 

I took the Pixie for a ‘walk around the block’, in the fields behind our house, and visited some of my favourite places. I used the Camera Meter app to set the aperture, which on this unusually sunny day this was mostly f16. In the shade under the trees, the app suggested an aperture of f5.6—f8 so I assumed f6.4 would work. I also calculated that with an ND8 neutral density filter, on a sunny day the aperture could be reduced to about f6.4, so I’ve invested in a cheap ND8 filter, that I hope will allow me to get the maximum blur possible. 

https://flic.kr/p/2sd1cjs

https://flic.kr/p/2sd1GRE

Having only used about a half of the film, a week or so later I took the Pixie with me to Aveiro where I used up the remaining film. By this time, I had obtained an ND8 neutral density filter, so I used this to try and use the heavily blurred f6.4 aperture. Once completed, I took the films from the Pixie, the Belca Beltica, and the Sprocket Rocket to Forever Blue to be developed.

https://flic.kr/p/2sd1GRe

https://flic.kr/p/2sd1cp2

According to what I’ve learned about this camera, the viewfinder, which is a roughly film proportioned piece of plastic on the top of the camera, only shows what will be in focus in the centre of the frame. The actual field of view of the lens is much bigger, and all of this is blurred, so what I tried to do was fill the viewfinder with the subject, and leave the rest of the frame to the whims of the gods (since this is definitely a ‘shitty’ camera, the gods in question are the Elder Gods). And I must say, it worked a treat.

https://flic.kr/p/2scUQTX

https://flic.kr/p/2sd1GYD

With the aperture set to f6.4, even with the neutral density filter, the blur of the Ilford Pixie was amazing. At f16, the blur was less pronounced, but it was still present. The colour shift of the Switch Azure was very reminiscent of Lomochrome Turquoise. I found the tones of Lomochrome Turquoise a litter richer than the Switch Azure, but aside from that they’re quite similar. For me though, the best thing about the Switch Azure over the Turquoise is that it’s much easier to obtain. If you’re interested, I’ve posted the whole series in an album on my Flickr if you want to see the rest of the images.

If you are on Mastodon, you can now follow this blog directly. Just go to Mastodon and follow my WordPress account at @keithdevereux.wordpress.com. All new posts will be automatically updated to your timeline on Mastodon.

#ColourShift #HalfFrameCamera #HarmanSwitchAzure #HarmanTechnology #IlfordPhoto #ILFORDPixie35II #TiltShiftVibesGakkenLens #ToyCamera
Filling The Gaps: The Ilford Photo Pixie 35 II

It’s not that easy finding anything about the Ilford Photo Pixie 35 II. Apart from a couple of Reddit posts, practically every entry, and video, is a boilerplate product entry on an online sh…

/ˈsnæp.ʃɒt/
Got back my first images on Harman Switch Azure from the Ilford Pixie 35-II. Absolutely adore them, though I reckon Azure works better in the city than the country. #HarmanSwitchAzure #HarmanTechnology #IlfordPixie

Remember the, 'It's VERY worn in almost every way, but somehow still working' Proud Chrome Six III? I got the first film developed yesterday, and the results were fantastic!! #ChromeSix, #MediumFormat, #Folder, #HarmanPhoenix, #HarmanTechnology,

https://keithdevereux.wordpress.com/2026/04/03/its-very-worn-in-almost-every-way-but-somehow-its-still-working-the-proud-chrome-six-iii/

‘It’s VERY Worn In Almost Every Way, But Somehow [It’s] Still Working’: The Proud Chrome Six III

Nowadays, it seems to me that I’m getting photographic equipment more for the craic (the fun of it) than for any serious artistic endeavour. Not that I ever had any sense of artistic endeavou…

/ˈsnæp.ʃɒt/

Harman Technology release Harman Red, a redscaled version of Phoenix

This sort of thing never happens to me. Back in January I was contacted by the marketing department of Harman Technology about a new product they were launching. ‘Please don’t share the information in this mail with anyone else as we haven’t shared it yet’, read the email. Well that sounded exciting. It continued, ‘We have a new product launching, probably later this month, which will be called HARMAN RED and is a redscale version of the Phoenix 200 film.’

By coincidence I had recently redscaled some Harman Phoenix film, which came out really well. Harman had seen these images and wondered if I might be interested in trying out Harman Red. Well, of course I would! A few days later a package arrived containing some rolls of Harman Red. Typically, it’s arrival coincided with some of the most miserable weather of the year. Two storms rolled across Portugal, accompanied by wind and heavy rain, so there wasn’t much chance of going out to take some redscale photos.

When the weather briefly cleared, I rolled a twelve exposure length of Harman Red into a Rapid canister and loaded it into the new (to me) Lomo Smena SL, the Rapid film version of the 8M. As usual I used the app Camera Meter to judge the exposures and took the film on a shopping trip and ‘around the block’. Although I rated my redscaled Harman Phoenix at ISO 50, the box speed of Harman Red is ISO 125, so I chose that for the exposures of the Harman redscale film. 

When I took the film to the lab it was machine processed at 55°C and scanned. I don’t have any details of the processing and scanning, aside from the temperature, but I reckon that’s a good test of how this film will be treated in a commercial lab. I was really pleased with how the images came out. As usual with these Rapid films decanted back into 35mm cassettes there were light leaks. I had used a different 35mm cassette to my first decanted Rapid film to try to avoid the leaks, but it looks like these are all cheap and nasty cassettes. That said, I’m embracing these imperfections. You can buy light leaks presets for photo editors, or make your own, but there’s nothing like the real thing.

Harman Red was really nice to use, even decanted into Rapid canisters. I reckon that to get the best out of the emulsion it really needs a lot of light. When the sky was clear we had lovely contrasty orange and black images, but when the conditions were hazy the results were more muted. Mind you, even under these conditions I really like how the skies came out. For me, the high contrast Harman Phoenix is a fabulous emulsion, and Harman Red complements this perfectly.

Now that the film has been officially released there are more details on the Harman Technology website. ‘Depending upon the exposure and colour characteristics of a scene, images can range from strong “apocalyptic” looking bright orange and red tones to more subtle orange and green tones with delicate shadows’, is how Harman Red is described. It, ‘has a usable exposure range of EI 50 – 400. For best results we recommend shooting between EI 100 – 200 depending on scene brightness and contrast.’ Looking at the nice ‘apocalyptic’ example of a sunset, I might well expose my next roll at ISO 200. 

I was delighted with the redscaled images, and Harman Red is a great idea. After the launch, all of the early comments were really positive, and it looks like this is something people were looking for. I would say Harman Red is a great option for anyone who wants to try redscale film but doesn’t have the facilities to do so.

If you are on Mastodon, you can now follow this blog directly. Just go to Mastodon and follow the ‘Snapshot’ WordPress account at @keithdevereux.wordpress.com. All new posts will be automatically updated to your timeline.

#AgfaRapid #Experimental #HarmanRed #HarmanTechnology #Phoenix #Redscale #RedscaleFilmHarman #RedscalePhotography

HARMAN RED 125 35mm

HARMAN RED 125 is an ISO 125 redscale film, that can transform mundane scenes into dystopian masterpiece with hues of red, orange, and yellow. Clear base and high red sensitivity Medium speed ISO 125 DX coded cassette Standard* C41 processing

For the Shitty Camera Challenge today I give you a panorama of the Melia Ria hotel, Aveiro. Taken with a 100-year-old Kodak 3-A Folding Pocket camera on expired (Nov. 2022) Ilford XP2.
#ShittyCameraChallenge #HarmanTechnology #CamerHack