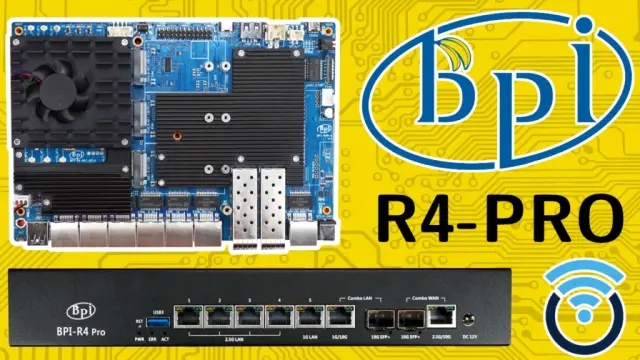
Banana Pi BPI-R4 Pro: Build Guide And Setup Ft. Forbidden OpenWRT
https://www.youtube.com/watch?v=x6f_sJP-0ZE
Back in 2024 Banana Pi sent over their BPI-R4 and I spent a few days sorting out how to get OpenWRT up and running on it. For the most part things technically functioned, and two years later it’s matured into a solid DIY router board with full OpenWRT support.
Welp, Banana Pi is back with an upgraded version sporting quad 2.5 gigabit, dual 10 gig copper/fibre for LAN and WAN, and a lonely 1 gigabit port for old times’ sake. Better yet, there’s a USB-C serial port on the back so I don’t have to go digging through the cable bin for a UART adapter.
Unfortunately it’s only been on the market for seven-ish months, so we’re still quite a ways out from having OpenWRT support. But that’s not going to stop me from downloading HackedUpTechDemoWRT™ from Banana Pi and slinging a couple of databits through it.
You know, for science.
HARDWARE
Under the hood there’s the same quad core Arm Cortex-A73 MediaTek MT7988A found in the BPI-R4, but the RAM has been bumped to 8 GB. You also get three M.2 B key slots for 4 & 5G modules, plus two M.2 M key slots for NVMe drives.
And there’s a new case. It’s like the old one, but bigger.
FORBIDDEN OPENWRT
I can’t stress this enough, the version of OpenWRT from Banana Pi is not something you want running your home network. Banana Pi is in the business of making SBCs, not assembling and maintaining secure builds of OpenWRT.
What’s available on Google Drive should be treated as a tech demo to verify hardware functionality, nothing more.
EMMC INSTALL
With that said, let’s get it installed to eMMC by booting from an SD card, installing to NAND, then booting from NAND and installing to eMMC.
Up first, grab the *.zip from Google Drive, extract the zips inside the zip, and write the SD image to an SD card. Then flip both DIP switches to the down position and pop in it the back.
Now format a USB flash drive as FAT32, create two directories, EMMC and NAND, and copy over the contents of the EMMC and SNAND folders to the newly created directories on the USB flash drive. Then slide that business into a USB hole.
Time to stab the BPI-R4 Pro with a USB-C cable, crack open a copy of minicom, set the serial device to ttyACM0, and apply the electrons.
First up, is mounting the USB flash drive.
mount -t vfat /dev/sda1 /mnt ; cd /mnt/NANDThen we need to track down where NAND is hanging out.
cat /proc/mtdMine is on mtd3, so let’s go ahead and erase it.
mtd erase /dev/mtd3Write the image to NAND.
mtd write *.bin /dev/mtd3Power down the system, flip the dips to 1 up and 2 down and reapply the electrons.
Back at the console, mount the USB flash drive.
mount -t vfat /dev/sda1 /mnt ; cd /mnt/EMMCDisable the write protection on an eMMC boot partition.
echo 0 > /sys/block/mmcblk0boot0/force_roWrite the preloader.
dd if=BPI-R4Pro-8X-MT76-emmc-preloader.bin of=/dev/mmcblk0boot0Then write the image.
dd if=BPI-R4Pro-8X-BE14-MT76-OpenWRT24.10-DSA-emmc-251229.img of=/dev/mmcblk0All that’s left to do is enable booting from the eMMC partition.
mmc bootpart enable 1 1 /dev/mmcblk0Power down and one more trip to the dips. This time it’s 1 down and 2 up.
Reapply the electrons, and after a bit of a wait you’ll boot into Forbidden OpenWRT running from eMMC.
LUCI WEB INTERFACE
Here we’re logged into LuCI, and short and sweet: we can see the 8 GB of memory, and 300 MB out of the 8 GB of eMMC is available. At least it sees the NVMe drive I snuck in there, so there’s that.
Ports appear to be porting, and it looks like the 2G, 5G, and 6G radios are up. Neat.
Outside of that, not much to poke at, because there’s zero chance I’m running forbidden OpenWRT on my network.
IPERF3 SPEED TESTS
I wanted to sling some databits through this critter, so I used iperf3 with the --bidir flag. Hardly scientific, but it at least lets me know if the ports are working.
All of the 2.5 gig ports came up Milhouse, with 2.3 on the send and 2.2 on the receive.
Both the 10 gig copper and fibre ports were a bit of a mess, with 9.2 on the send and 5.0 on the way back. Don’t know what’s going on here, flapping?
THERMALS AND POWER
I tried my darndest to cook the MediaTek SoC using stress-ng, but even with the passive cooler I couldn’t get it to crack 55 C under load.
And electron vampirism is about what you would expect from an SBC with 7 RJ45 ports, two SFP+, and a WiFi 7 card attached. Around 11 W at idle and just a smidge over 13 W under load.
DISK SPEED
If you’re wondering what 1 lane of PCIe 3.0 attached to an NVMe looks like, it tops out at around 800 MB/s, which is a little under the theoretical max of ~985 MB/s. But come on, this is a router.
VERDICT
The Banana Pi BPI-R4 Pro reminds me a lot of the Radxa Orion O6 and Orange Pi 6 Plus. It is a piece of fantastically neat, powerful hardware with absolutely no software to take advantage of it. It is the kind of board you unbox, tinker with for an afternoon, pack away, and set a calendar reminder to check back on in a year.
Alright, I shouldn’t say there is absolutely no software. Frank has a nice version of Debian 13 you can build, but nobody’s dropping BPI-R4 Pro money just to run standard Debian.
I’ll be keeping an eye on the OpenWRT pull request because this critter has the potential to become the single most no kill like overkill router I’ve ever owned. Once things are in a workable state I want to circle back, swap out the MikroTik 4011 in the studio, and somehow convince this critter to host my community x86 Trackmania server… while also doing the router thing.
LINKS
All links in this article go directly to the sources they reference. There are no affiliate links or unrelated backlinks. If you would like to support my work on Interfacing Linux, you can use the affiliate links below or check out the sponsors page.
This helps fund future projects and keeps the site ad-free.
Some posts contain affiliate links. If you click on an affiliate link and later make a purchase, I may receive a small commission. Money earned via affiliate links helps to keep this site up and running.
Have questions about your Linux setup? Ask in the forums.