Already reached Milestone 2! ๐Ÿ’ชโ€‹

it is so nice when you get to make the milestones, and they are so easy to reach ๐Ÿคซโ€‹

In this step I mainly move around stuff, clean up the #6502Assembly code and make use of macros more productively.

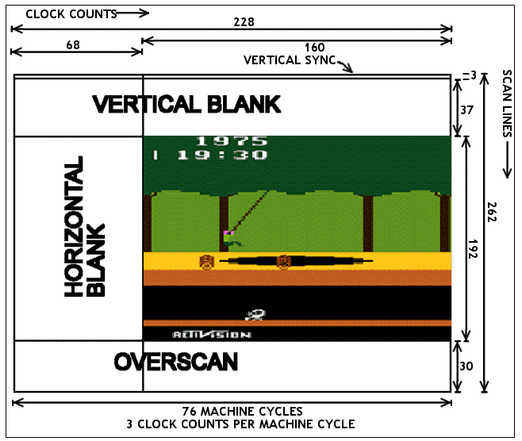
The main goal was to show how you can use #Atari2600 timers to show a complicated image, while the CPU processes new commands at the same time.

Using macros, I was able to clean the main file and focus mainly on game code without caring about counting what scanline the TIA is on, that is the magic of Macros... if that gets you excited, next step will have subroutines, get ready! ๐Ÿคฉโ€‹

Subroutines are very usefull as they let us count how many cycles we have inside them, and thus calculate if we have enough time to use them.

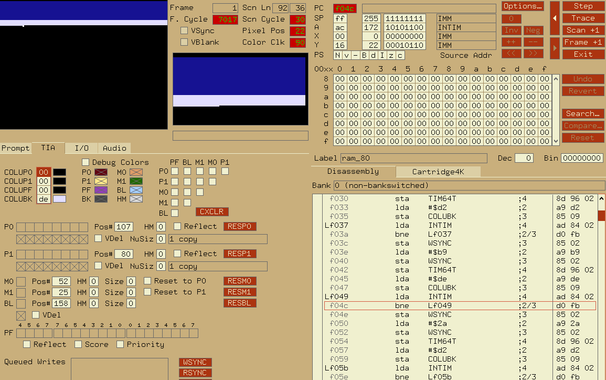
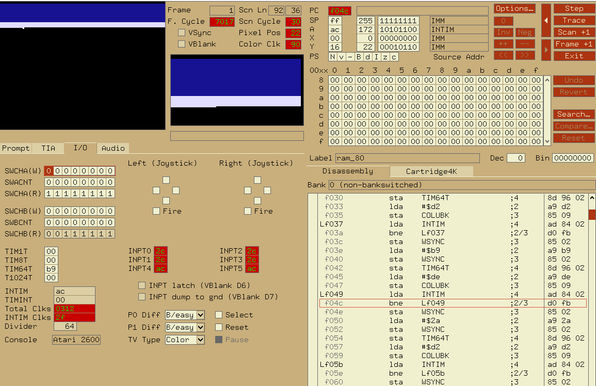
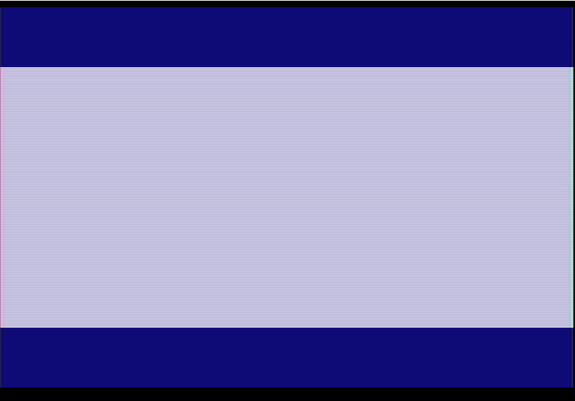
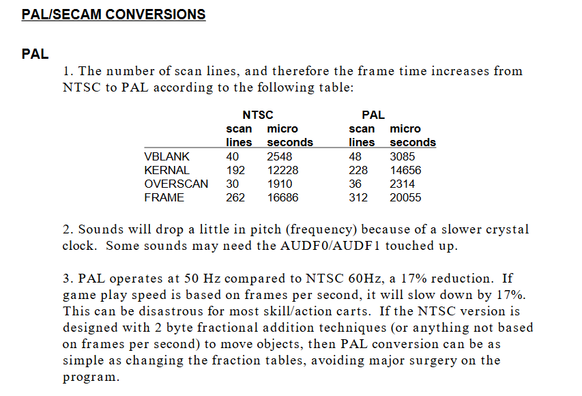
OK, where are we now? We have most of the boilerplate done, we have a stable PAL image and we understand exactly each part of the code does.

Next step is to start printing some text, and while at it, also make that text be a score and a timer, fake for now, but no one will know if they only look at a picture, right?๐Ÿ˜‡โ€‹

The challenge is that there is no such thing as fonts in Atari2600, we have to tell the TIA when to show a colour, and by arranging them correctly, we will make shapes that look like letters and numbers... hmm, i guess that is what fonts are anyway.

Here is the code now:

https://gitlab.com/xsk/mineredd

and the release for this ROM Milestone:

https://gitlab.com/xsk/mineredd/-/releases/v0.02

You can use the Makefile commands to load the game up on #StellaEmulator or just use #8bitworkshop directly.

Canโ€™t wait to receive the PCBs so we can see the code run on actual hardware!! should be this week

xsk / Mineredd ยท GitLab

GitLab.com

GitLab

So.... coding an #atari2600 how hard can it be? it is a 40 year old machine after all, nothing existed back then, let alone complex coding design structures, right? ๐Ÿ˜ˆโ€‹

Well, yes, but coding a system that is this old comes along with the limitations of those times, and there are a lot of them.

Overall, the main board has 3 ICs, the CPU, that does all the calculations, the TIA chip that does all the Television Interface, Sound and collision stuff (plus some potentiometer reading), and the RIOT chip that has the RAM does Input output and Timer related things.

You program the 6507 CPU, that is a cut down 6502, using #6502assembly and you interact with the other two chips by the use of memory registers. ๐Ÿง‘โ€๐Ÿซโ€‹

You have (if you exclude banking techniques) 4Kbyte of space to write your program which will end up in the Cartridge and 128 Bytes of Ram ( yes, bytes ) that is used for everything runtime, including the stack.

Oh, and no framebuffer, you have to make sure you pipe data to the TIA chip the moment it needs them, this is where the term โ€œracing the beamโ€ comes from. ๐Ÿ–ผ๏ธโ€‹

My console is PAL, so there are some particular numbers that i need to put in place, so that the image shows correctly. Generally the difference between PAL and NTSC is that the second runs faster, as NTSC creates an image at almost 60 frames per second, while PAL every 50. But for PAL on this extra time you can draw more lines, so... bigger playfield!

For developing, i use the #StellaEmulator (https://stella-emu.github.io/), pretty much the de facto choice, and #DASM (https://dasm-assembler.github.io/), the assembler that makes our assembly code to something that the Atari can understand.

I code in Vim on Linux, but VSCode plug-ins for DASM exist to be used.

You can also use #8bitworkshop for an Online IDE, the main difference is that you have less control over the registers/ram/state of a program compared to Stella, but in return you get much faster previews and you don't need to install anything to use it.

OK, enough with that, lets jump into some code. The first task is to make a blue screen that works on my PAL Atari, letโ€™s call it the Blue screen of Life ๐Ÿ˜‡โ€‹

Here is the snippet ( fixed access ):

https://gitlab.com/-/snippets/2459337

I hope the code comments are good enough, check the images on the post for the raster scan details that are mentioned in it.

You can take the code as it is and paste it on https://8bitworkshop.com/ to see the result... I will show how to make a cartridge to use it in real life once i have the PCBs delivered. ๐Ÿ’ฏโ€‹

This is not the best way to create a playfield, as later on we will need to use timers to avoid losing the sync due to CPU calculating the game logic, but it is the best way to understand basic Atari 2600 Graphic generation.

I am going to watch some blue screen, and decide on what kind of game to write now... maybe it will watch me back ?

Stella: "A Multi-Platform Atari 2600 VCS Emulator"

Wanted to start with one of my best finds i had in Mastodon. https://8bitworkshop.com, Up until now i used Dasm, Stella development cycles for developing using #6502assembly but this online IDE is so cool, i have to try it! โค๏ธโ€‹
#8bitworkshop

Now, to the Story Cliffhanger part:

Of course it works!, but, i hope none expected some kind of Crystal clear HDMI Image, The main achievement is that i can now connect the #Atari2600 on my Car real view Screen so i can develop Games on the comfort of my Desk ๐Ÿฑ

No, I donโ€™t use my Desk as a Car, it will make sense once you see it

That said.. you can see that the RF Artifacts are gone now ๐Ÿ’ฏ

But why? Lets Dig a bit Deeper on the Mod Design from my previous Post

https://social.treehouse.systems/@xsk/109321329549926035

The Key part is that we have some (most would say redundant because of the 7805 Regulator, but anyway) 5V Power supply Filtering, then the 3k3 and 2k2 Resistors work together to ensure the DC bias point, acting as a Voltage divider so that the video signal can Drive the 2N2222 Transistor as expected, which will send out a Signal that is of appropriate Power (~2V max) to the TV.

The 75 Ohm resistor on that output to Ground is to ensure what most modern (80s and later) attenuated Cables assume... a 75 Ohm signal. This Article has good information about that:

https://retro-access.com/blogs/news/why-75-ohm-coax-cabling-is-the-best-cable-for-video-signals

Anyway, We are now not susceptible to Radio Frequency noise and taking a look on the horizontal retrace, compared to before, The new signal is cleaner, but the Voltages are still off.

Thankfully, TVs can work with that, but you may get some trippy colours if they are waaay off (given that your TV can even sync by then). ๐Ÿ˜…โ€‹

Overall, excluding trying out different, more sensitive/fast Transistors, this is quite much the best you can get out of this, simple, out of the box type of Composite mod, as you will always amplify everything you receive from the Composite signal on pin 4, including noise.

If you wanted more fidelity, two relatively simple improvements of the mod would be to separate and compose the signals from TIA yourself, using a variable resistor on all lines (similar to the Ben Heck link i shared on the linked Post), which would let you control all aspects of the image. ๐ŸŽปโ€‹

If you want the best image Atari2600 can make, then you could add a video driver IC that will generate S-Video reliably on spec, (like the one from Parker Dillman)

https://longhornengineer.com/category/projects/atari-av-mods/

Next Step !, 3D printing out a small box to mount under the Atari Case for the new RCA Plugs, i am a big fan of the โ€œnot Drilling anything that is a part of Historyโ€ club. ๐Ÿ˜‡โ€‹

8bitworkshop

Learn how classic game hardware worked. Write code and see it run instantly.

8bitworkshop

Hi, I am a #bot that runs vintage #BASIC programs!

I can only run programs (and send output) under 500 characters. Also, this server can take a minute or two to respond, so please be patient.

I support lots of commands, even INPUT! Go here for more info: https://8bitworkshop.com/docs/platforms/basic/index.html #8bit #8bitworkshop

BASIC Interpreter

History: Dartmouth professors John G. Kemeny and Thomas E. Kurtz had the idea that every student should have access to a computer. But in those days, batch processing was the law of the land. Progr...

8bitworkshop

#veriloghdl #8bitworkshop
Ball Motion

ๅณใฎBallใŒๅ‹•ใ็ถšใ‘ใ‚‹