This account will soon be changing servers to a new one I've setup.
I don't expect there to be any problems, but just to give a heads up should you see a new follow notification from me.
This account will soon be changing servers to a new one I've setup.
I don't expect there to be any problems, but just to give a heads up should you see a new follow notification from me.
Yes I normally make each layer going from the foreground back.
Sometimes I'll have a sketch down where I've drawn a rough plan for the center to background layers;
Often times the foreground layers are designed on the fly to fit the look of whatever I'm going for :)
Lovely photo 🤩
You could vectorize the image perhaps - using a tool like this: https://vectormagic.com/
But the way I'd tackle this would be to start by tracing over it while separating sections out into layers, foreground to background.
Grass
Flowers 1
Flowers 2
House Detail
House Base
Clouds 1
Clouds 2
Each layer I'd have in mind to bring into the edges, so that it'd be supported when cut.
I've not worked with color though so can't help there much,
Overdue shadowbox gifts done - now I want to focus on getting some more designs made + my website developed.
Cheeky little YouTube channel too? Working on it.
After much thought I've also decided to create a 2nd Etsy shop.
The benefits for me would be
- Clear split between physical and digital files.
- I can more easily restrict sales to one area for now (EU) while digital remains worldwide.
- I can run store-wide sales.
The extra admin is fine, and my website will be the main focus ✨
Latest shadowbox done ✅,
this will be a gift.
6 x A4 layers, spaced out and backlit with LED.
Inspired / based on the Tian Tan Buddha statue in Hong Kong, from this photo I took back in 2016:
https://unsplash.com/photos/7GGBA0hXym8
#MastoArt #MastodonArt #Cricut #AffinityPhoto #Papercut #Shadowbox
Glue up done for the LED strip in the back panel.
I'm seriously impressed with these LED's from IKEA.
VATTENSTEN: 1m, USB-A low-power, warm white.
3.99€ 🤩
Comes with a built in switch too.
For a quick and easy solution to a shadowbox backlight, these are great.
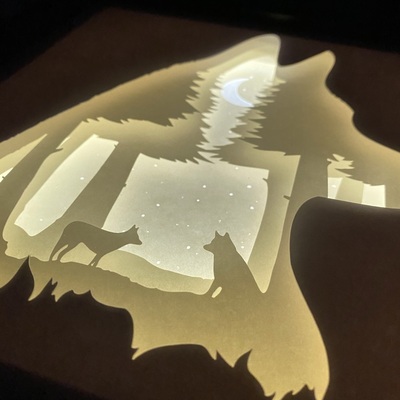
🤣 Yeah that's true - it sucked when I got to the last layer full of stars, 218 of the little things...
That's where these trusty tools come in handy though, a spatula, scraper, or old debit card will work fine to take them off.
The little bits do have a tendency to start popping off the mat like popcorn when you try to get them with this though, so safety squints very much advised.
Note to self, don't leave such tiny gaps (Unless they're clean shapes, like a circle) - this was a PAIN to sort out after the cut, many of the little bits hadn't separated properly.
Know what's worse? The layer I am cutting after this one has even smaller trees! 😂 🌲
I could perhaps let the machine cut with slightly more pressure, but for nearly everything else the machine cuts fine.
Smol shapes are just not a fun time.

