Finally figured out how the wiring should be done on my #dactyl #keyboard to the #teensy 2.0.

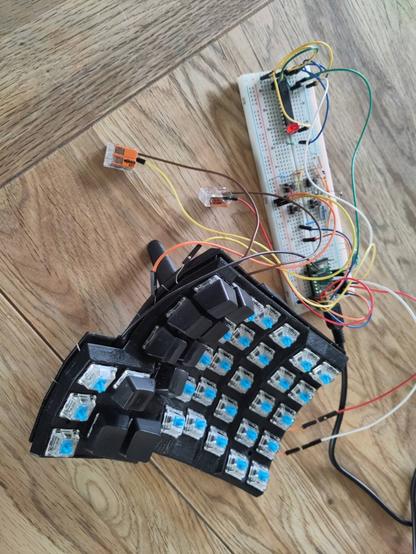
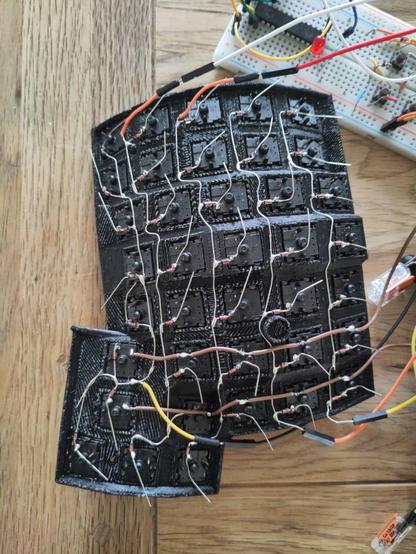
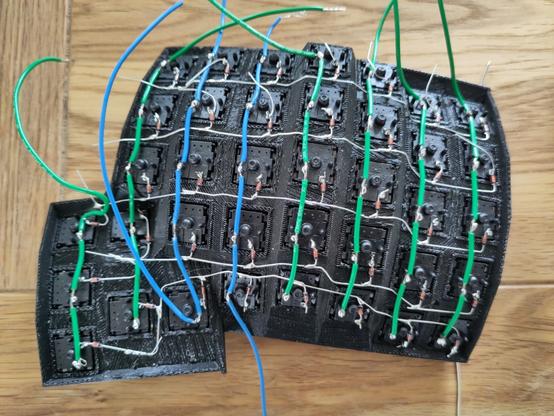
Work in progress on #soldering the diodes in rows. It'll be five rows and eight columns, I figured that layout would be the easiest to do correctly.

Each side has 38 keys which doesn't divide nicely into a useful matrix. In this 5×8 layout there will be some unused pins on the eighth column.

Soldering continues and now I got a working 2×5 button #handwired #keyboard! Implements a6ofdb plus space, backspace and enter!

The firmware it's running is also hand-written and found here:

https://git.sr.ht/~laumann/teensy-keyboard

Another glamour shot of the 5×2 #handwired #dactyl #keyboard. The middle key in the left column now works as Shift_R (working on modifier keys).

Now it's a 5×5 keyboard, all the black keys work! The thumb cluster in front has space, enter and backspace.

The firmware is also overhauled to better separate key press and release events. A key being held is now a single "press" event to the OS, and the "release" event only happens when the key is actually released. Shoutout to wev (https://git.sr.ht/~sircmpwn/wev) for helping me figure out how key events should work.

It's starting to feel like a real keyboard!

All wires are soldered on the right-hand side now. Just some #firmware #programming left and half the keyboard is more or less done.

The firmware is written in C #clanguage for the 8-bit AVR processor on the Teensy 2.0. Really fun to write this stuff from scratch!

There's #QMKfirmware I could've used, but then I wouldn't be learning as much as I am about firmware programming. I have used qmk for reference though, it's a good resource.

Now there's two of them! All keys now work on the righthand side, and left has a functioning 2×2 matrix implemented.

The left side is controlled through an MCP23018 I/O expander over I²C.

#handmade #keyboard #electronics #I2C

Soldering wires to key switches completed on the lefthand side. Need to test that all the switches work, then I can start wiring the I/O expander in place.

#handwiredkeyboard #electronics #soldering

Here is an entire post typed on my very own #handwired split #keyboard! It's not finished, but all letter keys are now working.

The biggest challenge for me now is to figure out how to wire everything together inside the enclosure. There's not a lot of space and I don't have many good ideas on how to it neatly.

I'll figure something out though (I hope).

I finally got the electronics moved into the enclosure! This took more tinkering, fiddling and thinking than I had thought it would. It's a really tight fit for the electronics, it feels like the enclosure design isn't made for handwiring and assumes very specific part sizes.

But it works!

#handwired #keyboard

The TRRS jack connection between the #Teensy and MCP23018 IO expander was one of the last puzzles I resolved. On breadboard I never got #I2C to work via the jack cable.

Eventually, I noticed that the plug didn't fully reach all four connection points! The extra bit of plastic "collar" on the connectors was preventing the tip from reaching all the way. With the help of a colleague, we figured out that this was the exact problem and cut off the extra plastic.

#handwired #keyboard #electronics

@laumann åh nej 🙄
@reynir i det mindste fik jeg fundet og løst problemet - den fungerer rigtig godt nu 😁