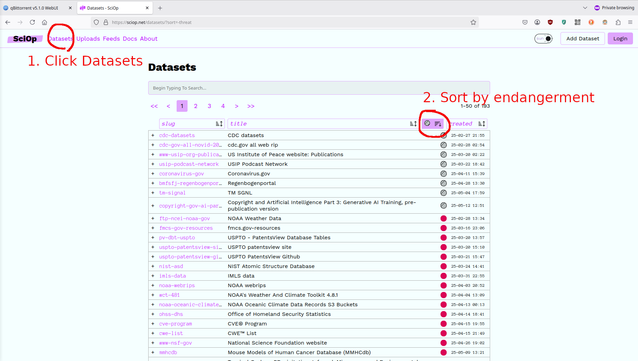
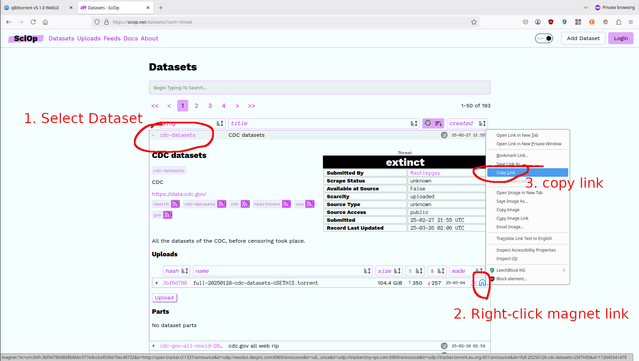
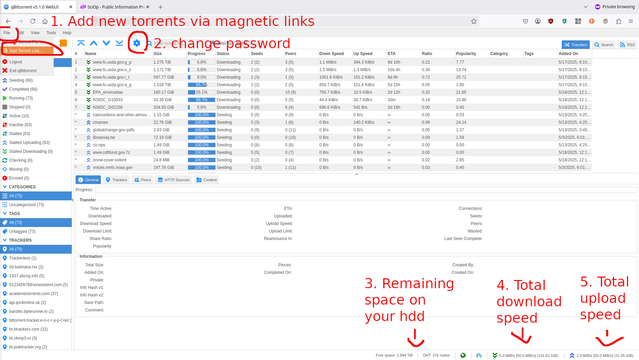
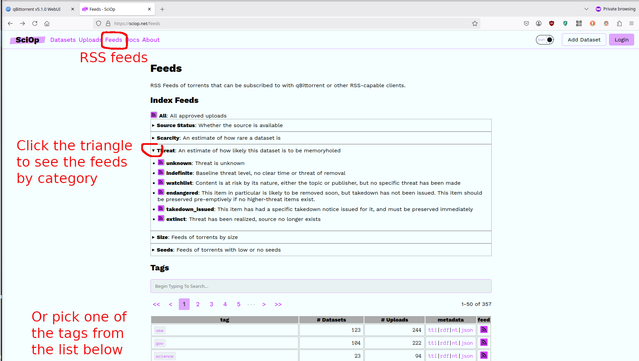
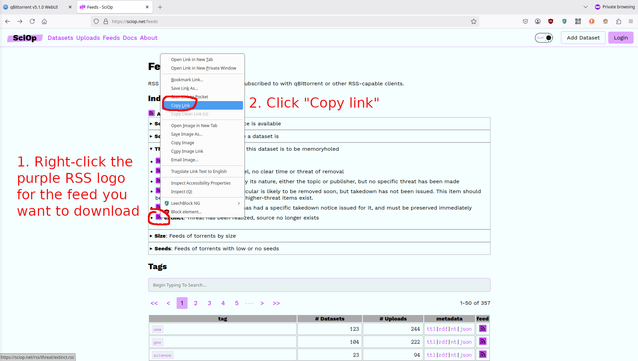
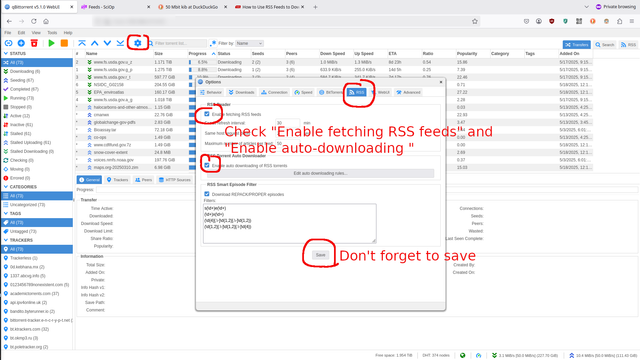
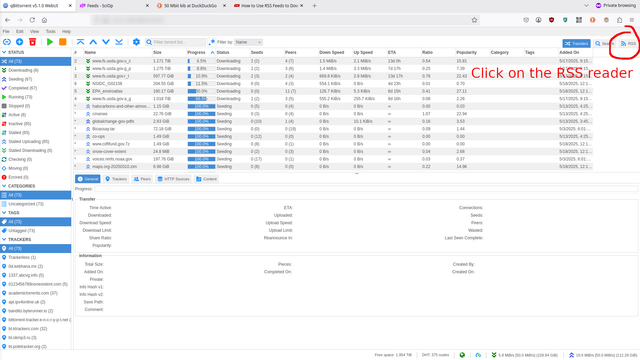
I am happy to report that @SafeguardingResearch 's torrent swarm now has ca 14 TB storage and a Gbit connection more.
#sciop #safeguardingresearch #academicchatter
What I really did was dust off a bunch of random junk-drawer hard drives and tinker with LVM and docker settings for an evening.
If you think "I bet I can do this in half an hour", please go ahead and help the swarm.
If you haven't the foggiest idea what this is about but want a chance to do some good in the world, let me know and I'd be happy to help with setting up whatever you have available.
Maybe, together, we can keep the doom at bay for a little while.
@SafeguardingResearch Holy cow, this blew up. Thanks for your attention, lovely people of the fediverse.
If you want to reproduce what I did, here's a rough guide:
1) Grab an old PC / Laptop / Raspberry pi, whatever you have lying around. If it has a network connection and some storage, it's probably fine.
2) Install Linux on it. Ubuntu is fine most of the time. I used Ubuntu server following this guide: https://ubuntu.com/tutorials/install-ubuntu-server#1-overview
@SafeguardingResearch (Ubuntu server is text-only and therefore requires some use of the command line. If you'd rather have a graphical interface, install regular ubuntu following this guide instead: https://ubuntu.com/tutorials/install-ubuntu-desktop#1-overview )
3) Update the system by running this in the command line:
sudo apt update && sudo apt upgrade -y
4) Add storage to the system. This can be as simple as an external hard drive.
5) Figure out where the storage is mounted. In the command line, check:
cat /etc/mtab
Typically the external disk (or your lvm volume) should be on the last line and look like this:
/dev/sdg1 /home/user/externaldisk ext4 rw,relatime 0 0
the first item (/dev/sdg1 in this case) is the external HDD, and the second item (/home/user/externaldisk in this case) is where it is mounted in the system. Copy the second item.
6) Make three folders for the docker container. In the command line (replace <wherever your hdd is mounted> with the copied item):
mkdir <wherever your hdd is mounted>/config
mkdir <wherever your hdd is mounted>/config/qBittorrent
mkdir <wherever your hdd is mounted>/downloads
7) Download the qBittorrent.conf from here: https://archive.org/details/qbittorrent_202505
Place the qBittorrent.conf in the mkdir <wherever your hdd is mounted>/config/qBittorrent file.
I adapted it so that the web interface is accessible from within your home network, using the following credentials:
name: sciop
password: safeguardingresearch
8) Place the run_qbittorrent.sh script ( https://archive.org/details/qbittorrent_202505 ) in the config folder:
(I adapted this from here: https://pimylifeup.com/docker-qbittorrent/ )
Adapt lines 11 and 12 to point to your storage. In the command line, you can use
nano run_qbittorrent.sh
-v <wherever your hdd is mounted>/config:/config \
-v <wherever your hdd is mounted>/downloads:/downloads \
9) Make the script executable:
chmod +x <wherever your hdd is mounted>/config/run_qbittorrent.sh
10) Test whether docker works correctly. In the commandline, run:
docker run hello-world
The response should start with:
Hello from Docker!
This message shows that your installation appears to be working correctly.
11) Start the container by running the script:
<wherever your hdd is mounted>/config/run_qbittorrent.sh
Your output should look as follows:
user@dustyoldstoragepc:~/externaldisk/config/run_qbittorrent.sh
qbittorrent
12) You should now be able to access the web interface from your home network by typing http://<your storage PC's IP>:8080 into your browser.
You can check the ip address in the command line of your storage PC with the command line:
ifconfig | grep 192
The output should look as follows:
inet 192.168.1.71 netmask 255.255.255.0 broadcast 192.168.1.255
Your PC's IP address is the first one. In this example, the web interface is at http://192.168.1.71:8080
13) The web interface should look like this.
14) Enter your credentials into the web interface, it should look like this. Per the configuration in step 7, the credentials should be as follows:
name: sciop
password: safeguardingresearch
You can change those later in the web interface under Settings -> WebUI.
15) Add a torrent by copying the magnet link from sciop.net. You can sort the datasets by endangerment or by the number of other people seeding it.
https://sciop.net/datasets/?sort=-threat
Pick a dataset, right-click on the blue magnet and copy the link.
16) Back on the web interface, click File -> Add a torrent link and paste the magnet link into the box. You can add several magnet links at once if you enter each on a new line (=hit Enter between links).
17) Scroll down and press the Download button. Now the qBittorrent program should start downloading and sharing the data.
18) Repeat until your harddisk is full. Thank you for keeping a tiny sliver of humanity's collective knowledge from disappearing forever!
19) Optional optimalizations: If you want to change upload/download max speed, click the Settings symbol -> Speed -> Upload/Download speed. The speed is set to a rather high 50 MByte/s, i.e. slightly less than half a Gigabit connection. The speeds are denoted in Kibibit/s, you can convert the units to something more common by typing e.g. "50 Mbit kib" into e.g. https://duckduckgo.com
20) Optional optimalizations: If you want to change the web interface password, go to Settings -> WebUI and filling in the new user/password combo. Don't forget to scroll down and click "Save" to make the changes stick.
21) Much easier way to add torrents via RSS feeds, with thanks to @hazel for pointing this out. This is adapted from the following guide: https://www.makeuseof.com/tag/how-to-use-rss-feeds-to-download-torrents-easily-and-automatically/
22) Skip steps 15-17. Instead, go to https://sciop.net/feeds and copy one of the RSS feeds that you think is interesting. The curated RSS feeds at the top are sorted e.g. by threat level (extinct, takedown_issued, etc), or whether there are few seeders. Otherwise, pick one of the tags from the list below.
23) In the qbittorrent webUI, go to Settings -> RSS, and check the "Enable fetching of RSS feeds" and "Enable auto-downloading of RSS torrents" checkboxes. Don't forget to hit Save to make the changes stick.
22) Then click on the RSS logo to the very right side at the top of the web interface. This takes you to the RSS reader.
23) Click on the "New Subscription" button on the left. Then, paste the RSS feed link from https://sciop.net/feeds into the popup field and click "OK"
24) To automatically keep downloading any torrent that gets added to the RSS feed, click "RSS Downloader" on the very right side.
Then, create a new rule by clicking the blue + in the pop-up.
Then select the new rule, check the "Use Regular Expression" checkbox, and leave the fields below blank. This will mean that any torrent in the feed gets auto-downloaded, now and in the future.
Select the RSS feed you just added, and click "Save" to apply this rule.
25) The newly added torrents should now show up at your Transfers.
@delaiglesia Ah yes. I live in NL, where fiber internet is the default (for new buildings) since a couple of years, so it's just what our house was built with. This would have been pretty impossible if I had still lived in Germany.
(For a per-country comparisons on market penetration see e.g. here: https://www.oecd.org/content/dam/oecd/en/topics/policy-sub-issues/broadband-statistics/data/1-10-fibre-in-total-broadband.xls )
@aizuchi @moritz_negwer Take your pick :)
We got 349 torrents making up 104.1 TiB (193 datasets) and new ones are always coming
Yes of course! If you want the raw text and screenshots without having to pull them out of mastodon, let me know :)