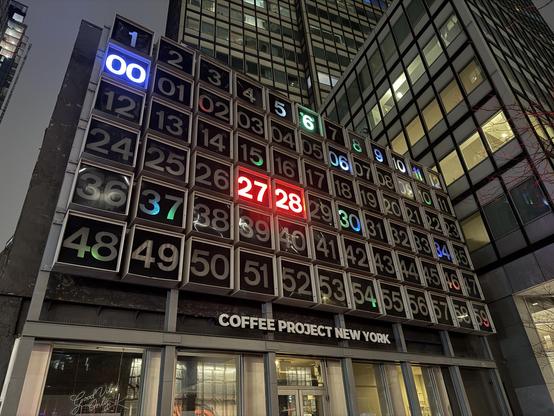
I always thought I'm not a DIY person - I'd prefer to take a ready-made thing off the shelf, or assemble something from ready-made components. That being said, I started to think I was delusional. 😅 One day we stumbled upon this clock in NYC's FiDi and my son got obsessed with it. All my attempts to figure out the name of this installation have failed so far, so I'm sticking with what some LLM hallucinated when I tried to lean on it during my little name-finding investigation - #IndicesOfTime.
I think it's a little broken by now and I assume the original intent was to use different colors for highlighting current hour/minute/second. We would be coming back every week so my son could look at it, and I thought about buying a replica to put on a wall, which obviously I wasn't able to find. So... I decided to build one in my own. ¯\_(ツ)_/¯ And as I was coming across other makers' projects on FediVerse, I thought I'd share mine as well. #IndicesOfTime
I was clear it's not going to be easy and it's going to take a lot of time, but I also felt like I've got skills to get it done. At the same time, as my objective was to get it done rather than spend time and abandon along the way, I decided I'm not going to optimize for cost (within reasonable boundaries), but for progress. E.g., I'd pay $20 for an ESP32 PCB wired to drive addressable LEDs, rather than solder resistors and capacitors to a $5 bare-bones ESP32 MCU. #IndicesOfTime
In grand scheme of things, the plan was quite simple. I need a frame that will hold everything together, a bunch of cubic "shells" for each number, a bunch of number cut-outs, a bunch of light diffusers to place behind those cut-outs, and a bunch of addressable LEDs wired to a micro-controller like ESP32. Maybe with a stretch-goal of a real-time clock to keep track of time when not connected to the power. I'd also need firmware to blink those LEDs, and lots of patience. #IndicesOfTime
Looking at file attributes, it looks like I started on February 2nd this year, and by today on March 22nd I think I'm about 80% done. I'd get to work on this only occasional in spikes (when everyone fell asleep and I got few hours of free time he-he), which would probably translate to about 2 hours per week on average. Not counting 3D-printing time, shopping for components or filament etc. Projecting progress so far, it looks like about 20 hours of total effort end-to-end. #IndicesOfTime
The first challenge I faced was to decide on the size of the replica. Didn't want it to be too tiny, but neither wanted it to be too huge and bulky. With #Prusa Mini as my 3D-printing workhorse with 180 mm of working area, I knew I won't be able to print it as a single part anyway and eventually decided to work backwards from the digits size and go with smallest comfortably readable from a distance, which ended up being 25mm for the "number square." #IndicesOfTime
And while at that, I immediately faced another unexpected challenge: picking a font for the digits. 😅 I knew I wanted a monospaced font, but there are so many of those. But also, the idea is to have a black plate with number as a cut-out, meaning there cannot be any "isolated" regions in digits such as 0 and 8 - those round "holes" would just fall off. And while stricken-through 0s are common, not so 8s. Eventually, the only idea I had was to use a 7-segment like font. #IndicesOfTime
There are quite a few 7-segment style fonts, but none looked exactly like I wanted, and most trial prints were flimsy and falling apart due to very narrow "bridges" connecting inner sections. After banging my head against a wall for a while, I found fantastic @glyphrstudio in which I was able to basically create a new font from scratch for my needs based on other examples I saw on the web. Never dealt with fonts before, but Glyphr Studio made it feel really easy! 😍 #IndicesOfTime
Now having a decent font that fits the need I was able to move to the enclosure. This was relatively easy part - just a little tedious with my Blender skill level to - couldn't think about any other way but to define 3 cubes such as one serves as the base and 2 others serve as cut-outs to achieve a hollow "shell" with a "step" on which the number cut-out would rest. #IndicesOfTime
The next step was the grid which should hold the number enclosures. I decided to deviate a bit from the original design and do my replica as 5x12 grid such that hours, minutes, and seconds would be displayed across the same 60 LEDs using different color channels (obviously hours would use only first 2 rows with first 24 LEDs). #Blender's boolean filters were my bread and butter for this part and and it was just a matter of many tedious hours to get it done. #IndicesOfTime
And to make space for electronics and wires at the back, I decided to add a hollow "base" that the grid would attach to, and that would allow it to stand on its own or to hang on a wall. #IndicesOfTime
And while I'm glossing over it like it was no big deal, out of 7 weeks I've been working on it so far, 3D modeling took 6. It's pretty simple when you look at the end-result, but the way to get to it through countless unsuccessful attempts was quite grueling. I think the root cause here is my limited ability to think about objects in 3D space.Or maybe lack of Blender skills, or using a wrong tool for the job? Maybe it would've been easier in Fusion 360 if I knew how to use it. 🤔#IndicesOfTime
Actually, that took 5 weeks, not 6. I then had to face a challenge of how to slice the object into pieces such that I can print with #Prusa Mini's 180mm print area, so that I can then put it back together. That was another journey of its own, during which I learned that my intuition about how virtual object can come together in real world was completely off. Nevertheless, 1 Kg of of PLA filament later, I've got pieces to come together and hold even without glue. #IndicesOfTime
Now, there was one piece I left out - the light diffuser. I knew it'd have to be about 6mm deep square with a side of 25mm of semi-transparent material to diffuse the light from the LED, but I wasn't sure about the cutout shape to house the LED. And finding the right LED ended up being another unexpected challenge. There are lots of addressable light strips out there based on WS2812, but most are too bulky for the project. And I was dreading soldering 60 LEDs manually. #IndicesOfTime
I did find one that fits, but that was unexpectedly hard. And my biggest worry is that it was the only thing of that kind I could find - all other WS2812 strips used much larger LEDs with bulkier cables which would've made it much more challenging to put together. I hope I wasn't searching good enough and there are plenty of similar LED on the market, but the only one I've found is this one https://www.amazon.com/dp/B0CQRFCK35 #IndicesOfTime
Amazon.com

And with that, I've got all of the pieces I need - and that's where I'm today. All in all, I've got 2 base segments, 3 grid segments, 60 number cutouts, 60 diffusers, and 60 enclosures, which together total at about 60 hours of print time on #Prusa Mini. And while that's under way, I've started looking into hardware and firmware aspect of the project so that the LEDs would actually blink. #IndicesOfTime
For the hardware, I knew I wanted to go with ESP32. It's ubiquitous and cheap. While I have some experience programming for it, my intent was to actually avoid need to do so thanks to the fantastic #ESPHome. It's surely an overkill for this project, but it would just take few dozen lines of YAML config and would give me Over-the-Air updates, logs and what not. So here I am, looking for a way to drive WS2182 with an ESP32 controller. #IndicesOfTime
While it seems to be as simple as connecting the LED strip to the ESP32 pins, apparently the common wisdom suggests including an extra capacitor and a resistor to stabilize voltage and current. As I wanted to err on the side of off the shelf components, I was delighted to find MagWLED-1 that took care of all those nuances. #IndicesOfTime
Now that I could just plug the board into a random USB power adapter, and the LED strip into the board, the only remaining piece was software. Since I was relying on #ESPHome, it was just a matter of setting up my #HomeAssistant as a time-source and wiring a loop to switch LEDs every second. The only tricky part was translating indices to take into account LED strip being a single continuous sequence of lights arranged in a zigzag manner. #IndicesOfTime
Now that I was excited about putting everything together, I realized that I screwed up - as I was contemplating the base layout between 6x10 and 5x12 I ended up designing 3D models for 6x12. 🤦‍♂️ Not that it was hard to change the models to remove an extra row, but it meant another 2 days of printing. But at last, it was ready #IndicesOfTime
Assembly itself took several hours - while I was proud that it held together exclusively by tension and not glue, it also meant that it was pretty hard to fit pieces together, and then run the LED through 60 cells. #IndicesOfTime
While I ended up working on it for about 10 weeks (from few hours once a week to few hours every evening), and probably spending upwards of $100 on materials and components, I'm extremely satisfied with the end result. I knew it will be a long project with lots of challenges, so having all 245 pieces printed, coming together and lightning up felt as quite an accomplishment. #IndicesOfTime #diy #diyprojects #maker