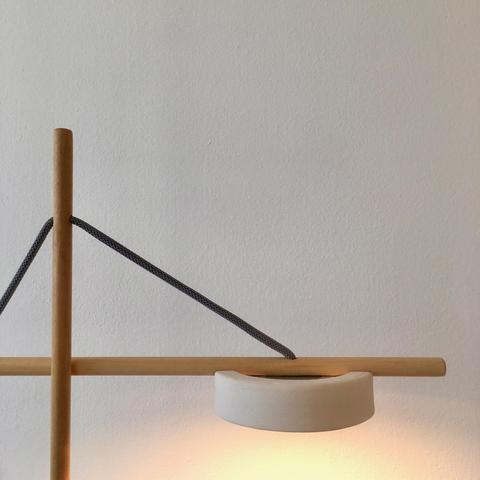
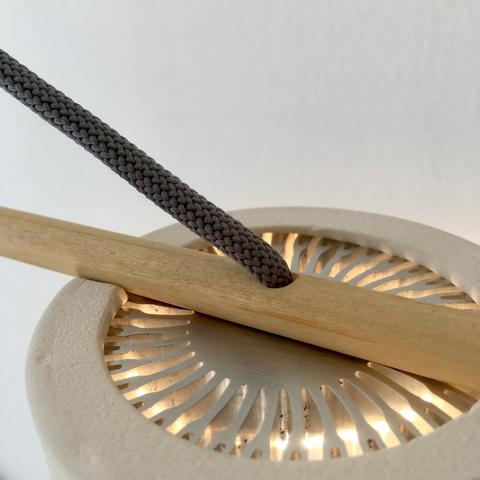
One issue with this shameless display of the heatsink is that it should at least be left more or less presentable for that. Normally the heatsinks are hidden inside the luminaire because they are considered ugly and not very aesthetic, but that is an idea I do not share, as you can see in my other prototypes ๐Ÿ˜.

This is how the heatsink comes from the manufacturer, and sometimes they come worse than that with steps from the sawing.

๐Ÿงต #PortuariaLamp #LED #heatsink #lamp #prototype

f it is going to be hidden, it is enough to level only the part where the LED will make contact so that it has good thermal transfer. But here it is part of the visual of the product, so I proposed to leave it as mirrored as possible.

The steps were 220 grit sandpaper, fine sanding sponge, superfine sanding sponge, and rubber abrasive block (I have no idea what grit these last three are).

๐Ÿงต #PortuariaLamp #LED #heatsink #lamp #prototype

Putting the heatsink so exposed also has a technical reason; doing that maximizes the air flow through the heatsink, which reduces the working temperature of the LED and extends its useful life.

It would need one more step with some finer grit, because the scratching is still a bit visible, but it turned out pretty mirror-like compared to how it was initially ๐Ÿ’ช.

๐Ÿงต #PortuariaLamp #LED #heatsink #lamp #prototype

Shellac is my favorite finish for wood. Some reasons for this are:

- It is of biological origin, since it is obtained from the secretion of an insect from Southeast Asia.

- It can be diluted in ethyl alcohol, a relatively safe solvent also of biological origin.

- It is not toxic, it is even an authorized food additive under code E904.

- Easy to apply and repair locally if it gets scratched.

- Biodegradable in reasonable times.

๐Ÿงต #PortuariaLamp #shellac #woodworking

Shellac is sold in flakes to dissolve or in a ready-made solution with alcohol. In both cases it has a limited storage time of one to two years. In the case of flakes, what happens is that it polymerizes and then no longer dissolves in alcohol.

It already happened to me with a batch of flakes that were left unused for two years. With the next batch I bought, I set out to prevent the same thing from happening to me again.

๐Ÿงต #PortuariaLamp #shellac #woodworking

I read that you can extend the shelf life by lowering the temperature and humidity the flakes are exposed to, so the plan was to seal portions with silica gel in vacuum-sealed packs, store the packets in an airtight glass jar, and store the jar in the refrigerator.

Two years have passed and the flakes from that batch still completely dissolve in alcohol in just two hours, as if they were freshly harvested ๐Ÿฅณ.

๐Ÿงต #PortuariaLamp #shellac #woodworking

The time has come to assemble the base. The idea is to have a printed circuit board with the voltage booster, resistors, and connectors for the LED and the switch, and at the same time to act as a cover for all the wiring.

Sending the printed circuit board to be manufactured in China as usual implies a delay of at least a month in the mail, so I decided to improvise something with a blank board. It didn't turn out so bad ๐Ÿ˜.

๐Ÿงต #PortuariaLamp #lamp #woodenlamp #electronics

First working prototype of the Portuaria Lamp! ๐Ÿ’ช

Although it is a desk lamp, I will be using it as a bedside lamp to test the mechanical stability against being hit in the dark.

There are still several things to improve:

- The cotton-covered cable gets very linty and stains very easily.

- The ceramic screen also needs modifications. I can see the screws ๐Ÿ˜ฑ.

- Making the vertical axis of the lamp perfectly square is hard ๐Ÿคฏ.

๐Ÿงต #PortuariaLamp #lamp #woodenlamp #woodworking #LED #productdesign

Trying other cable colors. I got some colored polyester cords (plastic ๐Ÿ˜ฑ) to cover the lamp cable. The idea is to solve two problems that the white cotton cord has: it gets very linty and stains very easily.

Of the four, I chose the orange one because I thought it was the one that best matched the wood of the base. I took the whole lamp apart, reassembled the LED cable with the orange cord, put the orange cable in the lamp... and I didn't like how it turned out ๐Ÿคช๐Ÿคฆโ€โ™‚๏ธ.

๐Ÿงต #PortuariaLamp #lamp

What I didn't like is how the contrast between the orange cable and the wood of the rods looks. I had only compared it with the wood of the base before putting it on and it looked good, but the wood of the rods being lighter and with less grain is totally overshadowed by the striking orange cable.

So I took it all apart again and put the grey cord on, which doesn't conflict with the wood of the rods... but now the lamp is very sober and boring! ๐Ÿ˜‚.

Keep trying ๐Ÿคทโ€โ™‚๏ธ.

๐Ÿงต #PortuariaLamp #lamp

I'm working on a new screen for the prototype. This time custom made instead of recycling what was lying around from previous projects.

๐Ÿงต #PortuariaLamp #lamp #prototype #ceramics

The things this new screen design aims to improve are:

- Ease of assembly. Placing the LED in place while tightening the screws was no fun at all ๐Ÿคฏ.

- Mounting the LED with connectors instead of soldering it, to make it easier to repair ๐Ÿ› .

- Avoiding the cable and screws being visible through the gap between the heatsink and the screen.

- Improving the airflow through the heatsink by creating a chimney effect.

๐Ÿงต #PortuariaLamp #lamp #prototype #productdesign #ceramics #lampdesign

This task is kind of delayed because the clay is sabotaging the perfect circularity of my pieces ๐Ÿ˜‚.

Because of the unorthodox shape for a ceramic piece, the circle dries unevenly and ends up becoming an ellipse ๐Ÿคจ.

Slow drying over several days didn't work either. So I turned to the wisdom of r/Ceramics on Reddit to see how I could fix it and they threw out a few ideas that I need to try.

To be continued...

๐Ÿงต #PortuariaLamp #lamp #prototype #ceramics #lampdesign #productdesign

I made a USB cable that matches the cable I put in the lamp ๐Ÿ˜Ž.

It only has two conductors because it will be used to send power and does not need the data pins, if someone wants to use it to transfer data they will be in for a disappointment ๐Ÿ˜ (probably the me of the future ๐Ÿคฆโ€โ™‚๏ธ).

The white tubes are heat shrinkable tubes that come coated with glue inside. I have not grey heat-shrink in stock, so I used a white one that was around here ๐Ÿคทโ€โ™‚๏ธ.

๐Ÿงต #PortuariaLamp #lamp #prototype #USB

The heat shrink on the USB-A side turned out pretty good because the metal USB plug gives it shape, but on the USB-C side it turned out kind of a mess because there is nothing uniform underneath. I am still quite happy with the results of this improvised technique to assemble USB plugs.

๐Ÿงต #PortuariaLamp #lamp #prototype #USB

Working on the second prototype, now with more angles for greater pleasure ๐Ÿ˜‚.

In the previous prototype, making the cutouts in the round rods and aligning the holes turned out to be quite complicated. And the result didn't convince me much either, because it had a more crafty style than a designer lamp one ๐Ÿคจ.

So to change the look and simplify the manufacturing, I tried using square and rectangular rods.

๐Ÿงต #PortuariaLamp

I made them different on purpose, to add contrast between the rods. Making the vertical rod rectangular also helps prevent the wood from bending due to the weight of the lamp head.

And look who's back, the orange cable! Because I like how it matches the eucalyptus wood rods.

Another reason to use eucalyptus wood instead of "palo blanco" wood for the rods is that, as with all other native woods in Argentina, everyone cuts them down and no one replants them ๐Ÿ‘€.

๐Ÿงต #PortuariaLamp

The LED is running at 48.6 C. Pretty good considering the maximum operating temperature is 105 C ๐Ÿฅณ.

What's not so good is the voltage regulator temperature, which is at 50 C. We're in winter now and the room was at 19 C, so it's running at 31 C above ambient. In the summer heatwaves it could reach 35 C + 31 C = 66 C.

While the recommended maximum is 85 C, those 66 C won't help achieve the goal of a lifespan that is counted in decades ๐Ÿค”.

๐Ÿงต #PortuariaLamp #electronics #LED #regulator

One way to reduce the regulator temperature is to use a more efficient one.

The regulator PCB I'm using is based on Aerosemi's MT3608. Measuring the incoming and outgoing current and voltage gives an efficiency of 86%, which is a very decent number for a switching regulator boosting from 5V to 18V.

Maybe by using some of the latest ICs the efficiency can be increased to ~92%, but I don't think this will be enough to solve the temperature problem ๐Ÿค”.

๐Ÿงต #PortuariaLamp #electronics #efficiency

New ceramic lampshade design. Apart from the fact that the piece deformed when drying and that I sawed and sanded it after firing, it turned out "acceptable".

I like the fit between the wooden rod and the ceramic. The thermal design got a little worse; it now works at 1 or 2 degrees warmer than before.

And what I liked least is that now the lamp head is very large in relation to the base ๐Ÿคจ. So I have to think about how to fix this ๐Ÿค”.

๐Ÿงต #PortuariaLamp #lamp #prototype #woodlamp #ceramic

There are days when you wake up feeling a bit like Jony Ive, except for the tolerances ๐Ÿ˜‚๐Ÿ™ˆ.

This is the base of the second prototype of the Portuaria I'm working on now. The change in shape is to give more visual weight to the base with respect to the ceramic screen, because in the previous prototype I didn't like how that relationship turned out.

๐Ÿงต #PortuariaLamp #lamp #prototype #woodlamp

Another change is that instead of the printed circuit board it has an aluminum plate to better dissipate the heat from the regulator. The goal is to create a product that lasts several decades in regular use, and the rule of thumb is that for every additional 10 C the useful life is reduced by half.

It's probably not the final shape of the base, I'm already thinking of a third prototype that needs less sanding! ๐Ÿคง.

๐Ÿงต #PortuariaLamp #lamp #prototype #woodlamp

New LED holder design, now with connector so you can change the LED without having to use a soldering iron ๐Ÿ˜Ž.

I did it to be able to mount the Bridgelux V8s I'm using, with 3mm polycarbonate scraps I had around here.

The future plan is to migrate to the Bridgelux V6s, which have more standard measurements and can be used with TE's Z35 holders.

๐Ÿงต #PortuariaLamp #lamp #prototype #LED #holder #lighting #DIY

Portuaria 0.3!

- More angles! Square and rectangular rods add contrast; it's easier to align the holes and slots when making them; and they use the same eucalyptus wood as the base instead of Palo Blanco.

- Larger base surface. The idea was to give the base more visual weight in relation to the ceramic screen, turning the circle into a rounded square without modifying the width and length. But I think I went overboard and now it's too big ๐Ÿ˜‚.

๐Ÿงต #PortuariaLamp #lamp #prototype

- Aluminum heatsink for the voltage regulator. This worked quite well, the temperature of the circuits dropped 10 C compared to the previous version.

- New LED holder with connector. This allows changing the LED without needing a soldering iron, increasing repairability ๐Ÿ’ช. Made of polycarbonate for now, but perhaps ceramic in future versions to reduce plastic parts to the minimum necessary.

๐Ÿงต #PortuariaLamp #lamp #prototype

Recalculating! I've been doing measurements of various parameters on the last prototype, and I'm less and less convinced that it's a good idea to run a 5 watt lamp from a 5 volt USB ๐Ÿคจ.

Here's the list of problematic issues:

- Crappy USB cables ๐Ÿ‘€. Unless they're of very good quality, they use very thin conductors and connectors with dubious plating. This produces a significant voltage loss of up to 0.4 volts with the currents that the circuit handles.

๐Ÿงต #PortuariaLamp

- USB chargers. Usually you can only use up to half of the maximum current without the output voltage dropping too much.

- The voltage regulator I'm using loses efficiency if the voltage drops below 5 volts, and it gets too hot ๐Ÿฅต.

- The total efficiency is terrible, it only reaches 63% due to all the power losses from the previous points ๐Ÿ˜ฑ. The Huanacus I built before with a simpler circuit that was only an 18 volt transformer, an LED and resistors reached 80% efficiency ๐Ÿ˜.

๐Ÿงต #PortuariaLamp

But don't panic! ๐Ÿ˜ I have a plan: Use a step-down LED driver like the one in the photo, with a switching transformer from 18 to 30 volts... or 20 volts from an USB-PD ๐Ÿ˜Ž.

The first tests gave a total efficiency of 87%, an amazing improvement ๐Ÿคฉ. There are still some issues with the flickering produced by the LED driver (a whole topic, it's for another post), but they are being resolved ๐Ÿ’ช.

๐Ÿงต #PortuariaLamp #LED #driver #efficiency #flicker #electronics #USB

The design of the dimmable version of the Portuaria is progressing, slowly but it is progressing ๐Ÿฅณ.

Organizing the wiring of the components inside the base was quite a challenge because there are things with fixed positions (potentiometer, LED cable, vertical rod and power plug) and the circuits have to fit into the gaps between those things ๐Ÿคฏ. I think it could be simplified more, but for now everything fits into its place.

๐Ÿงต #PortuariaLamp #lamp #prototype #LED #driver #dimmer #electronics

I also managed to stabilize the driver circuit to reduce the oscillations of the light intensity to less than 0.2% (2 mV, 0.84 lumens), from 72% that the original circuit had ๐Ÿ˜ฑ. The trick was to add four 22 uF ceramic capacitors in parallel to the LED, and another 10 uF at the potentiometer input.

The goal remains to simulate natural lighting as best as possible, and after all, the sun does not flicker ๐Ÿค”.

๐Ÿงต #PortuariaLamp #lamp #prototype #LED #driver #dimmer #flicker #electronics

New electronics design that improves energy efficiency from 63% in the previous USB version to 79% with a new circuit that uses USB PD at 20V ๐Ÿ˜Ž.

๐Ÿงต #PortuariaLamp #lamp #prototype #LED #driver #USB #PD #electronics #efficiency

The problem with the previous circuit, which worked with the 5V of the common USB, is that it had a lot of power losses due to the inefficiency of working at such a low voltage. The charger got very hot due to the low conversion efficiency from 220V to 5V, power was lost in the cable due to the 1.4A current, and the step-up worked hard if the voltage dropped much below 5V due to using a charger or cable of dubious quality ๐Ÿ‘€.

๐Ÿงต #PortuariaLamp #USB #efficiency

The solution? Use the new USB PD chargers, which can deliver different voltages if we ask them nicely ๐Ÿ˜. I'm using a board with the HUSB238 to ask the charger to give me 20V, which is enough to turn on the 17V LED and makes everything work more efficient and cooler because the current in the cable is only 0.25A, converting from 220V to 20V is more efficient, and the step-down to regulate the LED current is more efficient than the step-up of the previous version.

๐Ÿงต #PortuariaLamp #USB #USBPD

But not everything is pure pleasure in the world of USB PD. The USB PD charger I'm using is not a big deal, and has a standby power consumption of 0.125W when it's working at 5V (unpresentable for 2024 ๐Ÿ™ˆ), but when it's put to work at 20V the standby consumption goes to 1W! ๐Ÿ˜ฑ. A 5W lamp that consumes 1W when turned off?!?! ๐Ÿ’ฉ

After a couple of days pondering this depressing result, I thought of trying something: Make the charger go back to 5V when the lamp is off!

๐Ÿงต #PortuariaLamp #USB #USBPD

The first attempt with the IP2721 chip didn't work because that chip can't renegotiate another voltage after power on, but I found another chip that can do it: the HUSB238! ๐Ÿฅณ

The trick was to put a double switch and another cable to the HUSB238 so that when turning off the lamp it asks the charger to go down to 5V, and the result was quite interesting: 0.19W in standby, 80% less than before ๐Ÿ’ช.

More efficient USB PD chargers with GaN chips are already on the way...

๐Ÿงต #PortuariaLamp

Experiments with an alternative wooden lampshade. The problem with the ceramic screen I was using is that it is very difficult to manufacture, because it deforms when it dries due to the cutouts it has. The only way to avoid that that I found is to make the cutouts after the piece is already baked... and that takes a looooong time with saws and diamond micro-files ๐Ÿคฏ.

๐Ÿงต #PortuariaLamp #lamp #prototype #woodworking

Making the wooden screen is a more precise and predictable process, because it does not shrink between 5% and 9% like ceramic. It takes a lot of sanding work to get an acceptable finish, but eventually the rough cutting part of the piece could be sped up with CNC ๐Ÿค”.

๐Ÿงต #PortuariaLamp #lamp #prototype #woodworking

But the problem now is that everything looks very woody and very brown ๐Ÿ˜. I liked the contrast of materials that the ceramic made. So, continuing with my materials hysteria, I now started trying to make the same shape of the wooden screen (held with screws from below) but in ceramic, which would need only two holes that are easier to make than the one with cutouts.

๐Ÿงต #PortuariaLamp #lamp #prototype

Found some unexpected problems with the LED driver in the USB-PD version of the lamp ๐Ÿคจ. It seems the PT4115 chip I'm using is VERY sensitive to ESD on the DIM input, and I already toasted one of the two boards I have.

It would have been nice to know that the PT4115 was such an unreliable chip before ordering the 20 boards with the same chip that are now coming from China ๐Ÿคฆโ€โ™‚๏ธ.

๐Ÿงต #PortuariaLamp #lamp #electronics #LED #driver

I implemented a protection for the remaining board, with a resistor and a zener diode as explained in a comment here: https://forum.arduino.cc/t/difficulties-with-pt4115-dim-pin/210874

And I also added a Schottky diode to VIN just in case the problem was a polarity reversion between CSN and VIN pins when the lamp is turned off and VIN goes back to 5V while the flicker-filtering capacitor in parallel with the LED is still charged at about 17V ๐Ÿค”.

๐Ÿงต #PortuariaLamp #lamp #electronics #LED #driver

Difficulties with PT4115 dim pin

Hi ! My project is to build an RGB light like the Philips Living colors but cheaper and smaller while brighter. The lamps will be connected together with 2.4 gHz modules (using nrf24l01 chips as they are incredibly cheap !! (As it is my first post on don't hesitate to correct me if I did anything wrong on this post ! ) I've google a lot about mood lamp, high power leds (RGB, RGBA, RGBW...) and on led drivers. I found many very interesting projects. As I have limited number of instruments (un...

Arduino Forum

Things got really cramped when fitting the larger board with the extra protections into the space of the previous smaller board ๐Ÿ™ˆ.

๐Ÿงต #PortuariaLamp #lamp #LED #driver