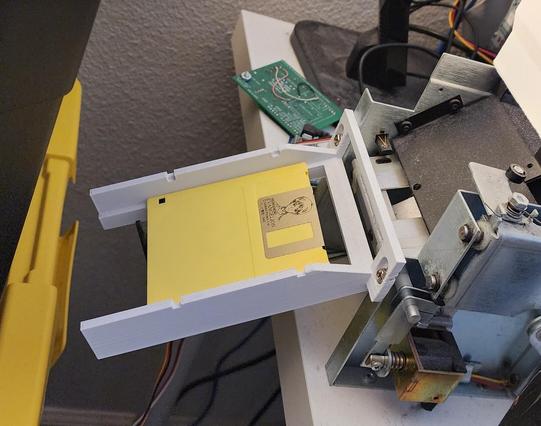
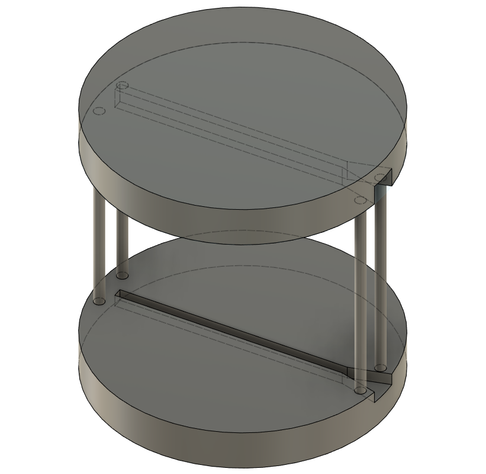
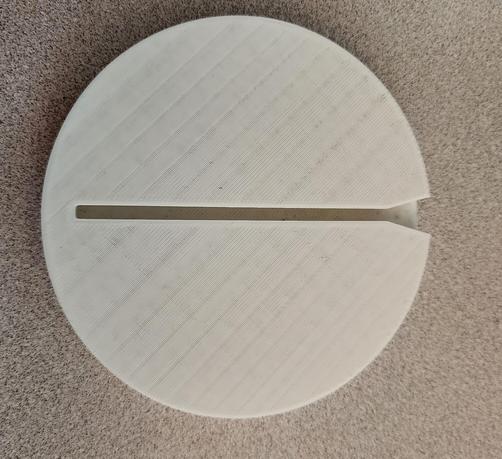
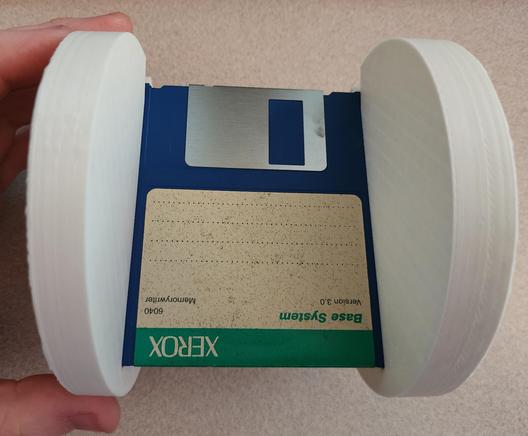
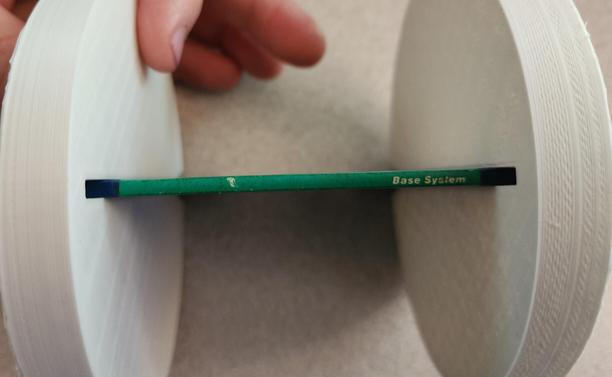
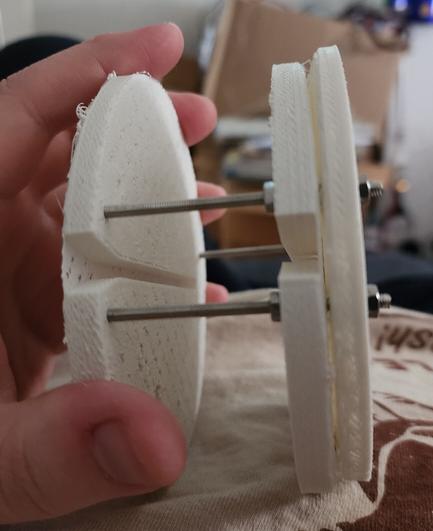
Properly photographing a 3.5" floppy disk for archival is annoyingly complicated. The label has THREE sides!

I've already built an automated system to take a picture of the front of a disk, but really I need to take THREE photos if I want to get the whole thing.

That means either three cameras or I need to rotate the disk 90° and then 180°, which is going to really stress the limits of my mechanical engineering skills.

So the front is easy. The disk slides down a slide, it's stopped by a servo, I take a picture with a camera aimed down at it.

The back... Either I flip the disk, or I have a camera under the disk which takes a picture aimed up.

And the edge is the worst. I can't have a camera aimed at it unless I either move the camera out of the way of the disk, or I make the disk move in an L shape

How about this: I stick with the "stop disk and aim down" method, but I do it on a transparent surface, and I add some mirrors.

Then the disk can be photographed from three sides at once.

The only downside then is that the focus can't be exactly right, since the back/edge will be further away. I'd need to either adjust the focus while taking pictures or have some of the sides slightly out of focus
And the question of where to place the mirrors gets tricky. I'm not 100% I can even place them appropriately without getting really complicated with multiple mirrors, or having the mirrors be in the path of the disk
Mirrors could also cause a slowdown: if I can't mount them well enough that the motion of the disk and drive mechanism doesn't shake them, I've got to add an additional delay while I wait on the mirrors to stop vibrating so I can get a clean picture

If I can rotate the disk sideways I might be able to solve the edge problem. Then I could just have a second camera that aims at the edge.

I could rotate it sideways with some static obstacles, but I may need a servo mechanism or something to do a 180 flip to get the back, unless I do the transparent glass thing.

The disk comes out, it whacks into a bumper and rotates 90° sideways, and three separate cameras photograph it at once, then something ejects it?

The problem is that all possible answers for this problem (other than "don't worry about the edge and back") are either going to be tricky to design and fiddly to operate, and expensive in terms of cameras.

And some solutions are both.

The best designed option would probably be a sort of carrier that rotates. It'd have to grab the disk by the edges, but if it could move the disk from the original orientation, to 90° for the edge pic, then 180° for the back pic, it could then rotate to like 270° to drop the disk.

That might be the most reasonable option.
It would require variable focus on the camera, since the surface it's photographing is closer for the edge picture.

Or just a second camera mounted roughly parallel that is on fixed focus for the edge picture. That might be easier/cheaper to do, actually.

(since multiple fixed focus cameras for raspis can be cheaper than one camera with a motorized focus)

@foone 3 cameras, and a shelf made of glass.
For reference, this is how the floppy copier works now. The disks come out the hopper and get injected into the drive, then ejected down this slide.
@foone flopp'in, flopp'out!
The servo arm stops them right here, and the (not currently attached) camera takes a picture of them. Then the servo rotates to drop them in a box.
My idea is to replace this slide & stop-servo system with a rotating cylinder carriage. It'd have grooves down each side where the floppy can slide, and it's stopped from sliding all the way down by the enclosing 3D structure. Then it can rotate to different positions for different photos, then finally to a position that lets the floppy fall out the bottom
Quick first pass/mockup. The floppies slide into this, and then it's embedded into a larger structure that can use a motor to rotate it. One camera, three positions of the carriage, and then it rotates to drop the floppy out.
@foone for single camera use, you could ~double that radius with the floppy sitting between one edge and the center, so that when rotated both sides and the edge of the label are the same distance from the camera.
time to print it and see how it'd work.

@foone

How many floppies are you photographing that you need to automate the process?

@The4thCircle 50 at a time, thousands over time.
@foone @The4thCircle I'm almost certain for the money you're spending on multiple cameras and 3d printed gadgets you could just hire a couple poor slobs on fiverr and make them take the pictures by hand...
My proof of concept print is done.
So it gets photographed at this angle, rotates to this, then to this, and then to opening-down to drop the flop.
Rinse, lather, repeat.
@foone Does it cover up the holes, making it hard to know type?
@Thorsted Yeah, but by this point I've already imaged the disk, so I know what format it is
@foone if you make it eliptical you could use a line scanner
@foone couldn’t you just use 3 cameras and put in on a sheet of glass?

@foone Would a big enough lens be able to image all three sides at once?

...also, destructively, couldn't you break open the diskette and lay the whole label flat?

@kerio A big lens? I talk about setting up a mirror system earlier in the thread. I'm not sure what you mean by a big lens, though. I need to photograph three sides of the object at once.

And I'm not gonna do this destructively, especially because I have thousands of disks like this. I don't want to destroy them all!

@foone
Nice jig.
First thought it was styrofoam and meant to hold one (1) floppy disk inside a sealed can for long term storage.
@foone *chefs kiss* for the mechanical simplicity of it, well worth obscuring a tiny strip along the edges imho
Next step: Widen up the slide area a bit so it's smoother (ideally I'd have metal or something here, but maybe I can sand down the 3D printed surface), add holes for rods to hold it at the right width, a mount for a bearing on one side, and a servo motor on the other side.
but the purpose of this print was just to hold it in my hands and confirm I wasn't completely off base with this idea
The servo motor might not be the best way to go, it might be better to use a geared system with a stepper motor, but that's more complicated. So I'm probably going to build it with a servo motor and only look at the stepper motor option if that doesn't work out
My first rodded-prototype failed for the very out of character reason of forgetting how big 3.5 inch floppy disks are
@foone May I share unsolicited printer advice? It looks in this photo as though the nozzle is partially clogged and is causing extrusion issues. You may get better results / less fragile prints if you get a needle or nozzle unclogger folks sell.
@k1m yeh, it's a known problem. These were done very quickly when I didn't have time to clean the printer. I'll definitely fix it before I do the actual prints.
@foone As long as you know how / know it's an issue. Good luck with your floppy label digitization project.
@foone oh I know this one, they’re 3.5 inches! 😎

@madrush

Yeah, you’d think that, but, no.
It’s 90 mm.
(8 inch and 5¼ inch are 203.2 mm and 133.35 mm, tho.)

@ospalh I’ve been lied to my whole life! Ok I’m not really surprised.
(actually the reason was "Amazon sent the wrong rods and I'm still waiting on the right ones")
@foone did they send you uranium rods
@foone So with Amazon being the highest authority on retail these days, it would be safe to say you're waiting on rods from the gods?
@foone you’re ahead of the curve on the SD card archiving robot though!
@foone 'half-width floppy' (dual disk)

@foone Turns out 3.5 inch disks are 90mm.

I know, I didn't realize at the time either.

@foone is it the 1.1 missing millimetre from the imperial/metric conversion?
@altareos yeah. 3.5" floppy disks were designed by sony, who actually designed them as 90mm disks

@foone

I'd look into UHMW (https://en.m.wikipedia.org/wiki/Ultra-high-molecular-weight_polyethylene) it's what industrial grade systems would likely use here.

You can buy strips and probably secure it like your thinking the metal.

Ultra-high-molecular-weight polyethylene - Wikipedia

@foone That's awesome! I'm wondering if you can avoid having to focus the camera if you rotate the floppy at the edge and center the camera on the edge?

I made a little cardboard model: 1. Floppy goes in, picture taken of back. 2. Rotate 90 degrees, picture of spine. 3. Rotate 90 degrees, picture of front. 4. Rotate a little more and dump the floppy.

The camera distance remains the same without distortion and gravity does the alignment. Hopefully. I have no idea how finicky this would be. 😅

@ratfactor very nice work on the model. Yeah, I've considered this! I'll see how well the servo can move the whole thing when it's not balanced evenly

@foone

Have you considered painting it green, and putting it on a green background, so you can easily remove everything in the image except the disk?

@foone this does not solve the out of focus edge problem. One solution is to have the cilinder radius be double the floppy height. This way the edge is exactly at the center, so when you rotate, the subject is always at the same distance from the camera
@foone You don't have to have the pivot point for rotating the disk in the center of it. If you put the pivot point right next to the edge you also want to photograph, both sides and the edge will be at the same distance to the camera.
@foone You might be able to have it slide down into another slide at a right angle to the first, then do the slide and stop... though you still need the three cameras then.
@foone could you maybe slide the disk down already 90° rotated to the left or right? Then you could have one of the sides transparent or have slot there to take a photo of the top of the disk?
@foone What's the failure rate on Shinji floppies?