https://blog.s0.is/blog/home-workbench-storage-system-status-quo
#s0Projects #Tinkering
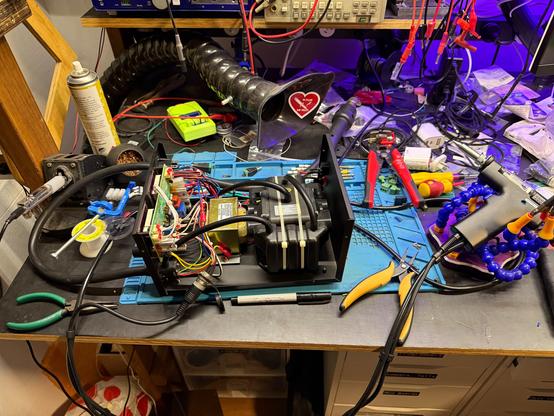
Spent a fun weekend repairing this Crown CTs 3000 power amplifier!
I bought a set of two of these (well, a 2000 and a 3000; mostly the same) for cheap at auction to be the main power amp for the venue I’m running.
I trust Crown’s designs from the 2000s/2010s very well, and they actually made schematics and service manuals available!
So I was pretty confident when I got them that if something went wrong, I’d have a good chance of repairing.
Well, that happened! I got a text to say that the amp at the theatre just wouldn’t turn on. I came and confirmed this. I swapped over the spare 2000 unit which worked, and took this one home to test.
It was clear that the protection/inrush control relay was never clicking at all, which hugely narrowed the potential faults.
A few test points from the schematic later, I found that the unregulated 28VAC that makes the 24VDC aux power rail was not coming out of the aux transformer.
Desoldered that, and bingo! One of the mains windings is open circuit.
I soldered some wires in to feed 28VDC externally, to simulate replacing it, so I could check if there was a downstream fault that caused the transformer to fail.
Nope! The whole thing powered up and worked great.
(Some minor cleaning of connectors, switches and pots was required on the input board to cure a scratchy right channel.)
So now I’ve ordered two replacements of the aux transformer — happily a drop in replacement is still made, and a few fresh new 24V fans because these have had 20 good years of service and the bearings aren’t what they used to be.
Electronics repair is such fun!
Thanks to https://github.com/omerfaruk-aran/esphome_samsung_hvac_bus project, I now have my older living room aircon unit hooked up to Home Assistant!
I used a Seeed Studio Xiao ESP32-C3 board, with a 3.3V capable fully isolated RS485 converter board that I had lying around.
Seeed also has its own RS485 Xiao breakout which would be perfect. In fact, I ordered one of those, but I forgot to wait for it to arrive! Heh.
The small black cube that has a JST connector is a miniature 240VAC to 5V 0.5A converter (HiLink HLK-PM01). I ordered several of these from a reputable supplier a while ago. They’re helpful when monitoring/controlling a device with no convenient DC supply to siphon off. (Note to self — pull this out and add a fuse inline tomorrow).
3/
I then went and opened up the other unit, and pulled out the input board. Under all the dust, a few things became apparent.
First, they revised the design to remove the stupid metal tab that you had to bend to be able to remove the input board without taking every other board out first. Nice.
Second, the only noticeable revision to the input board was replacing those exact yellow capacitors with a different kind of film/poly cap. Aha! Vindication perhaps?
Anyway, I was able to swap the newer input board into the older amp (after removing all the dust).
And then test, and yay! It worked great!
Nice quiet fans achieving plenty of airflow, chassis doesn’t get hot, no input popping. This 20-year old amp is ready for another decade or two of service, I hope.
And maybe I’ll get some filter foam over the front intake…
I’m most of the way to retrofitting my soldering & hot-air station to be a *de*soldering & hot-air station instead. I’ve added the new connector to fit the desoldering gun and wired up the trigger for the vacuum.
Only trouble is the thermistor is different to the type in the original iron (which I can’t find, but the internet suggests is a K type thermocouple?). Hopefully I can work out what type this is and bodge the op-amp circuit to calibrate it into useful range.
I THINK I'VE DONE IT!!!
I just added a regular "pong" transmit and that seems to have satisfied the other side's state machine that I'm still "connected". I should have thought of this earlier as it was part of the work I did on the serial protocol side!
Pulled my Sony NW-A45 Walkman music player out to test and it was dead. Opened it up following the great ifixit guide, and yep, looks like the battery got too low and kicked in its self-protection (this prevents a battery from being re-charged or discharged once it drops below a certain point, because the cell is likely damaged and has a higher chance of dangerous failure). This shows as the battery measuring open-circuit/0V.
Before buying a replacement, I thought I’d test with a nearby single lithium cell, and it’s happy as Larry.
Ok, I’ll order a new battery and it should work fine again!
I wrote a quick blog post about my Soldering Fume Extractor v4 finally.
It's a relatively cheap (~AU$120), compact, effective and quiet fume extractor, that uses cheap off-the-shelf filters.
Anyone who's interested in making one, check it out. If there's more interest I'll see about building a v4.5 with stronger 7mm ply.
Fifth time lucky with modelling this replacement collar to hold the clear viewing window onto a vintage coffee kettle.
The thread was an odd square-ish profile with much less trapezoidal draft than the standards I’m familiar with, so I modelled it manually in Fusion 360 with the helix function. It’s a bit annoying that you can’t directly helix a profile, but have to create a square/round one and then sweep the profile along that.
Now I will be asking a favour from friends with SLA resin printers to reproduce it in something a bit less thermoplastic, since it’s for a kettle!