Texas Instruments MSPM0G5187 and AM13Ex MCUs integrate TinyEngine NPU for Edge AI applications

Texas Instruments MSPM0G5187 and AM13Ex are two new microcontroller (MCU) families featuring the company's  TinyEngine neural processing unit (NPU) to enable low-latency, high-efficiency Edge AI/Machine Learning inference on the chips. TI claims that the TinyEngine NPU can run AI models with up to 90 times lower latency and more than 120 times lower energy utilization per inference than similar MCUs without an accelerator.  The MSPM0G5187 is a general-purpose, low-power Arm Cortex-M0+ MCU, while the AM13Ex Arm Cortex-M33 microcontroller targets real-time motor control, starting with the AM13E23019 SKU. TI MSPM0G5187 general-purpose Cortex-M0+ MCU Key features and specifications: CPU - Arm Cortex-M0+ @ 80 MHz Memory - 32 KB RAM with ECC Storage - 128 KB flash with ECC, 8 KB data flash with ECC Accelerators TinyEngine NPU for AI/ML delivering up to 2.56GOPS (Giga Operations Per Second) at 80MHz MATHACL math accelerator Peripherals USB - 1x USB 2.0 (12 Mbps) Audio

CNX Software - Embedded Systems News
Microchip PIC32CM PL10 Cortex-M0+ microcontrollers are pin-to-pin compatible with AVR MCUs, support 5V operation

Microchip has added the PIC32CM PL10 MCUs to its PIC32C Arm Cortex-M0+ microcontroller family. Pin-to-pin compatible with AVR MCUs, the new PL10 MCUs feature a range of Core Independent Peripherals (CIPs), 5V operation, and functional safety (FuSa) compliance. The microcontrollers notably integrate a 12-bit ADC with strong noise immunity, a Peripheral Touch Controller (PTC) for responsive touch applications, and two serial communication interfaces with USART, I2C, and/or SPI support. Target applications include industrial control, building automation, consumer appliances, power tools, and sensor-based systems. Microchip PIC32CM PL10 specifications: MCU core - Arm Cortex-M0+ core up to 24 MHz Memory -  Up to 16 KB SRAM (8 KB in current datasheet) Storage - Up to 128 KB Flash (64 KB in current datasheet) I/Os and peripherals Up to 55x programmable I/O pins Up to 16x external interrupts Multi-Voltage I/Os (MVIO), removing the need for external level shifters Peripheral Touch Controller (PTC)  with

CNX Software - Embedded Systems News

Ein Bastler zeigt, wie man aus einer Wegwerf-E-Zigarette mit PUYA ARM Cortex-M0+ einen Webserver baut. Sarkastischer Blick darauf, dass wir heute leistungsfähige Chips im Müll entsorgen.

https://polente.de/2025/09/15/winziges-webserver-experiment-mit-einer-wegwerf-e-zigarette/

Winziges Webserver-Experiment mit einer Wegwerf-E-Zigarette – Holger Hellingers' Polente

Heroic Efforts Give Smallest ARM MCU a Breakout, Open Debugger

In today's episode of Diminutive Device Technology Overview, [Sprite_TM] is at it again - this time conquering the HC32L110. A few weeks ago, we have highlighted the small ARM Cortex M0+ microcontroller, which is outstanding because of its exceptionally small size. We also pointed out a few hurdles, among them - hard-to-approach SDK and documentation, and difficulties making and assembling a PCB for such a small BGA. Today, we witness how [Sprite_TM] bulldozed through all of these hurdles for all of us, and added a few pictures to our collective "outrageous soldering" galleries while at it.

First, he figured out an example layout for this MCU that's achievable for us even on a cheapest 2-layer board from JLCPCB, keeping distances within the generic tolerance standards by snubbing out a few pins. As a result, we only lose access to four GPIOs - those will have to be kept as inputs, so that nothing burns out. However, that's the kind of tradeoff we are okay making if it helps us keep our PCB small and lightweight for projects where these factors matter. After receiving the resulting board, he also recorded a short tutorial on soldering such packages at home with a mere hot air gun and a few bare necessities like flux and tweezers - embedded below.

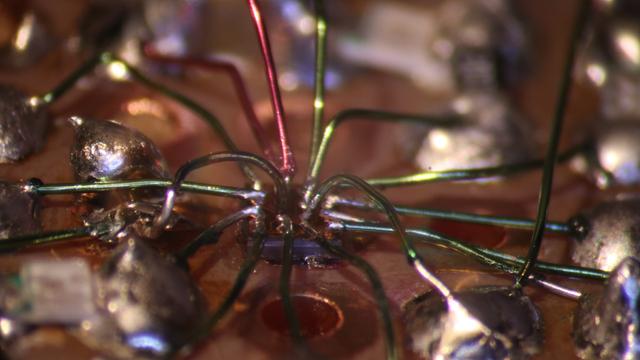
It doesn't end there, however, as he decided to work around the GPIO fanout limitation in a non-intended way. Evidently, [Sprite_TM] decided to have some fun, taking a piece of regular 0.1″ spacing protoboard and deadbugging the chip with magnet wire, much to our amusement. The resulting contraption, pictured above, worked - and this is ever something you'd like to be able to achieve yourself in times of dire need, whether you make something work or simply to be entertained by making use of a cursed mounting technique, there's an one-hour-long livestream recording of how this magnet wire contraption came to be. And, of course, that wasn't the last thing to be shared.

As a finishing touch, he has published bindings and wrappers for Huada SDK so that the chip is usable with GCC, GDB and OpenOCD. He also added datasheets to the same repository - auto-translated but quite readable. All-GPIOs-involved blinkie GIF of a magnet-wire-bound chip triumphantly concludes the write-up.

An addition to [Sprite_TM]'s toolkit is an addition to everyone's toolkit - the techniques, the insights, and the are all here for us to learn from. If you ever doubted your ability to work with small packages in general or this MCU specifically, now you have a whole lot more material to draw upon!

Wondering what kind of miniature device you might want to make? We hackers have mostly been having fun so far, building things like the USB-cable-hidden RubberDucky or a miniature PDP11, but there must be applications in, say, the wearable or medical fields where such a small MCU would prove itself to be a hacker's friend. Maybe you want to build an LED engagement ring with some Cortex-M0+ smarts? In fact, this microcontroller is small enough that it wouldn't be hard to hide inside your PCB itself.

#arm #howto #parts #armcortexm0 #armm0 #bga #chiponboard #chipscalepackage #cortexm0 #hc32l110 #huada #newpartday #sprite_tm #wcsp #wlcsp

Heroic Efforts Give Smallest ARM MCU A Breakout, Open Debugger

In today’s episode of Diminutive Device Technology Overview, [Sprite_TM] is at it again – this time conquering the HC32L110. A few weeks ago, we have highlighted the small ARM Cortex M0…

Hackaday

New Part Day: Smallest ARM MCU Uproots Competition, Needs Research

We've been contacted by [Cedric], telling us about the smallest MCU he's ever seen - Huada HC32L110. For those of us into miniature products, this Cortex-M0+ package packs a punch (PDF datasheet), with low-power, high capabilities and rich peripherals packed into an 1.6mm x 1.4mm piece of solderable silicon.

This is matchstick head scale computing, with way more power than we previously could access at such a scale, waiting to be wrangled. Compared to an ATTiny20 also available in WLCSP package, this is a notable increase in specs, with a way more powerful CPU, 16 times as much RAM and 8-16 times the flash! Not to mention that it's $1 a piece in QTY1, which is about what an ATTiny20 goes for. Being a 0.35mm pitch 16-pin BGA, your typical board house might not be quite happy with you, but once you get a board fabbed and delivered from a fab worth their salt, a bit of stenciling and reflow will get you to a devboard in no time.

Drawbacks? No English datasheet or Arduino port, and the 67-page PDF we found doesn't have some things like register mappings. LILYGO promised that they will start selling the devboards soon, but we're sure it wouldn't be hard for us to develop our own. From there, we'd hope for an ESP8266-like effect - missing information pieced together, translated and made accessible, bit by bit.

When it comes to soldering such small packages, we highly recommend reflow. However, if you decide to go the magnet wire route, we wouldn't dare object - just make sure to send us pictures. After all, seems like miniature microcontrollers like ATTiny20 are attractive enough of a proposition that people will pick the craziest route possible just to play with one. They say, the madness of the brave is the wisdom of life.

We thank [Cedric] for sharing this with us!

#arm #microcontrollers #parts #armcortexm0 #armm0 #attiny20 #bga #chiponboard #chipscalepackage #cortexm0 #hc32l110 #huada #newpartday #wlcsp

New Part Day: Smallest ARM MCU Uproots Competition, Needs Research

We’ve been contacted by [Cedric], telling us about the smallest MCU he’s ever seen – Huada HC32L110. For those of us into miniature products, this Cortex-M0+ package packs a punch…

Hackaday

Adafruit Trinket M0 Moving COM Ports in Arduino

I’ve been playing around with the Adafruit Trinket M0 board in an effort to a) move over to 32-bit Cortex M processors from 8-bit AVRs; and b) get to know CircuitPython a little more. I know there are more powerful boards, but I liked the small form factor of the Trinket M0 and see it as a good way into some of the other SAMD based boards supported by the Arduino IDE in the future too.

But the thing I want to do right now isn’t supported in CircuitPython, so I’m using the Arduino IDE.

It’s great how the board can support either, and it all started out fine, but somehow I’ve managed to get into the position where the board keeps coming up as two different serial ports under Windows.  It is COM35 when in bootloader mode (when you can see the TRINKETBOOT drive) but once I load in a sketch from the Arduino IDE and it starts running it it switches over to COM36. It was starting to get really irritating, especially when I wanted to use the serial monitor, as I was constantly telling the IDE which port to use!

There does seem to be a fix though.  I don’t know if this is a universal fix and it might cause problems further down the line, but it worked for me for now.  I also don’t know if this is a common thing for SAMD M0 boards – I can imagine it being a common issue for any board that re-uses the USB port as a serial port but under a different environment (like the Trinket does in the two modes).

In Device Manager you should be able to see the Trinket under “Ports” with the two COM port assignments as it changes.

But you can tell Windows what port assignment to use, so to make them the same do the following:

  • Check you see which COM port is in use in bootloader mode and then load a sketch and check the COM port number when running a sketch.  For me these were 35 and 36 respectively, but it will depend what other devices you’ve used (I used a lot of different microcontrollers!)
  • In Device Manager right click on the sketch COM port under “ports” and select Properties.
  • In Properties, if you aren’t already admin on your machine, you need to select “Change Settings” which has the admin icon.
  • Under Port Settings, select Advanced.
  • At the bottom you will see COM Port Number – you can select this and swap it from the sketch COM port to the same as the bootloader COM port.  Windows will show it as “in use” and check that you are sure you know what you are doing. I just pretended I did and hit “ok”.
  • You must be sure to get the right COM port here, I don’t know what happens if you choose the wrong one!  Presumably you’ll get weird things going on if you ever plug in both devices Windows things are that COM port at the same time.

    Assuming you chose wisely, at this point whichever mode the Trinket is in – bootloader or running sketches, it should be recognised by Windows as the same COM port and you no longer need to change anything in the Arduino IDE, although I still have to “double click” reset to enter bootloader mode to upload sketches.  I don’t know if this is typical – I guess so, but I can live with that.

    Note that dropping the CircuitPython bootloader back onto the Trinket sets it back to a different COM port again, but that just seems to be what it does… I’ll update this post as I discover more and if I uncover and weird side effects…

    Kevin

    #adafruit #cortexM0 #samd #serialPort #trinket #uart

    Adafruit Trinket M0

    The Adafruit Trinket M0 may be small, but do not be fooled by its size! It's a tiny microcontroller board, built around the Atmel ATSAMD21, a little chip with a lot of power. We wanted to design a microcontroller board that was small enough to fit into any project, and low cost enough to use without hesitation. Perfect for when you don't want to give up your expensive dev-board and you aren't willing to take apart the project you worked so hard to design. It's our lowest-cost CircuitPython programmable board!

    Adafruit Learning System
    https://www.raspberrypi.org/products/raspberry-pi-pico/# #RaspberryPi #RP2040 features a dual-core #Arm #CortexM0+ processor with 264KB internal RAM and support for up to 16MB of off-chip Flash. supporting #MicroPython
    Buy a Raspberry Pi Pico – Raspberry Pi

    The new, flexible $4 microcontroller board from Raspberry Pi