🎬 Porn Rafa - Yo, la primera vez que recibí lechita en mi cara. Con una sonrisa de ...
🎬 1772340595 IMG 2339
#AiGenerated #Strap-On #Lesbianas #Casting #Teacher #LechitaX
- Appropriate outfits: #Gimp masks, dresses, & #chastity cages, oh my! Be sure to dress your subbies appropriately for the tasks they are completing.
No being modest & demure here, for some a #buttplug, sixteen #clothespins, & a #strap-on in their face is the perfect outfit!
No being modest & demure here, for some a #buttplug, sixteen #clothespins, & a #strap-on in their face is the perfect outfit!
Use Scout, outdoor skills to make camera safety tether for about $1
A few years ago, I got a Bower Quick-Shot Camera Strap, which shifts the weight of the camera to my shoulder instead of my neck.
I’ve been quite pleased with it so far, especially keeping the camera in a more at-ready position by my hip, which makes me look less like a tourist.
I also have a double strap from KentFaith that I use when I’m packing both cameras, but the Bower is what I use when I’m only using one body.
No, this isn’t a sponsored product review, but I found a nice way to better secure the camera on the strap, as well as keep it attached to my wrist if I decide to forego the strap.
The Bower comes with a safety tether, which is essentially a small strap you thread one end through a camera strap lug and clip the carabiner on the other end to the strap.
(This is not to be confused with a camera tether cord, which allows you to transfer images directly from your camera to a computer.)
This is a good innovation, as it spreads out the points of failure instead of having everything rest on a 1/4-20 bolt.
But the problem is, it only came with one of these tethers and I have two bodies. I looked around various sites and found that there were replacement tethers I could order that would run around $7.
While I had some of those carabiner key chains, they were too short to be of much worth, in my opinon.
While looking around on YouTube one day, I found a video by Bo Ismono showing how he made a wrist strap for a camera, and I realized this was my solution.
What he uses is parachute cord, also known as paracord. And he assembles it in a technique familiar to both Scouts and outdoors enthusiasts.
https://youtu.be/SKMyb2BQtMg?si=iI7gk6I4U0PYqpK-
One of paracord’s great qualities is its strength. Designed as suspension lines for parachutes in World War II, a single strand of the cord has a test of 160 pounds, slightly more than the average weight of a human being.
Outdoor enthusiasts and Scouts make bracelets from the cord, which allows them to easily carry several feet of the cord that is available at a moment’s notice. I’ve gotten compliments on one I made at a Scout activity.
To build this strap, you want to use what’s known as a “cobra weave.” You arrange a length of paracord out so you work with about four strands. You weave the two outer strands around the middle, forming a pattern resembling the markings on a cobra’s skin.
The rule of thumb with paracord straps is to use one foot of cord for every inch of strap length.
I purchased a 50-foot length of paracord at Harbor Freight for $2.99 and dutifully measured out 10 feet of it for my strap, after measuring my original strap. I also bought a $4.99 set of a dozen carabiners there, and began tying the strap.
It took a couple tries to get the weave right, although I think it may have gone a bit off course in the middle. You finish off the weave by using a match or lighter to melt the end of the cord and weld it to the rest.
I left a loop at the end to thread through the camera lug and then loop the rest of the strap through to secure it. And with the Bower tether on the other body, I can also clip these into the double-strap.
Some may think this looks a bit awkward, but I prefer the piece of mind knowing that the camera’s secured by a tether that can easily handle that load.
Plus, I can also loop the strap back through the carabiner and have a wrist strap for the camera.
And in an emergency, I can break the welds and have about 10 feet of paracord to work with, making it a true MacGyver Photography project.
#Carabiner #DIY #HarborFreight #KentFaith #Paracord #photography #Strap #Tether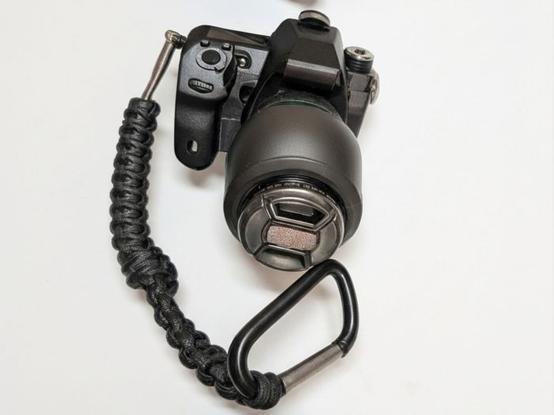
pull out the #strapon #strap #ride that shit!! #meme #lgbtq #lgbtqia #lgbt #bisexual #demisexual #trans

Produksi Strap Jam Tangan Handmade: Peluang Usaha Kreatif dengan Nilai Jual Tinggi
#Pugur - Produksi #Strap Jam Tangan Handmade: #Peluang Usaha Kreatif dengan Nilai Jual Tinggi - Dalam era modern yang didominasi oleh produk massal, minat terhadap produk #handmade justru semakin meningkat. Konsumen kini tidak hanya mencari fungsi, tetapi juga nilai estetika, keunikan, dan cerita di balik sebuah produk. Salah satu #peluang #usaha yang menarik dalam kategori ini adalah…
https://pugur.com/produksi-strap-jam-tangan-handmade-peluang-usaha-kreatif-dengan-nilai-jual-tinggi/

Produksi Strap Jam Tangan Handmade: Peluang Usaha Kreatif dengan Nilai Jual Tinggi - Pugur
#Pugur – Produksi #Strap Jam Tangan Handmade: #Peluang Usaha Kreatif dengan Nilai Jual Tinggi – Dalam era modern yang didominasi oleh produk massal, minat terhadap produk #handmade justru semakin meningkat. Konsumen kini tidak hanya mencari fungsi, tetapi juga nilai estetika,...