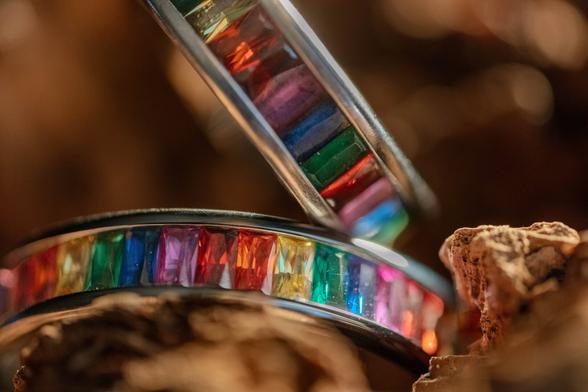
Yesterday, I stepped into something different: engagement ring photography.

Same curiosity, different subject. Using the Canon 5DSR with the MP-E 65mm—and occasionally the Sigma 24–70mm Art—I explored how light behaves on polished metal and cut surfaces. With a few “photographer’s secrets,” I shaped reflections and highlights, discovering just how sensitive these materials are to even the smallest change in angle or light.

And that’s where it became interesting.

At high magnification, every tiny detail becomes visible. Not just the craftsmanship—but also the imperfections. Dust, fibers, microscopic particles… things you don’t even see with the naked eye suddenly dominate the frame. I tried everything: blower, soft brushes, and cloth. And still, it found its way back.

Editing it out in Lightroom? That would have been a project on its own.

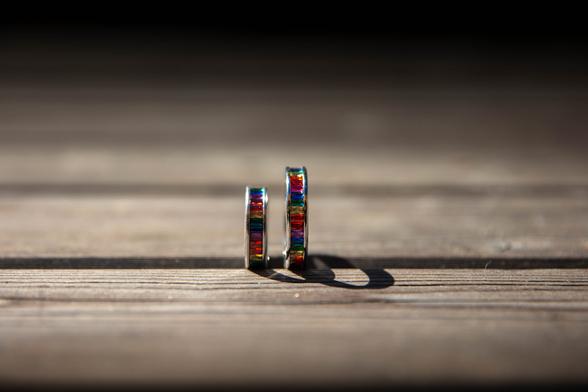
So this time, I’d like your input.

Which image do you like best—and why?

Is it the light, the composition, the reflections? Or something less tangible?

For me, this was less about perfection and more about learning to see differently. A reminder that every subject—no matter how small or refined—has its own challenges, its own physics, and its own way of revealing itself.

And sometimes, the smallest details are the hardest to control.

#MacroPhotography #ProductPhotography #EngagementRing #JewelryPhotography #Canon5DSR #MPE65 #Sigma2470Art #LightingSetup #StudioPhotography #Reflections #LightAndShadow #CloseUpPhotography #TinyDetails #HighMagnification #CreativeLight #PhotographyExperiment #InTheStudio #BehindTheScenes #LearningPhotography #VisualStorytelling #PhotographyJourney #DetailShot #ShinyObjects #LensWork #FocusStacking #DustProblems #AskForFeedback #ByMaikeldeBakker #MaikeldeBakkerPhotography #WonderingLens

Day 2 continued the journey of learning and discovery.
Students not only refined their skills but also shared their experiences and takeaways, reflecting the impact of working with tools like the snoot, power station, fog machine, and lighting setups. With gear from Digitek and Viltrox, the sessions turned into a stage for creativity and confidence.

#Digitek #LightingSetup #PowerStation #PhotographyCommunity #VideographyLife #Viltrox #InnovationInPhotography

Day 1 was packed with hands-on learning and real-time practice.
Students explored lighting setups and experimented with tools like the snoot, power station, fog machine, and more. With professional gear from Digitek and Viltrox, every moment was about turning theory into action.

#Digitek #IITMWorkshop #LightingSetup #PowerStation #PhotographyCommunity #VideographyLife #Viltrox #InnovationInPhotography

Digitek 100W Bi-Color LED Light (DCL-100 WBC) is hands-down one of the most powerful and versatile lights I’ve tested.

Key Features:
Powerful 100W Output
2700K–6500K Bi-Color + 200 Color Presets
20 Built-in FX Modes
APP & Manual Control

Offer Price: Rs. 10,999.00
M.R.P: Rs. 15,995.00
Shop Now:https://zurl.co/IntCI

#DigitekLights #DCL100WBC #BiColorLED #ContentCreationGear #LEDLightingKit #CreatorTools #DigitekReview #LightingSetup

Just tested the Digitek DCL 100WBC RGB Light—and it’s officially made it to my must-carry gear list! Whether it’s a moody indoor setup or an outdoor golden hour shoot, this beast adapts like a pro.

Powerful 100W RGB LED Output
Wide Color Temperature Range
High Color Accuracy

Offer Price: Rs. 14,999.00

Shop Now: https://zurl.co/goGgb

#DigitekIndia #RGBLight #ContentCreatorGear #LightingSetup #VideographyTools #OnSetEssentials #DigitekDCL100WBC #CreatorApproved #LightItRight

Because the right light never lets you down.
The Digitek DCL-250 WBC is crafted to deliver consistent, flattering illumination, whether you're shooting portraits, streaming, or producing high-quality content.

Product Highlights:
- 250W Power Output

Offer Price: Rs. 7,899.00
M.R.P: Rs. 24,995.00
Shop Now: https://zurl.co/qFmMK

#Digitek #NewLaunch #DigitekLights #DigitekDCL250WBC #StudioLighting #LEDLights #ContentCreatorGear #PhotographyLighting #VideoProduction #LightingSetup

Your concept is solid, but the setup needs the right lighting-and that's where Digitek shines. From the Portable RGB Video Light for dynamic effects to the sturdy C Stand, the Beauty Dish Softbox for soft glow, and the Bi-Color LED Light for perfect tones, we’ve got everything you need. Set it up right and let your creativity shine in the best light!

#Digitek #LightingSetup #PerfectLighting #ContentCreation #PhotographyGear #VideoCreation #CreateWithDigitek

Lighting setup: Indoor swimwear shoot

Shooting swimwear outside in natural light is nearly always the best solution, after all, the bright, crisp sunshine is an easy-win when it comes to making swimwear look good. But what if an outdoor shoot simply isn’t practical or even possible due to location and of course weather? In this article I’ll discuss a simple […]

DIY Photography

How to Make a DIY Dappled Natural Light Background for Portraits

Creating a do-it-yourself lighting setup for dappled natural light backgrounds isn’t as tricky or as involved to achieve as some setups and techniques, but it is a nice little idea to play with if the occasion arises.

The good news is, you barely need any kit to make this work, and truth be told, I was actually packing away my lighting gear when I saw this natural light pattern form on my scrim after a shoot. I quickly asked the model back and decided to grab a few frames as the naturally formed dappled light background looked amazing. Here’s how to get the same look yourself…

The natural light background created in-camera here, looks an awful lot like a cloudy day, when in fact it’s not created by clouds at all…

What Do You Need?

1. A white sheet or bounce board

2. Another thin white sheet or scrim

Yes, that’s honestly all you need, so to all the people who complain about tutorials written for people with a full studio's worth of kit, this little setup is for you.

What You'll Also Need

1. Bright, sunny day

Sorry, there was one more item I forgot to mention and that’s the Sun. Sadly this last item will prevent most of us Brits from pulling this setup off for 51 weeks of the year, but if you get lucky and the Sun does indeed come out, this is a very quick and easy look to achieve.

The Setup

The setup itself involves you placing one white sheet or bounce-board behind you and then you place the other thin sheet or scrim behind the model. To be clear, yes I am using a purpose-built scrim here, but a single cotton sheet will do just as well for the look we’re after. When positioning the two sheets, be sure to also position your model with the Sun behind them.

Lastly, try to set the whole thing up in front of some bushes or trees to get the desired dappled light effect on the scrim behind your subject. Take a look at the diagram below to see what I mean.

The setup works as the hard sunlight shines through the trees behind the subject and essentially projects the dappled light and shadows onto the white sheet behind them, resulting in this beautiful pattern on the background.

The same sunlight is also so strong that it hits the white sheet behind you and bounces back onto the model which in turn bathes them in this beautifully soft light as well. Effectively you’re getting two lights in one here as the same light is illuminating the background as well as the model too.

The Final Look

There are some clear benefits to this look and firstly, of course, is its ease of implementation. Sure, you need the Sun to be out, but if you live in a region where the Sun isn’t revered like a mythical creature like it is here in England, this isn’t too much to ask for.

Secondly, the look this light gives to the model is extremely flattering as the bounced sunlight hitting the sheet behind you and illuminating the model is extremely soft. Plus, when the model is stood close to the scrim sheet behind her, a little light bleeds through and delicately lights the edges of her face and body to further add dimension to the body too. Look again at the images here if you missed them at first glance. See how the edges of her body and jacket are highlighted?

Lastly, I was particularly impressed by how the dappled light effect on the background actually looked like clouds on a sunny day behind her. This is of course just an illusion thanks to the dappled light from the trees behind, but it's an interesting way to achieve this effect if that’s what you’re after.

Closing Comments

Ultimately this is a very easy setup to achieve as long as the Sun is out. There are a couple of things I want to mention though that are worth bearing in mind when setting this up.

Color contamination

Be mindful of your surroundings when doing this and by that I mean be aware of what the Sun is actually bouncing off around you. Sure it will bounce off the white sheet behind you and light the subject beautifully, but the Sun is also bouncing off of everything too. In these shots, I had a red-brick building to my right and as a result, I was getting a red cast on the right of the model (her left). I reduced it in post so it's not too visible here now, but it's certainly worth being aware of.

Adjusting the amount of dappling

One other thing to play with is adjusting the amount of dappling you get on the background behind your subject. I liked the blurred and out-of-focus dappling I was getting on my background, but you can choose to make it sharper or more blurred depending on how close you position your setup to the trees and foliage behind you. Placing your setup quite close to the trees will result in very blurred mottling and puling the setup further away will get you sharper dappling effects. Just something to play or at the very least be aware of if you’re not getting the desired effect when you try it yourself.

Good luck and have fun playing with this one. Be patient though, as the scriptures have foretold the return of the Sun in due course, let’s just hope we can remember where this article was when that great day does indeed come to pass.

About the author : Jake Hicks is an editorial and fashion photographer based in Reading, UK. He specializes in keeping the skill in the camera and not just on the screen. If you’d like to learn more about his incredibly popular gelled lighting and post-pro techniques, visit this link for more info. You can find more of his work and writing on his website, Facebook, 500px, Instagram, Twitter, and Flickr. This article was also published here.

Credits: Photographs by Jake Hicks. Featured model is Annabelle Strutt.

#lighting #tutorials #dappledlight #jakehicks #lightingsetup #portraiture

How to Make a DIY Dappled Natural Light Background for Portraits

Photographer Jake Hicks shares an easy do-it-yourself way to create dappled natural light in the background of portraits.

PetaPixel